When Application Real-Time Monitoring Service (ARMS) detects an issue in your application, your team needs to act on it immediately. By integrating Jira with ARMS alert management through OAuth, alerts automatically create Jira issues, and status changes stay synchronized in both directions -- so your team can triage, assign, and resolve incidents from either platform without switching context.
This guide covers the end-to-end setup: generating OAuth credentials, configuring a Jira application link, connecting ARMS to Jira, and enabling bidirectional synchronization.
Integration capabilities
After you complete the setup, the integration provides the following capabilities:
Automatic issue creation: ARMS alerts create Jira issues based on your notification policy.
Priority mapping: Alert severity levels (P1--P5) map to Jira issue priorities (Highest--Lowest).
Bidirectional status sync: Claim, comment, and resolve actions in ARMS sync to Jira. Assignee changes and comments in Jira sync back to ARMS.
Flexible alert routing: Push alerts to Jira through notification policies, the alert history page, or DingTalk alert cards.
Prerequisites
Before you start, verify that you have the following:
Requirement | Details |
ARMS console access | Permission to configure integrations under Alert Management > Integrations |
Jira administrator access | Permission to create application links and webhooks in Jira |
OpenSSL | Installed on your local machine for generating RSA key pairs |
Step 1: Generate RSA keys
Generate an RSA key pair for the OAuth trust relationship between ARMS and Jira. Run the following OpenSSL commands in a terminal.
These commands create files in your current working directory.
Generate a 1024-bit RSA private key:
openssl genrsa -out jira_privatekey.pem 1024Create an X.509 certificate valid for 365 days:
openssl req -newkey rsa:1024 -x509 -key jira_privatekey.pem -out jira_publickey.cer -days 365Convert the private key to PKCS#8 format:
openssl pkcs8 -topk8 -nocrypt -in jira_privatekey.pem -out jira_privatekey.pcks8Extract the public key from the certificate:
openssl x509 -pubkey -noout -in jira_publickey.cer > jira_publickey.pem
After you run these commands, four files are created:
File | Used in |
| Intermediate file (not used directly in configuration) |
| Intermediate file (not used directly in configuration) |
| Step 3 -- ARMS integration setup (private key) |
| Step 2 -- Jira application link (public key) |
Step 2: Create a Jira application link
Configure Jira to accept OAuth connections from ARMS by creating an application link.
Log on to Jira, click the Settings icon in the upper-right corner, and then click Applications.
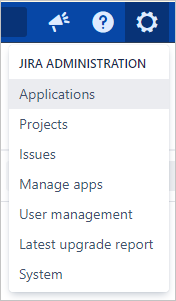
On the Applications tab, click Application links.
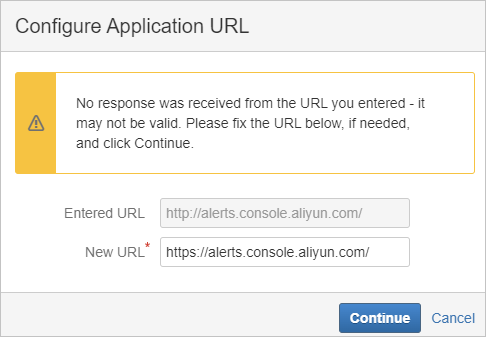
In the Configure Application Links section, enter a URL and click Create new link.
NoteThis URL is a placeholder and is not used for actual communication. Enter any valid URL, for example,
http://alerts.console.aliyun.com/.In the Configure Application URL dialog box, ignore the warning and click Continue.
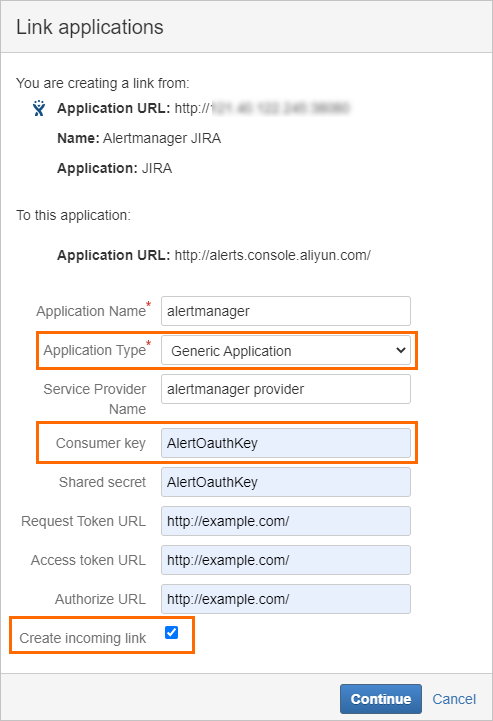
In the Link applications dialog box, configure the following settings and click Continue:
Field
Value
Application Type
Generic Application
Consumer key
AlertOauthKey
Create incoming link
Selected
Specify other fields as needed.
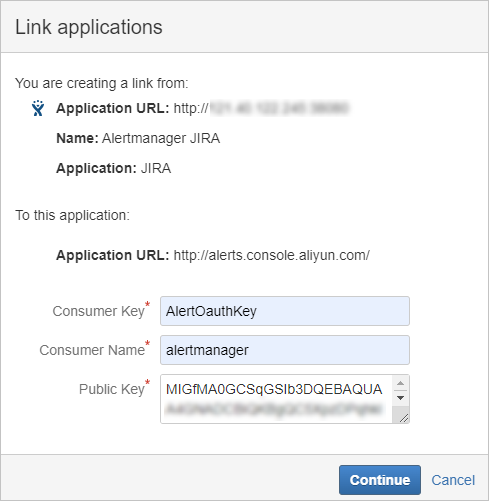
In the next Link applications dialog box, configure the incoming link settings and click Continue:
Field
Value
Consumer Key
AlertOauthKey
Consumer Name
alertmanager
Public Key
The content of the jira_publickey.pem file generated in Step 1
After the link is created, it appears on the Configure Application Links page.

Click the
 icon in the Actions column of the application link. In the Configure alertmanager dialog box, click Incoming Authentication.
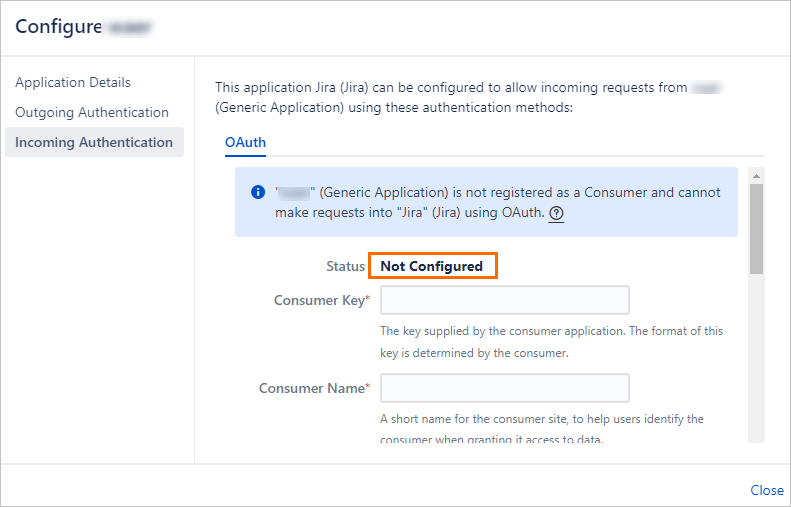
If the Status field displays Not Configured, enter the Consumer Key, Consumer Name, and Public Key values, and then click Save.
Click Cancel to close the dialog box.
Step 3: Connect ARMS to Jira
Configure the Jira integration in the ARMS console and complete the OAuth authorization flow.
Log on to the ARMS console.
In the left-side navigation pane, choose Alert Management > Integrations.
On the Integrations page, click the Notification Integration tab and then click JIRA.
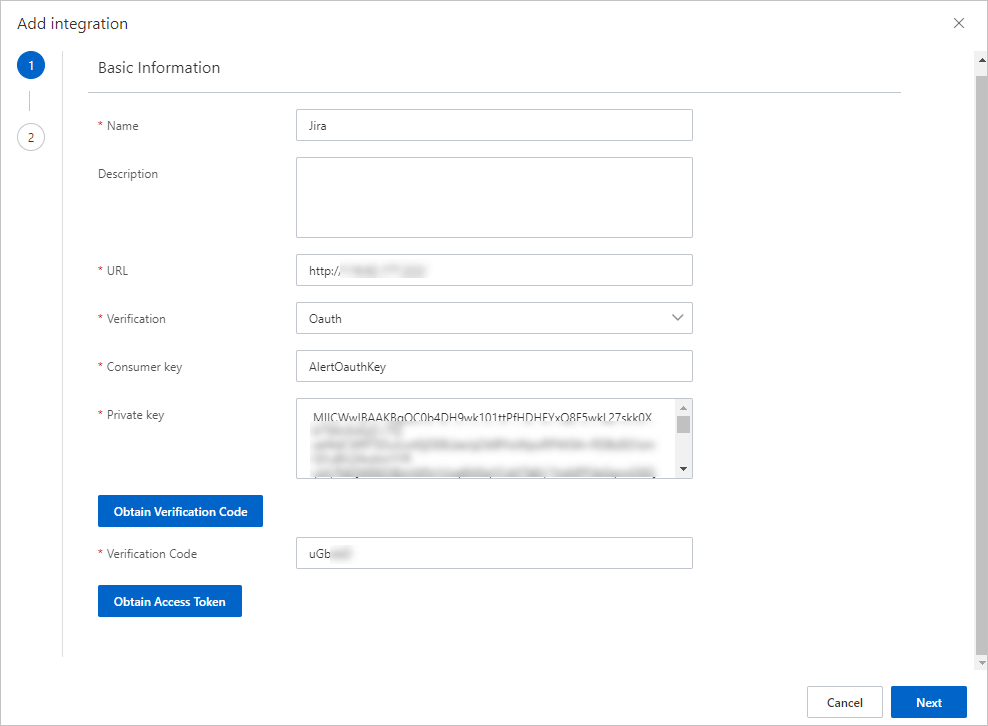
In the Add Integration wizard, configure the Basic Information page with the following settings, and then click Obtain Verification Code:
Parameter
Value
Name
A name for the Jira integration
Description
A description of the Jira integration
URL
The URL of your Jira instance
Verification
Oauth
Consumer key
AlertOauthKey
Private key
The content of the jira_privatekey.pcks8 file generated in Step 1
You are automatically redirected to the Jira authorization page.
On the Welcome to JIRA page, click Allow to grant ARMS access to your Jira instance.
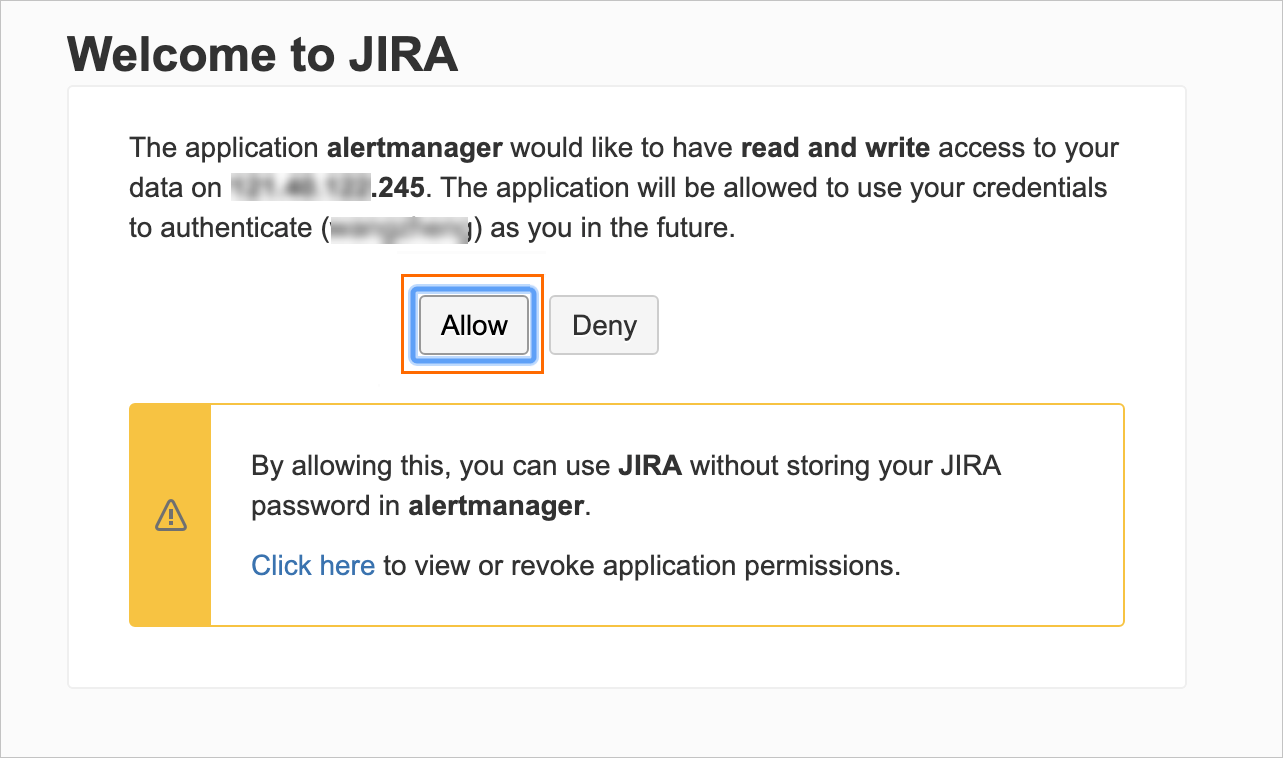
On the Access Approved page, copy the verification code.

Return to the Add Integration wizard in ARMS, paste the verification code into the Verification Code field, and then click Obtain Access Token.
After the message "The access token is obtained." appears, click Next.
On the Alert Source Configuration page, configure the following settings and click Save:
Parameter
Description
Example
Project
The Jira project where ARMS creates issues for alerts.
Integrated monitoring, management, and control project
Type
The Jira issue type. Valid values: Task, Subtask, Improvement, New feature, Bug, Epic, Story.
Bug
The status of the issue when the alert is disabled.
The Jira issue status that ARMS treats as resolved. When an issue reaches this status, ARMS stops syncing alert operations to the issue. Valid values: To Do, In Progress, In Review, Done.
Done
Priority
Maps ARMS alert severity levels to Jira issue priorities.
P1: Highest, P2: High, P3: Medium, P4: Low, P5: Lowest
ImportantIf you do not map a severity level to an issue priority, alerts of that severity level are not synchronized to Jira.
The severity-to-priority mapping applies only when ARMS first pushes an alert to Jira. Subsequent changes to the severity level alone are not synced.
Set the resolved status to Done. If you select a different status and the issue later changes to Done, ARMS continues to sync operations to the issue.
After you save the configuration, the Jira integration appears on the Ticket Integration tab of the Integrations page.

Step 4: Push alerts to Jira
After you set up the integration, push alerts to Jira in one of the following ways.
Method 1: Notification policy
Create or update a notification policy to automatically create a Jira issue when an alert fires.
In the left-side navigation pane, choose Alert Management > Notification policy.
Click Create Notification Policy, or edit an existing policy.
In the When an alert is triggered section, select at least one contact or contact group for the Contacts parameter.
ImportantJira matches the first contact in the policy to a Jira user by email address or username, and assigns that user as the issue assignee.
If Jira cannot find a matching user, the alert is not pushed to Jira.
For the Ticket system parameter, select the Jira integration you created.
Configure other parameters as needed. For more information, see Create and manage a notification policy.
Click the
 icon in the upper-right corner to save the policy.
Alerts that match this policy are automatically pushed to Jira.
Method 2: Alert history page
Manually push a specific alert to Jira from the alert history page.
In the left-side navigation pane, choose Alert Management > Alarm Sending History.
In the upper-right corner, select the operator and click the alert name. The operator becomes the assignee of the Jira issue.
ImportantThe operator is a contact whose mobile phone number is associated with the alert cards of a DingTalk group. For more information, see Handle alerts.
Jira matches the operator to a Jira user by email address or username. If no match is found, the alert is not pushed.
On the alert details page, click the
 icon in the upper-right corner and select Push to Ticket System.
In the Push Alert to Ticket System dialog box, select the Jira integration from the Ticket System drop-down list and click OK.
After the alert is pushed, a link to the Jira issue appears on the alert details page.
Method 3: DingTalk alert card
Push an alert directly from a DingTalk alert card to create a Jira issue.
The operator who pushes the alert becomes the assignee of the Jira issue.
The operator is a contact whose mobile phone number is associated with the alert cards of a DingTalk group. For more information, see Handle alerts.
Jira matches the operator to a Jira user by email address or username. If no match is found, the alert is not pushed.
Push an alert from a DingTalk card in one of the following ways:
In the alert card, click Push Alert and select the Jira integration.
Click the alert name to open the details panel. Click Settings, click Push Ticket, and select the Jira integration.
After the alert is pushed, a link to the Jira issue appears on the alert details page.
Synchronization behavior
After the setup is complete, certain operations sync automatically between ARMS and Jira.
ARMS to Jira
The following operations on the Alarm Sending History page sync to the corresponding Jira issue:
ARMS operation | Jira result |
Claim an alert | The claimant becomes the issue assignee. The claimant must have a matching Jira user account. |
Comment on an alert | The comment is added to the Jira issue. |
Resolve an alert | The solution is added as a comment on the Jira issue. |
The following operation on DingTalk alert cards syncs to Jira:
ARMS operation | Jira result |
Claim an alert | The claimant becomes the issue assignee. The claimant must have a matching Jira user account. |
Jira to ARMS
To sync Jira operations back to ARMS, create a webhook in Jira.
In Jira, click the Settings icon in the upper-right corner and click System.
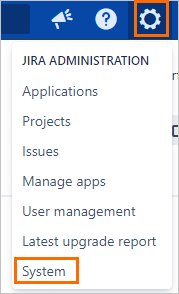
Enter the administrator password and click OK.
In the left-side navigation pane, choose Advanced > WebHooks.
Click + Create a WebHook.

Set the URL to the following value:
http://alerts.console.aliyun.com/api/jira/receiver/{token}/${project.key}/${issue.key}Replace
{token}with the integration key from ARMS. To find this key, go to the Integrations page in the ARMS console and click the Ticket Integration tab.
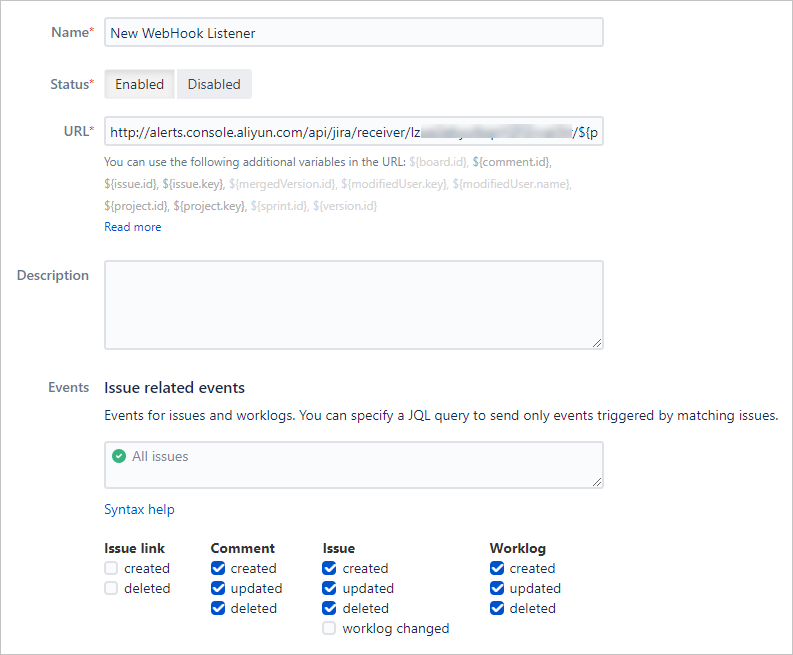
Configure other webhook parameters as needed. For more information, see the Jira webhook documentation.
Click Create.
After the webhook is active, the following Jira operations sync to ARMS:
Jira operation | ARMS result |
Modify the issue assignee | The handler of the corresponding alert is updated. |
Comment on an issue | The comment is added to the corresponding alert. |