ARMS Alert Management provides an API that accepts alert events from any system capable of making HTTP calls. Use this API to report alerts from custom or third-party monitoring tools to ARMS for centralized management.
Three core concepts drive the integration:
Trigger: Send an alert event to create or update an alert in ARMS.
Resolve: Automatically clear alerts when recovery conditions are met.
Deduplicate: Merge events that share the same field values into a single alert notification.
Prerequisites
Before you begin, make sure that you have:
An Alibaba Cloud account with ARMS activated
A third-party monitoring system or custom tool that can send HTTP POST requests
Step 1: Create a custom integration
Log on to the ARMS console. In the left-side navigation pane, choose Alert Management > Integrations.
On the Alert Integration tab, click Custom Integration.
In the Create Custom Event Integration dialog box, enter an integration name, specify the auto-clear period, and add an optional description. Click Save and Configure.
Step 2: Send alert events to the API endpoint
After creating the integration, ARMS generates an API endpoint and API key.
On the Integration Details page, in the Span Configuration section, copy the API endpoint and API key.

Send a POST request to the API endpoint from your alert source.
Quick start: minimal payload
Send the smallest possible payload to verify connectivity:
curl -k -H "Content-Type: application/json" -d '{
  "alertname": "test-alert",
  "severity": "P2",
  "message": "Test alert from custom source"
}' "https://alerts.aliyuncs.com/api/v1/integrations/custom/<your-api-key>"
Replace <your-api-key> with the API key copied in the previous step.
601 with the message Invalidincident,labels.alertnameisrequired. This is expected. Configure field mappings in Step 3 first, then resend the event.Full payload example
The following curl command sends a complete alert event for a scenario where TCP packet errors occur on a server. The payload includes nested metadata and equipment arrays:
curl -k -H "Content-Type: application/json" -d '{
  "trigger-type": "network",
  "trigger-location": "cn-hangzhou",
  "trigger-severity": "MAX",
  "trigger-policy": "package errors > 5%",
  "trigger-event": "inbound tcp package errors is 20%",
  "trigger-check": "tcp package error percentage",
  "trigger-value": "20",
  "trigger-time": "1629702922000",
  "metadata": [
    {
      "agent": "SERVER",
      "ip": "141.219.XX.XX",
      "fqdn": "websrv1.damenport.org",
      "microServiceId": "ms-login-2251",
      "accountId": "1504000433993",
      "service": "login-0"
    },
    {
      "agent": "CONTAINER",
      "ip": "172.1.XX.XX",
      "fqdn": "websrv2.damenport.org",
      "microServiceId": "ms-login-2252",
      "accountId": "129930302939",
      "service": "login-1"
    }
  ],
  "equipments": [
    {
      "equipmentId": "112"
    },
    {
      "equipmentId": "113"
    }
  ]
}' "https://alerts.aliyuncs.com/api/v1/integrations/custom/<your-api-key>"
The following table describes the key fields in this payload:
| Field | Description | Example value |
|---|---|---|
trigger-type | Event type | network |
trigger-severity | Severity level (MAX, MID, or LOW) | MAX |
trigger-event | Event description | inbound tcp package errors is 20% |
trigger-time | Start time as a Unix timestamp in milliseconds | 1629702922000 |
metadata[*].agent | Agent type (SERVER or CONTAINER) | SERVER |
metadata[*].accountId | User ID (not included in alert notifications) | 1504000433993 |
Replace the following placeholder with your actual value:
| Placeholder | Description | Example |
|---|---|---|
<your-api-key> | API key from the Span Configuration section | ymQBN****** |
Step 3: Configure alert field mappings
Field mappings define how your alert source fields translate to ARMS alert fields. Without mappings, ARMS cannot parse incoming events.
Send test data
On the Integration Details page, in the Event Mapping section, click Send Test Data.
In the Send Test Data dialog box, paste the JSON payload from your alert source and click Send.
If the message Uploaded. No events are generated. Configure mappings based on the original data. appears, the fields are not yet mapped. The raw data appears in the left pane for reference when configuring mappings.
If the message Uploaded. appears, the event was successfully reported. View it on the Alert Event History page. For more information, see View historical alert events.
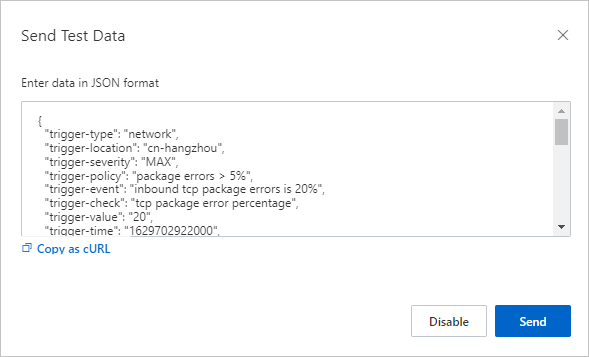
In the Send Test Data dialog box, click Disable.
Configure batch processing (optional)
If your alert data contains an array node (such as metadata), you can process all elements in the array as a batch.
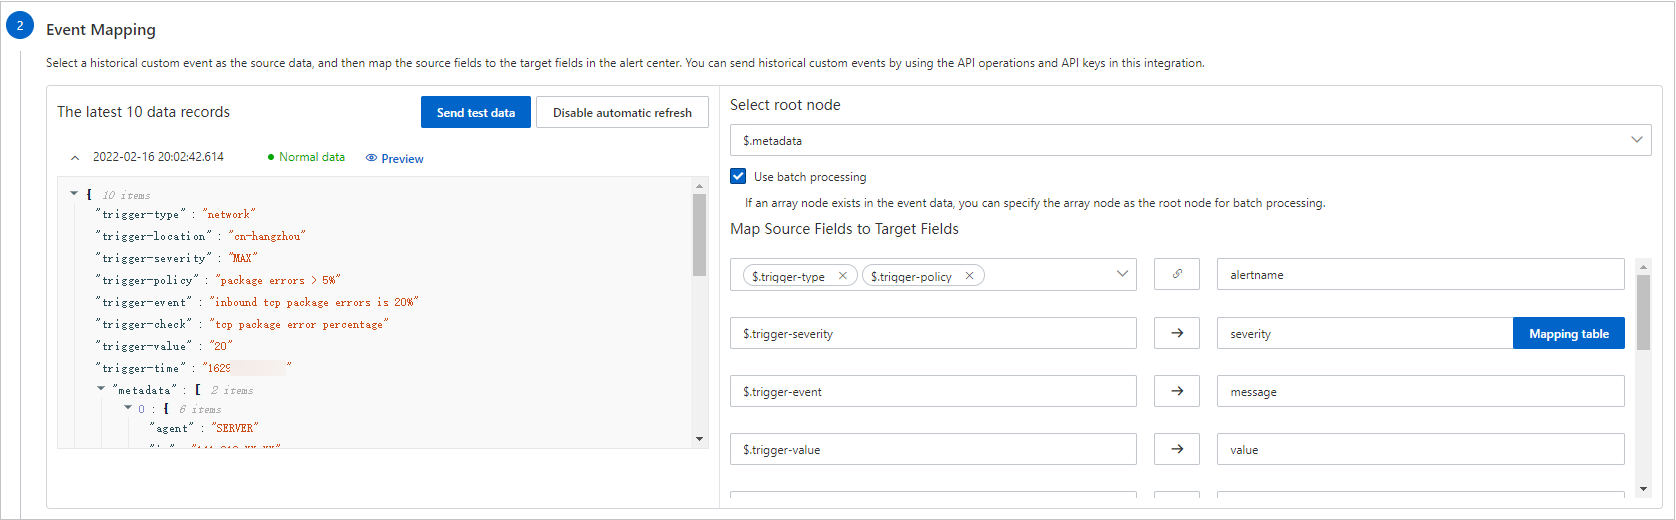
In the left pane of the Event Mapping section, click a data record to view its details.
In the right pane, under Select Root Node, select Use Batch Processing, then choose the array node to use as the root node.
How batch processing affects field mapping:
Batch enabled (e.g.,
metadataas root node): All$.metadata[*].servicevalues are iteratively mapped to the target ARMS field.Batch disabled: Only a specific element (e.g.,
$.metadata[0].serviceor$.metadata[1].service) maps to the target field.
Configure alert recovery events (optional)
To automatically clear alerts when a recovery event arrives, select Configure Alert Recovery Events and define field conditions.
When ARMS receives an event matching your conditions, it finds and clears the corresponding alerts. The condition field must be equivalent to alert severity in the event. The $.severity field cannot be used.
For example, the condition {$.eventType = "resolved"} clears all alerts in the integration where the eventType field equals resolved.
Map source fields to ARMS alert fields
In the Map Source Fields to Target Fields section, map each source field to an ARMS alert field.
The following table describes the ARMS alert fields:
| Alert field | Required | Description | Mapping method | Source field example |
|---|---|---|---|---|
| alertname | Yes | Alert name | Series | $.trigger-type and $.trigger-policy |
| severity | Yes | Alert level. Requires a mapping table to convert source values to ARMS values (P1, P2, P3). | Direct + Mapping table | $.trigger-severity (MAX -> P1, MID -> P2, MIN -> P3) |
| message | No | Alert description, used as the notification content. Maximum 15,000 characters. | Direct | $.trigger-event |
| value | No | Sample metric value | Direct | $.trigger-value |
| imageUrl | No | Grafana metrics chart URL for embedding in the alert | - | - |
| check | No | Check item, such as CPU, JVM, Application Crash, or Deployment | Direct | $.trigger-check |
| source | No | Alert source identifier, typically an IP address | Direct | $.metadata[*].ip |
| class | No | Object type that triggers the alert, such as host | Direct | $.trigger-type |
| service | No | Source service name. Supports conditional mapping. | Condition | See the conditional mapping example below |
| startat | No | Event start timestamp | Direct | $.trigger-time |
| endat | No | Event end timestamp | - | - |
| generatorUrl | No | URL linking to the event details page | - | - |
Mapping methods
Click the Map icon next to a field to switch between these mapping methods:
Direct: Maps one source field directly to one ARMS field.
Series: Concatenates multiple source fields with a delimiter (special characters only) into one value, then maps it to an ARMS field. For example, joining
$.trigger-typeand$.trigger-policywith an underscore (_) producesnetwork_package errors > 5%, which maps toalertname.Condition: Maps a source field based on a condition. For example:
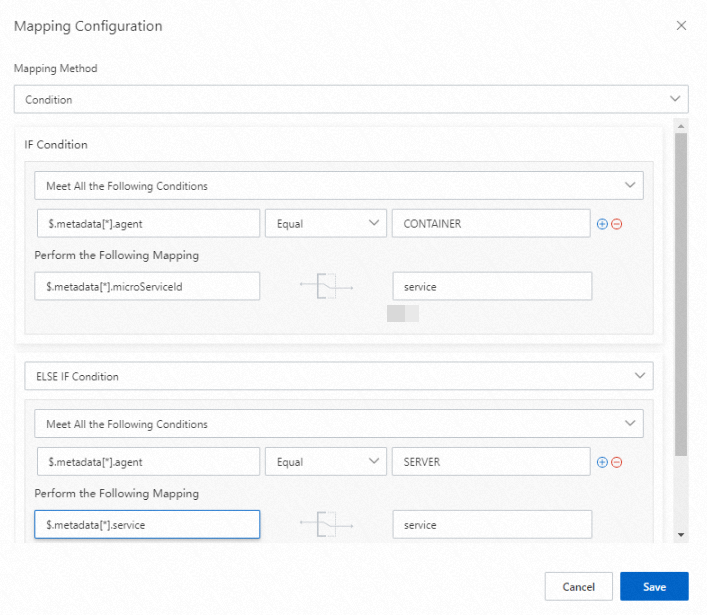
If
$.metadata[*].agentequalsCONTAINER, map$.metadata[*].microServiceIdto the ARMSservicefield.If
$.metadata[*].agentequalsSERVER, map$.metadata[*].serviceto the ARMSservicefield.
Mapping table: Converts source values to ARMS values through a lookup table. Used only for the
severityfield.
Step 4: Configure deduplication
Deduplication merges events that share the same field values into a single alert notification, reducing noise.
In the Event Deduplication section, select the fields to use for deduplication. For example, if
$.metadata[*].ipmaps tosourceand$.trigger-checkmaps tocheck, selecting bothsourceandcheckmerges events from the same IP address with the same check item into one alert. Events with different IP addresses or check items remain separate.Click Deduplication Test to preview the grouping results.
Note The test runs only against the latest 10 data records uploaded in the Event Mapping section.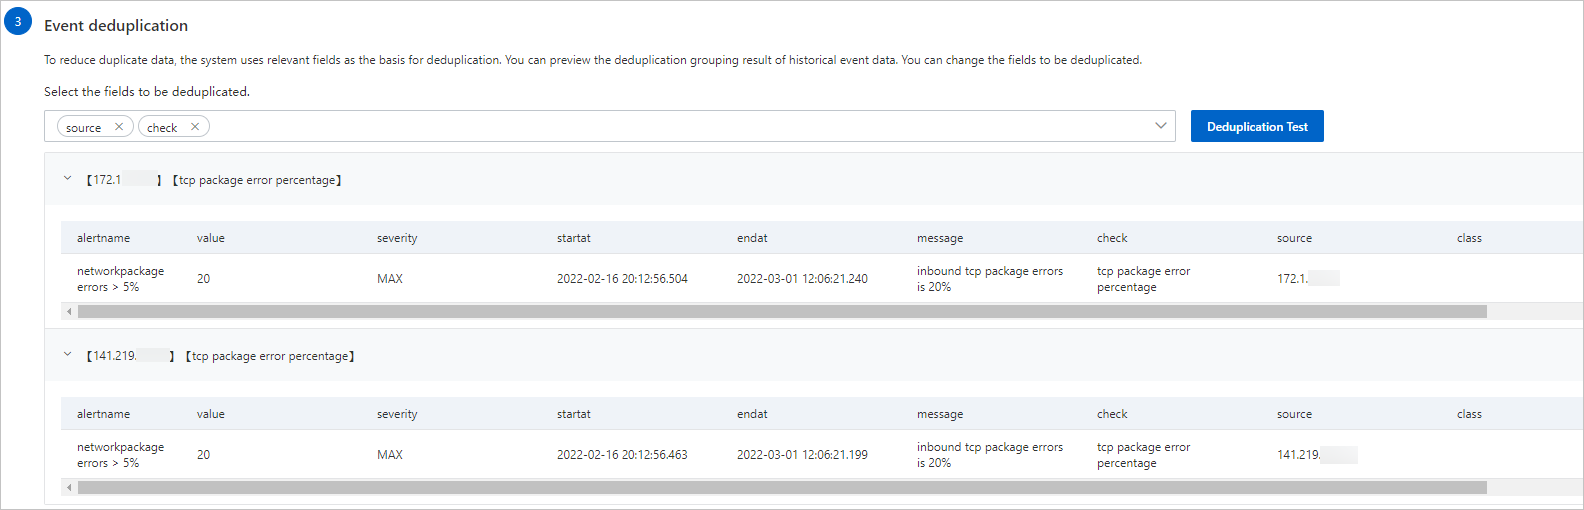
Click Save.
Verify the integration
After saving the configuration, go to Alert Management > Integrations. Confirm that your new integration appears on the Alert Integration tab.

More operations
On the Alert Integration tab, the following operations are available for each integration:
| Operation | Steps |
|---|---|
| View details | Click the integration row to open the Integration Details page. |
| Update the API key | Choose More > Update Key in the Actions column, then click OK. After updating, modify the endpoint in the alert source configured in Step 2. |
| Edit the integration | Click Edit in the Actions column. Modify the settings on the Integration Details page, then click Save. |
| Enable or disable | Click Enable or Disable in the Actions column. |
| Delete the integration | Click Delete in the Actions column, then click OK. |
| Add an event processing flow | Click Add Event Processing Flow in the Actions column. For more information, see Work with event processing flows. |
| Create a notification policy | Choose More > Create Notification Policy in the Actions column. For more information, see Create and manage a notification policy. |
What's next
After you create a notification policy, the system generates alerts and sends alert notifications based on that policy. For more information, see Create and manage a notification policy.
On the Alert Sending History page, you can view alerts generated based on the configured notification policy. For more information, see View historical alerts.