This topic describes how to use the data transmission service to migrate incremental data from an OceanBase database in Oracle compatible mode to a MySQL database.
A data migration task remaining in an inactive state for a long time may fail to be resumed depending on the retention period of incremental logs. Inactive states are Failed, Stopped, and Completed. The data transmission service releases data migration tasks remaining in an inactive state for more than 3 days to reclaim related resources. We recommend that you configure alerts for data migration tasks and handle task exceptions in a timely manner.
Prerequisites
The data transmission service has the privilege to access cloud resources. For more information, see Grant privileges to roles for data transmission.
You have created database users dedicated for data migration for the source OceanBase database in Oracle compatible mode and the target MySQL database, and granted required privileges to the users. For more information, see Create a database user.
Limitations
The data transmission service supports MySQL 5.5, 5.6, 5.7, and 8.0.
The data transmission service does not support migrating tables without a primary key from an OceanBase database in Oracle compatible mode to a MySQL database.
The data transmission service does not support triggers at the target when it is a database. If triggers exist, the data migration may fail.
The data transmission service supports the migration of an object only when the following conditions are met: the database name, table name, and column name of the object are ASCII-encoded without special characters. The special characters are line breaks, spaces, and the following characters: . | " ' ` ( ) = ; / & \.
Considerations
If the UTF-8 character set is used at the source, we recommend that you use a compatible character set, such as UTF-8 or UTF-16, at the target to avoid garbled characters.
If the clocks between nodes or between the client and the server are out of synchronization, the latency may be inaccurate during incremental synchronization or reverse increment.
For example, if the clock is earlier than the standard time, the latency can be negative. If the clock is later than the standard time, the latency can be positive.
If you modify a unique index at the target, you must restart the data migration task to avoid data inconsistency.
A difference between the source and target table schemas may result in data consistency. Some known scenarios are described as follows:
When you manually create a table schema at the target, if the data type of any column is not supported by the data transmission service, implicit data type conversion may occur at the target, which causes inconsistent column types between the source and target.
If the length of a column at the target is shorter than that at the source, the data of this column may be automatically truncated, which causes data inconsistency between the source and target.
If you selected only Incremental Synchronization when you created the data migration task, the data transmission service requires that the local incremental logs of the source database be retained for at least 48 hours.
If the source or target contains table objects that differ only in letter cases, the data migration results may not be as expected due to case insensitivity in the source or target.
Supported source and target instance types
In the following table, OceanBase Database in Oracle compatible mode is referred to as OB_Oracle, which supports OceanBase cluster instances.
Source | Target |
OB_Oracle | MySQL (RDS instance) |
OB_Oracle | MySQL (PolarDB instance) |
OB_Oracle | MySQL (self-managed database in a VPC) |
OB_Oracle | MySQL (self-managed database with a public IP address) |
Procedure
Log on to the
ApsaraDB for OceanBase console and purchase a data migration task.For more information, see Purchase a data migration task.
Choose Data Transmission > Data Migration. On the page that appears, click Configuration for the data migration task.

If you want to reference the configurations of an existing task, click Reference Configuration. For more information, see Reference the configuration of a data migration task.
On the Select Source and Target page, configure the parameters.
Parameter
Description
Migration Task Name
We recommend that you set it to a combination of digits and letters. It must not contain any spaces and cannot exceed 64 characters in length.
Source
If you have created an OceanBase data source in Oracle compatible mode, select it from the drop-down list. Otherwise, click New Data Source in the drop-down list and create one in the dialog box that appears on the right. For more information about the parameters, see Create an OceanBase data source.
Target
If you have created a MySQL data source, select it from the drop-down list. Otherwise, click New Data Source in the drop-down list and create one in the dialog box that appears on the right. For more information about the parameters, see Create a MySQL data source.
Tag (Optional)
Select a target tag from the drop-down list. You can also click Manage Tags to create, modify, and delete tags. For more information, see Use tags to manage data migration tasks.
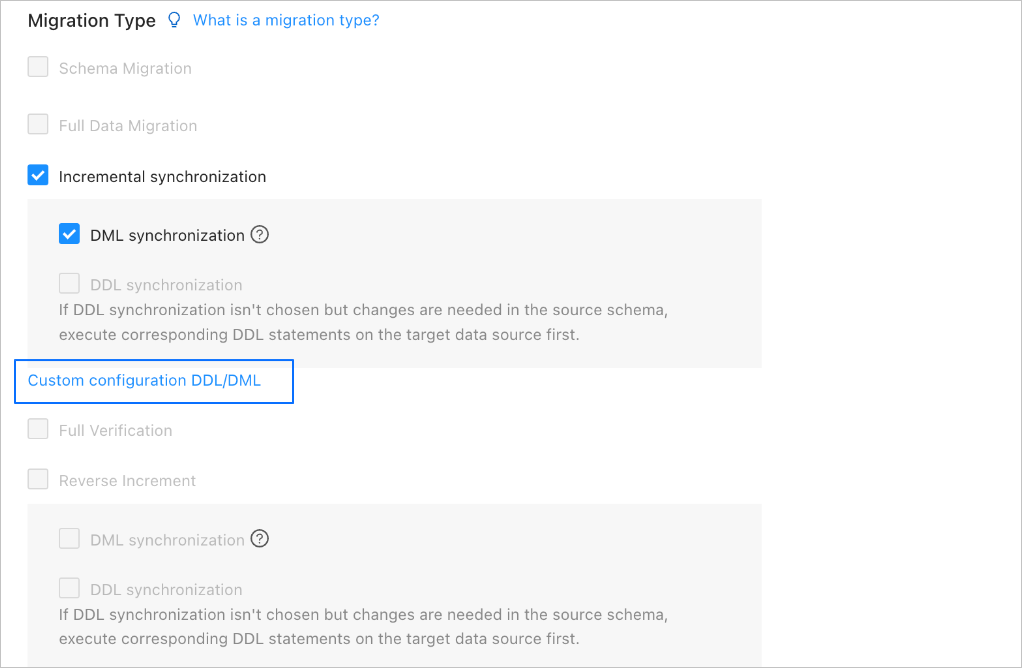
Click Next. On the Select Migration Type page, specify migration types for the current data migration task.
At present, only DML synchronization is supported for Incremental Synchronization. You can select operations as needed. For more information, see Configure DDL/DML synchronization.
Click Next. On the Select Migration Objects page, specify migration objects for the data migration task.
You can select Specify Objects or Match Rules to specify the migration objects. This topic describes how to specify the migration objects by using Specify Objects. For information about matching rules, see Configure and modify matching rules.
ImportantThe names of tables to be migrated, as well as the names of columns in the tables, must not contain Chinese characters.
If a database or table name contains double dollar signs ($$), you cannot create the migration task.
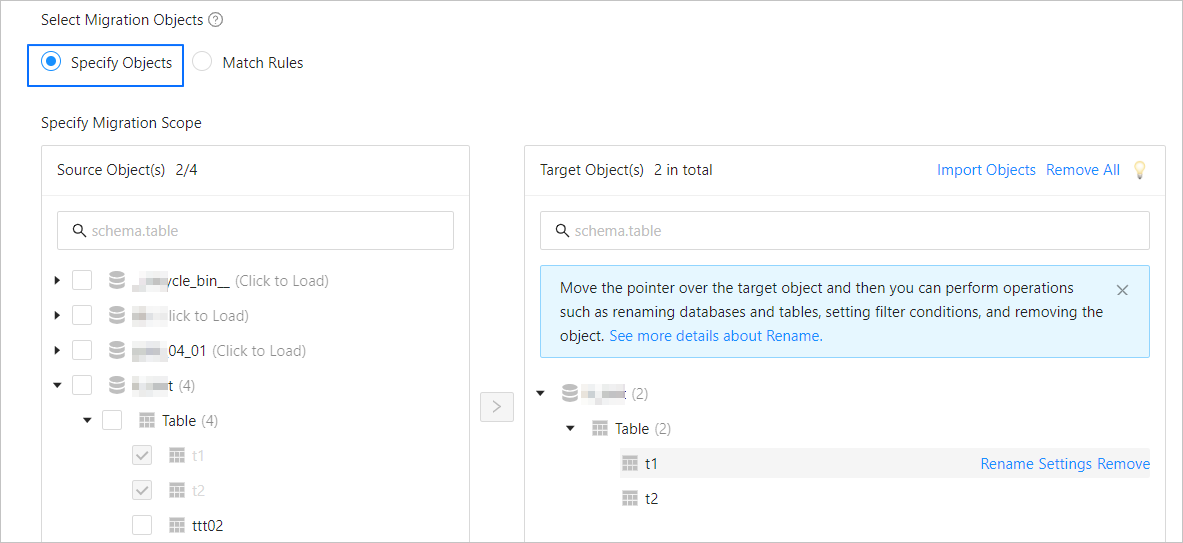
In the Select Migration Objects section, select Specify Objects.
In the Source Object(s) list of the Specify Migration Scope section, select the objects to migrate. You can select tables and views of one or more databases.
Click > to add them to the Target Object(s) list.
The data transmission service allows you to import objects from text files, rename target objects, set row filters, view column information, and remove a single or all migration objects.
NoteWhen you select Match Rules to specify migration objects, object renaming is implemented based on the syntax of the specified matching rules. In the operation area, you can only set filter conditions. For more information, see Configure and modify matching rules.
Operation
Description
Import objects
In the list on the right, click Import Objects in the upper-right corner.
In the dialog box that appears, click OK.
ImportantThis operation will overwrite previous selections. Proceed with caution.
In the Import Objects dialog box, import the objects to be migrated.
You can import CSV files to rename databases or tables and set row filter conditions. For more information, see Download and import the settings of migration objects.
Click Validate.
After you import the migration objects, check their validity. Column field mapping is not supported at present.
After the validation succeeds, click OK.
Rename objects
The data transmission service allows you to rename migration objects. For more information, see Rename a database table.
Configure settings
The data transmission service allows you to filter rows by using
WHEREconditions. For more information, see Use SQL conditions to filter data.You can also view column information of the migration objects in the View Columns section.
Remove one or all objects
The data transmission service allows you to remove a single or all synchronization objects that are added to the right-side list during data mapping.
Remove a single migration object
In the list on the right, move the pointer over the object that you want to remove, and click Remove to remove the migration object.
Remove all migration objects
In the list on the right, click Remove All in the upper-right corner. In the dialog box that appears, click OK to remove all migration objects.
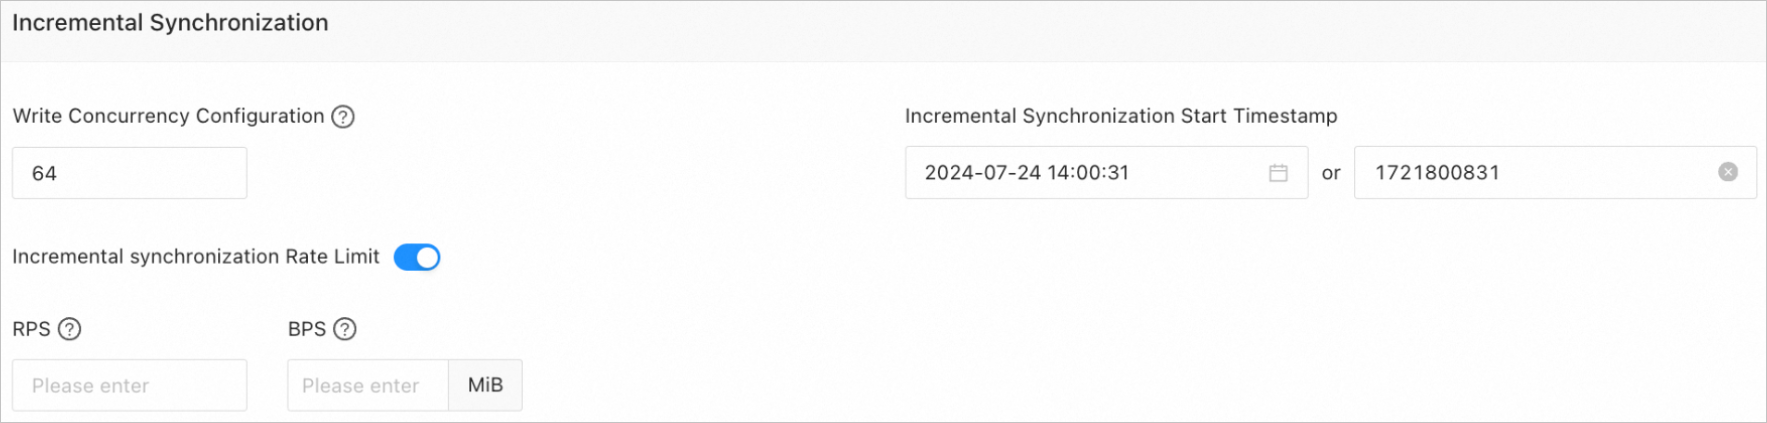
Click Next. On the Migration Options page, configure the parameters for incremental synchronization.
Parameter
Description
Write Concurrency
The concurrency for writing data to the target during incremental synchronization. The maximum value is 512. A high write concurrency may incur excessive stress on the target, affecting the business.
Incremental Synchronization Rate Limit
You can choose whether to limit the incremental synchronization rate as needed. If you choose to limit the incremental synchronization rate, you must specify the records per second (RPS) and bytes per second (BPS). The RPS specifies the maximum number of data rows synchronized to the target per second during incremental synchronization, and the BPS specifies the maximum amount of data in bytes synchronized to the target per second during incremental synchronization.
NoteThe RPS and BPS values specified here are only for throttling. The actual incremental synchronization performance is subject to factors such as the settings of the source and target and the instance specifications.
Incremental Synchronization Start Timestamp
Specify a point in time after which data is to be synchronized. The default value is the current system time. For more information, see Set an incremental synchronization timestamp.
Click Precheck to start a precheck on the data migration task.
During the precheck, the data transmission service checks the read and write privileges of the database users and the network connections of the databases. A data synchronization task can be started only after it passes all check items. If an error is returned during the precheck, you can perform the following operations:
Identify and troubleshoot the problem and then perform the precheck again.
Click Skip in the Actions column of the failed precheck item. In the dialog box that prompts the consequences of the operation, click OK.
After the precheck is passed, click Start Task.
If you do not need to start the task now, click Save. You can start the task later on the Migration Tasks page or by performing batch operations. For more information about batch operations, see Perform batch operations on data migration tasks.
The data transmission service allows you to modify the migration objects and their row filtering conditions when a migration task is running. For more information, see View and modify migration objects and their filter conditions. After the data migration task is started, it is executed based on the selected migration types. For more information, see View migration details.