By Hitesh Jethva, Alibaba Cloud Community Blog author.
Gitea is a free, open source and self-hosted version control system alternative to GitHub and GitLab. It is simple, easy, robuts, scalable and a great alternative to other git services. All source code is available under the MIT License on GitHub. Gitea has low minimal requirements, so it can run on an inexpensive Raspberry Pi. You can also compile Gitea for Windows, macOS, Linux, ARM, etc. Gitea provides lots of features such as, Low resource usage, Multiple database support, free and open source, Multiple OS support, etc.
In this tutorial, we will learn how to install and configure Gitea Git Service on Ubuntu 18.04 server with an Alibaba Cloud Elastic Compute Service (ECS) instance.
Create a new ECS instance, choosing Ubuntu 18.04 as the operating system with at least 2GB RAM, and connect to your instance as the root user.
Once you are logged into your Ubuntu 18.04 instance, run the following command to update your base system with the latest available packages.
apt-get update -yBefore starting, you will need to install Nginx, MariaDB server and git to your server. You can install all of them by running the following command:
apt-get install nginx mariadb-server git -yOnce all the packages are installed, you can proceed to configure MariaDB database for Gitea.
By default, MariaDB is not secured. So, you will need to secure it first. You can secure it by running the mysql_secure_installation script:
mysql_secure_installationThis script will set root password, remove anonymous users, disallow root login remotely and remove test database as shown below:
    Enter current password for root (enter for none):
    Set root password? [Y/n]: N
    Remove anonymous users? [Y/n]: Y
    Disallow root login remotely? [Y/n]: Y
    Remove test database and access to it? [Y/n]:  Y
    Reload privilege tables now? [Y/n]:  Y
Once the MariaDB is secured, log in to MariaDB shell with the following command:
mysql -u root -pEnter your root password when prompt. Then, change the GLOBAL innodeb_file_per_table to On:
MariaDB [(none)]>SET GLOBAL innodb_file_per_table = ON;Next, create a database and user for Gitea:
MariaDB [(none)]>CREATE DATABASE gitea;
MariaDB [(none)]>CREATE USER 'gitea'@'localhost' IDENTIFIED BY 'gitea';
Next, grant all the privileges to the database:
MariaDB [(none)]>GRANT ALL ON gitea.* TO 'gitea'@'localhost' IDENTIFIED BY 'gitea' WITH GRANT OPTION;Next, update the database character set:
MariaDB [(none)]>ALTER DATABASE gitea CHARACTER SET = utf8mb4 COLLATE utf8mb4_unicode_ci;Finally, flush the privileges and exit from the MariaDB shell with the following command:
MariaDB [(none)]>FLUSH PRIVILEGES;
MariaDB [(none)]>EXIT;
Next, you will need to edit MariaDB default config file and add innodb parameters:
nano /etc/mysql/mariadb.conf.d/50-server.cnfAdd the following lines:
innodb_file_format = Barracuda
innodb_large_prefix = 1
innodb_default_row_format = dynamic
Save and close the file. Then, restart MariaDB service to apply the changes:
systemctl restart mariadbFirst, you will need to download the latest version of Gitea binary from Git repository. You can download it with the following command:
wget https://github.com/go-gitea/gitea/releases/download/v1.5.1/gitea-1.5.1-linux-amd64Next, copy the downloaded file to /usr/local/bin/ directory and give necessary permissions:
cp gitea-1.5.1-linux-amd64 /usr/local/bin/gitea
chmod 755 /usr/local/bin/gitea
Next, create a system user for Gitea with the following command:
adduser --system --shell /bin/bash --group --disabled-password --home /home/gitea giteaNext, create a directory structure for Gitea with the following command:
mkdir -p /etc/gitea /var/lib/gitea/{custom,data,indexers,public,log}
chown gitea:gitea /etc/gitea /var/lib/gitea/{custom,data,indexers,public,log}
chmod 750 /var/lib/gitea/{data,indexers,log}
chmod 770 /etc/giteaNext, you will need to create a systemd service file to manage Gitea service. You can create it with the following command:
nano /etc/systemd/system/gitea.serviceAdd the following lines:
[Unit]
Description=Gitea
After=syslog.target
After=network.target
After=mysql.service

[Service]
RestartSec=2s
Type=simple
User=root
Group=root
WorkingDirectory=/var/lib/gitea/
ExecStart=/usr/local/bin/gitea web -c /etc/gitea/app.ini
Restart=always
Environment=USER=root HOME=/home/git GITEA_WORK_DIR=/var/lib/gitea

[Install]
WantedBy=multi-user.target
Save and close the file. Then, reload systemd and start Gitea service with the following command:
systemctl start giteaYou can check the status of Gitea service with the following command:
systemctl status giteaOutput:
¡ñ gitea.service - Gitea
   Loaded: loaded (/etc/systemd/system/gitea.service; enabled; vendor preset: enabled)
   Active: active (running) since Fri 2019-01-18 10:32:28 UTC; 5min ago
 Main PID: 7015 (gitea)
    Tasks: 8 (limit: 1114)
   CGroup: /system.slice/gitea.service
           ©ž©€7015 /usr/local/bin/gitea web -c /etc/gitea/app.ini

Jan 18 10:32:28 ubuntu1804 systemd[1]: gitea.service: Service hold-off time over, scheduling restart.
Jan 18 10:32:28 ubuntu1804 systemd[1]: gitea.service: Scheduled restart job, restart counter is at 972.
Jan 18 10:32:28 ubuntu1804 systemd[1]: Stopped Gitea (Git with a cup of tea).
Jan 18 10:32:28 ubuntu1804 systemd[1]: Started Gitea (Git with a cup of tea).
Jan 18 10:32:28 ubuntu1804 gitea[7015]: 2019/01/18 10:32:28 [T] AppPath: /usr/local/bin/gitea
Jan 18 10:32:28 ubuntu1804 gitea[7015]: 2019/01/18 10:32:28 [T] AppWorkPath: /var/lib/gitea
Jan 18 10:32:28 ubuntu1804 gitea[7015]: 2019/01/18 10:32:28 [T] Custom path: /var/lib/gitea/custom
Jan 18 10:32:28 ubuntu1804 gitea[7015]: 2019/01/18 10:32:28 [T] Log path: /usr/local/bin/log
Jan 18 10:32:28 ubuntu1804 gitea[7015]: 2019/01/18 10:32:28 Serving [::]:3000 with pid 7015
Next, enable Gitea service to start at boot time with the following command:
systemctl enable giteaBy default, Gitea listens on port 3000. So, you will need to configure Nginx as a reverse proxy to access Gitea using port 80.
First, remove Nginx default configuration file and create new configuration file with the following command:
rm /etc/nginx/sites-enabled/default

nano /etc/nginx/sites-available/gitea
Add the following lines:
upstream gitea {
    server 127.0.0.1:3000;
}

server {
    listen 80 default_server;
    listen [::]:80 default_server;
    server_name 192.168.0.11;
    root /var/lib/gitea/public;
    access_log off;
    error_log off;

    location / {
      try_files maintain.html $uri $uri/index.html @node;
    }

    location @node {
      client_max_body_size 0;
      proxy_pass http://localhost:3000;
      proxy_set_header X-Forwarded-For $proxy_add_x_forwarded_for;
      proxy_set_header X-Real-IP $remote_addr;
      proxy_set_header Host $http_host;
      proxy_set_header X-Forwarded-Proto $scheme;
      proxy_max_temp_file_size 0;
      proxy_redirect off;
      proxy_read_timeout 120;
    }
}
Save and close the file. Then, enable Nginx configuration file with the following command:
ln -s /etc/nginx/sites-available/gitea /etc/nginx/sites-enabled/Finally, restart Nginx service with the following command:
systemctl restart nginxYou can check the status of Nginx service with the following command:
systemctl status nginxOutput:
¡ñ nginx.service - A high performance web server and a reverse proxy server
   Loaded: loaded (/lib/systemd/system/nginx.service; enabled; vendor preset: enabled)
   Active: active (running) since Sat 2019-01-19 04:40:31 UTC; 2min 6s ago
     Docs: man:nginx(8)
  Process: 3609 ExecReload=/usr/sbin/nginx -g daemon on; master_process on; -s reload (code=exited, status=0/SUCCESS)
  Process: 3543 ExecStart=/usr/sbin/nginx -g daemon on; master_process on; (code=exited, status=0/SUCCESS)
  Process: 3524 ExecStartPre=/usr/sbin/nginx -t -q -g daemon on; master_process on; (code=exited, status=0/SUCCESS)
 Main PID: 3547 (nginx)
    Tasks: 2 (limit: 1114)
   CGroup: /system.slice/nginx.service
           ©À©€3547 nginx: master process /usr/sbin/nginx -g daemon on; master_process on;
           ©ž©€3610 nginx: worker process

Jan 19 04:40:30 ubuntu1804 systemd[1]: Starting A high performance web server and a reverse proxy server...
Jan 19 04:40:31 ubuntu1804 systemd[1]: nginx.service: Failed to parse PID from file /run/nginx.pid: Invalid argument
Jan 19 04:40:31 ubuntu1804 systemd[1]: Started A high performance web server and a reverse proxy server.
Jan 19 04:42:23 ubuntu1804 systemd[1]: Reloading A high performance web server and a reverse proxy server.
Jan 19 04:42:23 ubuntu1804 systemd[1]: Reloaded A high performance web server and a reverse proxy server.Now, open your web browser and type the URL http://192.168.0.11/install. You will be redirected to the following page:
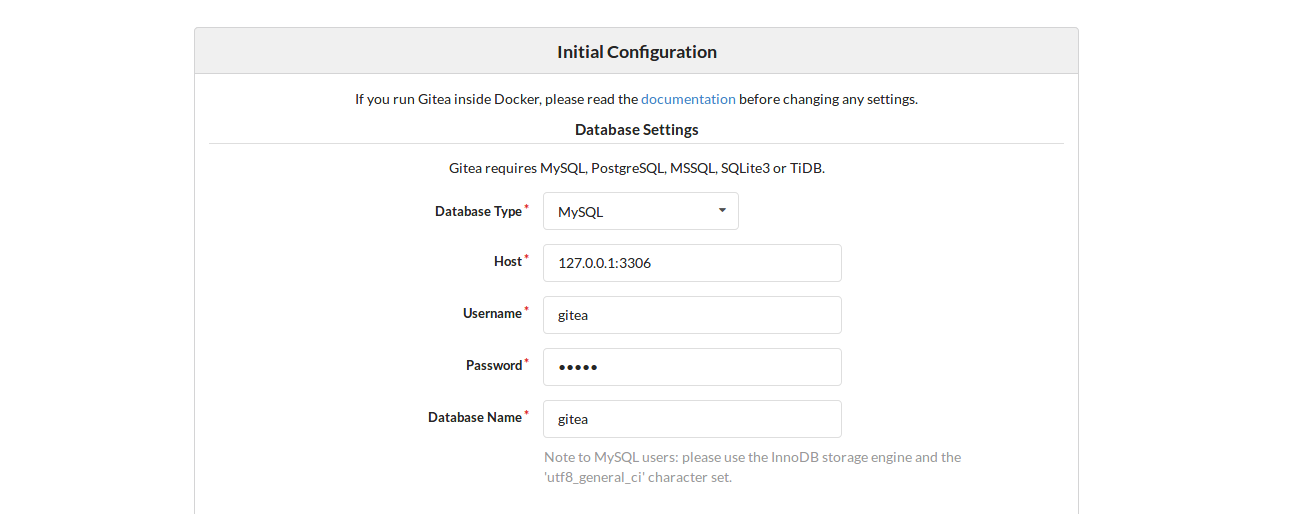
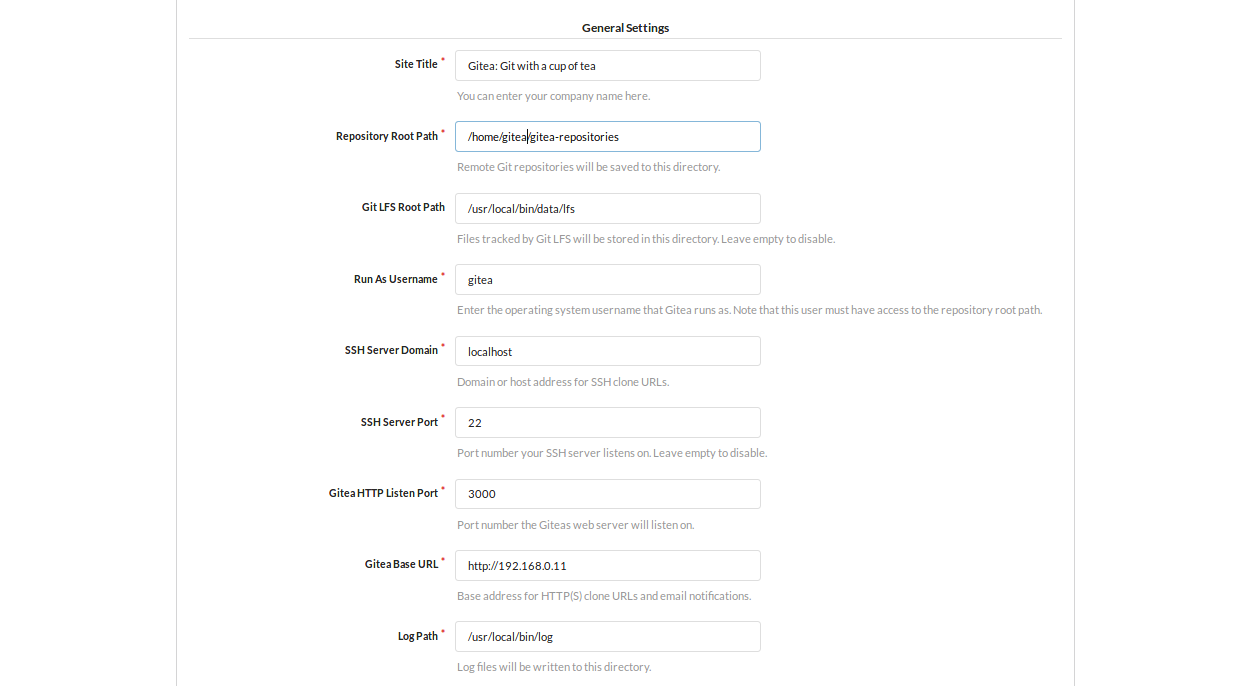
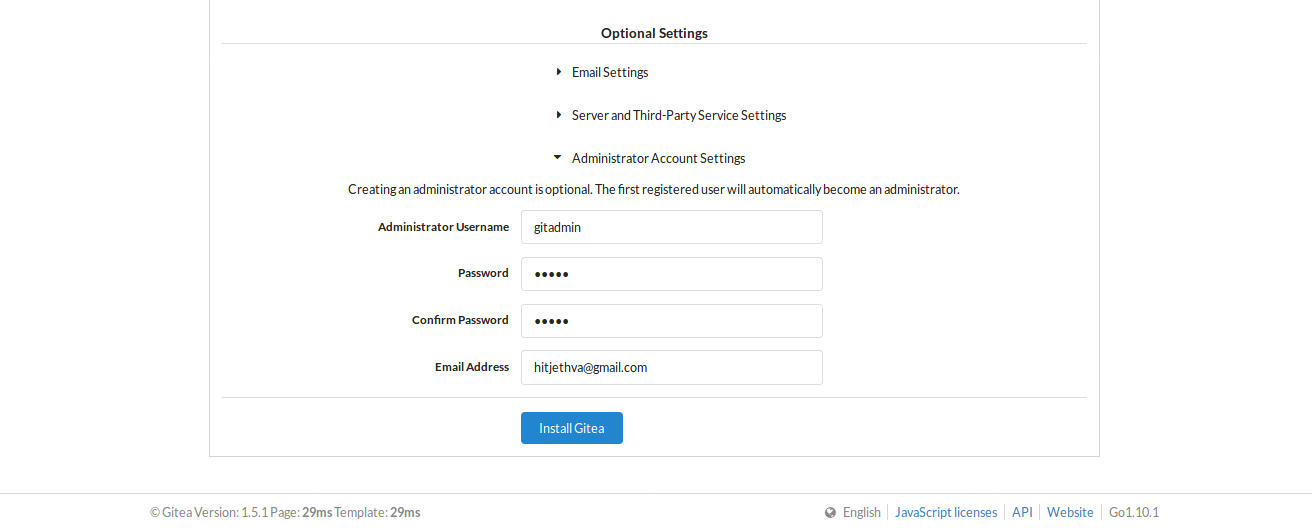
Now, provide all the required details like, database name, database username, password, Gitea site name, Run as username. admin username and password. Then, click on the Install Gitea button. Once the installation has been completed, you will be redirected to the following page:
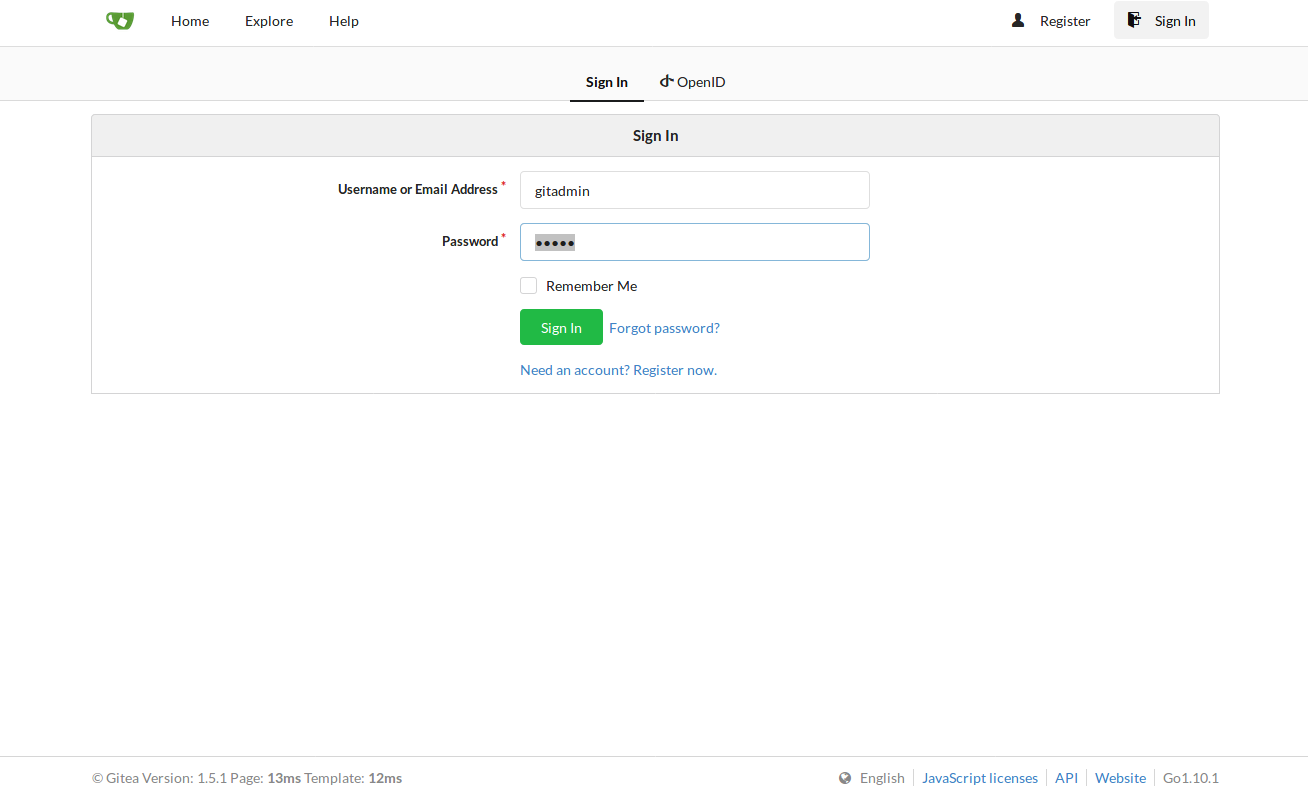
Now, provide your admin username and password. Then, click on the Sign In button. You should see the following page:

Gitea is now installed and configured, it's time to test Gitea repository.
On the Gitea dashboard, click on the Plush button to create a new repository. You should see the following page:
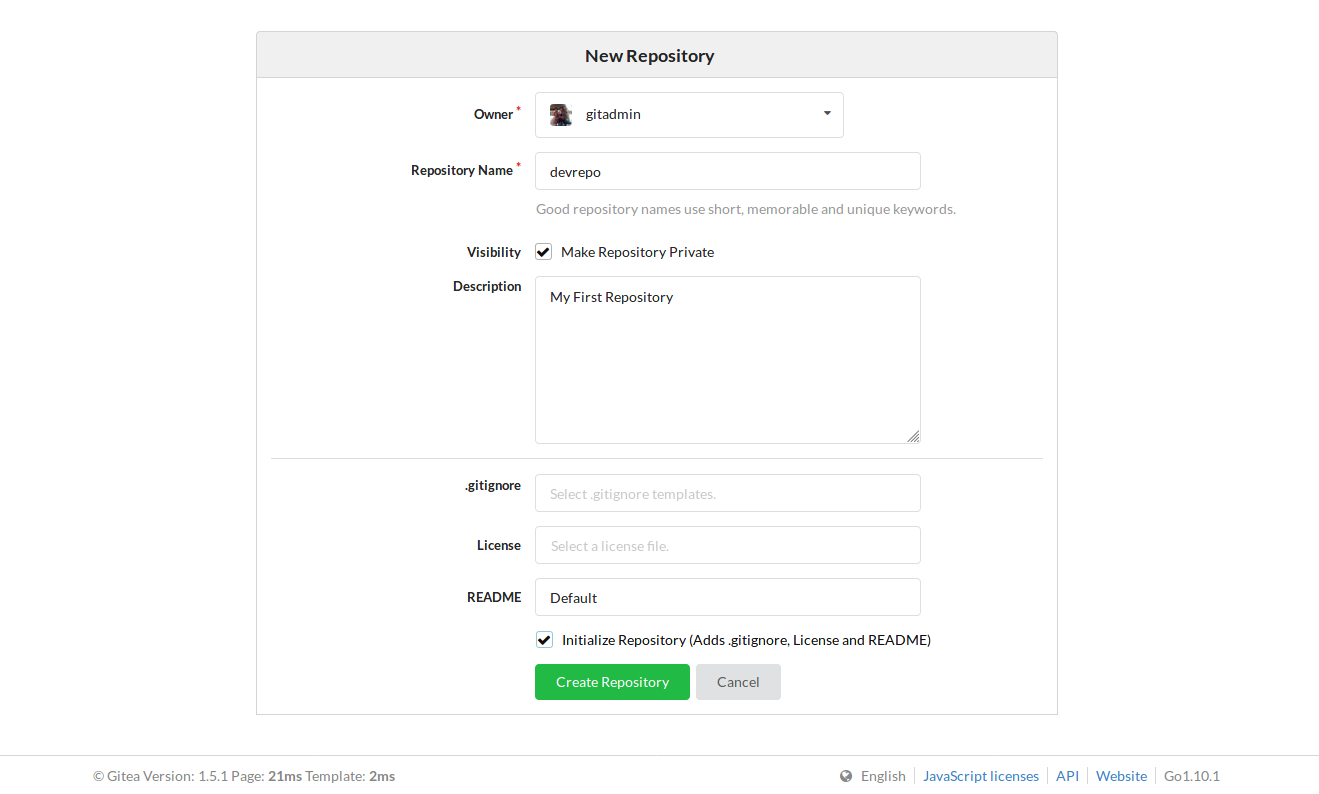
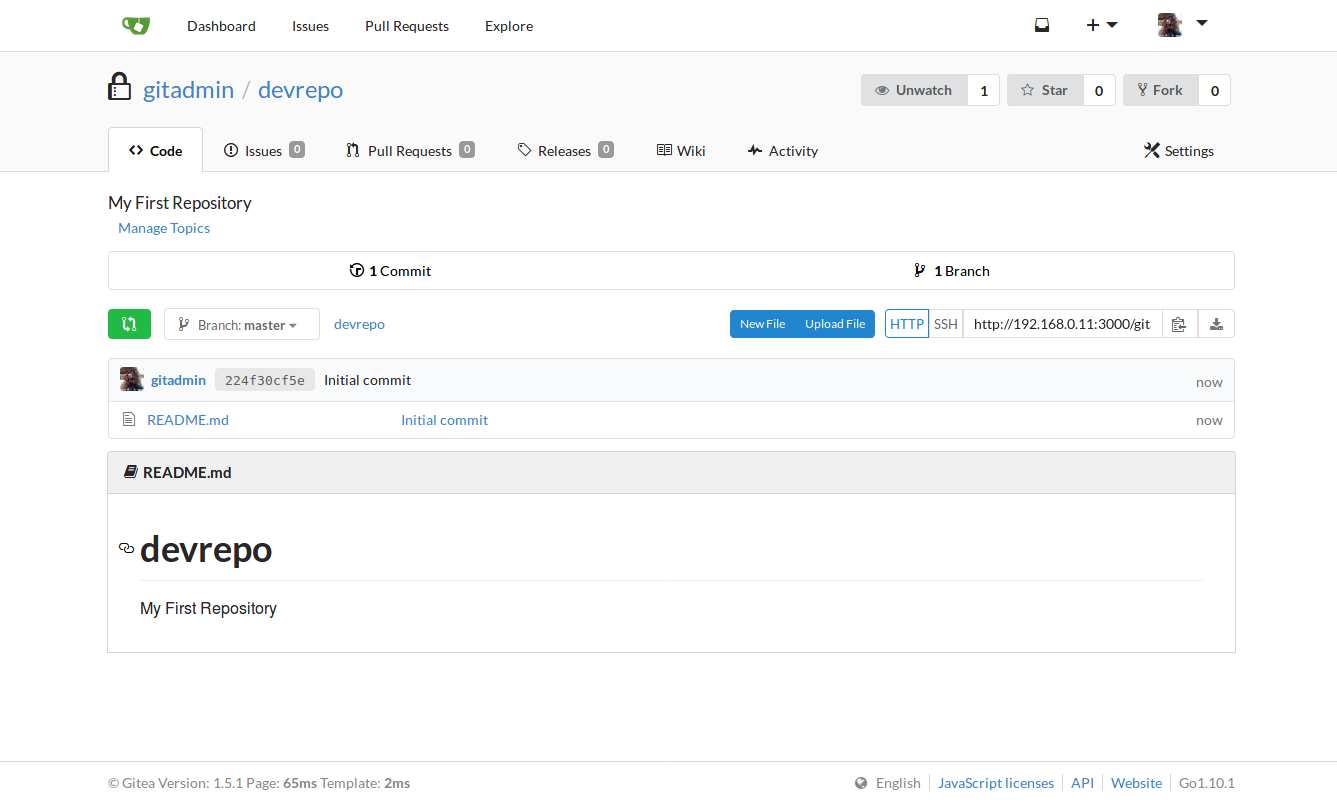
Now, provide all the required information and click on the Create Repository button. You should see your newly created repository in the following page:
Next, log in to client instance and set up the default git user and email with the following command:
git config --global user.name "gitadmin"
git config --global user.email "hitjethva@gmail.com"
Next, clone the repository from Gitea server with the following command:
git clone http://192.168.0.11/gitadmin/devrepo.gitYou should see the following output:
Cloning into 'devrepo'...
Username for 'http://192.168.0.11': gitadmin
Password for 'http://gitadmin@192.168.0.11':
remote: Counting objects: 3, done.
remote: Total 3 (delta 0), reused 0 (delta 0)
Unpacking objects: 100% (3/3), done.
Checking connectivity... done.
Next, change the directory to devrepo and create some files:
cd devrepo/
touch test1 test2
Next, add and commit the newly created files to the repository with the following command:
git add .
git commit -m "Added two test file"
Output:
[master 9c31dbb] Added two test file
 2 files changed, 0 insertions(+), 0 deletions(-)
 create mode 100644 test1
 create mode 100644 test2
Finally, push them to repository server with the following command:
git push origin masterYou should see the following output:
Username for 'http://192.168.0.11': gitadmin
Password for 'http://gitadmin@192.168.0.11':
Counting objects: 4, done.
Delta compression using up to 4 threads.
Compressing objects: 100% (2/2), done.
Writing objects: 100% (3/3), 282 bytes | 0 bytes/s, done.
Total 3 (delta 0), reused 0 (delta 0)
To http://192.168.0.11/gitadmin/devrepo.git
   224f30c..9c31dbb  master -> master
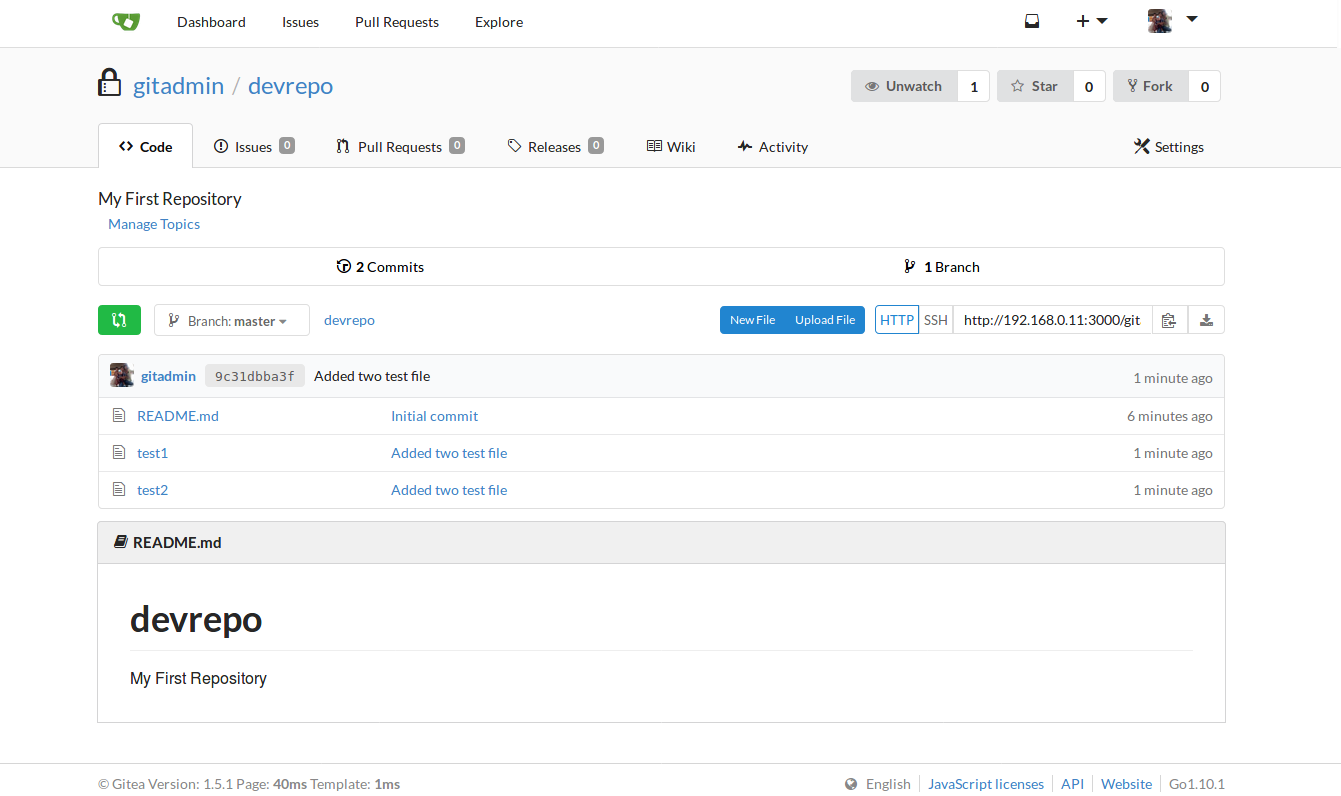
Now, go to the Gitea dashboard and open repository page. You should see your newly added files in the following page:

39 posts | 6 followers
FollowAlibaba Cloud Community - January 31, 2022
Hiteshjethva - December 12, 2019
Hiteshjethva - March 2, 2020
Hiteshjethva - January 8, 2020
Hiteshjethva - March 2, 2020
Alibaba Clouder - April 12, 2019

39 posts | 6 followers
Follow ECS(Elastic Compute Service)
Elastic and secure virtual cloud servers to cater all your cloud hosting needs.
Learn More Elastic Desktop Service
A convenient and secure cloud-based Desktop-as-a-Service (DaaS) solution
Learn More Marketplace
Marketplace is an online market for users to search and quickly use the software as image for Alibaba Cloud products.
Learn More Elastic High Performance Computing Solution
High Performance Computing (HPC) and AI technology helps scientific research institutions to perform viral gene sequencing, conduct new drug research and development, and shorten the research and development cycle.
Learn MoreMore Posts by Hiteshjethva