By Hitesh Jethva, Alibaba Cloud Community Blog author.
If your company has a data center with a large number of hardware devices, then you will need to manage the company's IT assets and monitor their status as well as their physical location. RackTables can help you. It is a free and open source data center asset management tool that can be used to maintain documentation of the racks, devices, links and network resources.
In this tutorial, we will learn how to install and configure RackTables on an Alibaba Cloud Elastic Compute Service (ECS) Ubuntu 18.04 server.
Create a new ECS instance and connect to your instance as the root user.
Once you are logged into your Ubuntu 18.04 instance, run the following command to update your base system with the latest available packages.
apt-get update -yRackTables runs on web server, written in PHP and use MariaDB to store their data. So, you will need to install Nginx, PHP, MariaDB and other required packages to your server. You can install all of them by running the following command:
apt-get install nginx mariadb-server php7.2 php7.2-fpm php7.2-curl php7.2-ldap php7.2-cli php7.2-snmp php7.2-gd php7.2-mysql php7.2-mbstring php7.2-bcmath php7.2-json git wget unzip -yOnce all the packages are installed, start Nginx and MariaDB service and enable them to start on boot time with the following command:
systemctl start nginx
systemctl start mariadb
systemctl enable nginx
systemctl enable mariadb
You can also check the status of MariaDB with the following command:
systemctl status mariadbOnce you have completed the above steps, you can proceed to the next section.
By default, MariaDB is not secured. So, you will need to secure it first. You can secure it by running the following command:
mysql_secure_installationAnswer all the questions as shown below:
    Enter current password for root (enter for none):
    Set root password? [Y/n]: N
    Remove anonymous users? [Y/n]: Y
    Disallow root login remotely? [Y/n]: Y
    Remove test database and access to it? [Y/n]:  Y
    Reload privilege tables now? [Y/n]:  Y
Once the MariaDB server is secured, log in to MariaDB shell with the following command:
mysql -u root -pEnter your root password, then create a database and user for Racktables with the following command:
MariaDB [(none)]> CREATE DATABASE racktables CHARACTER SET utf8 COLLATE utf8_general_ci;
MariaDB [(none)]> CREATE USER racktables@localhost IDENTIFIED BY 'password';
Next, grant all the privileges to Racktables with the following command:
MariaDB [(none)]> GRANT ALL PRIVILEGES ON racktables.* TO racktables@localhost;Next, flush the privileges and exit from the MariaDB shell with the following command:
MariaDB [(none)]> FLUSH PRIVILEGES;
MariaDB [(none)]> EXIT;First, you will need to download the latest version of Racktables from Git repository. You can do this with the following command:
cd /var/www/html/
git clone https://github.com/RackTables/racktables.git
Next, give proper permissions to the racktables directory with the following command:
chown -R www-data:www-data /var/www/html/racktables
chmod -R 755 /var/www/html/racktablesNext, you will need to create an Nginx virtual host file for Racktables. You can create it with the following command:
nano /etc/nginx/sites-available/racktables.confAdd the following lines:
server {
        listen 80;
        server_name 192.168.0.104;

        root /var/www/html/racktables/wwwroot;

        location / {
            index index.php;
        }

        location ~ \.php$ {
            try_files $uri =404;
            fastcgi_pass unix:/run/php/php7.2-fpm.sock;
            fastcgi_index index.php;
            fastcgi_param SCRIPT_FILENAME $document_root$fastcgi_script_name;
            include /etc/nginx/fastcgi_params;
        }
    }
Save and close the file, when you are finished. Then, enable virtual host file with the following command:
ln -s /etc/nginx/sites-available/racktables.conf /etc/nginx/sites-enabled/Next, check Nginx for any configuration error with the following command:
nginx -tYou should see the following output:
nginx: the configuration file /etc/nginx/nginx.conf syntax is ok
nginx: configuration file /etc/nginx/nginx.conf test is successful
Next, restart Nginx service to apply all the changes with the following command:
systemctl restart nginxYou can also verify the status of Nginx with the following command:
systemctl status nginxRackTables is now installed and configured, it's time to access RackTables web interface.
Open your web browser and type the URL http://192.168.0.104/?module=installer. You will be redirected to the following page:

Now, click on the proceed button. You should see the following page:

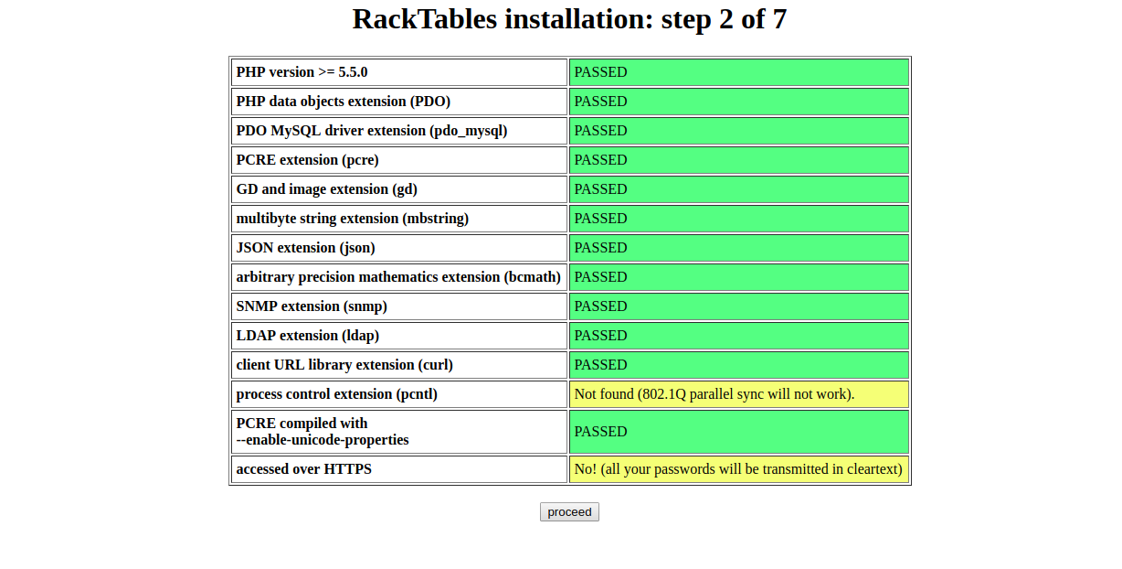
Make sure all the required dependencies have been installed. Then, click on the proceed button. You should see the following page:

Now, create secret.php and give proper permission with the following command:
touch '/var/www/html/racktables/wwwroot/inc/secret.php'
chmod a=rw '/var/www/html/racktables/wwwroot/inc/secret.php'
Next, click on the retry button. You should see the following page:

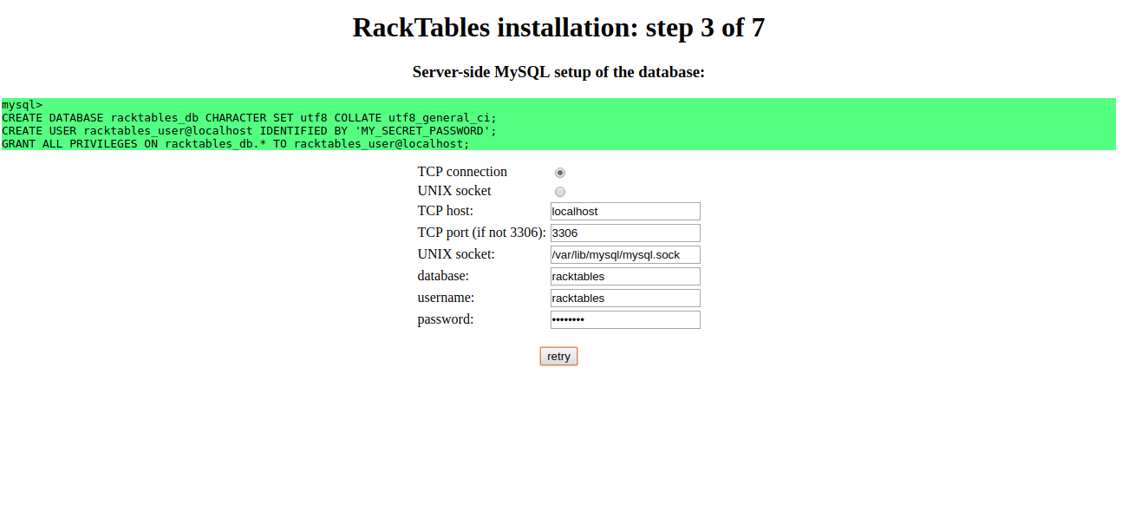
Now, provide your database details like database name, database username and password. Then, click on the retry button. You should see the following page:

Now, click on the proceed button. You should see the following page:

Next, open command prompt and reset permission of /var/www/html/racktables/wwwroot/inc/secret.php with the following command:
chown www-data:nogroup /var/www/html/racktables/wwwroot/inc/secret.php
chmod 440 /var/www/html/racktables/wwwroot/inc/secret.php
Next, click on the retry button. You should see the following page:

Next, click on the proceed button. You should see the following page:

Next, click on the proceed button. You should see the following page:

Next, provide your administrator password and click on the retry button. You should see the following page:

Next, click on the proceed button. Once the installation has been completed successfully. You should see the following page:

Next, click on the proceed button. You will be redirected to the following page:

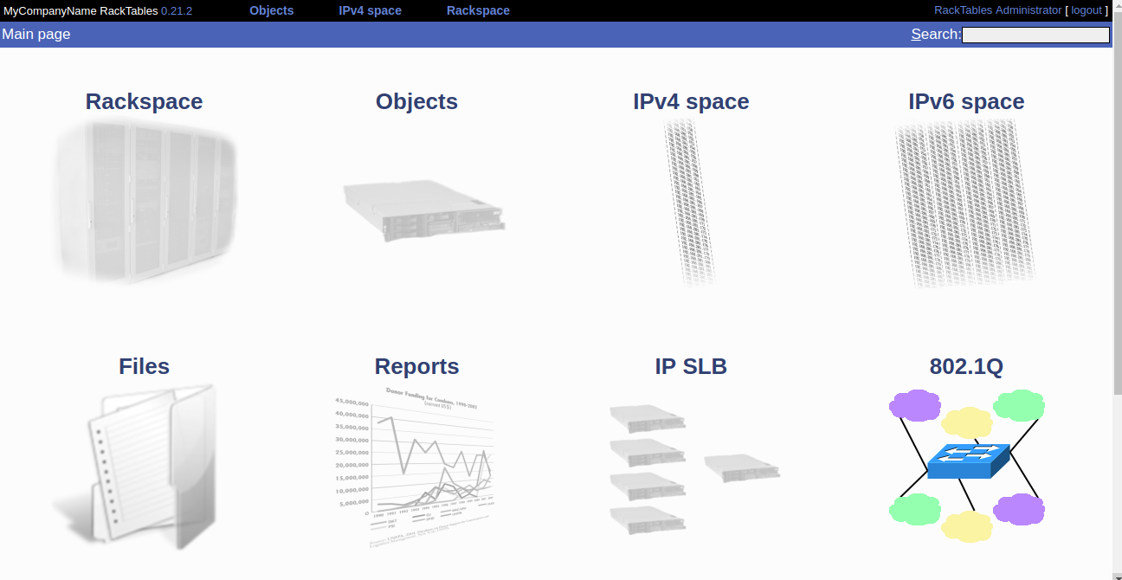
Next, provide your username and password. Then, click on the Sign In button. You will be redirected to the Racktables default dashboard in the following page:

Congratulations! You have successfully installed RackTables on an ECS Ubuntu 18.04 server. You can now easily manage your IT assets from the central location.

39 posts | 6 followers
FollowHiteshjethva - March 2, 2020
Hiteshjethva - December 12, 2019
Hiteshjethva - March 2, 2020
Alex - June 21, 2019
francisndungu - February 24, 2020
Alibaba Clouder - June 3, 2020

39 posts | 6 followers
Follow Super App Solution for Telcos
Alibaba Cloud (in partnership with Whale Cloud) helps telcos build an all-in-one telecommunication and digital lifestyle platform based on DingTalk.
Learn More ECS(Elastic Compute Service)
Elastic and secure virtual cloud servers to cater all your cloud hosting needs.
Learn More ECS Bare Metal Instance
An elastic and horizontally scalable high-performance computing service providing the same computing performance as traditional physical servers including physical isolation.
Learn More EMAS Superapp
Build superapps and corresponding ecosystems on a full-stack platform
Learn MoreMore Posts by Hiteshjethva