OST and PST are both Outlook data files. OST (Offline Storage Table) file is created on your computer when you sign in with an Exchange, IMAP, or Outlook.com account, whereas the PST (Personal Storage Table) file is created when your Outlook account is configured using POP3 account.
PST files are easily imported into another Outlook account. But OST file is linked with user account in which it is created and cannot be transferred to another Outlook account or profile. To move or transfer OST file data, you need to convert the OST file into PST file format. In this article, we will mention some best methods to convert OST file to PST file on Windows 11/10 system.
There are several reasons why you need to convert an OST file to a PST file. These are:
Access OST Data during Server Maintenance or Downtime: If mailbox server is down due to maintenance or any other reason, you cannot access the OST mailbox data. In such a case, you can convert the OST file to PST to access the mailbox items.
Here are some best methods that can help you to convert OST to PST without any hassle.
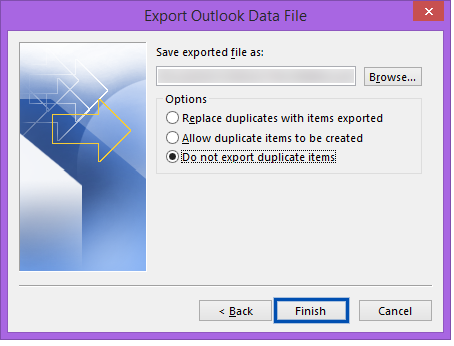
You can use the Import/Export feature in the Outlook application to convert the OST file data to PST format. Here are the steps:
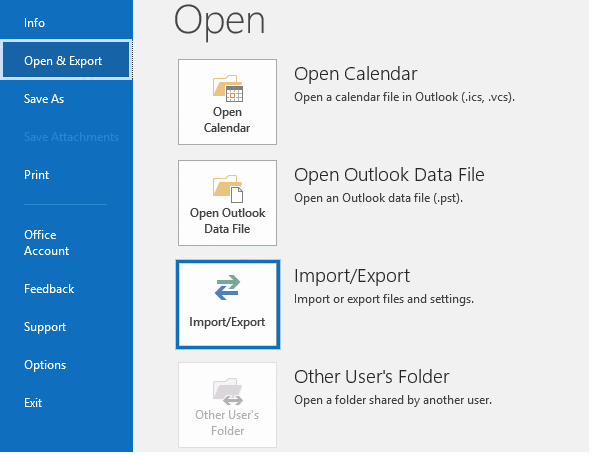
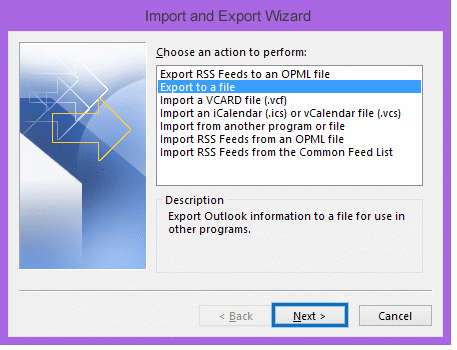
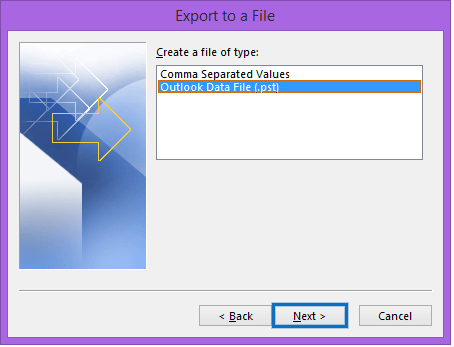
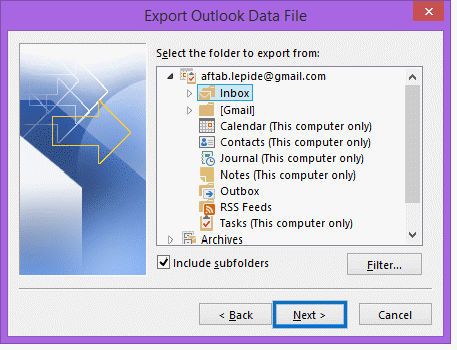
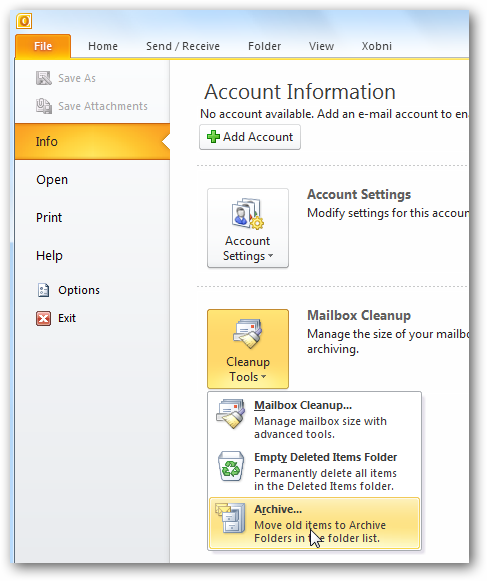
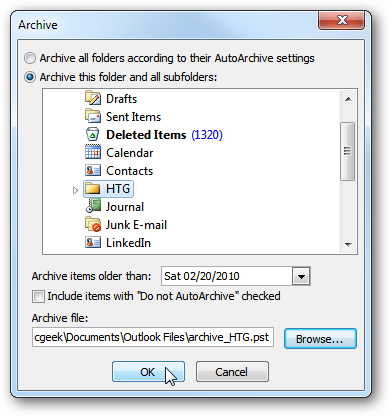
You can also convert OST file data to PST file using the Archiving feature in Outlook. You can configure ‘AutoArchive’ settings in Outlook to archive the older mail items automatically or archive the mailbox items manually.
Follow the steps given below to archive OST file items using the ‘AutoArchive’ feature:
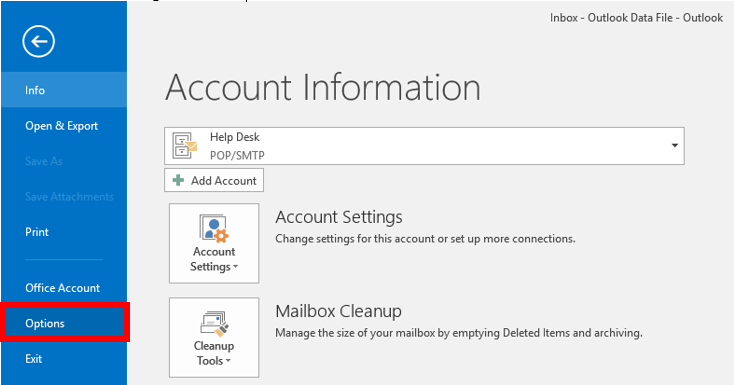
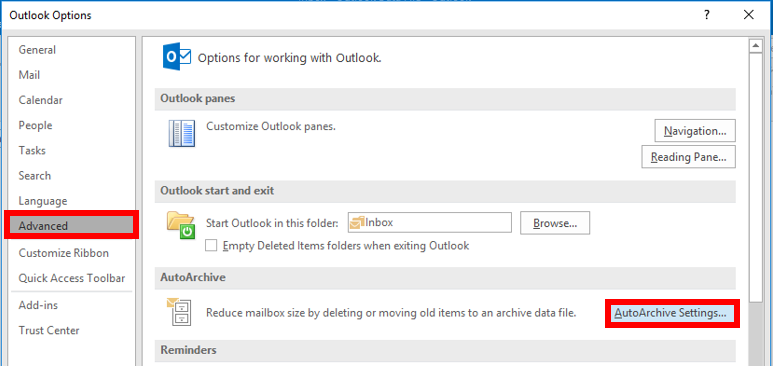
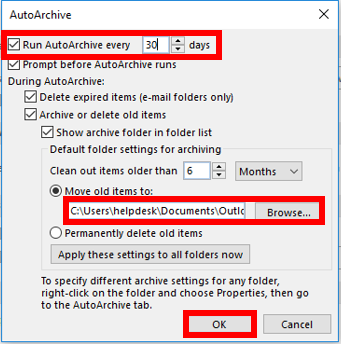
However, if you want to archive specific items or folder to PST manually, you can follow the steps given below:
The above manual methods can convert OST file into PST file format. However, these methods have some limitations, such as:
The methods mentioned above have some limitations and cannot convert inaccessible or orphaned OST files. In such cases, you can use a specialized OST to PST converter software, like Stellar Converter for OST for safe and secure OST to PST conversion process. The software allows you to save the converted OST file data in various other file formats, like MSG, RTF, HTML, and PDF.
Above, we have mentioned some best methods to convert the OST files to PST. However, the manual methods will not work if you have an inaccessible or orphaned OST file. In such a case, you can use a specialized OST to PST converter software, like Stellar Converter for OST. This software can successfully convert orphaned or inaccessible OST of any size to PST in just a few simple steps. It maintains 100% data integrity and original folder hierarchy after conversion.

39 posts | 6 followers
FollowAlibaba Cloud Community - December 13, 2024
ApsaraDB - January 8, 2025
ApsaraDB - January 17, 2025
ApsaraDB - May 24, 2022
digoal - July 22, 2021
ApsaraDB - October 26, 2023
With the help of the Sysinfo OST to PST Converter Tool, you can easily convert your OST files to PST, PDF, and multiple file formats. It also allows users to import OST data files to a number of email clients, such as Gmail, Yahoo Mail, and many more. Moreover, it is highly supported on all Windows OS versions, including Windows 11.
I suggest you to try Import/Export, a built-in option in Microsoft Outlook. But if you are willing to use a third-party utility then you can try the free demo version of SysTools OST Converter and test the software's working.
Shoviv OST to PST Converter tool is a simple and reliable software that helps users convert OST files to PST format easily. This tool also allows converting OST files into other formats like EML, MSG, HTML, and vCal. It keeps the data safe and maintains the original folder structure during the conversion. The tool can handle large OST files without any problem and offers a smooth process for all users. It also provides a free demo version that lets users check its working features by converting the first 50 items per folder before buying the full version.

39 posts | 6 followers
Follow ECS(Elastic Compute Service)
Elastic and secure virtual cloud servers to cater all your cloud hosting needs.
Learn MoreMore Posts by Hiteshjethva
Mithilesh Tata January 23, 2025 at 11:10 am
You can also try Aryson OST to PST Converter software to easily convert OST file to PST file on Windows.Visit: https://www.arysontechnologies.com/convert-ost-to-pst-online.html
Rohanwiese September 27, 2025 at 11:51 am
I would also like to recommend the Aryson OST to PST Converter tool, which efficiently exports mailboxes from OST files to PST format.