By Arslan Ud Din Shafiq, Alibaba Cloud Tech Share Author. Tech Share is Alibaba Cloud’s incentive program to encourage the sharing of technical knowledge and best practices within the cloud community.
Redmine is a web-based, free, open-source management and issue tracking tool, which supports multiple languages and databases (MySQL, SQLite, and PostgreSQL).
Redmine is one of the most popular project planning tool and is coded in Ruby on Rails framework. On Redmine, you can declare a project as public or private depending on level of privacy. Access control is very flexible in Redmine; you can assign a project to multiple users and each of them will have its specific role on each project. You can define your role and set permissions accordingly.
Redmine does not restrict its installation to any specific operating system (OS). You can use any operating system (OS) of your choice; however, the installation steps would vary according to the choice of operating system.
In this tutorial, we will be installing and configuring Redmine on an Alibaba Cloud Elastic Compute Service (ECS) instance with CentOS 7.
After completing the prerequisites, log in as a root user with your root username & password via SSH client or VNC console available in your Alibaba Cloud account dashboard. You will also need to update your CentOS system and install nano editor. You can refer to this guide if you are not sure how to set up your Alibaba Cloud ECS instance. I have chosen "aareez" as my username.
Execute the command below.
# sudo yum install httpd-develYou will be prompted a message Is this ok?. Type Y and hit Enter. You should see the installation of httpd-devel as "Complete!".
Execute the command below.
# sudo yum install mysql-develYou will be prompted a message Is this ok?. Type Y and hit Enter. You should see the installation of mysql-devel as "Complete!".
Execute the command below.
# sudo yum install curl-develYou will be prompted a message Is this ok?. Type Y and hit Enter. You should see the installation of curl-devel as "Complete!".
Execute the command below.
# sudo yum install unzipYou will be prompted a message Is this ok?. Type Y and hit Enter. You should see the installation of unzip as "Complete!".
To install Ruby, you will need to install RVM, a command-line tool, used for installing, managing and working with multiple Ruby environments on the same device. You will need to follow the steps below which involves installation of RVM and Ruby.
Install RVM script by executing the command.
# \curl -sSL https://get.rvm.io | bash -s stableBefore proceeding to next command, you will need to get public key for GPG 2 by executing the following command. This command will add public key for GPG to your server.
# gpg2 --recv-keys 409B6B1796C275462A1703113804BB82D39DC0E3Execute the command again after adding public keys.
# \curl -sSL https://get.rvm.io | bash -s stableTo start using Ruby, you will need to run the following command:
# source /home/aareez/.rvm/scripts/rvmIn this tutorial, aareez will be your username.
To install Ruby using RVM, execute the following command.
# rvm install 2.4You will be prompted to type your password for logged in user to continue installation of remaining required packages. Enter your password and hit Enter.
Now check if you have successfully installed ruby.
# ruby -vYou should see the following screen upon successful installation.

Execute the command below.
# sudo yum install rubygemsYou will be prompted a message Is this ok?. Type Y and hit Enter. You should see the installation of rubygems as "Complete!".
Execute the command below.
# gem install passengerAs we are not using root user directly for security reasons, you are recommended to give permissions to your sudo user to access Phusion Passenger files. To do so, execute the following command.
# sudo chmod o+x "/home/aareez"Execute the command below and hit Enter to continue installation.
# passenger-install-apache2-moduleYou will be asked to select the language from the given list. Select Ruby as your language. Press Spacebar to select and hit Enter. After completion, hit Enter for apache configuration warning and continuing process.
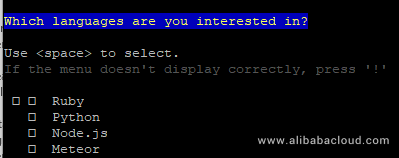
Skip the next steps shown below in screenshots by pressing Enter.
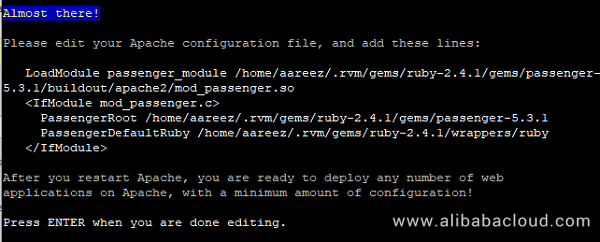
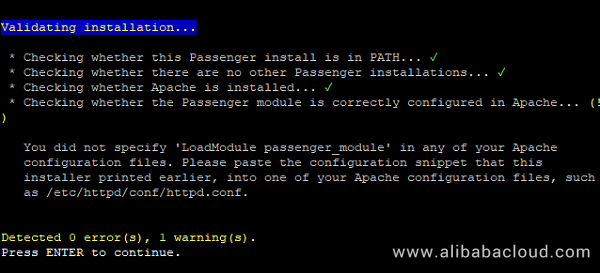
After successful installation of Phusion Passenger, you will see the following screen.

At the end while installing Phusion Apache, you will be asked to add few lines of code in your apache configuration file. To do so, copy the code below and add these lines to mentioned apache configuration files.
Open /etc/httpd/conf.modules.d/00-base.conf using the command below.
# sudo nano /etc/httpd/conf.modules.d/00-base.confCopy and paste the following line in the opened file and save it.
LoadModule passenger_module /home/aareez/.rvm/gems/ruby-2.4.1/gems/passenger-5.3.1/buildout/apache2/mod_passenger.soOpen apache configuration file /etc/httpd/conf/httpd.conf by executing the command below.
# sudo nano /etc/httpd/conf/httpd.confCopy and paste the code below in opened file and save it.
<IfModule mod_passenger.c>
     PassengerRoot /home/aareez/.rvm/gems/ruby-2.2.2/gems/passenger-5.3.1
     PassengerDefaultRuby /home/aareez/.rvm/gems/ruby-2.2.2/wrappers/ruby
   </IfModule>
Now you will have to restart apache.
# sudo service httpd restartRedmine supports multiple databases including PostgreSQL, SQLite, MySQL. In this tutorial, I will use MySQL. By default, CentOS support MariaDB server. To install MariaDB, follow the steps below.
Execute the command below.
# sudo yum install mariadb-serverYou will be prompted a message Is this ok?. Type Y and hit Enter. You should see the installation of mariadb as "Complete!".
Execute the following command to enable and start MariaDB server so that it may automatically start when system is rebooted.
# sudo systemctl start mariadb
# sudo systemctl enable mariadb
Now to secure your MariaDB server, execute the command:
# sudo mysql_secure_installationThe root password will be blank by default, just hit Enter to proceed and select Y and choose your password.
Type Y for removing anonymous users and hit Enter.
Type Y for Disallow root login remotely? And hit Enter.
Type Y for Remove test database and access to it? And hit Enter.
Type Y for Reload privilege tables now? And hit Enter.
You have successfully secured your MariaDB server.
As an alternative, you can use https://account-intl.aliyun.com/register/intl_register.htm?biz_params=%7B%22intl%22%3A%22%7B%5C%22referralCode%5C%22%3A%5C%22ffxt3q%5C%22%7D%22%7D>Alibaba Cloud Aspara DB for RDS as your database. Alibaba Cloud AsparaDB for RDS frees you from database management, allowing you to focus on your business. It provides protection against SQL injections, network attacks, brute force attacks and many other types of database attacks. It is also highly scalable, available and secure.
To create database and setup user for that database, you will need to start MySQL client and execute queries for creating database and creating user and assigning user to database.
Start MySQL client.
# mysql -u root -pEnter your password to continue.
Now enter the following queries in sequence using the command line. You can replace username, database name and password with your preferred choice.
create database redmine character set utf8;
create user 'redmine'@'localhost' identified by 'your-password-here';
grant all privileges on redmine.* to 'redmine'@'localhost';
\q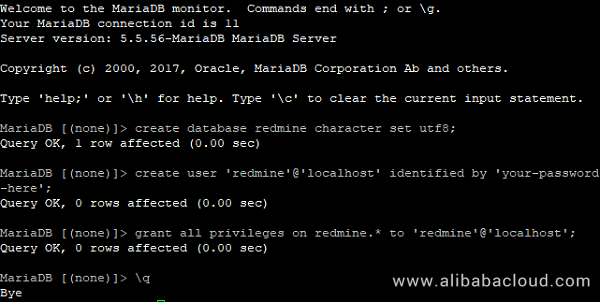
To install Redmine, you will first need to fetch a copy of compressed folder of Redmine and then do its setup. To complete installation and configuration of Redmine, follow the steps below.
Fetch a copy of Redmine
# wget https://www.redmine.org/releases/redmine-3.4.5.zipUnzip downloaded compressed redmine-3.4.5.zip folder.
# unzip redmine-3.4.5.zipCopy this extracted folder to public html path which is /var/www/html.
# sudo cp -av redmine-3.4.5/* /var/www/htmlNavigate to directory /var/www/html/config.
# cd /var/www/html/configCreate a copy of database.yml.example.
# sudo cp database.yml.example database.ymlOpen database.yml file using nano text editor.
# sudo nano database.ymlUpdate database settings in the opened file according to created database as shown below.
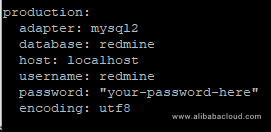
Before configuring Rails, you will need to give permissions to user by executing following command.
# sudo chown -R aareez:aareez /var/www/htmlFor installation of rmagick, you will need to install ImageMagick and ImageMagick-devel by executing the following command.
# sudo yum -y install ImageMagick ImageMagick-develNow you will install rmagick using the command below.
# gem install rmagickFor dependency management for Rails with bundler, you will need to install bundler using the following command.
# gem install bundlerNow you will have to edit Gemfile using nano editor and put the following lines of code. First, open nano editor.
# sudo nano /var/www/html/GemfileThen enter these lines of codes.
# file: /var/www/html/Gemfile
source "http://rubygems.org"
gem "rake", "12.3.1"
gem "rack", "1.6.0"
gem "rubytree", "0.5.2", :require => "tree"
gem "RedCloth", "~>4.2.3", :require => "redcloth" # for CodeRay
After adding the lines, enter Ctrl+X, then type Y and hit Enter.
Now navigate to directory /var/www/html
# cd /var/www/htmlNow to install the provided dependencies above, execute the following command.
# bundle installTo avoid any type of error due to older version of any gem, I suggest executing the command below.
# bundle updateTo generate secret token, execute the command.
# RAILS_ENV=production bundle exec rake generate_secret_tokenNow you will have to migrate database models by using the command.
# RAILS_ENV=production bundle exec rake db:migrateTo load default data, execute the command.
# RAILS_ENV=production bundle exec rake redmine:load_default_dataYou will be asked to select language from the given list. In my case, I have chosen en.
Navigate to /var/www/html/public
# cd /var/www/html/publicRename dispatch CGI files and .htaccess file for dispatch CGI configuration.
# mv htaccess.fcgi.example .htaccess
# mv dispatch.fcgi.example dispatch.fcgiNagivate to /var/www directory
# cd /var/wwwChange rights and permissions with the codes below.
# sudo chown -R apache:apache html
# sudo chmod -R 755 htmlTo access Redmine via your server’s IP address, you will be required to set up a virtual host.
Open the apache configuration file /etc/httpd/conf.d/welcome.conf
# sudo nano /etc/httpd/conf.d/welcome.confRemove all the code available in opened file.
Add the following lines of code in opened apache configuration file and press Ctrl+X, then type Y and then hit Enter.
<VirtualHost *:3000>
    ServerName 47.89.180.149
    DocumentRoot /var/www/html/public/
    PassengerRoot /home/aareez/.rvm/gems/ruby-2.4.1/gems/passenger-5.3.1
    PassengerRuby /home/aareez/.rvm/gems/ruby-2.4.1/wrappers/ruby
    PassengerUser aareez

    <Directory /var/www/html/public/>
      Allow from all ExecCGI
      Options -MultiViews
      Require all granted
    </Directory>
</VirtualHost>
Restart apache.
# sudo service httpd restartBefore accessing Redmine, you must enable inbound TCP port 3000 from your Alibaba Cloud Security group rules configurations.
After enabling port 3000, access your Redmine server by entering your Alibaba Cloud ECS IP address. In my case, I have used http://47.89.180.149/ to access Redmine.
And that's it!
Interview with Dr. Yu Kai of AISpeech – The Importance of Naturalness in Natural Language Processing

2,593 posts | 792 followers
FollowAlibaba Clouder - August 16, 2019
Alibaba Clouder - March 26, 2019
Alibaba Clouder - June 13, 2019
Hiteshjethva - January 8, 2020
Alibaba Clouder - August 16, 2019
Hiteshjethva - December 12, 2019

2,593 posts | 792 followers
Follow ECS(Elastic Compute Service)
Elastic and secure virtual cloud servers to cater all your cloud hosting needs.
Learn More RAM(Resource Access Management)
Secure your cloud resources with Resource Access Management to define fine-grained access permissions for users and groups
Learn MoreLearn More
More Posts by Alibaba Clouder