By Hitesh Jethva, Alibaba Cloud Community Blog author.
Spacewalk is an open-source Linux systems management software for RedHat based distributions like CentOS, Scientific Linux and Fedora. With Spacewalk, you can deploy, manage and update packages to Red Hat derived distributions. Spacewalk has a web interface that allows you to view the system updates in the clients and initiate updates and installations. Spacewalk has a built-in Proxy that can be used to connect to your central Spacewalk server and cache the contents and distribute these contents in various geographical locations, which can help to reduce the overall load on the central server and improve download speeds for systems.
In this tutorial, you will learn how to install Spacewalk on two Alibaba Cloud Elastic Compute Service (ECS) instances with CentOS 7 installed. We will also learn how to manage channels and repositories with Spacewalk.
To complete this tutorial, you will need to have the following items before you begin:
For reference, check out create a new ECS instance and connect to your instance as the root user. Also, note that once you are logged into your CentOS 7 instance, you'll need to run the yum update -y command to update your base system with the latest available packages.
First, you will need to setup the hostname and hostname resolution on both instance. You can do this by following these steps.
On the Spacewalk server instance: setup hostname with the following command:
hostnamectl set-hostname node1.spacewalk.comNext, configure hostname resolution by editing /etc/hosts file with the nano /etc/hosts command. Aferwards, add the following line:
192.168.0.101 node1.spacewalk.com
192.168.0.102 client.spacewalk.com
Save and close the file, when you are finished.
On the Spacewalk client instance: setup hostname with the following command:
hostnamectl set-hostname client.spacewalk.comNext, configure hostname resolution by editing /etc/hosts file with the nano /etc/hosts command. Then, add the following line:
192.168.0.101 node1.spacewalk.com
192.168.0.102 client.spacewalk.com
Save and close the file, when you are finished. Next, you will need to disable Selinux on both instance. You can do this by editing /etc/selinux/config file:
nano /etc/selinux/configMake the following changes:
SELINUX=disabledSave and close the file. Then, restart both instances to apply the changes:
Before installing Spacewalk, you will need to setup some repository to your system. Do so by following these steps. For the first step, install EPEL repository with the yum install epel-release command install Spacewalk and Java repository with the following command:
rpm -Uvh https://copr-be.cloud.fedoraproject.org/results/@spacewalkproject/spacewalk-2.8/epel-7-x86_64/00736372-spacewalk-repo/spacewalk-repo-2.8-11.el7.centos.noarch.rpm
cd /etc/yum.repos.d
curl -O https://copr.fedorainfracloud.org/coprs/g/spacewalkproject/java-packages/repo/epel-7/group_spacewalkproject-java-packages-epel-7.repo
Next, install Spacewalk along with PostgreSQL database with the following command:
yum install spacewalk-setup-postgresql spacewalk-postgresqlNext, initialize the PostgreSQL database with the postgresql-setup initdb command. Your output will look like this:
Initializing database ... OKNext, configure Spacewalk with the following command:
spacewalk-setupThis command will ask you to provide admin email and your organization details to generate self-signed certificate as shown below:
** Database: Setting up database connection for PostgreSQL backend.
Database "rhnschema" does not exist
** Database: Installing the database:
** Database: This is a long process that is logged in:
** Database:   /var/log/rhn/install_db.log
*** Progress: #
** Database: Installation complete.
** Database: Populating database.
*** Progress: ##########################
* Configuring tomcat.
* Setting up users and groups.
** GPG: Initializing GPG and importing key.
* Performing initial configuration.
* Configuring apache SSL virtual host.
Should setup configure apache's default ssl server for you (saves original ssl.conf) [Y]?
* Configuring jabberd.
* Creating SSL certificates.
CA certificate password?
Re-enter CA certificate password?
Cname alias of the machine (comma seperated)? node1.spacewalk.com
Organization? IT
Organization Unit [node1.spacewalk.com]? IT
Email Address [admin@alibaba.com]?
City? Ahmedabad
State? Gujarat
Country code (Examples: "US", "JP", "IN", or type "?" to see a list)? IN
** SSL: Generating CA certificate.
** SSL: Deploying CA certificate.
** SSL: Generating server certificate.
** SSL: Storing SSL certificates.
* Deploying configuration files.
* Update configuration in database.
* Setting up Cobbler..
Cobbler requires tftp and xinetd services be turned on for PXE provisioning functionality. Enable these services [Y]?
* Restarting services.
Installation complete.
Visit https://node1.spacewalk.com to create the Spacewalk administrator account.
Next, check the status of Spacewalk server with the /usr/sbin/spacewalk-service status command, which will have the following output:
● postgresql.service - PostgreSQL database server
   Loaded: loaded (/usr/lib/systemd/system/postgresql.service; enabled; vendor preset: disabled)
   Active: active (running) since Tue 2018-12-25 19:28:17 EST; 3min 42s ago
  Process: 4827 ExecStop=/usr/bin/pg_ctl stop -D ${PGDATA} -s -m fast (code=exited, status=0/SUCCESS)
  Process: 4859 ExecStart=/usr/bin/pg_ctl start -D ${PGDATA} -s -o -p ${PGPORT} -w -t 300 (code=exited, status=0/SUCCESS)
  Process: 4838 ExecStartPre=/usr/bin/postgresql-check-db-dir ${PGDATA} (code=exited, status=0/SUCCESS)
 Main PID: 4865 (postgres)
   CGroup: /system.slice/postgresql.service
           ├─4865 /usr/bin/postgres -D /var/lib/pgsql/data -p 5432
           ├─4887 postgres: logger process
           ├─4891 postgres: checkpointer process
           ├─4892 postgres: writer process
           ├─4893 postgres: wal writer process
           ├─4894 postgres: autovacuum launcher process
           ├─4895 postgres: stats collector process
           └─5374 postgres: rhnuser rhnschema 127.0.0.1(58976) COMMIT

● jabberd.service - Jabber Server
   Loaded: loaded (/usr/lib/systemd/system/jabberd.service; enabled; vendor preset: disabled)
   Active: active (exited) since Tue 2018-12-25 19:28:13 EST; 3min 46s ago
  Process: 4840 ExecStart=/bin/true (code=exited, status=0/SUCCESS)
 Main PID: 4840 (code=exited, status=0/SUCCESS)
   CGroup: /system.slice/jabberd.service

● tomcat.service - Apache Tomcat Web Application Container
   Loaded: loaded (/usr/lib/systemd/system/tomcat.service; enabled; vendor preset: disabled)
   Active: active (running) since Tue 2018-12-25 19:28:13 EST; 3min 46s ago
 Main PID: 4834 (java)
   CGroup: /system.slice/tomcat.service
           └─4834 /usr/lib/jvm/jre/bin/java -ea -Xms256m -Xmx256m -Djava.awt.headless=true -Dorg.xml.sax.driver=org.apache.xerces.parsers.SA...

● spacewalk-wait-for-tomcat.service - Spacewalk wait for tomcat
   Loaded: loaded (/usr/lib/systemd/system/spacewalk-wait-for-tomcat.service; static; vendor preset: disabled)
   Active: active (exited) since Tue 2018-12-25 19:29:44 EST; 2min 15s ago
  Process: 4841 ExecStart=/usr/sbin/spacewalk-startup-helper wait-for-tomcat (code=exited, status=0/SUCCESS)
 Main PID: 4841 (code=exited, status=0/SUCCESS)
   CGroup: /system.slice/spacewalk-wait-for-tomcat.service

● httpd.service - The Apache HTTP Server
   Loaded: loaded (/usr/lib/systemd/system/httpd.service; enabled; vendor preset: disabled)
   Active: active (running) since Tue 2018-12-25 19:29:44 EST; 2min 15s ago
     Docs: man:httpd(8)
           man:apachectl(8)
 Main PID: 5037 (httpd)
   Status: "Total requests: 4; Current requests/sec: 0; Current traffic:   0 B/sec"
   CGroup: /system.slice/httpd.service
           ├─5037 /usr/sbin/httpd -DFOREGROUND
           ├─5038 /usr/sbin/httpd -DFOREGROUND
           ├─5039 /usr/sbin/httpd -DFOREGROUND
           ├─5040 /usr/sbin/httpd -DFOREGROUND
           ├─5041 /usr/sbin/httpd -DFOREGROUND
           ├─5042 /usr/sbin/httpd -DFOREGROUND
           ├─5043 /usr/sbin/httpd -DFOREGROUND
           ├─5044 /usr/sbin/httpd -DFOREGROUND
           └─5045 /usr/sbin/httpd -DFOREGROUND

● spacewalk-wait-for-jabberd.service - Spacewalk wait for jabberd
   Loaded: loaded (/usr/lib/systemd/system/spacewalk-wait-for-jabberd.service; static; vendor preset: disabled)
   Active: active (exited) since Tue 2018-12-25 19:28:13 EST; 3min 46s ago
  Process: 4845 ExecStart=/usr/sbin/spacewalk-startup-helper wait-for-jabberd (code=exited, status=0/SUCCESS)
 Main PID: 4845 (code=exited, status=0/SUCCESS)
   CGroup: /system.slice/spacewalk-wait-for-jabberd.service

● osa-dispatcher.service - OSA Dispatcher daemon
   Loaded: loaded (/usr/lib/systemd/system/osa-dispatcher.service; enabled; vendor preset: disabled)
   Active: inactive (dead) since Tue 2018-12-25 19:28:42 EST; 3min 17s ago
  Process: 4862 ExecStart=/usr/sbin/osa-dispatcher --pid-file /var/run/osa-dispatcher.pid (code=exited, status=0/SUCCESS)
  Process: 4855 ExecStartPre=/bin/rm -f /var/run/osa-dispatcher.pid (code=exited, status=0/SUCCESS)
 Main PID: 4868 (code=exited, status=0/SUCCESS)

● rhn-search.service - Spacewalk search engine
   Loaded: loaded (/usr/lib/systemd/system/rhn-search.service; enabled; vendor preset: disabled)
   Active: active (running) since Tue 2018-12-25 19:29:46 EST; 2min 13s ago
  Process: 5046 ExecStart=/usr/sbin/rhn-search start (code=exited, status=0/SUCCESS)
 Main PID: 5073 (rhnsearchd)
   CGroup: /system.slice/rhn-search.service
           ├─5073 /usr/bin/rhnsearchd /usr/share/rhn/config-defaults/rhn_search_daemon.conf wrapper.pidfile=/var/run/rhn-search.pid wrapper....
           └─5078 /usr/bin/java -Djava.library.path=/usr/lib:/usr/lib64:/usr/lib/oracle/11.2/client/lib:/usr/lib/oracle/11.2/client64/lib:/u...

● cobblerd.service - Cobbler daemon
   Loaded: loaded (/usr/lib/systemd/system/cobblerd.service; enabled; vendor preset: disabled)
   Active: active (running) since Tue 2018-12-25 19:29:44 EST; 2min 15s ago
 Main PID: 5047 (cobblerd)
   CGroup: /system.slice/cobblerd.service
           └─5047 /usr/bin/python -s /usr/bin/cobblerd --no-daemonize

● taskomatic.service - Taskomatic
   Loaded: loaded (/usr/lib/systemd/system/taskomatic.service; enabled; vendor preset: disabled)
   Active: active (running) since Tue 2018-12-25 19:29:46 EST; 2min 13s ago
  Process: 5048 ExecStart=/usr/sbin/taskomatic start (code=exited, status=0/SUCCESS)
 Main PID: 5076 (taskomaticd)
   CGroup: /system.slice/taskomatic.service
           ├─5076 /usr/bin/taskomaticd /usr/share/rhn/config-defaults/rhn_taskomatic_daemon.conf wrapper.pidfile=/var/run//taskomatic.pid wr...
           └─5255 /usr/bin/java -Dibm.dst.compatibility=true -Dfile.encoding=UTF-8 -Xms256m -Xmx1024m -Djava.library.path=/usr/lib:/usr/lib6...
● spacewalk.target - Spacewalk
   Loaded: loaded (/usr/lib/systemd/system/spacewalk.target; enabled; vendor preset: disabled)
Active: active since Tue 2018-12-25 19:29:46 EST; 2min 13s agoSpacewalk is now installed and configured, so it's time to setup your admin user and password. As the first step, open your web browser and type the address https://192.168.0.101. You will be redirected to the following page:
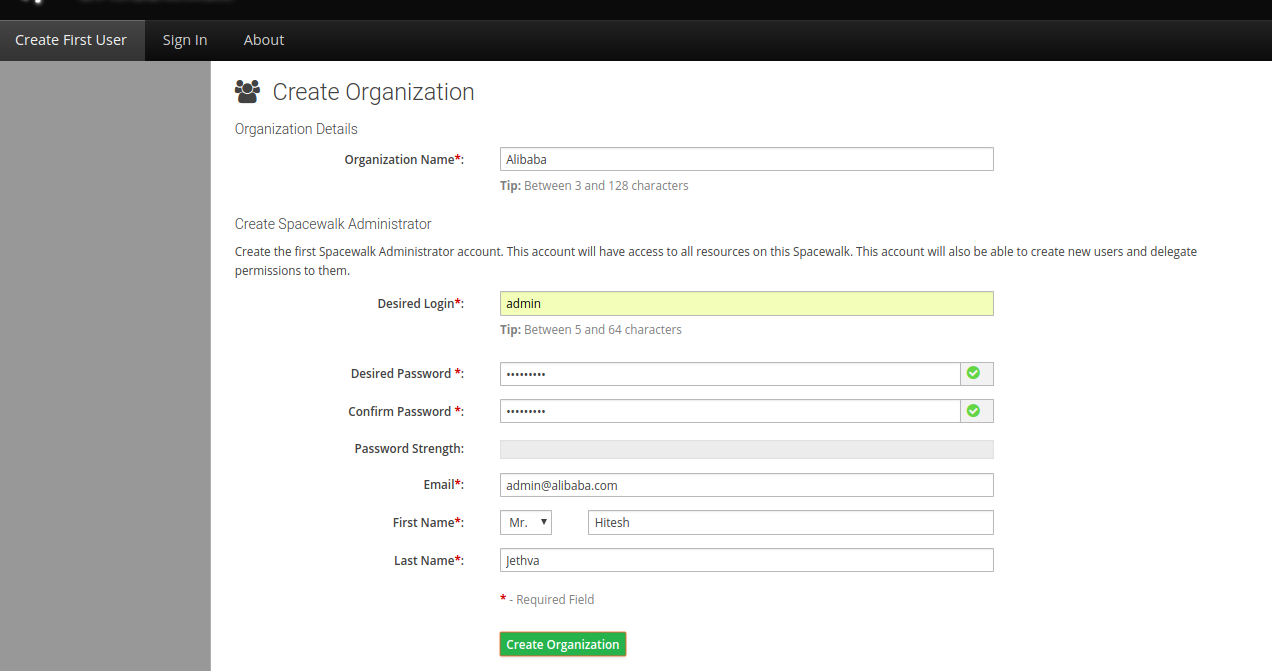
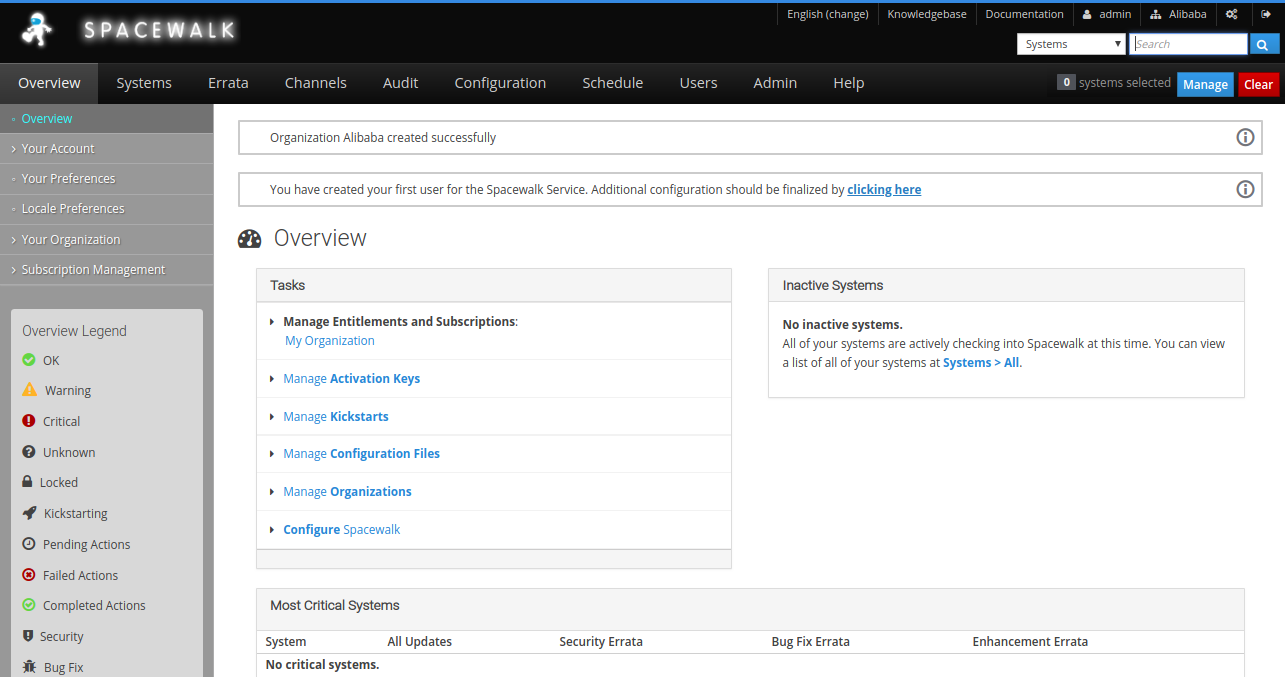
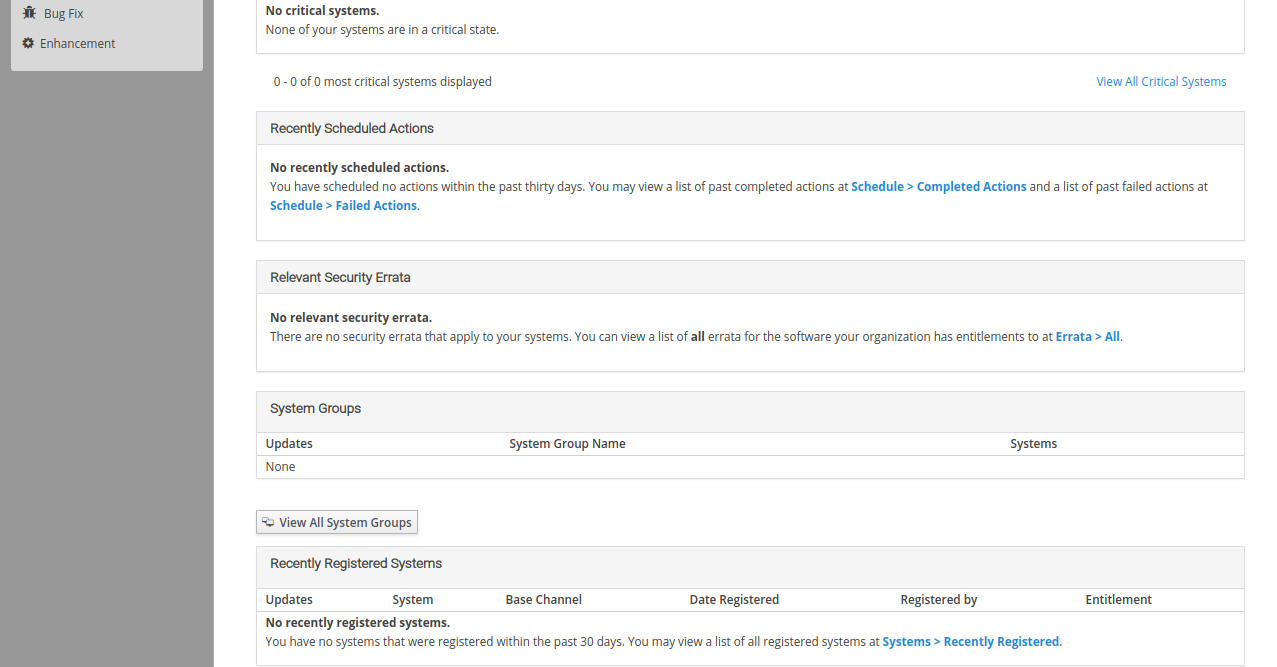
Now, provide all the required details like, Organization name, username and password. Then, click on the Create Organization button. You should see the following page:
Channel is a collection of software (RPM) packages. Any client has need to subscribe to a particular channel to download, update, install packages. There are two types of channels, the base channels and the child channels. A base channel consists of packages based on a specific architecture, and a child channel is a channel associated with a base channel that contains extra packages.
Here, we will create a base channel using the Spacewalk web interface. As the first step, open your web browser and type the URL https://192.168.0.101. You will be redirected to the Spacewalk login page:
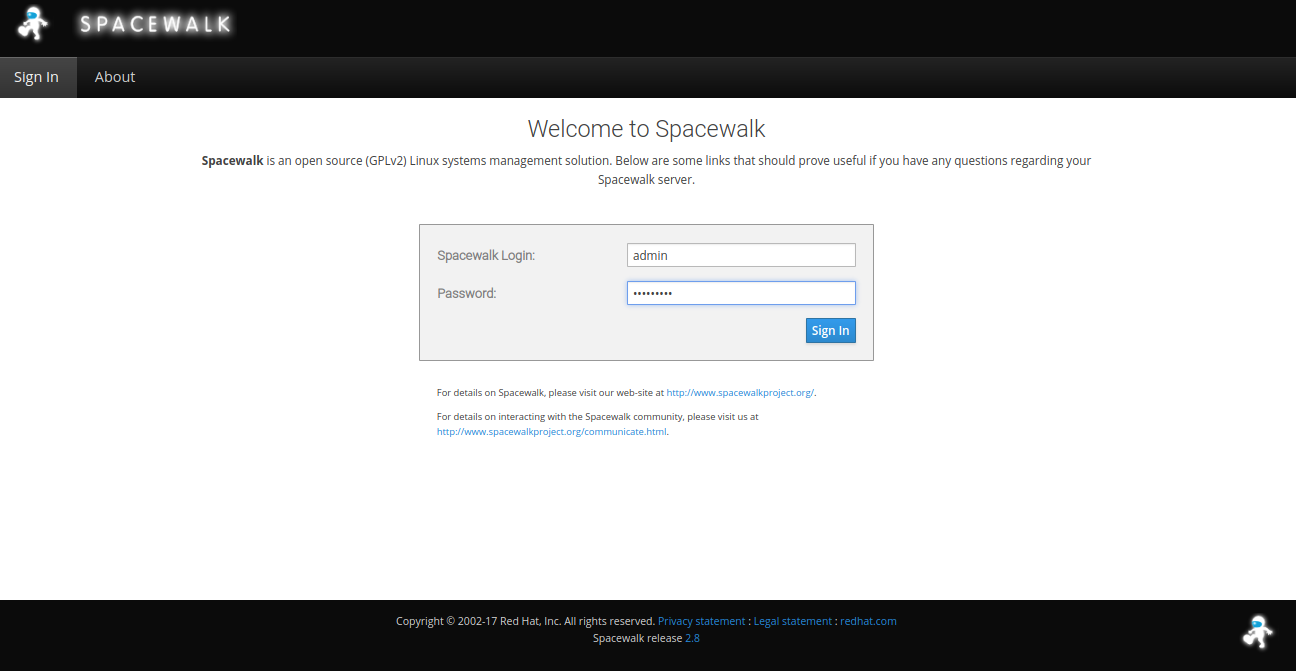
Provide your admin username and password. Then, click on the Sign In button. Next, go to the Channels > Manage Software Channels. You should see the following page:
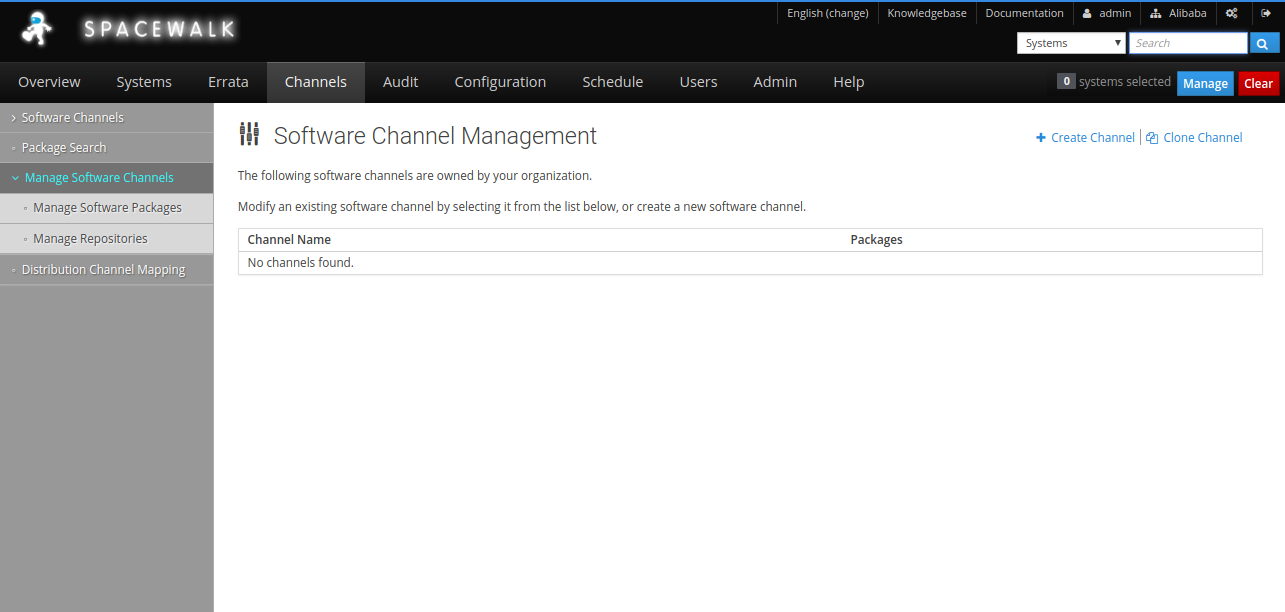
Next, click on the Create Channel button. You should see the following page:
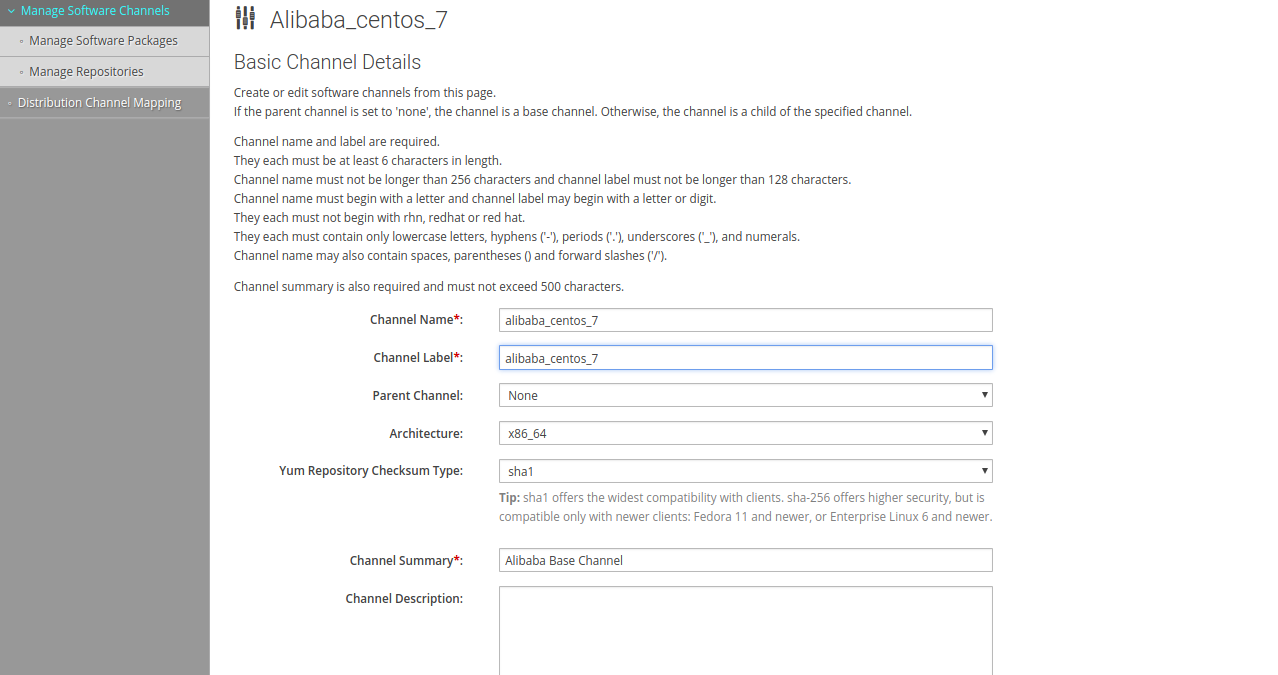
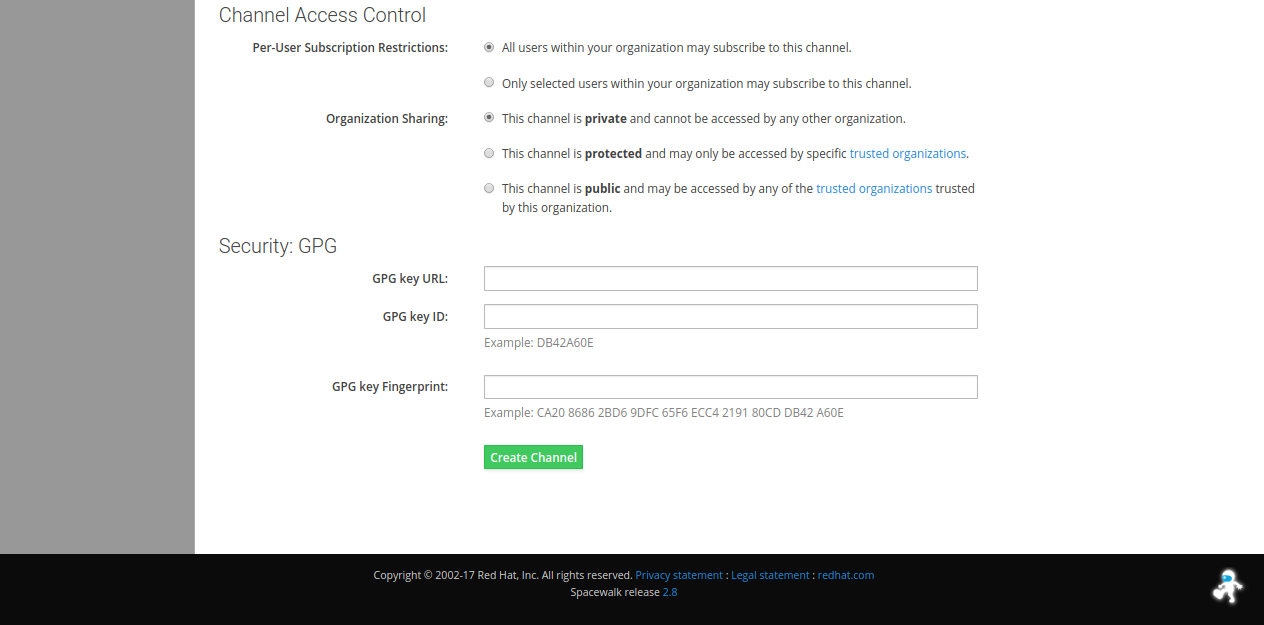
Here, provide all the required details like, Channel Name, Channel Label, Parent Channel, Architecture etc. Then, click on the Create Channel button.
Next, you will need to create a repository and link it with the channel. As the first step, on the Spacewalk dashboard, go to the Channels > Manage Software Channels > Manage Repositories. You should see the following page:
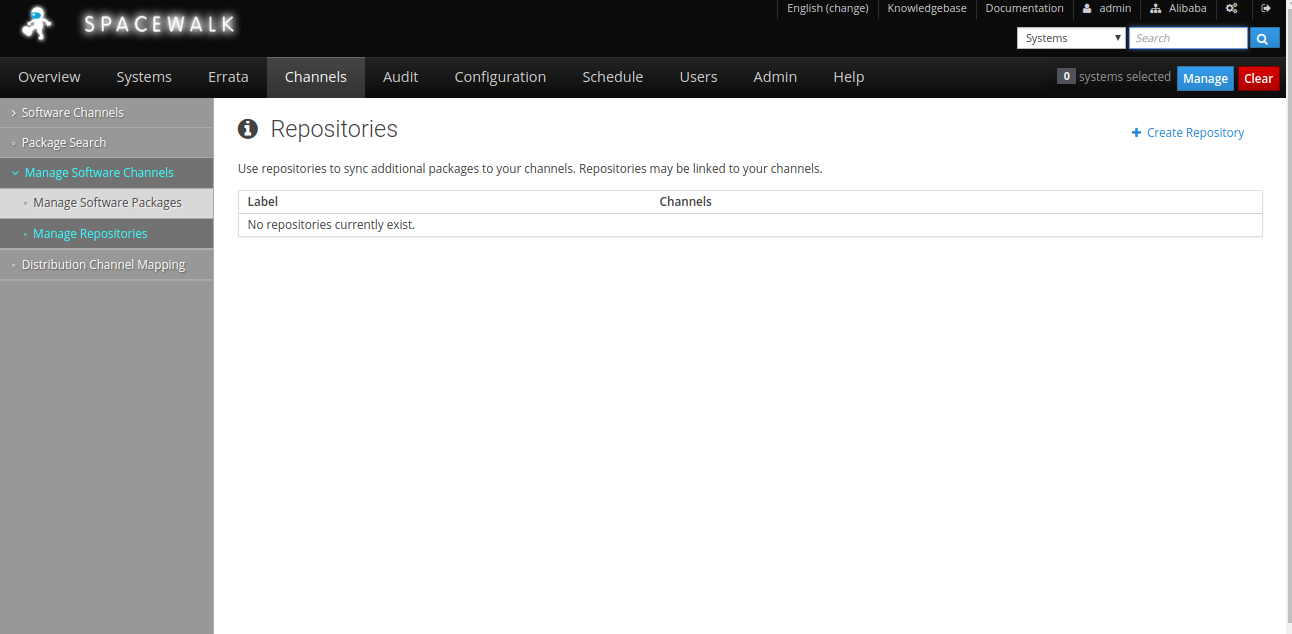
Next, click on the Create Repository button. You should see the following page:
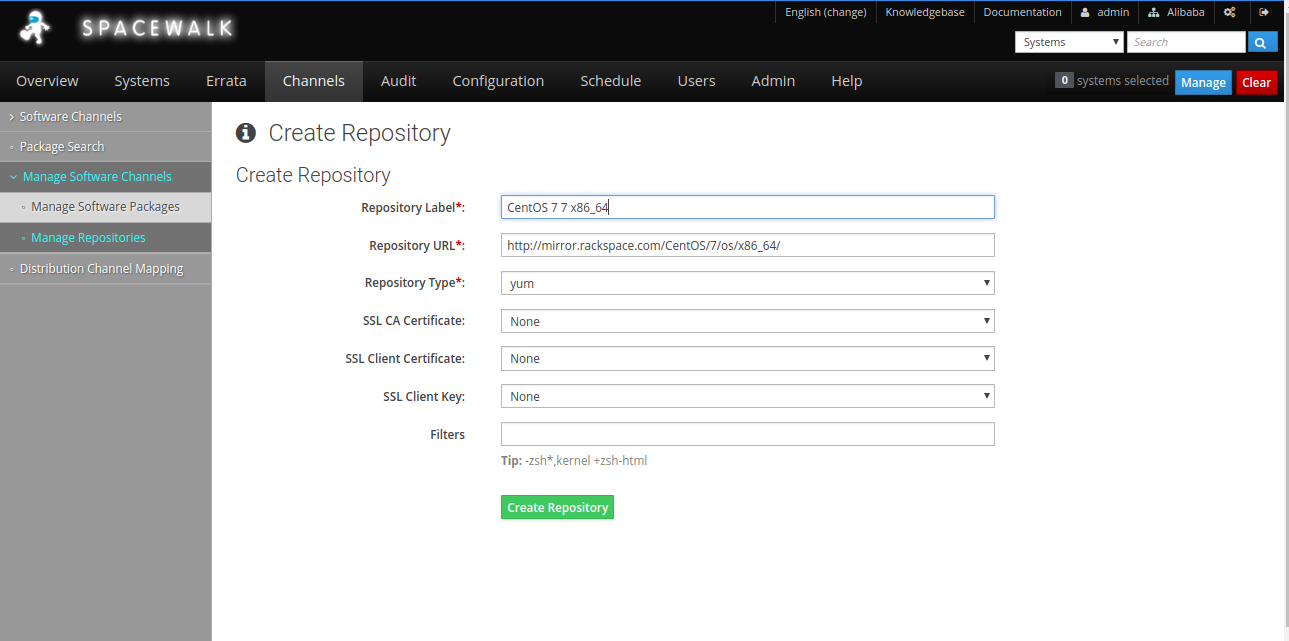
Here, provide all the details like, Repository Name, Repository URL and Repository Type. Then, click on the Create Repository button.
Next, you will need to link a repository to base channel. On the Spacewalk dashboard, go to the Channels > Manage Software Channels. You should see the following page:
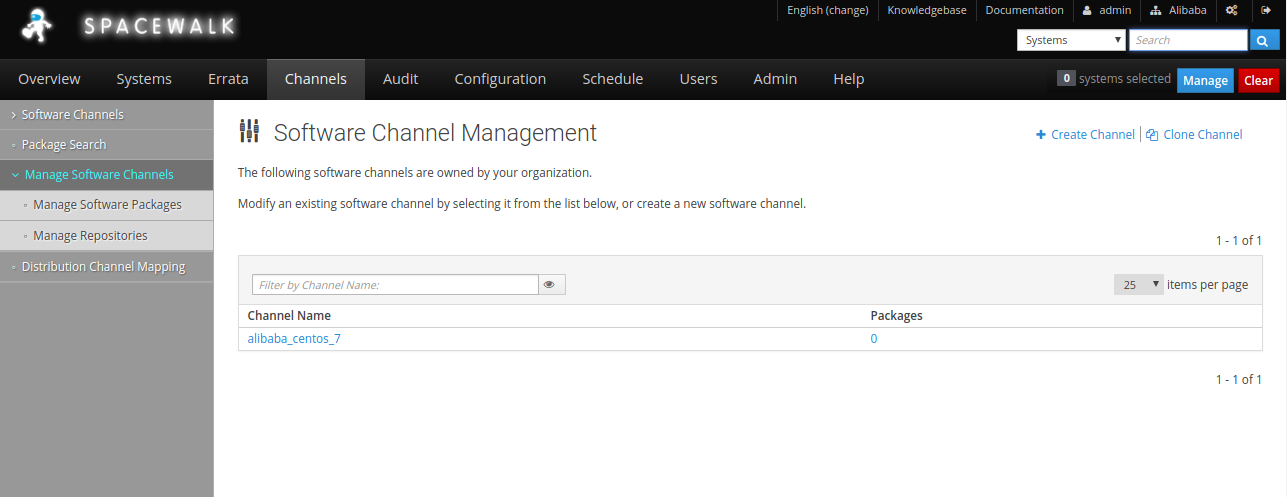
Here, click on your created channel (alibaba_centos_7) > Repositories. You should see the following page:
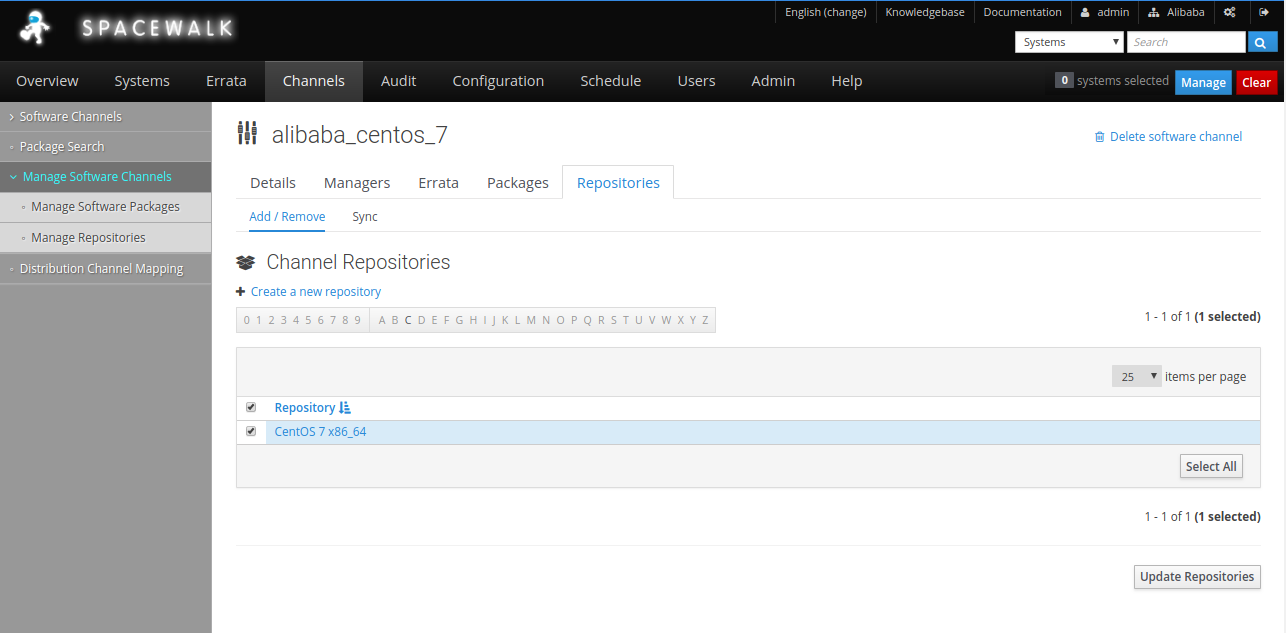
Now, select your created repository (CentOS 7 x86_64) and click on the Update Repositories button to update the repository.
Next, you will need to sync packages from the upstream server. To do so, click on the Sync button under Repositories menu. You should see the following page:
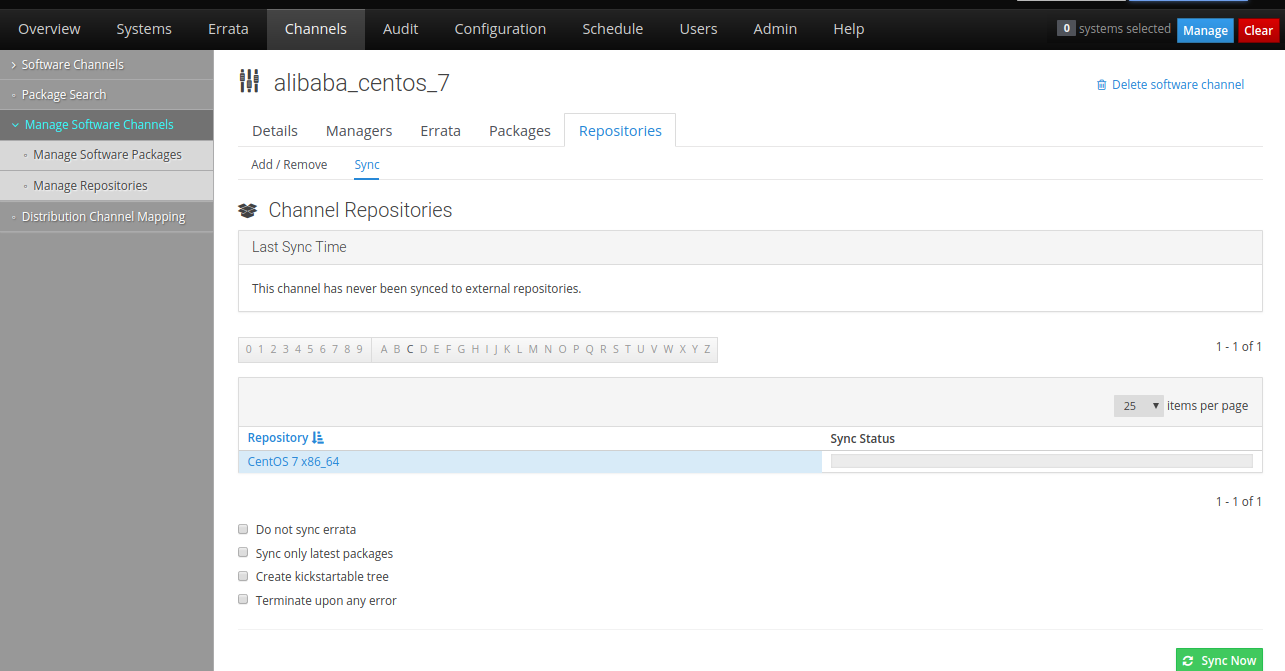
Now, click on the Sync Now button to sync with the upstream server. You can check the status of your sync with the tail -f /var/log/rhn/reposync/alibaba_centos_7.log command. The output will be as follows:
2018/12/26 06:13:44 -04:00     10019/10019 : xulrunner-31.6.0-2.el7.centos.x86_64.rpm
2018/12/26 06:13:44 -04:00 Importing packages started.
2018/12/26 06:13:44 -04:00
2018/12/26 06:13:44 -04:00   Importing packages to DB:
2018/12/26 08:36:37 -04:00 Importing packages finished.
2018/12/26 08:36:37 -04:00
2018/12/26 08:36:37 -04:00   Linking packages to the channel.
2018/12/26 08:37:50 -04:00
2018/12/26 08:37:50 -04:00   Errata in repo: 0.
2018/12/26 08:37:51 -04:00 Sync of channel completed in 9:01:41.
Once the sync has been completed, you can find all the downloaded packages under /var/satellite directory. Make sure you have enough space in the /var/satellite directory.
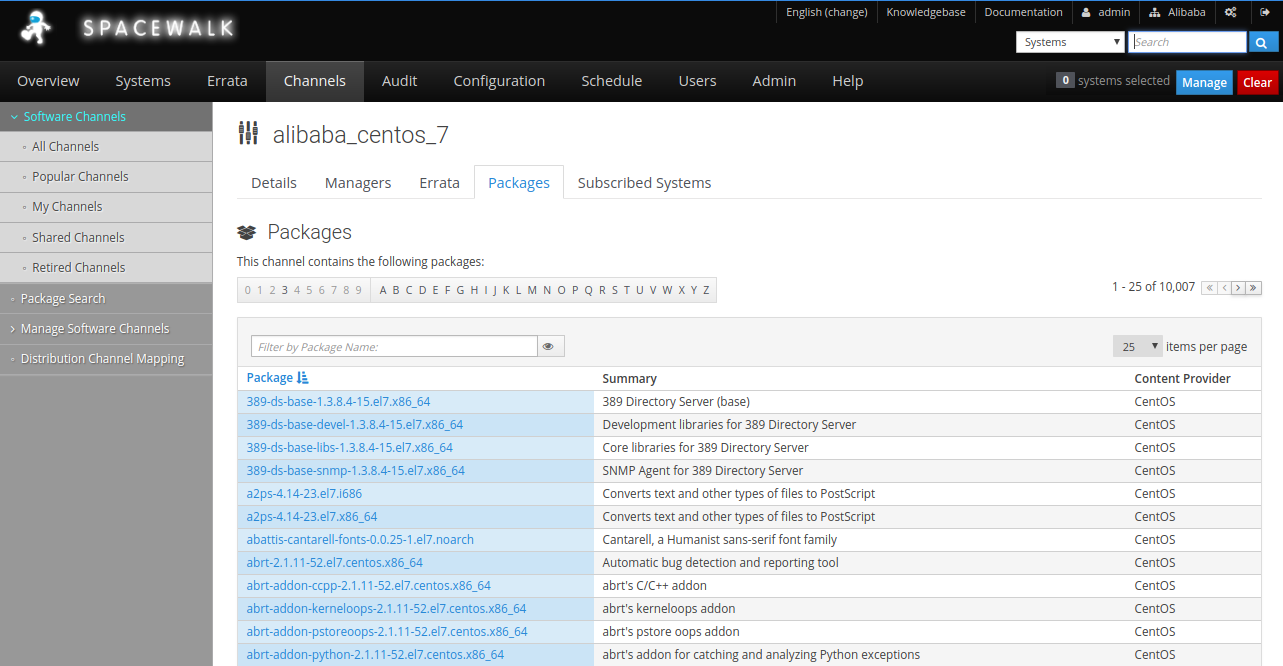
To view all the packages, go to the Channels > Manage Software Channels > Select your channel > Packages and click on the List/Remove button. You should see all the packages in the following page:
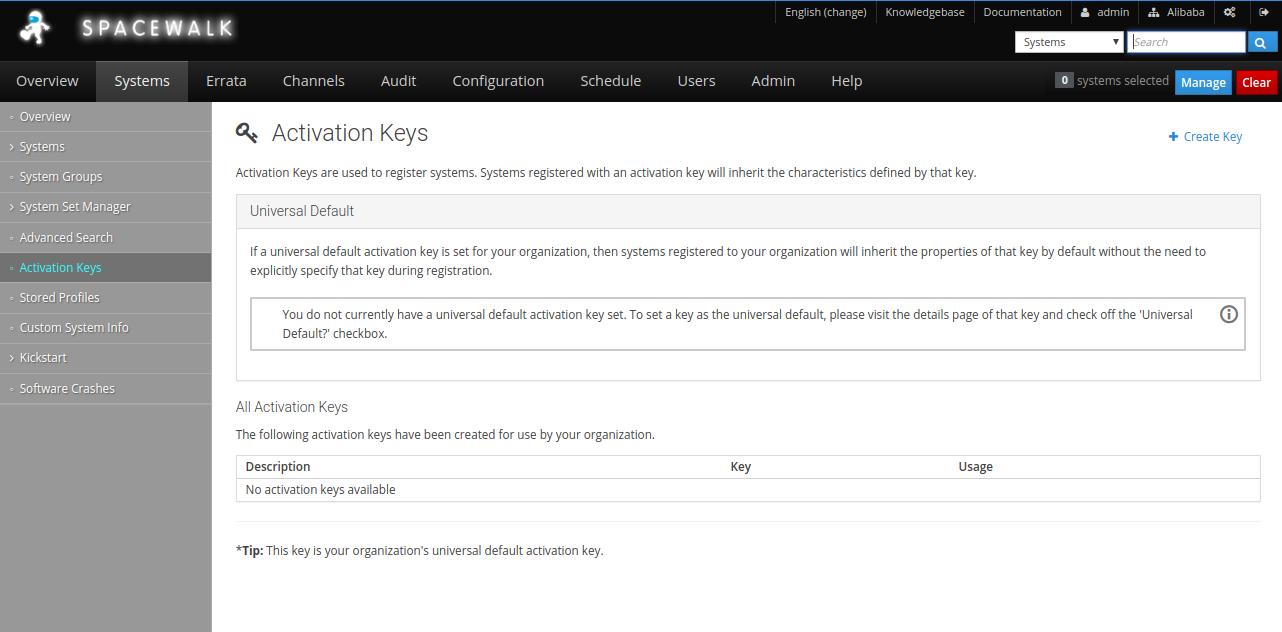
Next, you will need to create an activation key for client subscription. Any client can use this key to subscribe to the created channel. To do so, go to the Systems > Activation Keys . You should see the following page:
Next, click on the Create Key, You should see the following page:
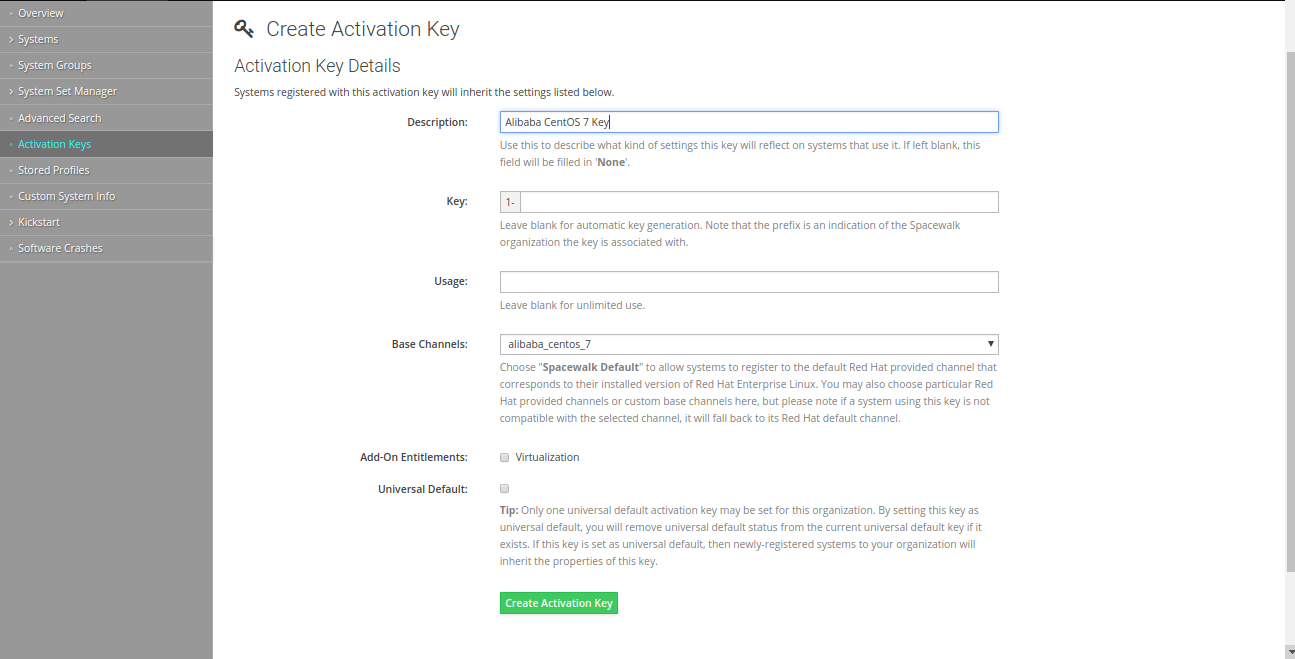
Here, provide all the details and click on the Create Activation Key button.
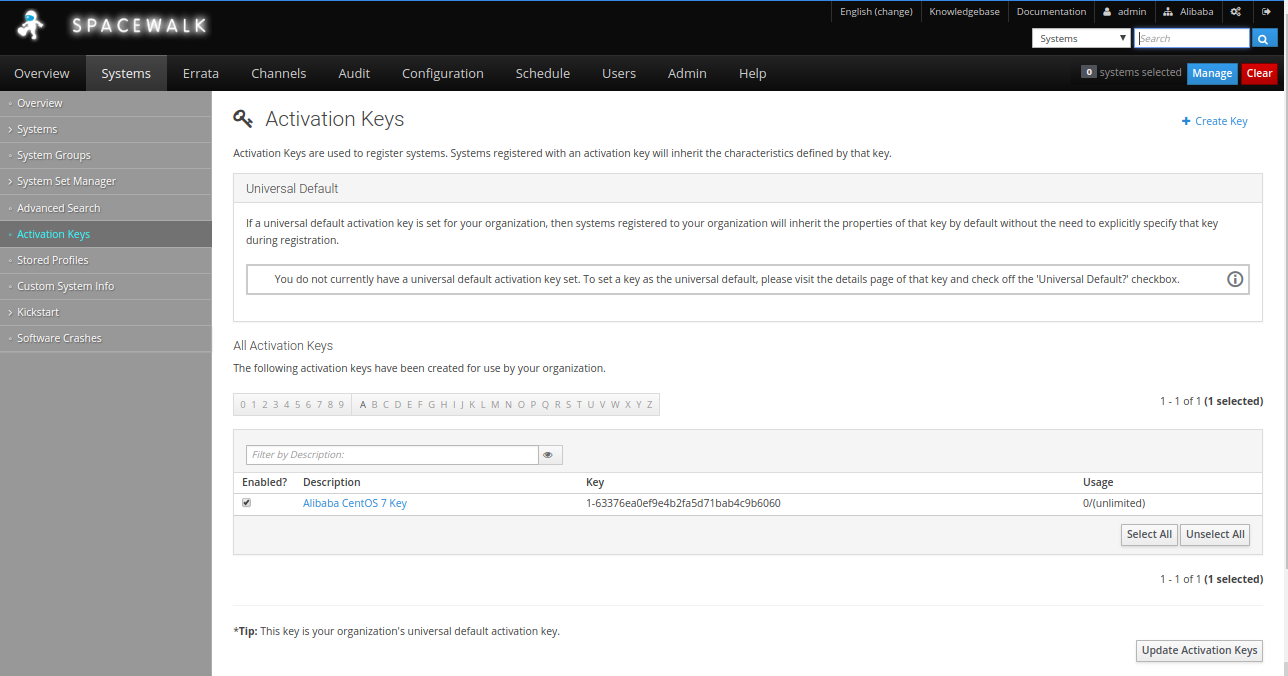
You can now see the newly created key by going to Systems > Activation Keys button as shown below:
Spacewalk server is now installed and configured. By default, Spacewalk Client is not available in the CentOS 7 default repository. So you will need to add Spacewalk repository to your instance. First, log in to Spacewalk Client instance and run the following command to install Spacewalk Client repo:
rpm -Uvh https://copr-be.cloud.fedoraproject.org/results/%40spacewalkproject/spacewalk-2.8-client/epel-7-x86_64/00742644-spacewalk-repo/spacewalk-client-repo-2.8-11.el7.centos.noarch.rpmNext, install Spacewalk Client with the following command:
yum install rhn-client-tools rhn-check rhn-setup rhnsd m2crypto yum-rhn-pluginYou will also need to download the Spacewalk's certificate on Client instance to enable secure communication. To do so, change the directory to /usr/share/rhn
cd /usr/share/rhnNext, download the certificate from Spacewalk server with the following command:
wget https://node1.spacewalk.com/pub/RHN-ORG-TRUSTED-SSL-CERT --no-check-certificateNext, you will need to use activation keys which you have created on Spacewalk Server for registering and configuring client systems with Spacewalk server. On the Spacewalk server dashboard, go to System > Activation Keys. You should see the following page:

Now, copy an activation key, go to the Client instance and run the following command to register it to the Spacewalk server.
rhnreg_ks --serverUrl=https://node1.spacewalk.com/XMLRPC --sslCACert=/usr/share/rhn/RHN-ORG-TRUSTED-SSL-CERT --activationkey=1-63376ea0ef9e4b2fa5d71bab4c9b6060Next, go to Spacewalk dashboard and click on the Systems menu. You should see your Client system that you have just registered with Spacewalk in the following page:
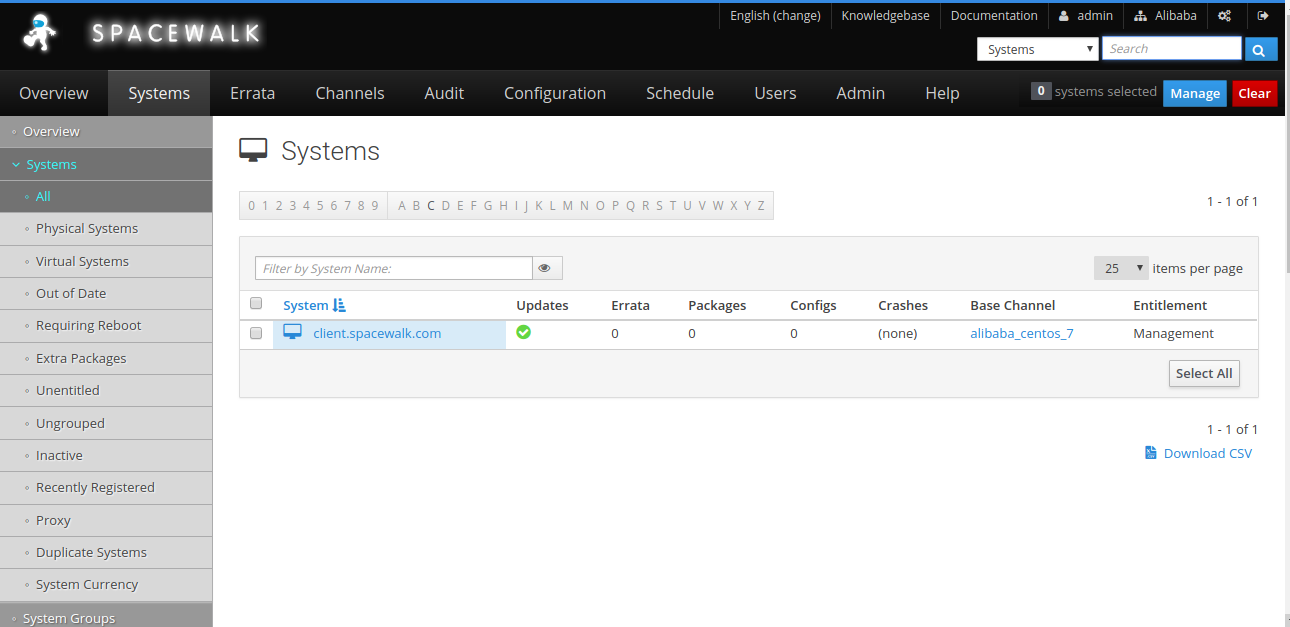
Now, click on the client name, you should see the detailed information about the registered client in the following page:
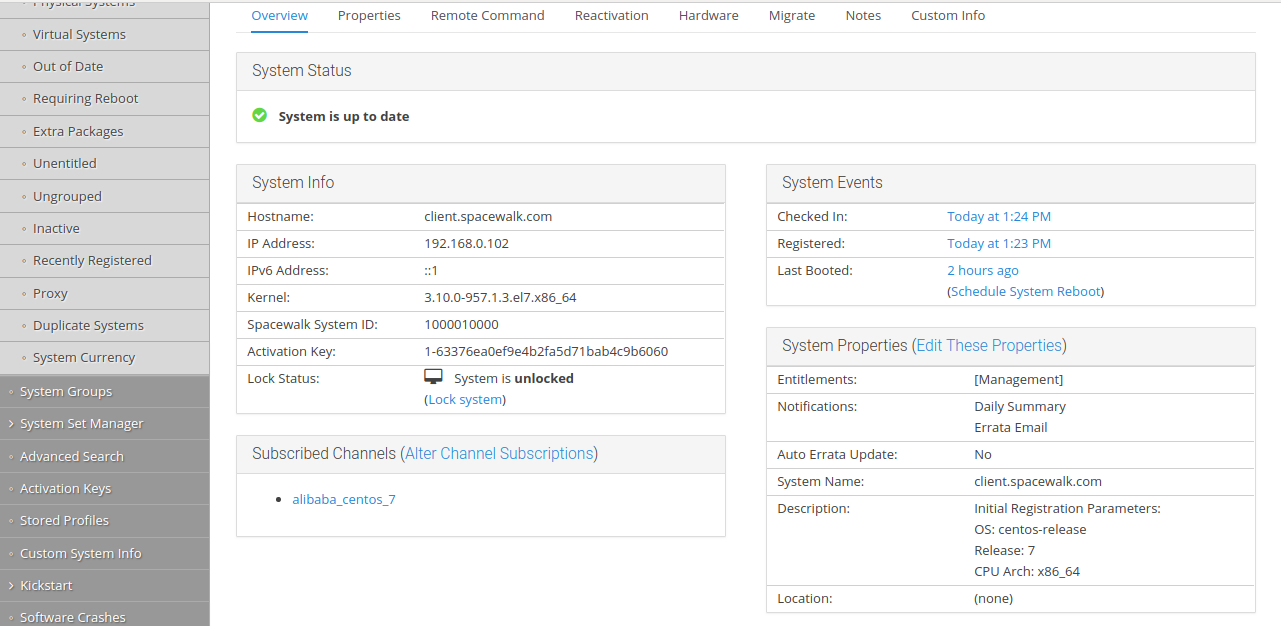
Spacewalk server and client is now installed and configured. It's time to install package from Spacewalk Server. First, remove all the default repositories from Spacewalk client to avoid packages being downloaded from the internet. Then, on the Client instance, run the rm -rf /etc/yum.repos.d/* command to remove all the repositories. Next, install httpd package with the yum install httpd command. You should see that all the packages have been installed from Spacewalk alibaba_centos_7 channel in the following output:
Loaded plugins: fastestmirror, rhnplugin
This system is receiving updates from RHN Classic or Red Hat Satellite.
Loading mirror speeds from cached hostfile
 * base: mirror.nbrc.ac.in
 * extras: mirror.nbrc.ac.in
 * updates: mirror.nbrc.ac.in
base                                                                                                                    | 3.6 kB  00:00:00
extras                                                                                                                  | 3.4 kB  00:00:00
updates                                                                                                                 | 3.4 kB  00:00:00
Resolving Dependencies
--> Running transaction check
---> Package httpd.x86_64 0:2.4.6-88.el7.centos will be installed
--> Processing Dependency: httpd-tools = 2.4.6-88.el7.centos for package: httpd-2.4.6-88.el7.centos.x86_64
--> Processing Dependency: /etc/mime.types for package: httpd-2.4.6-88.el7.centos.x86_64
--> Processing Dependency: libapr-1.so.0()(64bit) for package: httpd-2.4.6-88.el7.centos.x86_64
--> Processing Dependency: libaprutil-1.so.0()(64bit) for package: httpd-2.4.6-88.el7.centos.x86_64
--> Running transaction check
---> Package apr.x86_64 0:1.4.8-3.el7_4.1 will be installed
---> Package apr-util.x86_64 0:1.5.2-6.el7 will be installed
---> Package httpd-tools.x86_64 0:2.4.6-88.el7.centos will be installed
---> Package mailcap.noarch 0:2.1.41-2.el7 will be installed
--> Finished Dependency Resolution

Dependencies Resolved

===============================================================================================================================================
 Package                         Arch                       Version                                 Repository                            Size
===============================================================================================================================================
Installing:
 httpd                           x86_64                     2.4.6-88.el7.centos                     alibaba_centos_7                     2.7 M
Installing for dependencies:
 apr                             x86_64                     1.4.8-3.el7_4.1                         alibaba_centos_7                     103 k
 apr-util                        x86_64                     1.5.2-6.el7                             alibaba_centos_7                      92 k
 httpd-tools                     x86_64                     2.4.6-88.el7.centos                     alibaba_centos_7                      90 k
 mailcap                         noarch                     2.1.41-2.el7                            alibaba_centos_7                      31 k

Transaction Summary
===============================================================================================================================================
Install  1 Package (+4 Dependent packages)

Total download size: 3.0 M
Installed size: 10 M
Is this ok [y/d/N]: y

Downloading packages:
(1/5): apr-1.4.8-3.el7_4.1.x86_64.rpm                                                                                   | 103 kB  00:00:00
(2/5): apr-util-1.5.2-6.el7.x86_64.rpm                                                                                  |  92 kB  00:00:00
(3/5): httpd-2.4.6-88.el7.centos.x86_64.rpm                                                                             | 2.7 MB  00:00:00
(4/5): httpd-tools-2.4.6-88.el7.centos.x86_64.rpm                                                                       |  90 kB  00:00:00
(5/5): mailcap-2.1.41-2.el7.noarch.rpm                                                                                  |  31 kB  00:00:00
-----------------------------------------------------------------------------------------------------------------------------------------------
Total                                                                                                          385 kB/s | 3.0 MB  00:00:08
Running transaction check
Running transaction test
Transaction test succeeded
Running transaction
  Installing : apr-1.4.8-3.el7_4.1.x86_64                                                                                                  1/5
  Installing : apr-util-1.5.2-6.el7.x86_64                                                                                                 2/5
  Installing : httpd-tools-2.4.6-88.el7.centos.x86_64                                                                                      3/5
  Installing : mailcap-2.1.41-2.el7.noarch                                                                                                 4/5
  Installing : httpd-2.4.6-88.el7.centos.x86_64                                                                                            5/5
  Verifying  : httpd-tools-2.4.6-88.el7.centos.x86_64                                                                                      1/5
  Verifying  : apr-util-1.5.2-6.el7.x86_64                                                                                                 2/5
  Verifying  : mailcap-2.1.41-2.el7.noarch                                                                                                 3/5
  Verifying  : httpd-2.4.6-88.el7.centos.x86_64                                                                                            4/5
  Verifying  : apr-1.4.8-3.el7_4.1.x86_64                                                                                                  5/5

Installed:
  httpd.x86_64 0:2.4.6-88.el7.centos

Dependency Installed:
  apr.x86_64 0:1.4.8-3.el7_4.1    apr-util.x86_64 0:1.5.2-6.el7    httpd-tools.x86_64 0:2.4.6-88.el7.centos    mailcap.noarch 0:2.1.41-2.el7

Complete!
You can also list your default repository with the following command:
yum repolist allYou should see the following output:
Loaded plugins: fastestmirror, rhnplugin
This system is receiving updates from RHN Classic or Red Hat Satellite.
Loading mirror speeds from cached hostfile
repo id                                                         repo name                                                       status
alibaba_centos_7                                                alibaba_centos_7                                                enabled: 10,007
repolist: 10,007
You've now successfully installed Spacewalk server and registered client system with Spacewalk server. You can now easily update and install other packages from Spacewalk server.
How to Create a Virtual Host on Apache Server for Phabricator

2,593 posts | 792 followers
FollowAlibaba Clouder - November 27, 2018
Alibaba Clouder - February 14, 2020
Alibaba Cloud Community - December 4, 2023
Sajid Qureshi - August 8, 2018
Alibaba Clouder - December 4, 2018
Alibaba Clouder - August 2, 2018

2,593 posts | 792 followers
Follow ECS(Elastic Compute Service)
Elastic and secure virtual cloud servers to cater all your cloud hosting needs.
Learn More Marketplace
Marketplace is an online market for users to search and quickly use the software as image for Alibaba Cloud products.
Learn MoreLearn More
More Posts by Alibaba Clouder