By Arslan Ud Din Shafiq, Alibaba Cloud Tech Share Author. Tech Share is Alibaba Cloud's incentive program to encourage the sharing of technical knowledge and best practices within the cloud community.
Diaspora is an open source, distributed, user owned and non-profit social network based upon Diaspora software. Diaspora is a project of The Diaspora Foundation which was written in Ruby, under the AGPLv3 and MIT License.
In this tutorial, we will be installing and setting up a Diaspora pod using Alibaba Cloud Elastic Compute Service (ECS) with Ubuntu 16.04 installed.
Before proceeding with installation of any kind of package, use the following command to update your Ubuntu system. To execute this command, remember to login from non-root user with sudo privileges.
# sudo apt update && sudo apt upgradeTo install build-essential execute the command.
# sudo apt-get install build-essentialTo install libssl-dev execute the command.
# sudo apt-get install libssl-devTo install libcurl4-openssl-dev execute the command.
# sudo apt-get install libcurl4-openssl-devTo install libxml2-dev execute the command.
# sudo apt-get install libxml2-devTo install libxslt-dev execute the command.
# sudo apt-get install libxslt-devTo install imagemagick execute the command.
# sudo apt-get install imagemagickTo install ghostscript execute the command.
# sudo apt-get install ghostscriptTo install curl execute the command.
# sudo apt-get install curlTo install libmagickwand-dev execute the command.
# sudo apt-get install libmagickwand-devYou will need to install Git on your server as well as local machine. To install and configure Git, follow the steps below.
# sudo apt-get install git(Optional) Now execute the commands below to configure Git by providing your name and valid email address so that commit messages may contain your correct information.
# git config --global user.name "Aareez"
# git config --global user.email "xyz@example.com"
To install libpq-dev execute the command.
# sudo apt-get install libpq-devTo install autoconf execute the command.
# sudo apt-get install autoconfTo install bison execute the command.
# sudo apt-get install bisonTo install libyaml-dev execute the command.
# sudo apt-get install libyaml-devTo install libreadline6-dev execute the command.
# sudo apt-get install libreadline6-devTo install zlib1g-dev execute the command.
# sudo apt-get install zlib1g-devTo install libncurses5-dev execute the command.
# sudo apt-get install libncurses5-devTo install libffi-dev execute the command.
# sudo apt-get install libffi-devTo install libgdbm3 execute the command.
# sudo apt-get install libgdbm3To install libreadline-dev execute the command.
# sudo apt-get install libreadline-devTo install libgdbm-dev execute the command.
# sudo apt-get install libgdbm-devTo install redis-server execute the command.
# sudo apt-get install redis-serverTo install patch execute the command.
# sudo apt-get install patchTo install ruby-dev execute the command.
# sudo apt-get install ruby-devTo install liblzma-dev execute the command.
# sudo apt-get install liblzma-devNode.js is a cross platform open source JS runtime environment that runs JS code outside the browser. A version of Node.js is available in Ubuntu's default repository. To install Node.js follow the steps below.
# sudo apt-get install nodejsType Y and hit Enter when you see the prompt. Nodejs should be installed successfully.
Diaspora supports PostgreSQL, MySQL and MariaDB. In this tutorial, I will use PostgreSQL.
In the first step, install PostgreSQL repo.
# sudo sh -c 'echo "deb http://apt.postgresql.org/pub/repos/apt/ `lsb_release -cs`-pgdg main" >> /etc/apt/sources.list.d/pgdg.list'
# wget -q https://www.postgresql.org/media/keys/ACCC4CF8.asc -O - | sudo apt-key add -
Now install the PostgreSQL server by executing the command below.
# sudo apt-get -y install postgresql postgresql-contribExecute the following command to start and enable PostgreSQL server so that it can start automatically after reboot.
# sudo systemctl start postgresql
# sudo systemctl enable postgresql
Now connect to PostgreSQL server using postgres username.
# sudo -u postgres psqlCreate a user and database for Diaspora.
CREATE USER dias WITH CREATEDB PASSWORD '654321Ab';To send emails to use, you will need Exim4 as STMP relay. To install Exim4, execute the command below.
# sudo apt-get install exim4To configure Exim4, execute the command below.
# sudo dpkg-reconfigure exim4-configTo install Ruby, you will use rbenv to manage environment and versions. Execute the following commands to download rbenv and set paths.
# git clone https://github.com/rbenv/rbenv.git ~/.rbenv
# cd ~/.rbenv && src/configure && make -C src
# echo 'export PATH="$HOME/.rbenv/bin:$PATH"' >> ~/.bash_profile
# echo 'eval "$(rbenv init -)"' >> ~/.bash_profile
Now install ruby-build plugin to compile Ruby.
# git clone https://github.com/rbenv/ruby-build.git ~/.rbenv/plugins/ruby-buildNow install rbenv using the command.
# sudo apt install rbenvNow install Ruby by executing command below.
# rbenv install 2.4.3
# rbenv global 2.4.3To install and configure Diaspora, follow the steps below.
Navigate to home directory
# cd ~Clone source code for Diaspora.
# git clone -b master https://github.com/diaspora/diaspora.gitNavigate to /diaspora
# cd diasporaCopy the example database configuration file to location required by Diaspora.
# cp config/database.yml.example config/database.yml
# cp config/diaspora.yml.example config/diaspora.yml
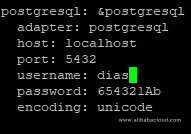
Now open the database configuration file in text editor and configure database.
# sudo nano config/database.yml
Now configure Diaspora file.
# sudo nano config/diaspora.ymlTo make it work properly, make the following changes in opened file.
Edit .ruby-version file and change value from 2.4 to 2.4.3.
# sudo nano .ruby-versionNow install bundle by executing command below.
# sudo gem install bundler
# sudo script/configure_bundler
# sudo bin/bundle install --full-indexNow create and configure database by executing command below.
# RAILS_ENV=production bin/rake db:create db:migrateTo precompile the assets, execute the command below.
# RAILS_ENV=production bin/rake assets:precompileWe will manage Diaspora via service. First of all, create the following files: target file, web service file, and sidekiq service file.
# sudo touch /etc/systemd/system/diaspora.target
# sudo touch /etc/systemd/system/diaspora-web.service
# sudo touch /etc/systemd/system/diaspora-sidekiq.service
Now add the following text to target file.
# sudo nano /etc/systemd/system/diaspora.target

[Unit]
Description=Diaspora social network
Wants=postgresql.service
Wants=redis-server.service
After=redis-server.service
After=postgresql.service

[Install]
WantedBy=multi-user.target
Now add the following text to web service file.
# sudo nano /etc/systemd/system/diaspora-web.service

[Unit]
Description=Diaspora social network (unicorn)
PartOf=diaspora.target
StopWhenUnneeded=true

[Service]
User=diaspora
Environment=RAILS_ENV=production
WorkingDirectory=/home/aareez/diaspora
ExecStart=/bin/bash -lc "bin/bundle exec unicorn -c config/unicorn.rb -E production"
Restart=always

[Install]
WantedBy=diaspora.target
Now add the following text to sidekiq service file.
# sudo nano /etc/systemd/system/diaspora-sidekiq.service

[Unit]
Description=Diaspora social network (sidekiq)
PartOf=diaspora.target
StopWhenUnneeded=true

[Service]
User=diaspora
Environment=RAILS_ENV=production
WorkingDirectory=/home/aareez/diaspora
ExecStart=/bin/bash -lc "bin/bundle exec sidekiq"
Restart=always

[Install]
WantedBy=diaspora.target
Now enable to services so that on reboot, they can restart automatically.
# sudo systemctl enable diaspora.target diaspora-sidekiq.service diaspora-web.serviceRestart the services by using command below.
# sudo systemctl restart diaspora.target
# sudo systemctl restart diaspora-sidekiq.service
# sudo systemctl restart diaspora-web.serviceBy default, openssl v1.0.2 is installed. But in your Nginx configuration file, you will use ssl_ecdh_curve which requires openssl 1.1.0f or higher, otherwise you will get syntax error. To install openssl, execute the following set of commands.
# cd ~
# wget https://www.openssl.org/source/openssl-1.1.0f.tar.gz
# tar -xf openssl-1.1.0f.tar.gz
# cd openssl-1.1.0f
# ./config -Wl,--enable-new-dtags,-rpath,'$(LIBRPATH)'
# sudo make
# sudo make install
# openssl versionYou will be required to install apache server, for this purpose, you will need to follow the steps below.
To install execute the command.
# sudo apt-get install apache2Now you will need to start apache server by executing command below.
# sudo systemctl start apache2To check status of apache server, execute the command below.
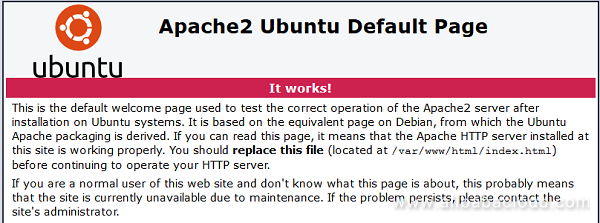
# sudo systemctl status apache2To check installation, access IP address of your Alibaba Cloud ECS or your domain name that you have pointed to your IP address. In my case, I have accessed via domain name and the following screen loaded.

Certbot will require port 80 for obtaining new certificate. Hence, in the first step, you will need to stop apache server because apache uses port 80. To do so, execute the command.
# sudo systemctl stop apache2To install certbot, update the system using command.
# sudo apt-get updateNow install software-properties-common.
# sudo apt-get install software-properties-commonAdd certbot repository.
# sudo add-apt-repository ppa:certbot/certbotAgain, update the system.
# sudo apt-get updateNow install python-certbot-apache
# sudo apt-get install python-certbot-apacheNow execute the following command for issuance of SSL certificate.
# sudo certbot certonly --standalone --register-unsafely-without-email -d softpedia.xyzGenerate dhparam.pem file.
# openssl dhparam -out /home/aareez/.acme.sh/softpedia.xyz_ecc/dhparam.pem 2048Create nginx configuration file by executing the command below.
# sudo nano /etc/apache2/sites-available/diaspora.confAdd the following text in opened file and save the file.
<VirtualHost *:80>
  ServerName softpedia.xyz
  ServerAlias www.softpedia.xyz

  RedirectPermanent / https://softpedia.xyz/
</VirtualHost>
<VirtualHost *:443>
 ServerName softpedia.xyz
 ServerAlias www.softpedia.xyz

 DocumentRoot /home/aareez/diaspora/public

 RewriteEngine On

 RewriteCond %{HTTP_HOST} !^softpedia\.xyz [NC]
 RewriteRule ^/(.*)$ https://softpedia\.xyz/$1 [L,R,QSA]


 RewriteCond %{DOCUMENT_ROOT}/%{REQUEST_FILENAME} !-f
 RewriteRule ^/(.*)$ balancer://upstream%{REQUEST_URI} [P,QSA,L]

 <Proxy balancer://upstream>
  BalancerMember unix://home/aareez/diaspora/tmp/diaspora.sock|http://
 </Proxy>


 ProxyRequests Off
 ProxyVia On
 ProxyPreserveHost On
 RequestHeader set X_FORWARDED_PROTO https

 <Proxy *>
  Require all granted
 </Proxy>

 <Directory /home/aareez/diaspora/public>
  Options -MultiViews
  Require all granted
 </Directory>

 SSLEngine On
 SSLCertificateFile /etc/letsencrypt/live/softpedia.xyz/fullchain.pem
 SSLCertificateKeyFile /etc/letsencrypt/live/softpedia.xyz/privkey.pem
 SSLCertificateChainFile /etc/letsencrypt/live/softpedia.xyz/chain.pem


 # Based on https://wiki.mozilla.org/Security/Server_Side_TLS - consider as global configuration
 SSLProtocol             all -SSLv2 -SSLv3
 SSLCipherSuite          ECDHE-RSA-AES128-GCM-SHA256:ECDHE-ECDSA-AES128-GCM-SHA256:ECDHE-RSA-AES256-GCM-SHA384:ECDHE-ECDSA-AES256-GCM-SHA384:DHE-RSA-AES128-GCM-SHA256:DHE-DSS-AES128-GCM-SHA256:kEDH+AESGCM:ECDHE-RSA-AES128-SHA256:ECDHE-ECDSA-AES128-SHA256:ECDHE-RSA-AES128-SHA:ECDHE-ECDSA-AES128-SHA:ECDHE-RSA-AES256-SHA384:ECDHE-ECDSA-AES256-SHA384:ECDHE-RSA-AES256-SHA:ECDHE-ECDSA-AES256-SHA:DHE-RSA-AES128-SHA256:DHE-RSA-AES128-SHA:DHE-DSS-AES128-SHA256:DHE-RSA-AES256-SHA256:DHE-DSS-AES256-SHA:DHE-RSA-AES256-SHA:AES128-GCM-SHA256:AES256-GCM-SHA384:AES128:AES256:AES:!aNULL:!eNULL:!EXPORT:!DES:!RC4:!MD5:!PSK
 SSLHonorCipherOrder on
 SSLCompression off
</VirtualHost>
Now enable rewrite mode by executing command.
# sudo a2enmod rewriteNow enable proxy mode by executing command.
# a2enmod proxy_httpNow enable headers by executing command.
# sudo a2enmod headersNow enable SSL engine by using command.
# sudo a2enmod sslNow enable lbmethod_byrequests by using command.
# sudo a2enmod lbmethod_byrequestsNow enable slotmem_shm by using command.
# sudo a2enmod slotmem_shmNow restart your apache to reload the updated settings.
# sudo systemctl restart apache2To start Diaspora, follow the steps below.
Navigate to diaspora directory.
# cd /home/aareez/diasporaNote: Remember to replace aareez with your username.
Start the server by executing command.
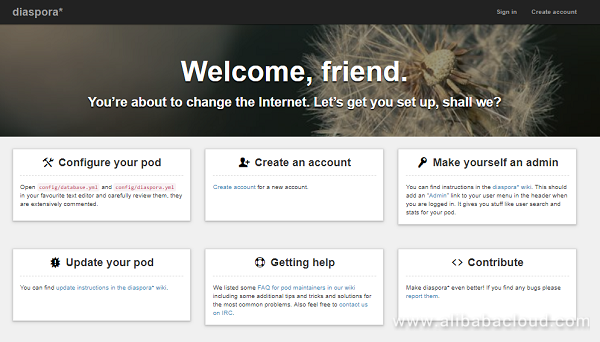
# sudo ./script/serverThat's it! You can now access Diaspora via domain name or ECS IP address.


2,593 posts | 792 followers
FollowRupal_Click2Cloud - October 9, 2023
Alibaba Clouder - February 14, 2020
Sajid Qureshi - August 8, 2018
Alibaba Clouder - December 4, 2018
Alibaba Clouder - December 3, 2019
Hiteshjethva - March 2, 2020

2,593 posts | 792 followers
Follow ECS(Elastic Compute Service)
Elastic and secure virtual cloud servers to cater all your cloud hosting needs.
Learn More OSS(Object Storage Service)
An encrypted and secure cloud storage service which stores, processes and accesses massive amounts of data from anywhere in the world
Learn MoreLearn More
More Posts by Alibaba Clouder