By Yong Yang
Alibaba Cloud Key Management Service (KMS) can be used to sign files or certificate files and verify their signatures. This helps effectively prevent attackers from tampering with sensitive files and important files during transmission. Additionally, it can be used to verify the validity of certificates during certificate-based mutual authentication, ensuring the security of the transmission.
• Encryption: The sender uses the receiver's public key to encrypt the plaintext to be sent.
• Decryption: The receiver uses its private key to decrypt the ciphertext.
• Signing: The sender writes its own signature for the file to be sent. The private key of the sender must be used.
• Signature verification: To verify the signature, the receiver needs to confirm whether the received ciphertext file is actually sent by the sender and whether it is tampered with along the way. The signature is finally verified based on the comparison of message digests.
Signature generation and verification process:
Digital signatures are widely used to defend against data tampering and authenticate identities.
• You can use digital signatures to protect the integrity of your binary code and verify that the code has not been tampered with. This helps provide a trusted execution environment.
• Digital signatures can also be used in digital certificate systems. In such a system, a certificate authority (CA) provides a signature for a digital certificate to certify the entity information, public and private key information, key purpose, expiration date, and issuer. The private key holder of a certificate uses the private key to sign a message. The message receiver uses the public key contained in the certificate to verify the message signature and uses the public key of the certificate issuer to verify the certificate.
Background: To avoid the disclosure of an SSL private key, you must use KMS to sign the SSL private key and verify the signature.
Test environment:
• You need to build an environment that implements PCA-based mutual authentication. To do so, you need to configure PCA-based mutual authentication on the Nginx server.
Click the three dots on the right of the root CA and click Details.

Scroll to the bottom to view the content of the root certificate and save it as a file named ca.crt, which will be used by the client and server later.
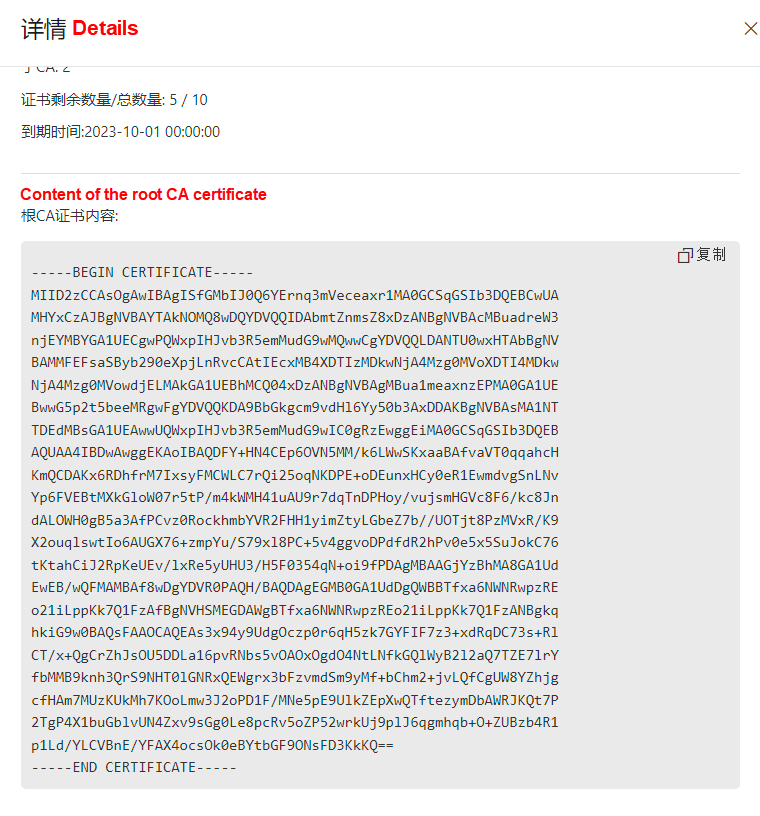
The new version of PCA allows you to directly export the server certificate in the PEM format without decryption. The server certificate file server.pem can be used in combination with the intermediate CA, while the private key file server.key can be directly used.
Go to the certificate list page of the intermediate CA.

You'll see the created server certificate. Click Details.

Select View Private Key Content, enter the password, and then click Export to view the certificate content.
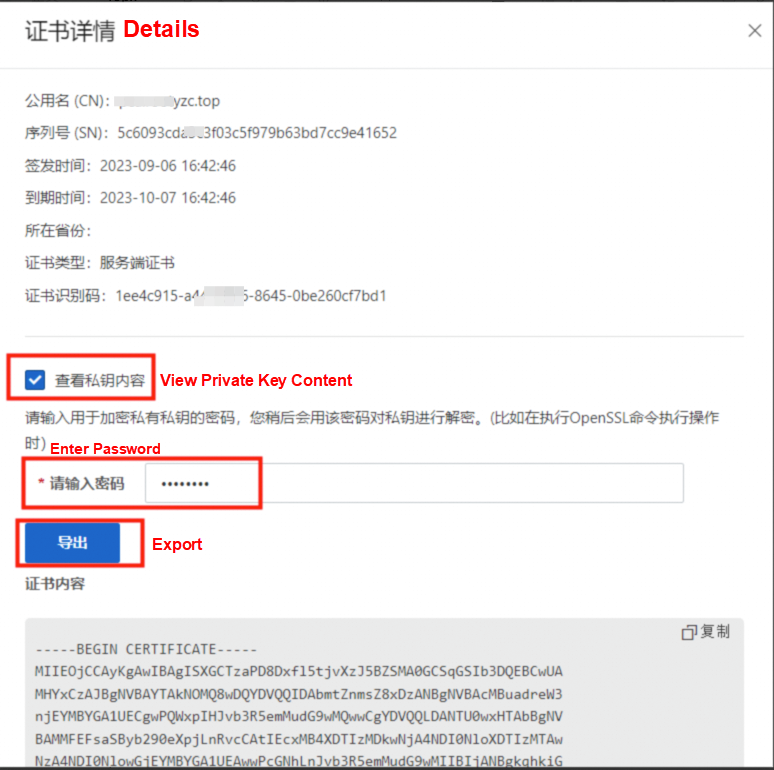
The certificate content and complete certificate chain are saved as server.pem.
The private key content is saved as enc_server.key.
Decrypt the file with the openssl command in the server:
openssl rsa -in enc_server.pem -out server.keyEnter the password used for export to obtain the decrypted private key file server.key.

You can export the client certificate in the PEM format in the same way as the server certificate. The client certificate file client.pem can be used in combination with the intermediate CA, while the private key file client.key can be directly used. If you want to import the client.pem and client.key files into a Windows environment, convert them to the PFX format. For testing purposes on Windows 10, you do not need to set a password during the conversion.
You can convert the client.pem and client.key files into a .pfx file by using the format conversion tool in the SSL console. Leave the original password empty and enter the new password for testing on Windows.
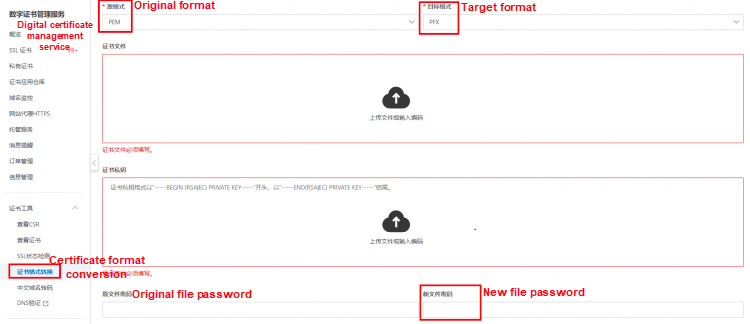
Finally, you'll get the client certificate file client.pfx.

Add configurations related to mutual authentication (line 8 to line 11 in the following code) to Nginx. Save the configurations and restart Nginx.
server {
        listen       443 ssl http2;
        listen       [::]:443 ssl http2;
        server_name  XX.rootyzc.top; # Domain name
        root         /usr/share/nginx/html;
        ssl_certificate "/etc/nginx/ssl/pca/server.pem"; # The public key certificate of the server
        ssl_certificate_key "/etc/nginx/ssl/pca/server.key"; # The private key of the server
        ssl_client_certificate "/etc/nginx/ssl/pca/ca.crt"; # The CA root certificate
        ssl_verify_client on;   # Enable mutual authentication
        ssl_session_cache shared:SSL:1m;
        ssl_session_timeout  10m;
        ssl_protocols TLSv1 TLSv1.1 TLSv1.2;
        ssl_ciphers ECDHE-RSA-AES128-GCM-SHA256:ECDHE:ECDH:AES:HIGH:!NULL:!aNULL:!MD5:!ADH:!RC4:!DH:!DHE;
        ssl_prefer_server_ciphers on;
    }
When the client accesses the server, the prompt in the figure below is displayed.

The root certificate and client certificate are ready on the client.

Open a browser, such as Chrome, and click the three dots in the upper right corner. Choose Settings > Privacy and security > Security > Manage certificates.
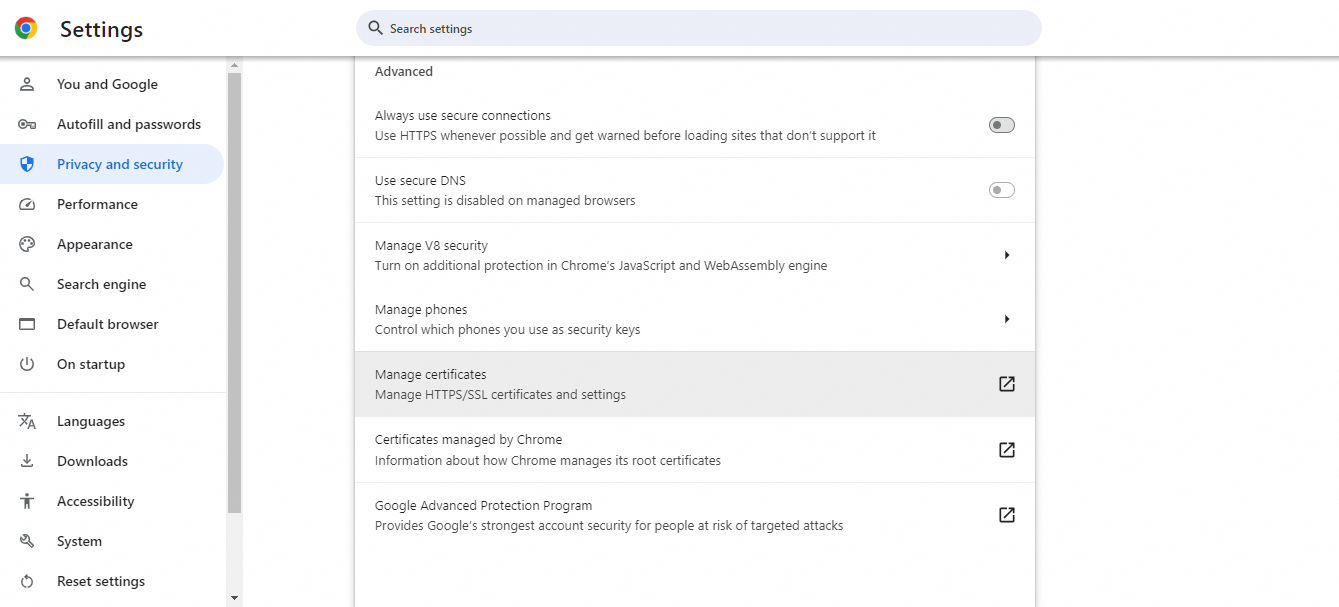
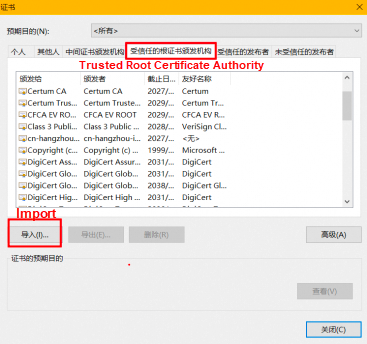
Click Trusted Root Certification Authorities and then Import. Select the root certificate file ca.crt to import it.
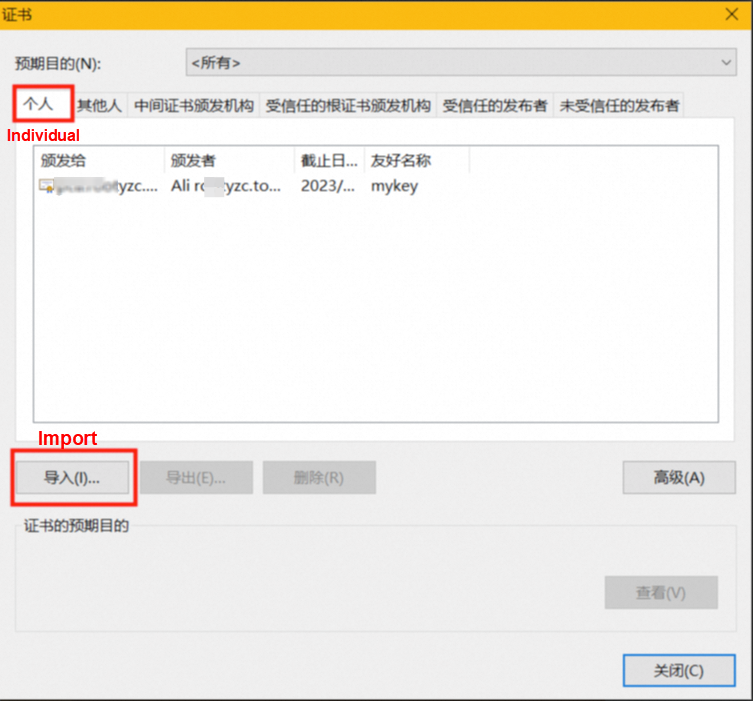
Click Personal and then Import. Select the client certificate file client.pfx and enter the new password to import it.
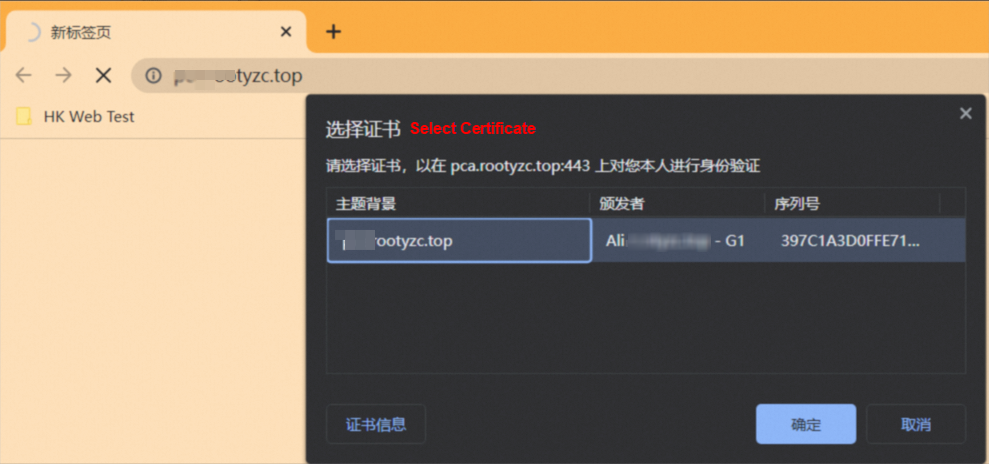
Access the domain name in the browser, select the certificate, and click OK.
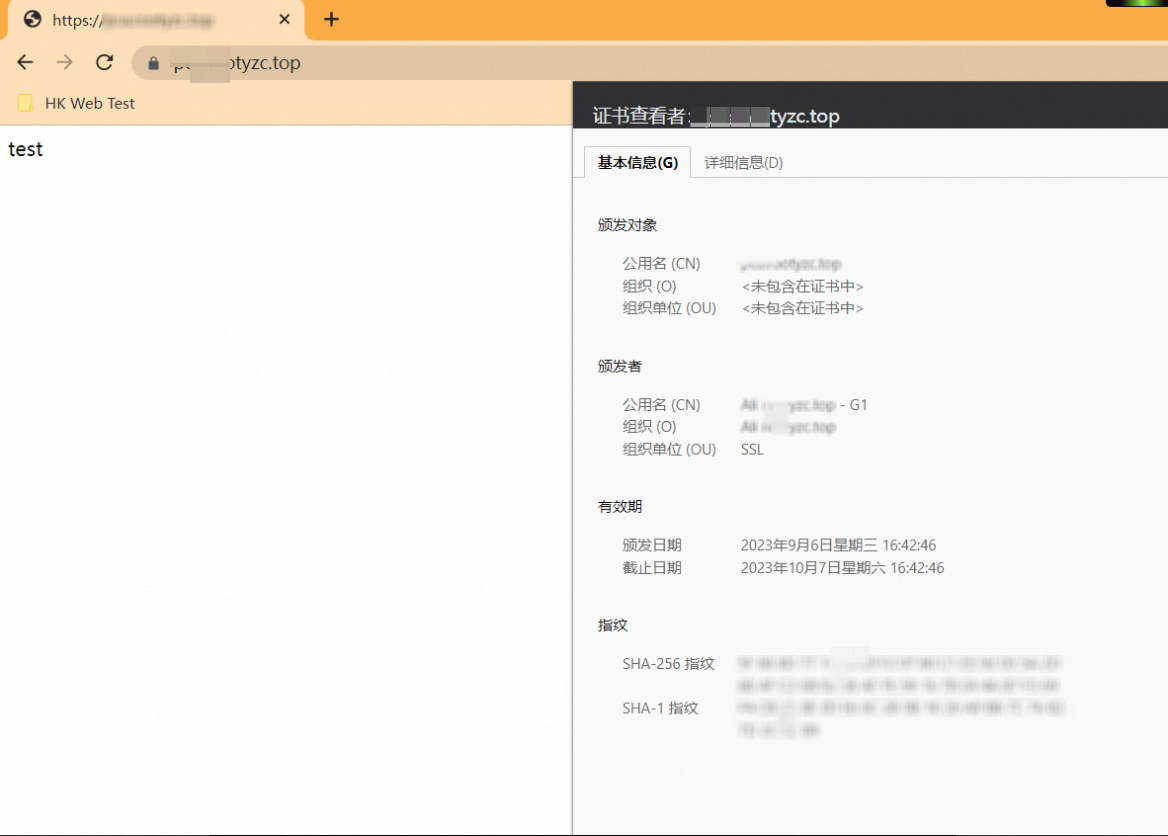
This step indicates that mutual authentication is successful.
You can also use the curl command in the server to verify that mutual authentication is successful.
curl --cacert ca.crt --cert ./client.pem --key ./client.key https://pca.roo
tyzc.top -k -v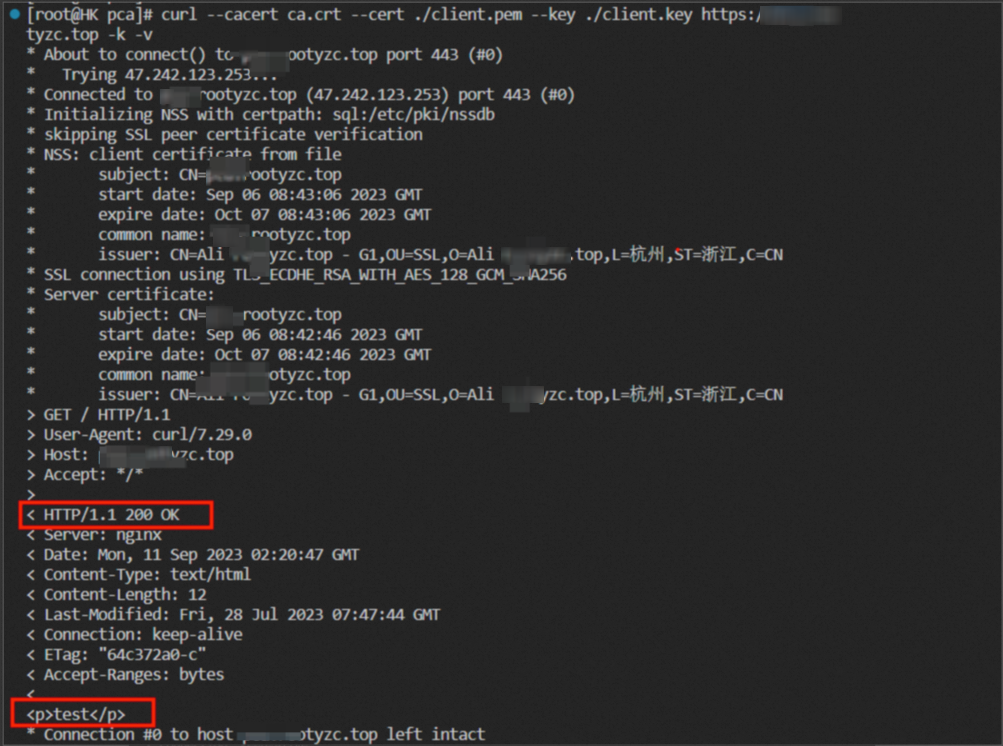
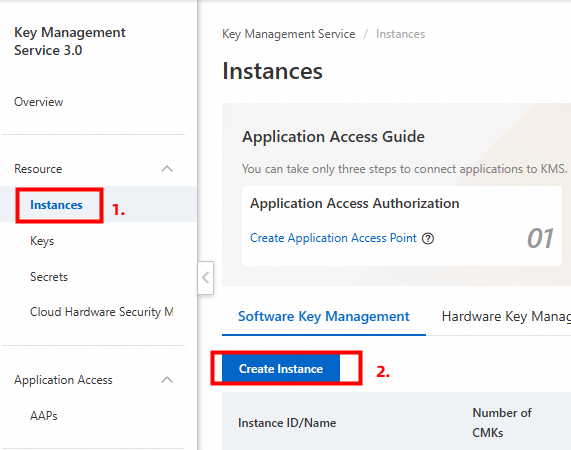
• In the left-side navigation pane, click Instances. On the page that appears, click the Software Key Management tab, and then click Create Instance.
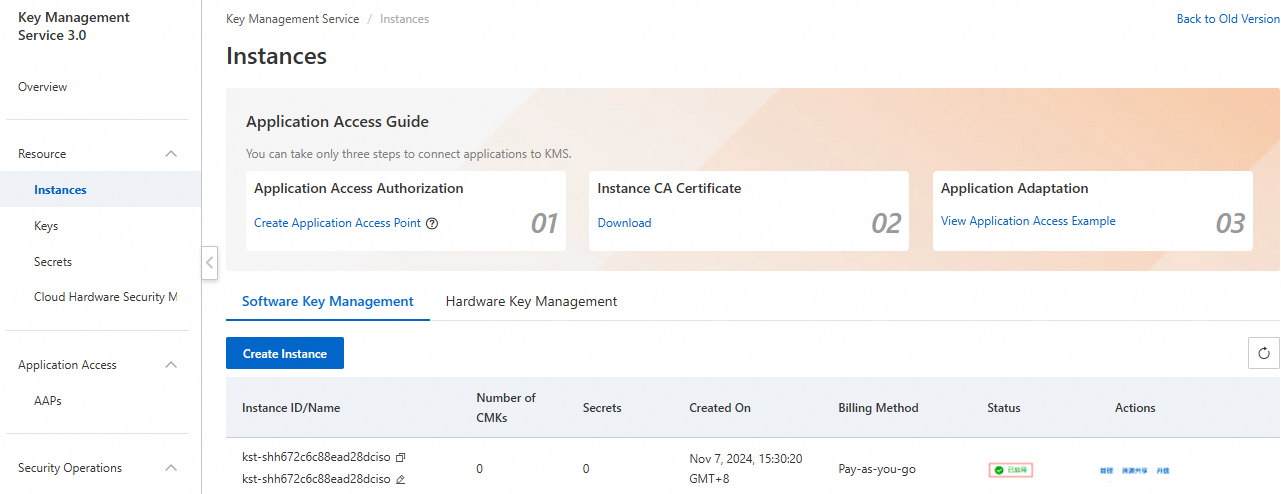
• Purchase an instance as needed and enable it. After the instance is enabled, it will appear in the instance list, as shown in the figure below.
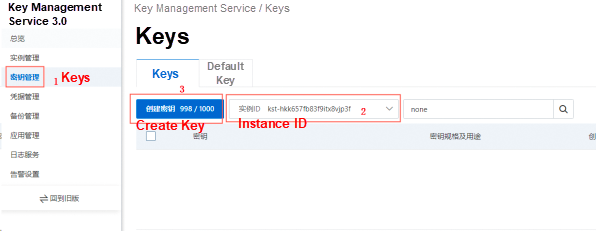
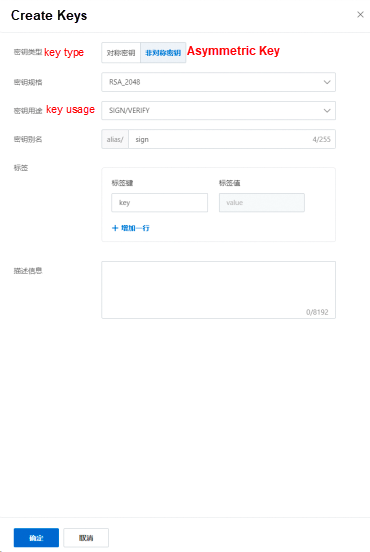
• In the left-side navigation pane, click Keys. On the page that appears, select the ID of the KMS encryption instance that you created and click Create Key.
• Select the key type Asymmetric Key and the key usage SIGN/VERIFY, set other parameters as needed, and then click OK.
• After the key is created, it appears in the key list, as shown in the figure below.

• Click Create Application Access Point in the first step Application Access Authorization.
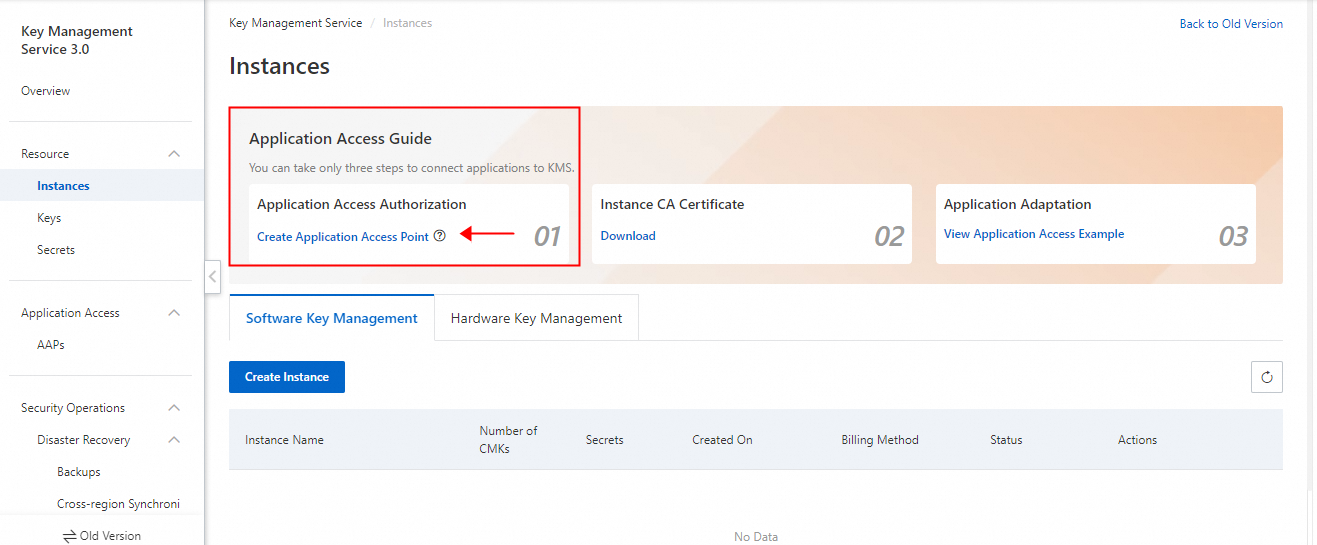
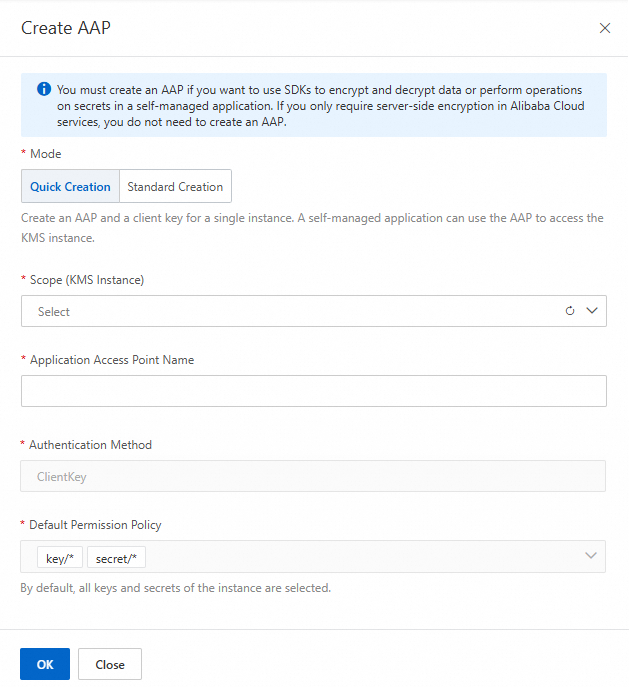
• Select the KMS encryption instance you created, enter the name of the access point, and then click OK.
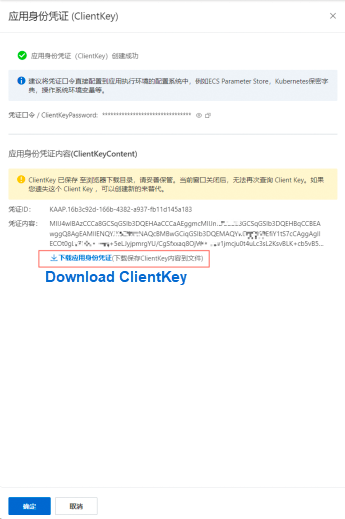
• After the access point is created, the client key files will be downloaded automatically. If they are not, click the button in the box to manually download the files, which are packaged in a ZIP file and will be used later.
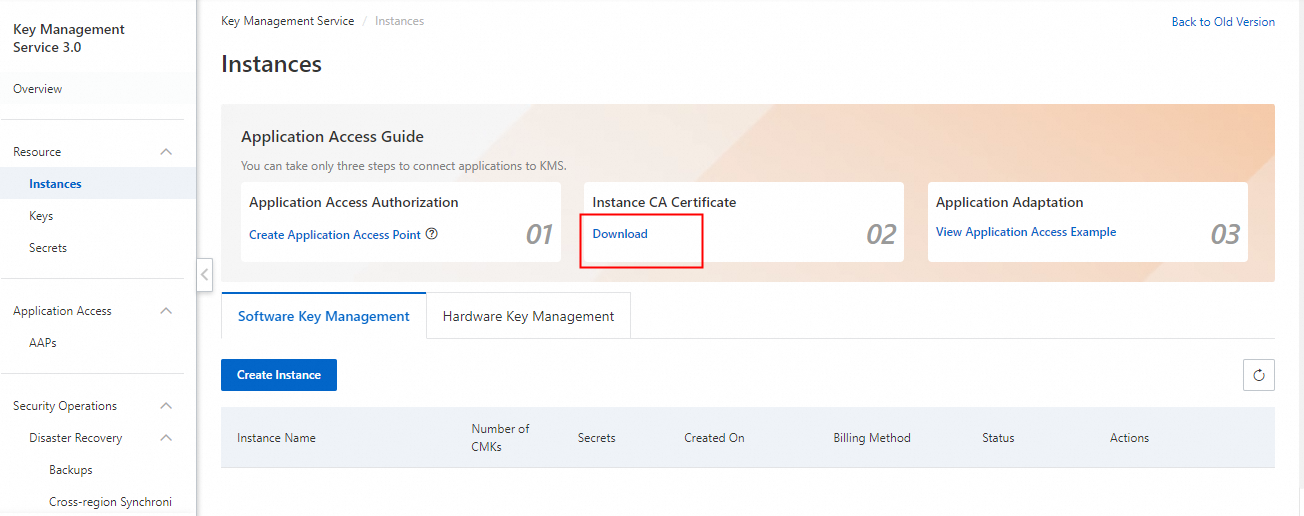
• Click Download in the second step Instance CA Certificate to download the CA certificate of the KMS encryption instance.
• You can find the reference document KMS Instance SDK at https://www.alibabacloud.com/help/en/kms/developer-reference/kms-instance-sdk/
• Here, we use the KMS instance SDK for Python to demonstrate the test process. For the access point name, see the reference document or test cases.

clientKey_KAAP.json: The client key file, which was downloaded after the application access point was created.PrivateKmsCA.pem: The CA certificate of the KMS encryption instance, which was also downloaded before.__init__.py: The Python main program used to test the SDK's interaction with the KMS instance.# -*- coding: utf-8 -*-
from openapi.models import Config
from sdk.client import Client
from openapi_util.models import RuntimeOptions
from sdk.models import SignRequest
from sdk.models import VerifyRequest
import os
import base64
# --------->Initialize the SDK.<---------
config = Config()
# Set the connection protocol to "https". KMS supports connections only over HTTPS.
config.protocol = "https"
# Set the endpoint of your KMS instance in the following format: <ID of your KMS instance>.cryptoservice.kms.aliyuncs.com.
config. endpoint="kst-hkk657fb8XXXXtx8vjp3f.cryptoservice.kms.aliyuncs.com"# Enter the KMS endpoint.
# The client key file.
config.client_key_file = "./clientKey_KAAP.json"
# The password of the client key file.
config. password="5bdbdf01cff8b144b2c8e4acdeXXXXd"# The certificate password, which is masked here.
client = Client(config)
# --------->Set the CA certificate of the KMS instance by configuring runtime options (RuntimeOptions).<---------
runtime_options = RuntimeOptions()
# The CA certificate path.
runtime_options.verify = "./PrivateKmsCA.pem"
# --------->Call the Sign API to use an asymmetric key to generate a digital signature.<---------
request = SignRequest()
# The ID or alias of the key.
request. key_id="key-hkk658125e7clXXXj3lds"# Enter the key ID or alias.
# The data that you want to sign.
# Read the file to be signed.
with open('/etc/nginx/ssl/server.key',encoding='utf-8') as file_obj:
contents = file_obj.read()
file_obj.close()
request.message = bytes(contents,encoding='utf-8')
# The signature algorithm.
request.algorithm = "RSA_PSS_SHA_256"
sign_response = client.sign_with_options(request, runtime_options)
# The signature value.
signature = sign_response.signature
# The request ID.
request_id = sign_response.request_id
# --------->Call the Verify API to use the asymmetric key to verify the digital signature.<---------
request = VerifyRequest()
# The ID or alias of the key.
request. key_id="key-hkk658125e7cXXXvj3lds"# Enter the key ID or alias.
# The data for which you want to verify the signature.
# Read the file whose signature is to be verified.
with open("/etc/nginx/ssl/server.key",encoding='utf-8') as file_obj:
contents = file_obj.read()
file_obj.close()
request.message = bytes(contents,encoding='utf-8')
# The signature algorithm.
request.algorithm = "RSA_PSS_SHA_256"
# The signature value.
request.signature = signature
verify_response = client.verify_with_options(request, runtime_options)
print ("<--Verified signature value-->\n",verify_response)
# The verification result.
value = verify_response.value
print ("<--Verification result-->\n", value)
# The request ID.
request_id = verify_response.request_idParameters are printed, and the verification result is 'Value': True ;.
Disclaimer: The views expressed herein are for reference only and don't necessarily represent the official views of Alibaba Cloud.

1,320 posts | 464 followers
FollowAlibaba Cloud Native Community - June 18, 2024
Alibaba Cloud Community - November 12, 2024
Miles Brown - December 2, 2025
OpenAnolis - June 30, 2022
Alibaba Clouder - May 20, 2019
Alibaba Cloud Community - November 12, 2024

1,320 posts | 464 followers
Follow Cloud Hardware Security Module (HSM)
Industry-standard hardware security modules (HSMs) deployed on Alibaba Cloud.
Learn More Key Management Service
Create, delete and manage encryption keys with Alibaba Cloud Key Management Service
Learn More Managed Security Service
Identify vulnerabilities and improve security management of Alibaba Cloud WAF and Anti-DDoS and with a fully managed security service
Learn More IDaaS
IDaaS
Make identity management a painless experience and eliminate Identity Silos
Learn MoreMore Posts by Alibaba Cloud Community