You can add the unallocated disk size to the existing partition of a data disk. You can also use the unallocated disk size to create a new partition for a data disk. This topic describes how to add the allocated disk size to the existing partition of a data disk.
Background information
If a cloud computer template has a larger data disk size than the custom image based on which the template is created, the initial data disk size of the cloud computer that is created based on the template equals the data disk size of the custom image. In this case, the excess data disk size of the template is not allocated for use. To address this issue, you can scale up the data disk partition.
Sample scenario:
Cloud Computer Template A created based on Custom Image B: The system disk size is 150 GiB and the data disk size is 150 GiB.
Custom Image B: The system disk size is 80 GiB and the data disk size is 70 GiB.
A cloud computer created based on Cloud Computer Template A: The system disk size is 150 GiB and the data disk size is 70 GiB (the excess data disk size is 80 GiB). In this case, you can refer to this topic to scale up the data disk partition to make the excess 80 GiB available for use.
Procedure
Normally, the scale-up operation does not cause data loss. To prevent data loss caused by misoperations, we recommend that you create a snapshot to back up your data disk before you perform the scale-up operation. For information about how to create a snapshot, see Create a snapshot.
Windows cloud computers
Connect to the desired cloud computer. For more information about how to connect to a cloud computer, see Quick start.
In the cloud computer window, right-click the Start menu and click Disk Management.
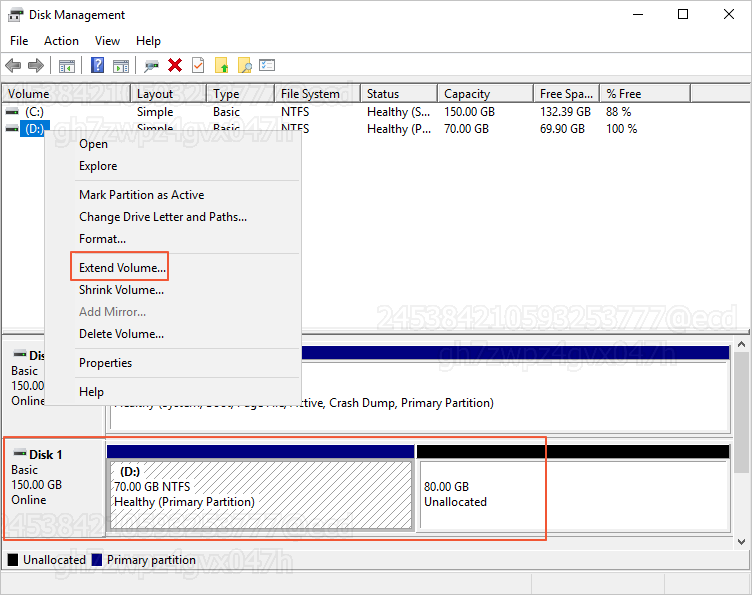
In the Disk Management dialog box, right-click the data disk that you want to scale up and select Extend Volume.
In the following figure, the Disk 1 section in the lower part displays Partition D and the unallocated size. The size of Partition D equals that of the data disk contained in the custom image. The unallocated size is the portion of the data disk size of the template that exceeds the data disk size of the custom image.
Extend the volume as prompted based on the wizard.
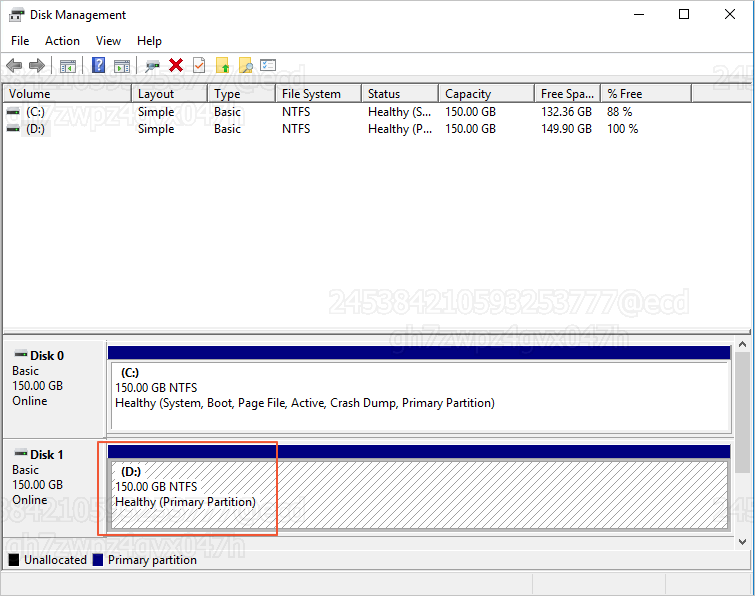
After the operation is complete, the previously unallocated size is automatically added to the volume.
Linux cloud computers
Connect to the desired cloud computer. For more information about how to connect to a cloud computer, see Quick start.
Click Start, search for Terminal, and then open Terminal.
In the command window, run the following command to switch to the root user:
sudo su
View the current status of the disk.
Run the following command to view the disk and partition information:
fdisk -lu
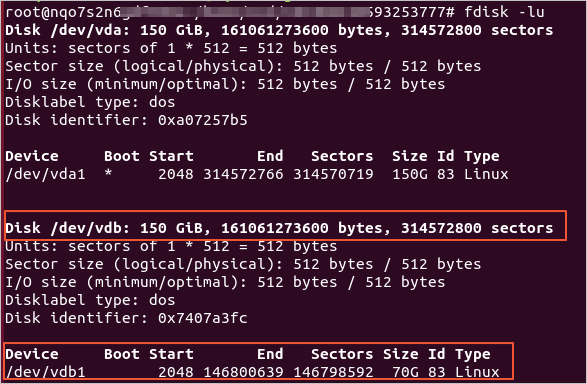
In the following sample output, the data disk is vdb. vdb has a storage size of 150 GiB. Currently, vdb has only one partition named
dev/vdb1
that has a storage size of 70 GiB. TheType
parameter is set toLinux
, which specifies that the partition is of the Master Boot Record (MBR) type.Run the following command to check the file system type of the partition:
df -Th
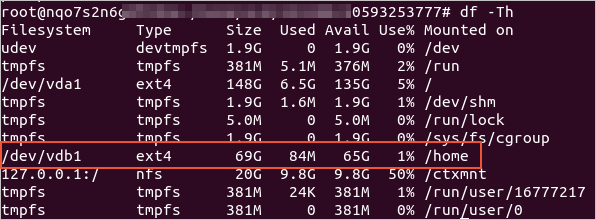
In the following sample output, the file system type of the
/dev/vdb1
partition isext4
.
Scale up the partition.
Run the following command to install growpart:
Run the following command to update the software repository:
apt-get update
Run the following command to install cloud-guest-utils:
apt-get install -y cloud-guest-utils
Run the following command to scale up the partition:
growpart /dev/vdb 1
ImportantYou must add a space between
/dev/vdb
and1
.The following figure shows the command output.
Run the following command to scale up the file system:
resize2fs /dev/vdb1
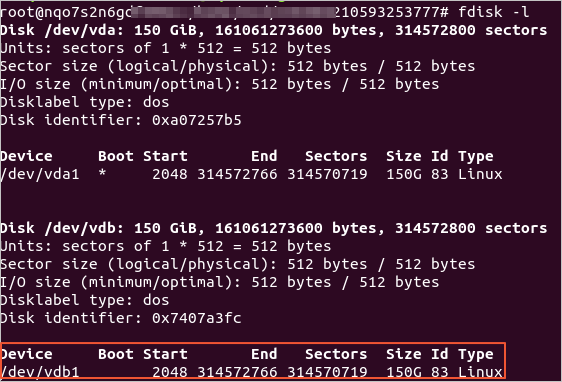
Run the following command to check the scale-up result:
fdisk -l
In the following sample output, the size of the
/dev/vdb1
partition is increased to 150 GiB.