IPsec-VPN is a route-based technology that enables secure communication over the Internet. After an IPsec-VPN connection is established, on-premises clients can connect to services that are deployed in virtual private clouds (VPCs) over virtual private networks (VPNs). This topic describes how to use IPsec-VPN to connect an on-premises client to the VPC of an office network in Elastic Desktop Service (EDS) Enterprise.
Preparations
Before you begin, carefully review the Access cloud computers over VPCs topic and complete the following preparations:
Create a Cloud Enterprise Network (CEN) instance. For more information, see Create a CEN instance.
Create a VPC and attach the VPC to the CEN instance. For more information, see Create a VPC and a vSwitch or Attach a network instance to a CEN instance.
Create an office network and attach its VPC to the CEN instance. For more information, see Create and manage convenience office networks and Create and manage an enterprise AD office network.
ImportantBefore you create an office network, you must plan the IPv4 CIDR block of the office network to prevent CIDR block conflicts between the office network and the CEN instance or between the office network and your data center. For more information, see Plan a CIDR block.
If you already created a office network, attach the convenience office network to the CEN instance.
If you deploy your Active Directory (AD) system on an Elastic Compute Service (ECS) instance, you must attach the VPC of the AD server to the CEN instance. If you deploy your AD system on an on-premises server, you must connect the on-premises network to the cloud network. You can create an enterprise AD office network and establish connectivity between the on-premises server and the cloud. Then, you can configure the AD domain.
Create a cloud computer and an account. Then, assign the cloud computer to the account.
For more information about how to create an account, see Create a convenience account or Create and manage enterprise AD accounts.
For more information about how to create and assign cloud computers, see Create cloud computers and Assign cloud computers to users.
Obtain an Alibaba Cloud Workspace client from which you can connect to the cloud computer. For more information, see Use a client.
NoteThe solution described in this topic supports the following Alibaba Cloud Workspace clients: Windows client and macOS client.
Sample CIDR blocks
You must plan CIDR blocks to prevent CIDR block conflicts between the networks used by on-premises devices and cloud instances. In this section, the CIDR blocks described in the following table are used. The actual CIDR blocks shall prevail.
Configuration item | CIDR block/IP address | Description |
Office network VPC | 172.16.0.0/12 | The CIDR block of the VPC that is used by the office network in which the cloud computer resides. Alibaba Cloud PrivateLink (endpoint service) uses the CIDR block. |
User VPC | 192.168.0.0/16 | The VPC that you created to establish a VPN connection. |
On-premises data center | 192.10.0.0/16 | The CIDR block of an on-premises network that the Alibaba Cloud Workspace client uses. A VPN connection is initiated from the CIDR block. |
Data center gateway | 115.XX.XX.154 | The public IP address of the gateway in the on-premises data center. |
The data center gateway must support standard IKEv1 and IKEv2 protocols to connect to VPN gateways. IKEv2 and IKEv1 are the two Internet Key Exchange (IKE) iterations. To check whether the gateway supports IKEv1 and IKEv2 protocols, contact the gateway manufacturer.
Step 1: Configure IPsec-VPN
Create a VPN gateway and enable IPsec-VPN. For more information, see Create a VPN gateway.
Create a customer gateway. For more information, see Create and manage a customer gateway.
Create an IPsec-VPN connection. For more information, see Create an IPsec-VPN connection .
Publish the peer CIDR block to CEN.
Log on to the VPC console.
In the left-side navigation pane, click Route Tables.
On the Route Tables page, find the route table of the user VPC and click the ID of the route table.
On the route table details page, select the Route Entry List tab and click the Custom Route tab.
Find the peer CIDR block (CIDR block of the private network used by the on-premises data center) that you configured and click Publish in the Actions column.
If the value in the Status column of the CIDR block is Published, the CIDR block is published.
Step 2: Load the VPN configurations to the data center gateway
Log on to the VPC console.
In the left-side navigation pane, choose .
In the top navigation bar, select the region of the IPsec-VPN connection.
On the IPsec Connections page, find the IPsec-VPN connection and click Generate Peer Configuration in the Actions column.
Load the IPsec-VPN connection configurations that you downloaded to the data center gateway.
For more information, see Configure an H3C firewall.
Step 3: Configure an enterprise VPC IP address or a cloud service route
You can select one of the following solutions based on your business requirements: Solution 1 and Solution 2 explain how to configure the IP address for an enterprise VPC. The main difference is that Solution 1 uses a static IP address, which makes the process easier for end users because they do not need to configure a custom IP address.
Solution 1: Configure a static IP address for an enterprise VPC
Obtain the private gateway address of the office network.
Log on to the EDS Enterprise console.
In the left-side navigation pane, choose .
On the Office Networks page, find the desired office network and click the network ID.
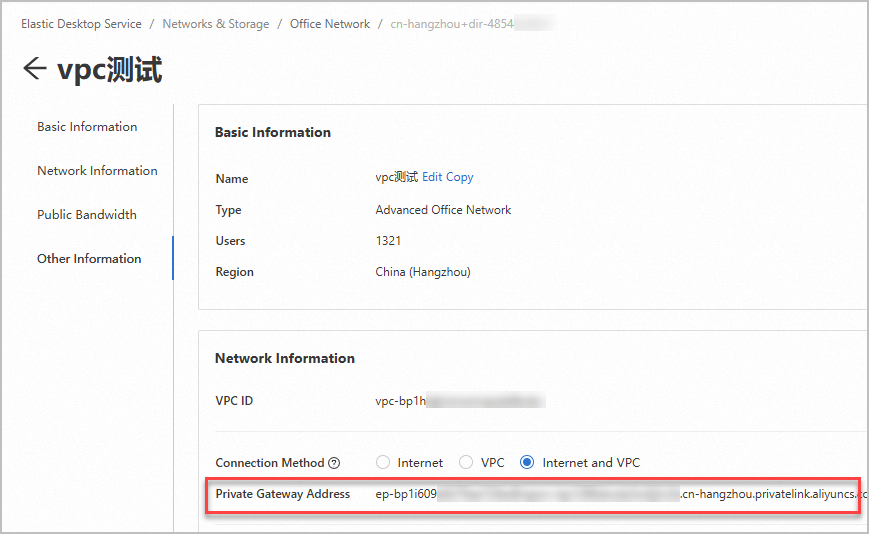
In the Network Information section of the office network details page, find the Private Gateway Address parameter and copy the parameter value. The private gateway address is required in subsequent steps.
Configure a CNAME record on the enterprise DNS server and point the
private.wuying.comdomain name to the private gateway address.Configure the network access mode on an Alibaba Cloud Workspace client as an end user.
Open a Windows client.
In the upper-right corner of the logon page, click the icon and then click Connection Configuration.
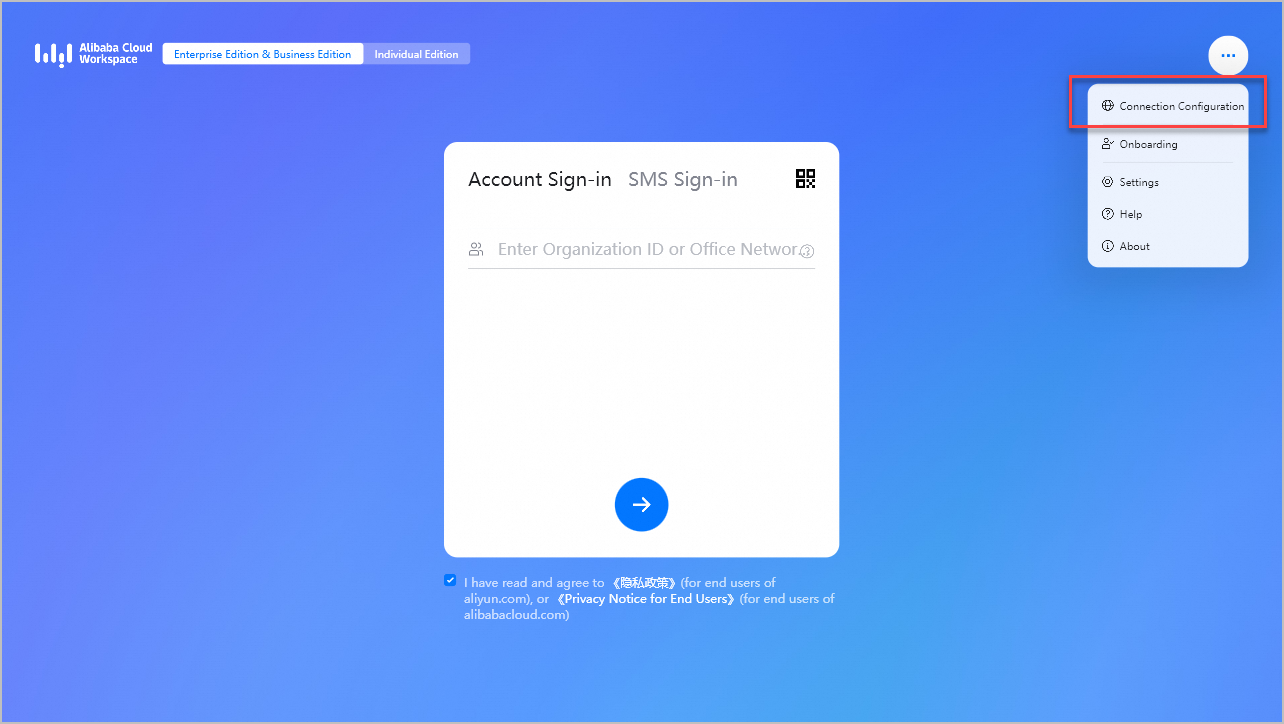
In the Connection Configuration dialog box, configure the following parameters:
ImportantMake sure that the version of your Windows client is 7.7 or later. Otherwise, you cannot configure an enterprise VPC IP address.
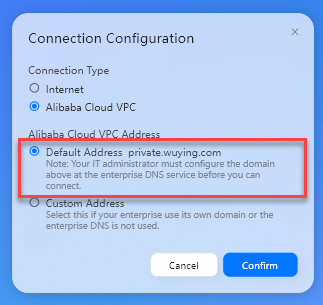
Connection Type: Set the value to Alibaba Cloud VPC.
Alibaba Cloud VPC Address: Set the value to Default Address.
Then, click Confirm.
Solution 2: Configure a custom IP address for an enterprise VPC
Obtain the private gateway address of the office network and forward it to end users.
Log on to the EDS Enterprise console.
In the left-side navigation pane, choose .
On the Office Networks page, find the desired office network and click the network ID.
In the Network Information section of the office network details page, find the Private Gateway Address parameter and copy the parameter value. The private gateway address is required in subsequent steps.

Configure the network access mode on an Alibaba Cloud Workspace client as an end user.
Open a Windows client.
In the upper-right corner of the logon page, click the icon and then click Connection Configuration.

In the Connection Configuration dialog box, configure the following parameters:
ImportantMake sure that the version of your Windows client is 7.7 or later. Otherwise, you cannot configure an enterprise VPC IP address.
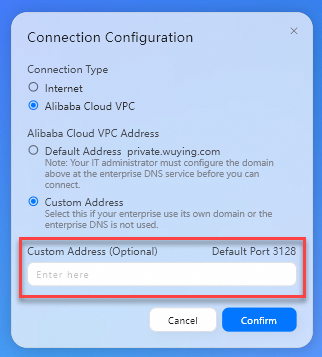
Connection Type: Set the value to Alibaba Cloud VPC.
Alibaba Cloud VPC Address: Set the value to Custom Address.
Custom Address: Enter the obtained private gateway address of the office network.
Then, click Confirm.
Solution 3: Configure routing and DNS for cloud services
Configure a route for cloud services.
The CIDR block of cloud services in Alibaba Cloud that can be accessed over a VPC is
100.64.0.0/10, which is a reserved CIDR block that is defined in RFC 6598. To call the EDS Enterprise API from an Alibaba Cloud Workspace client as expected, add the100.64.0.0/10CIDR block of the on-premises network in the VPN to forward requests destined for the CIDR block to the user VPC in the cloudNoteIf the 100.xxx.xxx.xxx CIDR block conflicts with other CIDR blocks, we recommend that you use Solution 1 or Solution 2.
If you want to use cloud computers in multiple regions, specify
100.64.0.0/10as the CIDR block of EDS Enterprise. If you want to configure an advanced network, specify the CIDR block of the cloud service by referring to Port overview. Note that the IP address of the domain name corresponding to the VPC-controlled service is the IP address of the cloud service.
(Optional) Before you configure DNS, run the following command to test whether the domain name can be resolved:
nslookup ecd-vpc.cn-hangzhou.aliyuncs.comIf an IP address is returned, the domain name can be resolved. In this case, you can skip the next step. If no IP address is returned, perform the following step to configure DNS.
(Optional) Configure DNS.
To access cloud computers over a VPC, DNS is required to resolve the domain names involved in the EDS Enterprise API and streaming gateways that reside in the VPC. In this example, the following IP addresses are used for your DNS server:
100.100.2.136
100.100.2.138
You can use one of the following methods to configure the DNS addresses:
Add the preceding DNS addresses to the Dynamic Host Configuration Protocol (DHCP) service of the data center.
Configure transit routers on the DNS server of the on-premises data center to route domain name resolution requests that end with
aliyuncs.comto100.100.2.136or100.100.2.138.
Step 4: Check whether a cloud computer can be connected over the VPC
In this section, the Windows client of Alibaba Cloud Workspace V7.7 is used as an example to check whether the cloud computer can be connected over the VPC. The actual type of the Alibaba Cloud Workspace client that you use prevails.
Open a Windows client.
In the upper-right corner of the logon page, click the icon and then click Connection Configuration.
In the Connection Configuration dialog box, set the Connection Type parameter to Alibaba Cloud VPC.
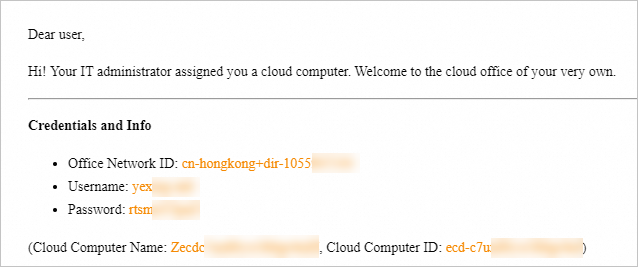
Enter the logon credentials sent to your email address, which includes an office network ID or organization ID, username, and password. Then, click the Next icon to proceed.
Find the cloud computer from the resource list. Then, start and connect to the cloud computer.
NoteIf errors such as network request timeout occur, network connectivity is not established. Check whether the preceding network settings are correctly configured. Then, re-log on to the client and connect to the cloud computer.