Background information
When you perform backup or archive operations, you must configure parameters such as the component and logon identity based on your environment. Otherwise, the Cloud Backup client fails to be activated.
How do I select a component?
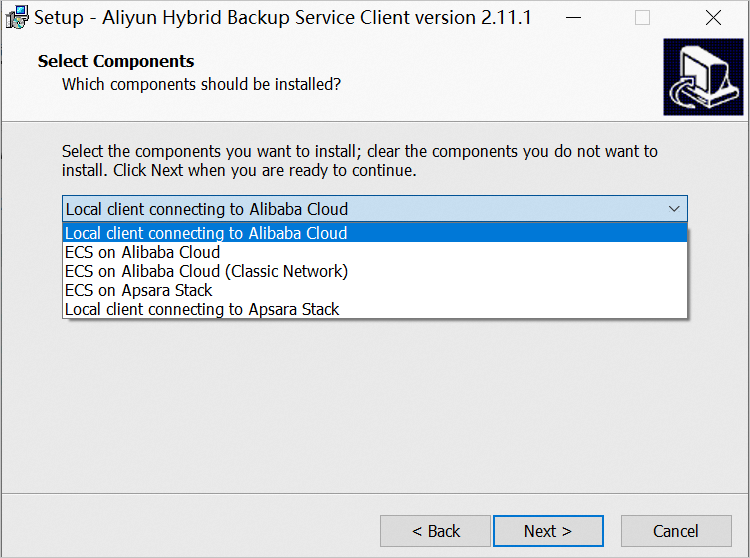
The following table describes the five types of components that are provided by a Cloud Backup client.
Component name | Description |
Component name | Description |
Local client connecting to Alibaba Cloud | If you back up on-premises files or on-premises NAS file systems, or archive data, select this component. |
ECS on Alibaba Cloud | If you back up files or databases from an ECS instance, select this component. The component is automatically pushed to the ECS instance and installed on the ECS instance. You do not need to perform additional operations. |
ECS on Alibaba Cloud (Classic Network) | An ECS instance deployed in the classic network. You cannot create ECS instances in the classic network. You do not need to select this component. |
ECS on Apsara Stack | This component is not applicable to the Alibaba Cloud public cloud. If you back up data from an ECS instance in Apsara Stack, select this component. |
Local client connecting to Apsara Stack | This component is not applicable to the Alibaba Cloud public cloud. If you back up on-premises files in Apsara Stack, select this component. |
How do I configure a logon identity for an on-premises Cloud Backup client?
A logon identity is the account principal that is used by Cloud Backup to back up or archive data. The account must have the permissions to access the destination path and read data.
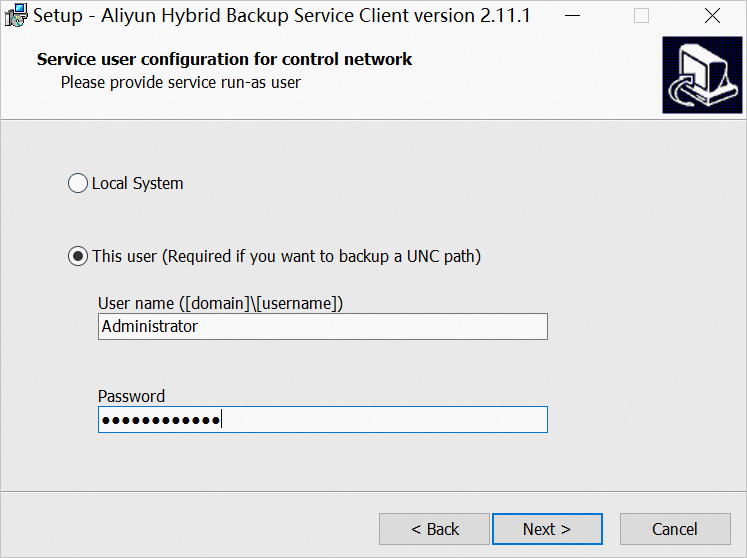
The following table describes the two types of identities that are provided by a Cloud Backup client.
Logon identity | Description |
Logon identity | Description |
Local System | If you back up or archive files from local paths, select this identity. |
This user | If you back up or archive files that are shared over a network, select this identity. |
For example, if you back up files that are shared over a network, select This user and configure the username and password. 
If you back up or archive files that are shared over a network, select This user. The user must meet the following three requirements:
The user has the permissions of the local administrator.
To configure the logon user, perform the following steps:
Open the Control Panel. In the window that appears, click User Accounts.
Check the account information and make sure that the account has the permissions of the administrator. If your account does not have the permissions of the administrator, grant the permissions of the administrator to the account.
The user has the permissions to log on as a service.
To configure the logon user, perform the following steps:
Open the Control Panel. In the window that appears, click Administrative Tools.
Open Local Security Policy and choose .
Turn on Log on as a service. In the dialog box that appears, add a user.
The user has the permissions to access files that are shared over a network.
To check whether the user has the permissions to access the destination network path, run the following command:
net use z: \\NAS network address\shared directory
Note
z: specifies the name of the attached drive. Replace it with the actual name.
If you can view the network path, you already have the permissions to access network shared files.
 Elastic Compute Service (ECS)
 Lingma


