Part 6 of this 10-part series explained the SQL parsing and execution process in GalaxySQL. Since GalaxySQL is a stateless compute node, real data needs to be transferred from storage nodes to compute nodes. This part of the work is completed with private protocols. This article will start with requests transmitted to data nodes and end with data returned to compute nodes, focusing on the complete lifecycle of private protocol connections and introducing the key code of private protocols.
To give full play to the local computing capabilities of data nodes while minimizing the amount of network data transmission, compute nodes push down as much computing content as possible. Therefore, the data request to a single storage node may be a complex join query or a simple index point query. At the same time, since a logical table has multiple physical shards, the number of request sessions of the compute nodes, and the storage nodes will be multiplied as the number of shards increases. The traditional MySQL protocol + connection pool architecture can no longer meet the requirements of the PolarDB-X, and the private protocol was created under this requirement scenario.
As shown in the following figure, the private protocol adopts the design concept of the RPC protocol that separates connection and session. It supports multiple sessions in the same TCP channel and has a traffic control mechanism. The full-duplex response mode allows request pipelining and has various features (such as high throughput and scalability).
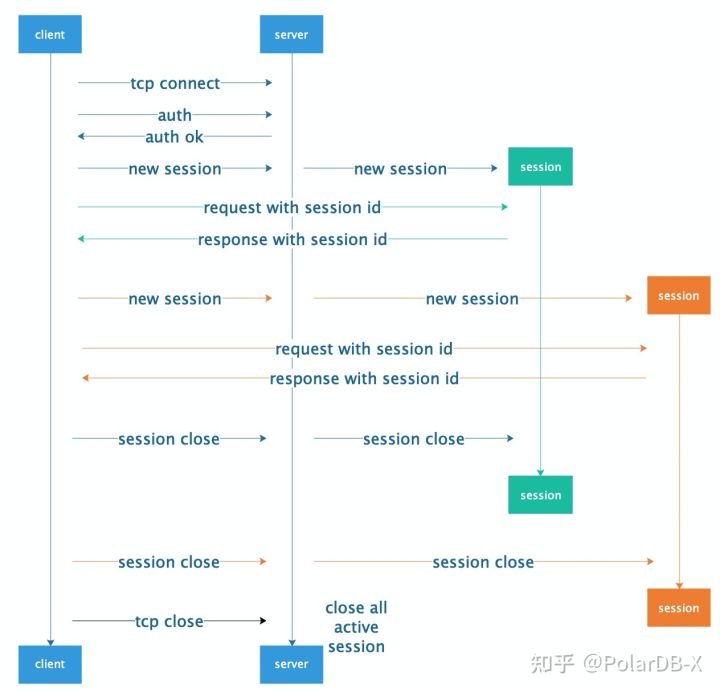
This article describes the workflow of private protocols from a code perspective in detail.
We will introduce the whole life of the private protocol connection from the compute node and the storage node. Due to word count limitations, this article only deals with the processing of private protocols on compute nodes. The private protocols on storage nodes will be introduced in The Life of Private Protocol Connections (DN).
The role of a compute node in a private protocol is a client, which is responsible for sending push-down requests and receiving returned data.
When it comes to the design and implementation of network communication protocols, the design of the network layer framework is essential. The network layer of PolarDB-X private protocols does not use the existing network library but uses a set of streamlined customized Reactor frameworks implemented by Java's NIO to pursue the ultimate performance. This part of the code improves from the Reactor framework in the GalaxySQL. The network layer initializes the NIOProcesser of 2 times the number of CPU cores (the maximum limit is 32) in the NIOWorker, while NIOProcessor is the package of NIOReactor. The latter is the implementation of the Reactor framework. Each Reactor uses a separate out-of-heap memory pool as a buffer for the package forwarding, and the total buffer memory size is limited to 10% of the heap memory size.
The packages received by NIO will be called to the registration processing function through the callback function. The sent data will only be written to send buf when calling, while network writing will be completed by a separate thread. When flushing, an event will be explicitly triggered to wake up the thread, and the write thread will write TCP send buf first. When there is no room for writing, the OP_WRITE event will be registered. Then, the rest will be written until it is writable.
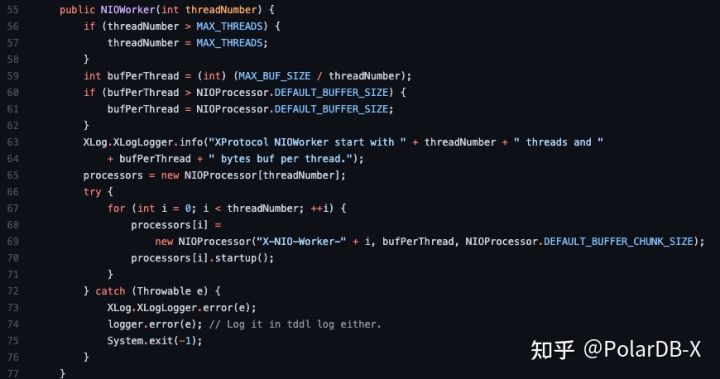
The encoding and decoding of data packages are implemented in NIOClient. The unpacking process is performed on the off-heap memory to achieve the best performance. Protobuf is used to parse the stream and put the unpacking result into the heap. The memory outside the heap is divided into several 64KB chunks. Each Reactor occupies a chunk as the receiving buffer, performing continuous parsing and reusing. The CPU cache is used to maximize the receiving and parsing efficiency.
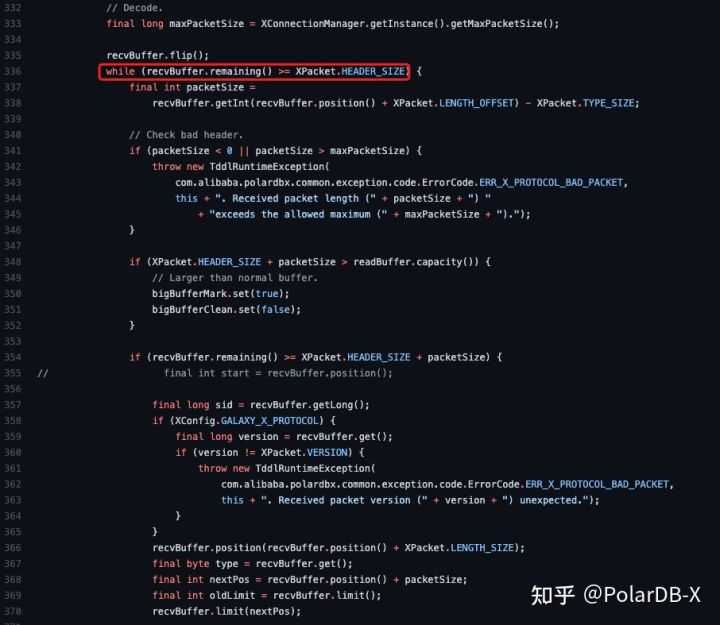
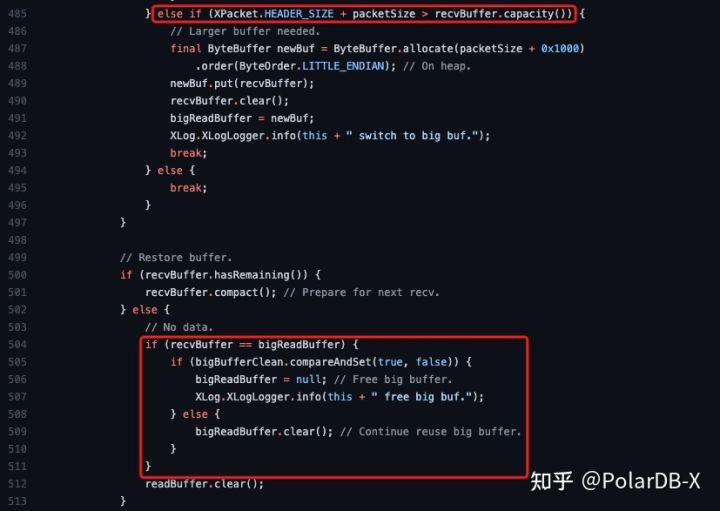
A large buffer in the heap will be constructed for receiving and parsing extra-large packages that exceed the chunk size, while the fallback flag of the extra large package will be reset in the scheduled probing task. In the case of no extra large packages in ten seconds, the memory in the heap will be released and rolled back to the high-performance 64KB buffer outside the heap for receiving and decoding.
The sending of requests is deeply integrated into the NIOClient. The writer will try to write to the buffer at the end of the sending buffer queue first. If the capacity is insufficient, it will apply for a new buffer and fill it to the end of the queue. The buffer here is taken from the out-of-heap buffer pool previously pre-allocated to each Reactor. When the sent package exceeds the chunk size, the corresponding in-heap buf is allocated for the serialization of the request.
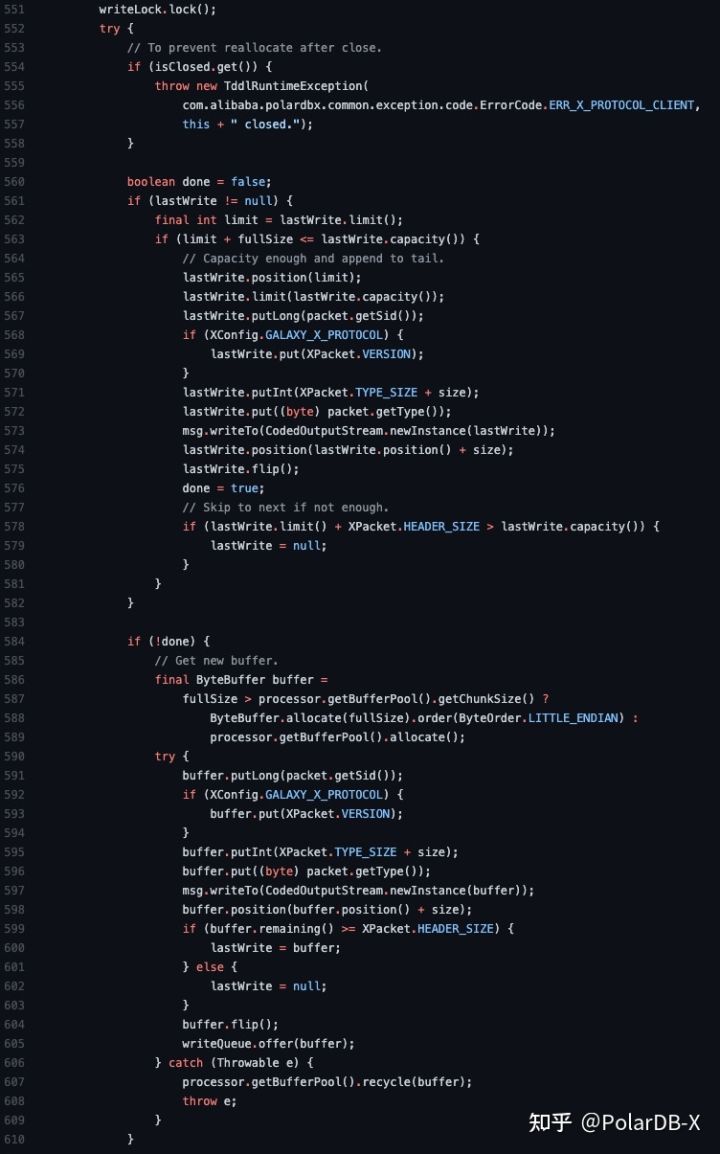
As a completely independent implementation of the underlying network resource management, NIOClient is responsible for the establishment of TCP connections and the release of disconnection resources. The definition of each field of the request and data package can be referred to as proto, but it will not be discussed here.
After the network layer, the following comes to the specific implementation of the separation of connection and session. The management of connection and session becomes much clearer and simpler since the specific implementation of connection and package forwarding is stripped off.
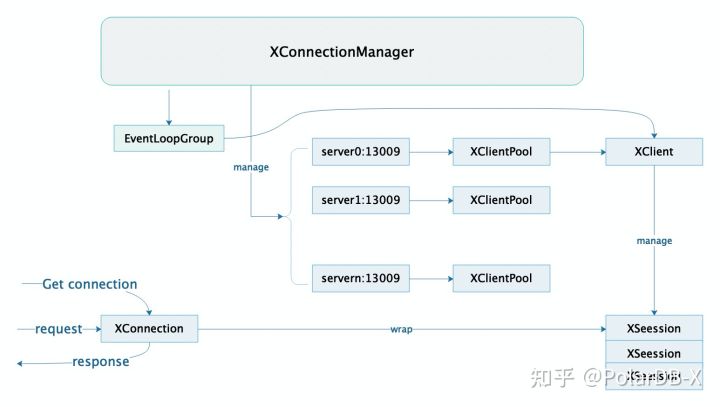
The first is the logical abstract structure of a TCP connection, which we implemented in XClient. The name client is to distinguish it from Connection in the JDBC model, avoiding misunderstanding. This class mainly manages a session that has been running in parallel on a TCP connection and is responsible for the management of the full lifecycle of TCP and authentication. It also maintains some public information.
The most important member variable is that the workingSessionMap records all session mappings running in parallel on the TCP connection, where the corresponding session abstraction structure XSession can be quickly found through the session ID.
XSession provides all session-related request functions and related information storage, including execution plan requests, SQL Query requests, SQL update requests, TSO requests, Session variable processing, package processing and asynchronous wake-up, and many other processing functions.
The reuse of TCP connections and sessions is essential to achieve better performance. Here, due to the unbinding of connections and sessions, the connection pool caches TCP connections of compute nodes and caches sessions among compute nodes.
XClientPool is a connection pool management structure to a storage node, where the target storage node is uniquely determined by the triplet [IP, Port, and User Name]. This class also stores all TCP connections (XClient) and all established sessions (XSession) to the target storage node.
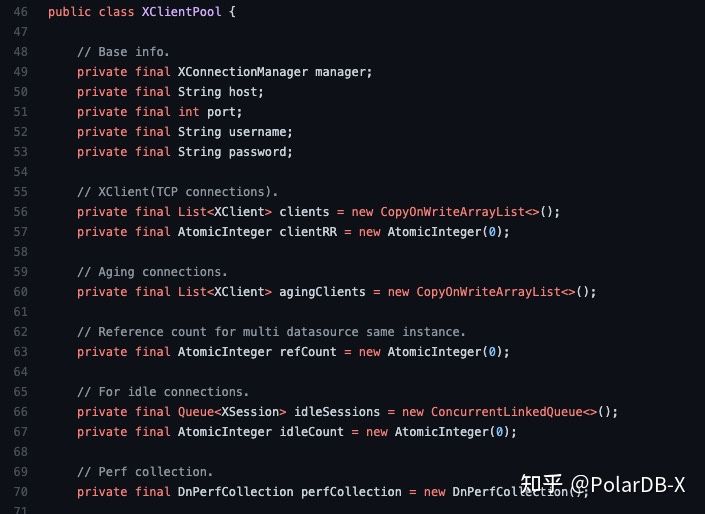
XClientPool realizes the session acquisition of the storage node, which is the getConnection in the JDBC interface, and realizes the lifecycle management, connection detection, session pre-allocation, and other functions for all connections and sessions of the storage node.
After implementing the connection pool of a single storage node, we need a global singleton to manage all connection pools and schedule scheduled tasks related to private protocols. This is the duty of XConnectionManager, which maintains the mapping between the triplet of the target storage node and the instance connection pool and maintains a scheduled task thread pool to realize the functions of scheduled detection, longest life control of session and connection, and connection pool preheating.
A new SQL protocol layer has relatively high requirements for upper-layer users. The private protocol provides a JDBC-compatible method to improve the development efficiency, which can smoothly switch from JDBC to the private protocol without too many changes in upper-layer calls and provides the capability of protocol hot switching.
The JDBC compatible layer code directory is in the compatible directory. The Connection is inherited due to historical reasons. The file can be found in XConnection. The JDBC compatibility layer provides most common interface function implementations, including DataSource, Connection, Statement, PreparedStatemet, ResultSet, and ResultSetMetaData. Unsupported functions will explicitly throw exceptions to avoid misusing.
So far, most of the structure of the private protocol compute node has been explained. The following is an overall relationship diagram.
After understanding the implementation of each layer of the private protocol, we take a request sent to the storage node as an example to sort out the execution process. Here, we bypass the complex process of the compute node and take the following code as an example. (Note: Since it is to bypass the start of compute nodes, we need to manually set the com.alibaba.polardbx.rpc.XConfig#GALAXY_X_PROTOCOL to true.)
public class GalaxyTest {
    public final static String SERVER_IP = "127.0.0.1";
    public final static int SERVER_PORT = 31306;
    public final static String SERVER_USR = "root";
    public final static String SERVER_PSW = "root";
    private final static String DATABASE = "test";

    static XDataSource dataSource = new XDataSource(SERVER_IP, SERVER_PORT, SERVER_USR, SERVER_PSW, DATABASE, null);

    public static XConnection getConn() throws Exception {
        return (XConnection) dataSource.getConnection();
    }

    public static List<List<Object>> getResult(XResult result) throws Exception {
        return getResult(result, false);
    }

    public static List<List<Object>> getResult(XResult result, boolean stringOrBytes) throws Exception {
        final List<PolarxResultset.ColumnMetaData> metaData = result.getMetaData();
        final List<List<Object>> ret = new ArrayList<>();
        while (result.next() != null) {
            final List<ByteString> data = result.current().getRow();
            assert metaData.size() == data.size();
            final List<Object> row = new ArrayList<>();
            for (int i = 0; i < metaData.size(); ++i) {
                final Pair<Object, byte[]> pair = XResultUtil
                    .resultToObject(metaData.get(i), data.get(i), true,
                        result.getSession().getDefaultTimezone());
                final Object obj =
                    stringOrBytes ? (pair.getKey() instanceof byte[] || null == pair.getValue() ? pair.getKey() :
                        new String(pair.getValue())) : pair.getKey();
                row.add(obj);
            }
            ret.add(row);
        }
        return ret;
    }

    private void show(XResult result) throws Exception {
        List<PolarxResultset.ColumnMetaData> metaData = result.getMetaData();
        for (PolarxResultset.ColumnMetaData meta : metaData) {
            System.out.print(meta.getName().toStringUtf8() + "\t");
        }
        System.out.println();
        final List<List<Object>> objs = getResult(result);
        for (List<Object> list : objs) {
            for (Object obj : list) {
                System.out.print(obj + "\t");
            }
            System.out.println();
        }
        System.out.println("" + result.getRowsAffected() + " rows affected.");
    }

    @Ignore
    @Test
    public void playground() throws Exception {
        try (XConnection conn = getConn()) {
            conn.setStreamMode(true);
            final XResult result = conn.execQuery("select 1");
            show(result);
        }
    }
}
An expected result of select 1 can be seen if we run the playground directly. Let's explain this code in detail.

First, we need to create an XDataSource that corresponds to the storage node to use the private protocol. A new instance connection pool is registered in the XConnectionManager during the construction of the XDataSource. If the corresponding connection pool already exists, the reference count of the existing connection pool is increased by one.

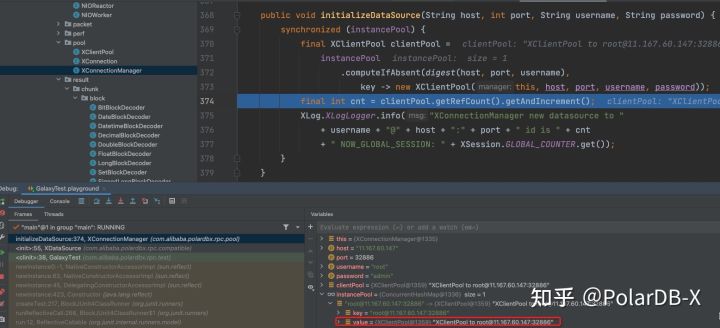
When we need to query on a storage node, we need to obtain a session first. Whether we explicitly open a transaction or use an auto commit transaction, the session is the minimum context for executing these requests. In the JDBC model, the corresponding one is getConnection. Here, we can get a session to the corresponding storage node through the getConnection method of XDataSource. First, XDataSource will find the connection pool in the XConnectionManager according to the stored trituple [IP, Port, and Username]. After passing the highest concurrency check, the acquisition logic of the session is implemented in the XClientPool. First, it will try to take the session in the idle session pool, which will be returned to the caller after passing the reset check and initialization. Most scenarios will come to this, but ConcurrentLinkedQueue provides better concurrency performance.
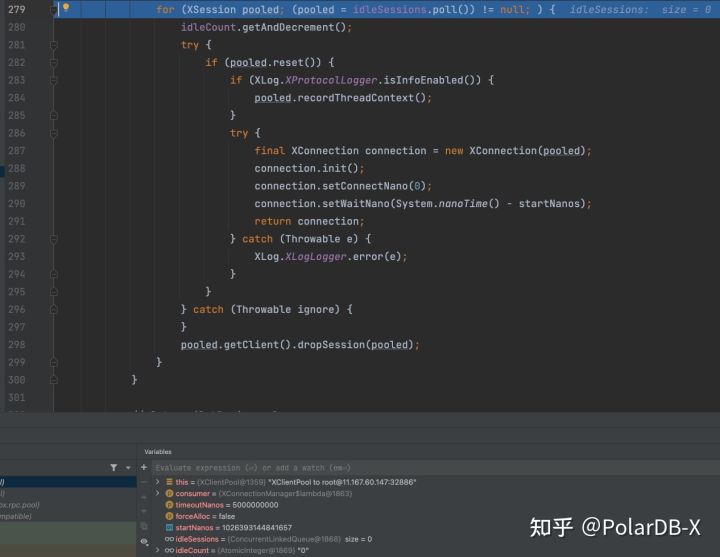
In our code scenario, since the data source has just been created and the background timing task has not been run, idleSessions is empty and will enter the following process. It will try to find the existing TCP connection, select an appropriate connection, and establish a new session on it. The specific policy is that TCP connections without sessions are preferred for session creation. Secondly, if the TCP connection does not reach the upper limit, TCP connections are preferentially created. When the connection reaches the upper limit, the round robin policy is used to create reused sessions on TCP connections. The overall policy is: priority - connection - session. Multi-session reuse only starts when the number of sessions exceeds the upper limit of the number of connections.
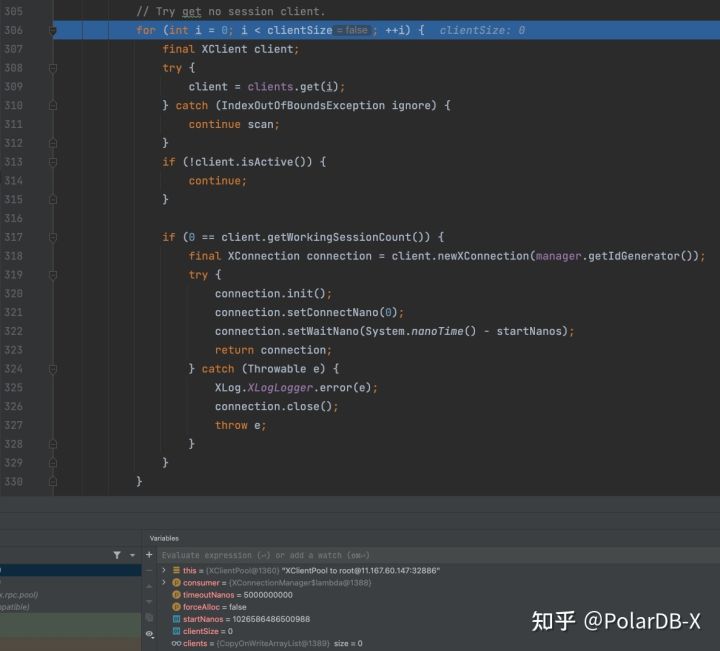
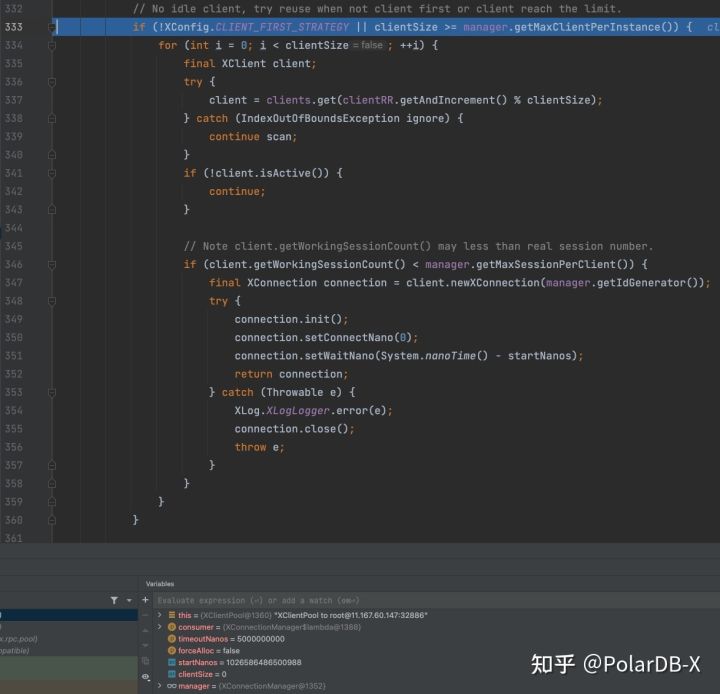
Similarly, we have not created a good TCP connection in the current code scenario. When the final connection creation process comes, there will be a large lock to lock the connection pool. When the TCP connection does not reach the upper limit and there is no timeout, a new XClient pit will be quickly created. If it is over the limit, it will sleep for 10ms and enter the busy waiting loop. The real TCP connect (waitChannel) will be called outside the lock. First, the client will connect in blocking mode with a timeout and then switch to non-blocking mode. The round robin policy is registered on a NIOProcesser. When it returns, the TCP connection has been established.
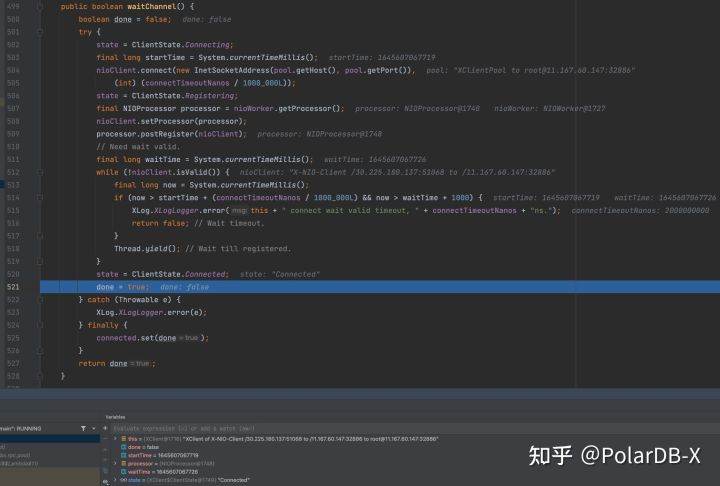
Connection authentication is only done once after the TCP connection is established to balance security and performance, while session creation does not require authentication. Authentication is done in the initClient. Here, we will only send a SESS_AUTHENTICATE_START_VALUE package, and the subsequent verification will be completed by callback.
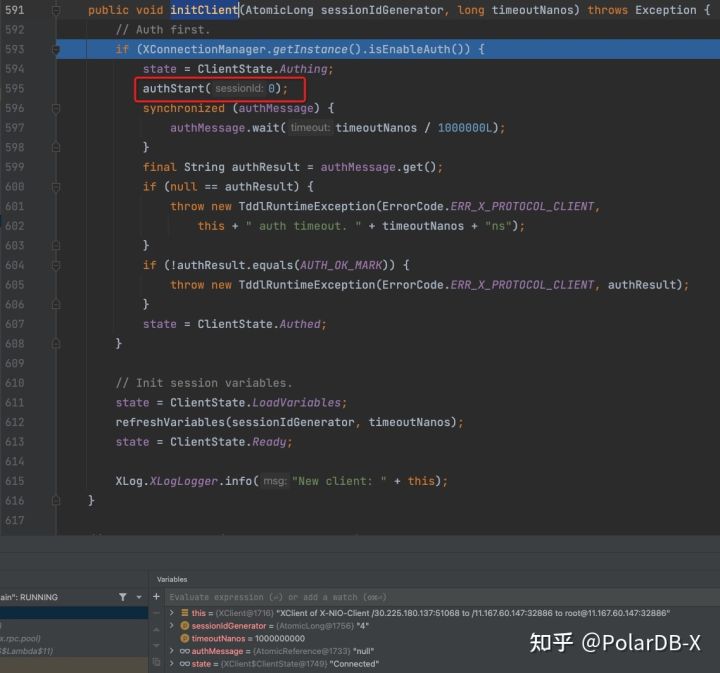
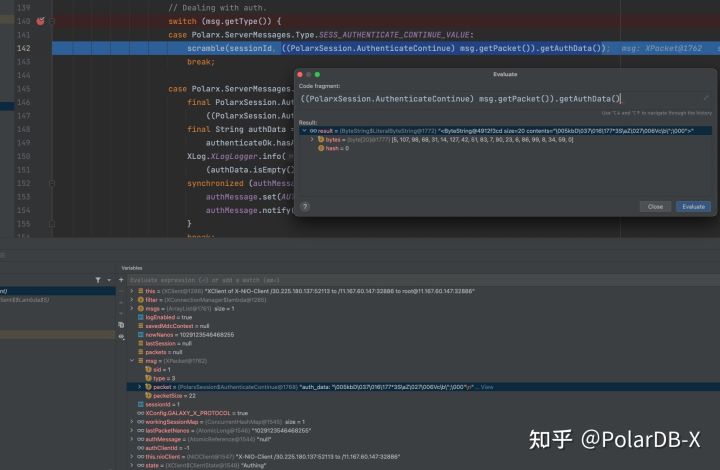
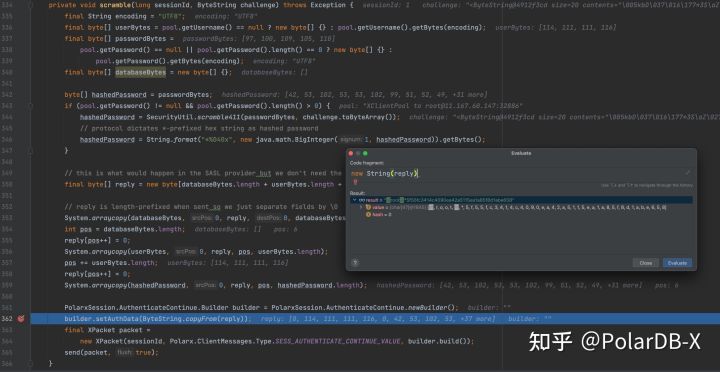
The authentication uses the standard MySQL41 process. The server returns a challenge value and returns the database name, username, and hash password to MySQL to complete the authentication.
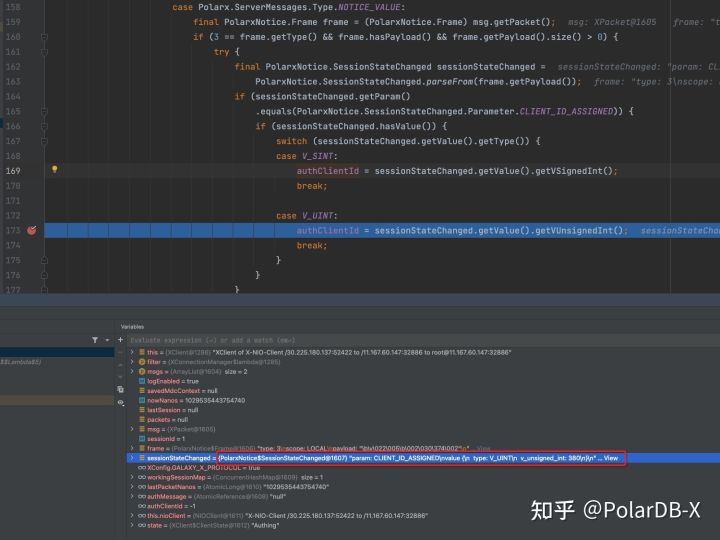
At this point, the TCP connection to the storage node has been established. The following step is creating a session, which is an asynchronous process. As early as when we created a new XClient, XConnection was created. Here, we can see the process of newXSession by following the breakpoint, whose essence is to assign a session id, initialize its state to init, and bind the XSession to an XConnection.
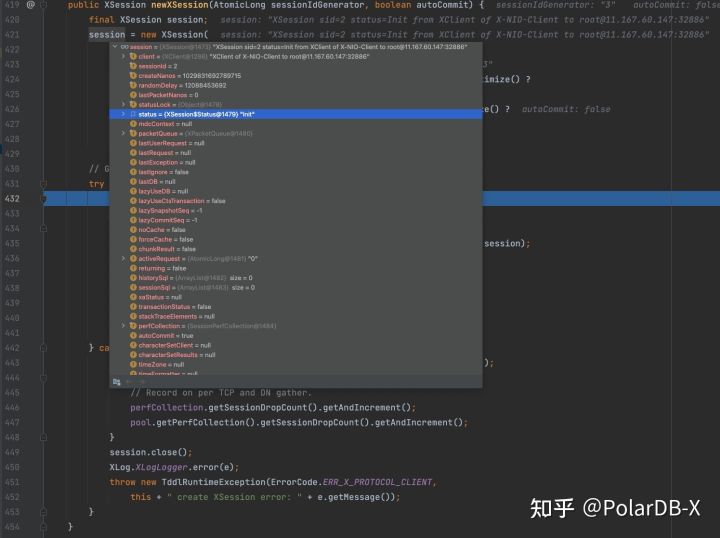
Finally, the initialized XConnection (resetting the auto commit state) resets the default DB and default character set (both are lazy operations), records some statistical information, and returns it to the user.
Now we have an initialized JDBC-compatible Connection. To simplify the process, we call execQuery in XConnection. This function is equivalent to creating a Statement and then executing it. ExecQuery of XConnection is the wrapper of execQuery in XSession. Here, before calling, we executed the
conn.setStreamMode(true);This will adjust the mode to streaming, making the subsequent data read process clearer.
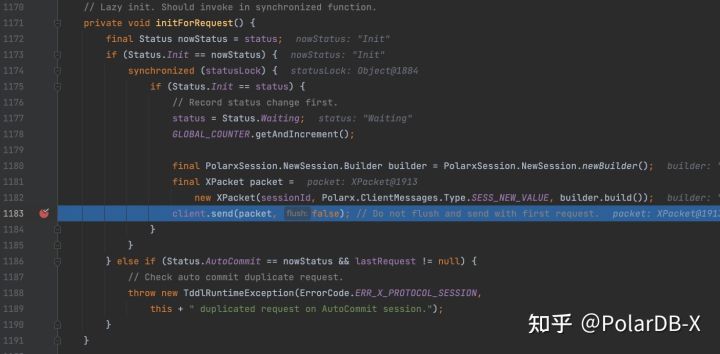
First, execQuery will record various call information for relevant statistics. Then, it will enter the key initForRequest process. As mentioned earlier, the initialization of XSession is lazy, with only one session id assigned. Then, the state is set to Init. This is the real process of creating a session. A SESS_NEW will be sent to the server to bind the new session with the assigned session id. If the session obtained is before reusing, the process does not exist (the state will be Ready).
Then, it comes to the character set change of lazy. Since the session may be recycled or reused, the character sets could change to other character sets during other request execution. Here, based on the comparison between the target character set and the current character set, it decides whether or not to send additional character sets.
set names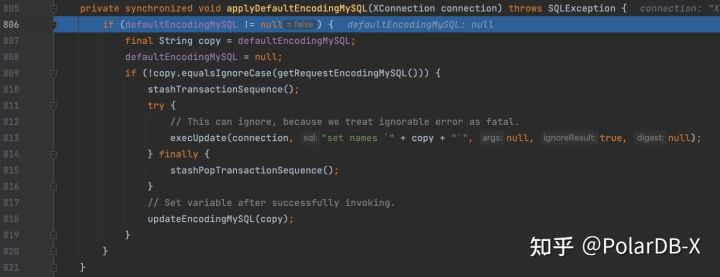
After setting the variables of some columns and lazy DB, we will construct a protobuf package to send specific requests.

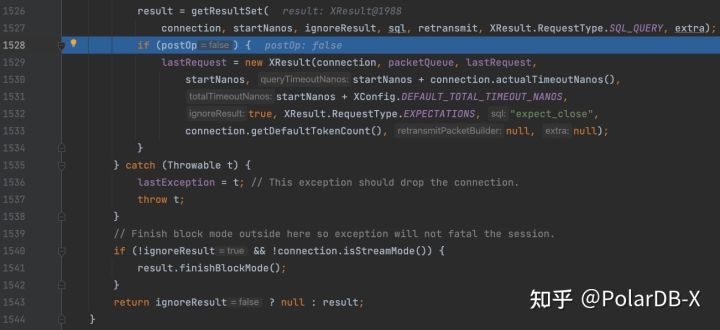
When sending, there is an additional processing logic, which is aimed at the pre-request that can ignore the return value in a request pipeline scenario (for example, before a formal request, the transaction needs to be opened, but this begin statement does not need to wait for its return, as long as it is executed before the formal request and no error is reported. Here, we use the expect stack function to wrap the pre-request and the formal request and send it out together in the form of a pipeline to avoid unnecessary waiting). We do not have this kind of pre-request here. The package will be written into a send buffer.
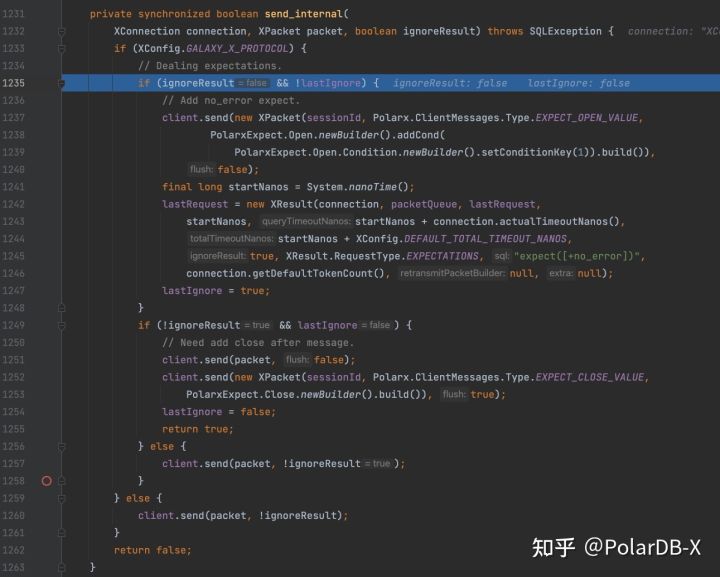
After the request is sent, an XResult is generated to parse the result. At the same time, XResult lists a linked list according to the request order to ensure the result corresponds to the request.
The following figure shows the structure of the overall request pipeline. The subsequent results can only be parsed after the previous requests are processed.
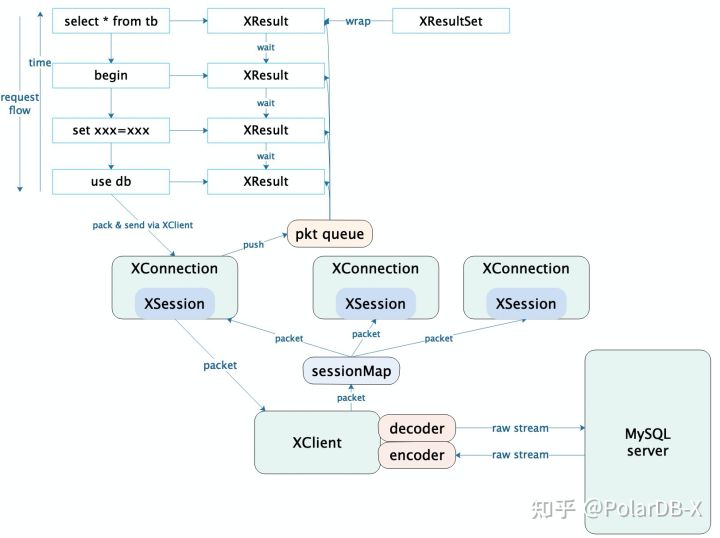
So far, our request has been sent to storage nodes for execution, and we have got an XResult where we collect a result set of the query.
As mentioned above, XResult corresponds to the sent request, and the processing of storage nodes is queued in the session. As such, only the corresponding request needs to be processed in each XResult, which will not affect the return of other requests on the pipeline to ensure the normal operation of the pipeline.
First of all, let's look at the state machine of result set processing. The main state consists of obtaining metadata, obtaining data rows, obtaining additional information, etc. They have a relatively fixed order. According to different request types, some links may be omitted. Error processing runs through the entire state machine. Any error message will cause the state machine to start error processing.
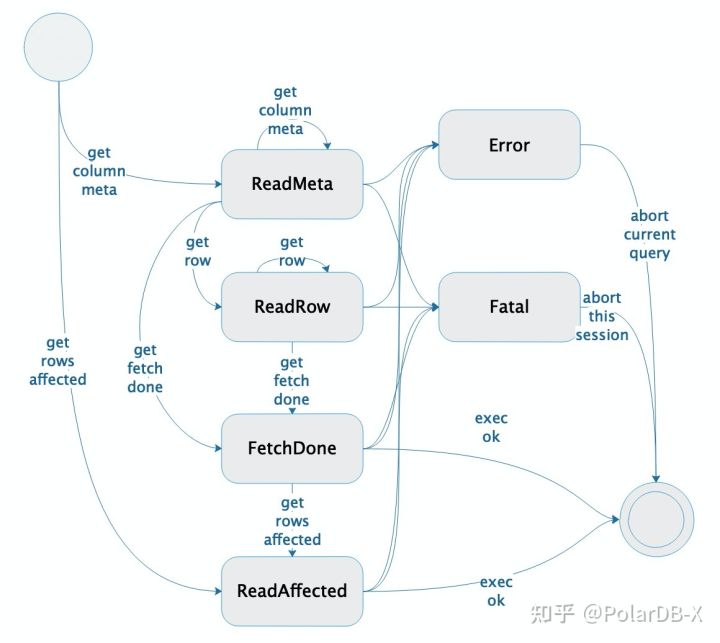
For non-streaming data reading, at the end of the request, the finishBlockMode will be called to read out all the results and cache them in the rows. In response to the streaming execution in the test code above, the result set state machine consumption package queue is driven by the next function of XResult. The internal function that specifically drives the state machine to execute is internalFetchOneObject. This function recursively calls a pre-order XResult, returns the results after consuming the pre-order request, and then consumes and drives the state machine to run from the package queue.
select 1For such query, you will first receive a RESULTSET_COLUMN_META_DATA package, which represents the definition of the returned data column, and one package represents one column.
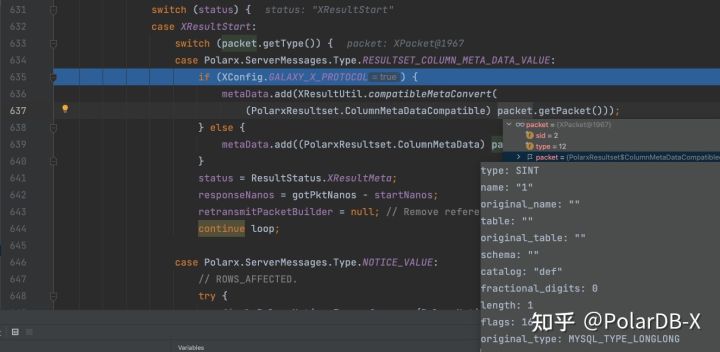
After the metadata package, a RESULTSET_ROW package containing data rows is received. One package corresponds to one row.

When all data rows are transmitted, a RESULTSET_FETCH_DONE package occurs on the server to indicate that the result set data is sent.

Before the request ends, a NOTICE package is used to tell the client rows affected or other information (including waring and generated id).

Finally, there will be an SQL_STMT_EXECUTE_OK package marking the end of this request.

At this point, a complete request has been processed, and the result of the request should have shown on the console.
select 1This article is long, but it only describes the processing flow of a single simple request. In the practice of GalaxySQL, it involves the use of more advanced features such as multi-request pipeline, traffic control, execution plan transmission, and chunk result set transmission. I believe this article can help readers master the key points and data structures in the private protocol connection process and can be handier in debugging and modifying.
An Interpretation of PolarDB-X Source Codes (6): Distributed Deadlock Detection
An Interpretation of PolarDB-X Source Codes (8): Life of Global Binlog
ApsaraDB - November 1, 2022
ApsaraDB - October 24, 2022
ApsaraDB - November 1, 2022
ApsaraDB - October 18, 2022
ApsaraDB - October 25, 2022
ApsaraDB - October 25, 2022
 PolarDB for Xscale
Alibaba Cloud PolarDB for Xscale (PolarDB-X) is a cloud-native high-performance distributed database service independently developed by Alibaba Cloud.
Learn More Managed Service for Prometheus
Multi-source metrics are aggregated to monitor the status of your business and services in real time.
Learn More PolarDB for PostgreSQL
Alibaba Cloud PolarDB for PostgreSQL is an in-house relational database service 100% compatible with PostgreSQL and highly compatible with the Oracle syntax.
Learn More PolarDB for MySQL
Alibaba Cloud PolarDB for MySQL is a cloud-native relational database service 100% compatible with MySQL.
Learn MoreMore Posts by ApsaraDB