You can create a workgroup to manage the lifecycles of multiple migration tasks at a time. This allows for batch migration through workgroups, enhancing the efficiency of server migration. This topic mainly introduces how to migrate servers in batch through workgroups.
Migration scenarios
Currently, batch migration through workgroups only supports migrating servers to ECS Image. After the migration is complete, you need to manually create ECS instances by using the generated ECS custom images.
Migrate a server to an ECS instance.
Migrate data from a simple application server to an ECS instance.
For more information about migration scenarios, see Server migration operations.
Prerequisites
Preparations for server migration are complete. For more information, see Before you begin.
The migration template is set up. For more information, see Set a migration template.
Procedure
Step 1: Create a workgroup
50 workgroups can be created in each Alibaba Cloud account.
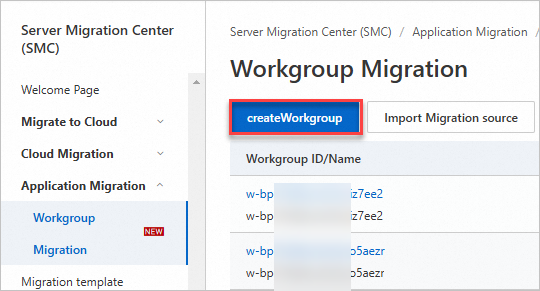
Log on to the Server Migration Center (SMC) console.
ImportantIf you migrate data between ECS instances that belong to different Alibaba Cloud accounts (migrate ECS instances of source account A to destination account B), use Alibaba Cloud account B to log on to the SMC console.
On the Workgroup Migration page, click createWorkgroup.
In the pop-up createWorkgroup dialog box, configure parameters based on the following table.
Parameter
Description
workgroupName
Optional. Enter the workgroup name.
The name must be 2 to 64 characters in length. It must start with a letter and cannot start with
http://orhttps://. It can contain digits, colons (:), periods (.), underscores (_), and hyphens (-).workgroupDescription
Optional. Enter the workgroup description.
Select Migration Source
Optional. If you have imported migration sources: You can select migration sources from the drop-down list.
If you have not imported migration sources: You can follow Step 2: Import and associate a source after you create a workgroup.
NoteA workgroup can associate up to 50 migration sources.
A migration source can only be associated with one workgroup.
Tag
Optional. Enter tag keys and tag values, or select existing tag keys and tag values to facilitate workgroup management.
NoteEach workgroup can bind up to 20 tags.
Click Create.
If you no longer need the workgroup later, you need to disassociate the migration sources in the workgroup, select
 > Delete Workgroup in the Actions column of the corresponding workgroup, and delete the workgroup as prompted.
Step 2: Import and associate a source
Migration sources can be servers of a variety of types, such as servers in data centers, VMs, and hosts on third-party cloud platforms.
In the Create a Workgroup dialog box that appears, click Import Migration Source.
NoteIf you have associated all migration sources when creating a workgroup, click Close and continue to Step 3: Start migration.
On the Import Migration Source page, follow the prompts to import and associate the migration source.
(Recommend) Use the CLI
ImportantThe source server must have public network access. If the source server has firewall restrictions, see What are the endpoints of SMC? to obtain the SMC domain names and ports, and add them to the firewall whitelist.
If your source server cannot access the public network or you want to improve migration efficiency by transferring data over a private network, see the private network migration solution.
Configure the parameters as prompted and copy the activation code command.
The following table describes the parameters.
Parameter
Description
Workgroup
By default, the created workgroup is selected.
Migration Source Type
Physical Server/VM/Cloud servers of other cloud platforms
Import Method
Select Use CLI to Import Server.
Migration Source Quota
The number of migration sources that can be activated by the activation code. The value ranges from 1 to 1000. The default value is 200.
Validity Period
The validity period of the activation code. The value ranges from 1 to 90 days. The default value is 90 days.
Activation Code
After generating the activation code, copy the command. Perform the following steps:
Click Generate.
Based on the source server's operating system, click the Linux Shell or Windows Powershell tab.
Click Copy to copy the activation code command.
Log on to the source server, and then paste and run the copied command with administrator privileges to import the migration source.
Linux source server
Log on to the Linux source server.
Paste and run the copied command with administrator privileges to import the migration source.

After you run the command, a message similar to
Import Source Server [s-bp18x8751kgz2oyh****] Successfully!appears, which indicates that the migration source was imported successfully.
Windows source server
Log on to the Windows source server.
Open Windows PowerShell with administrator privileges.
Paste and run the copied command to import the migration source.

After you run the command, a message similar to
Import Source Server [s-bp19rlidl3mwuptc****] Successfully!appears, which indicates that the migration source was imported successfully.If the command fails to run, see What do I do if the command fails to run when I import a Windows migration source from the command line?.
Use the SMC client
Configure the parameters as prompted and copy the activation code command.
The following table describes the parameters.
Parameter
Description
Workgroup
By default, the created workgroup is selected.
Migration Source Type
Select the type of source server as needed:
Physical Server or VM
ECS
Third-party Cloud Sever
Import Method
Select Use Client to Import Server.
Import the migration source.
ImportantDo not close the SMC client during the migration. Otherwise, the migration source will lose its connection to the SMC console and the migration will fail.
Import a migration source from a Windows source server
Use a remote connection tool that supports file transfer, such as WinSCP, to upload the SMC client to the Windows source server.
On the Windows source server, use the system's built-in or a third-party decompression tool to unzip the SMC client package.
In the SMC client folder that matches the system version of your source server, run the SMC client.
When prompted for administrator privileges, click OK.
GUI version: Double-click the go2aliyun_gui.exe application to run it.
Command-line version: Double-click the go2aliyun_client.exe application to run it.
Obtain an activation code or an AccessKey pair.
(Recommended) Obtain an activation code. In the SMC console, go to the Description section, click Generate, and copy the activation code.
Obtain an AccessKey pair: An AccessKey pair for an Alibaba Cloud account includes an AccessKey ID and an AccessKey secret. If you have not created an AccessKey pair, you must create one. For more information, see Create an AccessKey pair.
Enter the activation code or AccessKey pair as prompted.
In the GUI, enter the activation code or AccessKey pair into the Token Id/AK and Token Code/SK text boxes and click Start. For more information, see the SMC client user guide.
Command-line version: Enter the values for
access_access_token_idandaccess_token_code, and press theEnterkey.
When a message similar to
Import Source Server [s-bp18x8751kgz2oyh****] Successfully!appears, it indicates that the migration source was imported successfully.
Import a migration source from a Linux source server
Use a remote connection tool that supports file transfer, such as WinSCP, to upload the SMC client to the Linux source server.
Remotely connect to the Linux source server and unzip the SMC client package.
This example uses the
Linux 64-bit General-purpose Edition. If you use a different version of the SMC client, replace the package name in the command with the actual downloaded file name.tar -zxvf go2aliyun_client.tar.gzNoteThe Linux 64-bit ARM Edition supports the g6r general-purpose and c6r compute-optimized instance families. For more information about instance families, see Enterprise-level Arm-based compute instance families.
(Optional) As needed, filter and exclude files or directories that do not need to be migrated.
ImportantIf you enable block replication for migration, you cannot exclude files or directories from migration.
Obtain an activation code or an AccessKey pair.
(Recommended) In the Description section of the SMC console, click Generateand copy the activation code.
Obtain an AccessKey pair: An AccessKey pair for an Alibaba Cloud account includes an AccessKey ID and an AccessKey secret. If you have not created an AccessKey pair, you must create one. For more information, see Create an AccessKey pair.
In the SMC client folder, run the following commands to start the SMC client.
cd go2aliyun_client_linux_x86_64
sudo chmod +x go2aliyun_client
sudo ./go2aliyun_client
Enter the activation code or AccessKey pair as prompted. This example uses an activation code:

After you enter the activation code or AccessKey pair, the following prompts may appear:
If the source system does not have a snapshot driver installed, the SMC client prompts you, as shown in the following figure. You can choose whether to install the snapshot driver based on your needs.
If you enable block replication when you create the migration task, enter
yesto automatically install the snapshot driver.If you do not enable block replication when you create the migration task, enter
no.
ImportantIf the snapshot driver fails to install, do not enable block replication when you create the migration task. Otherwise, the migration will fail.

Most mainstream source systems have rsync installed by default. If it is not installed, the SMC client prompts you. Enter
yesto automatically install rsync, as shown in the following figure.
If SELinux is enabled on the source system, the SMC client prompts you to disable it. Enter
yesto automatically disable SELinux, as shown in the following figure.
When a message similar to
Import Source Server [s-bp11npxndknsycqj****] Successfully!appears, it indicates that the migration source was imported successfully.NoteIf importing the migration source fails, you can troubleshoot the issue based on the displayed message, and then run the following commands in sequence to exit the background program and re-import the migration source. For more information about common issues and solutions, see SMC FAQ and Troubleshooting.
sudo ./go2aliyun_client --abort
sudo ./go2aliyun_client
Associate the source.
Log on to the Server Migration Center (SMC) console.
In the actions column of the destination workspace, click Associate Migration Source.
In the Associate Migration Source dialog box that appears, select a migration source and click OK.
Check the status of the migration source.
Log on to the Server Migration Center (SMC) console.
Click the workgroup ID to go to the workgroup details page.
In the Migration Source section, view the status of the migration source in the Real-Time Migration Status column.
A status of Migration SourceOnline indicates a successful import.
If the status is not Source Online, the import failed. Troubleshoot the issue using the following methods and then re-import the source.
Troubleshoot the issue based on the error message in the console or by checking the SMC client log file. The default installation directories for the SMC client are:
Windows source server: C:\smc.
Linux source server: /smc.
For common issues and solutions, see SMC FAQ and Troubleshooting.
Step 3: Start migration
Log on to the Server Migration Center (SMC) console.
In the Actions column of the workgroup, click Start Migration.
In the Start Migration dialog box, confirm that the servers to be migrated are correct, and click Next.
If servers still exist in the Inoperable Migration Sources tab, you can click the
 icon to view the reasons why they cannot be migrated.
Configure the migration parameters as needed, and click Create.
If you have preset the migration task parameters in the migration template, the template parameters will be automatically filled in when the migration task is created to improve migration efficiency. For more information, see Set a migration template.
NoteIf migration tasks already exist for some migration sources, no additional migration tasks will be created for these sources.
In the message that appears, read the migration notes and click Got It.
In the pop-up Migration Settings dialog box, click View Now.
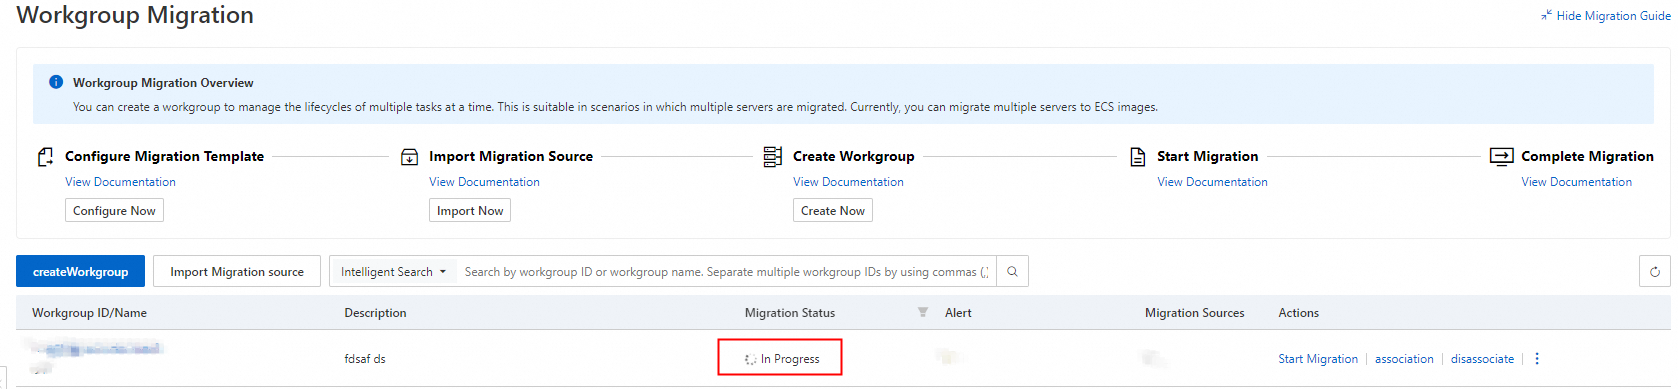
On the Workgroup Migration page, view the migration status.
When the Migration Status changes from Not Started to In Progress, it indicates that the servers have started migrating.
 You can click the workgroup ID to view the real-time migration status of each server. If you have enabled migration drills, SMC will first perform migration drills, and then perform migration operations after the drill is passed.
When the Real-time Migration Status is Drill Passed, it indicates that the migration drill is successful, and the system will automatically start the migration.
When the Real-time Migration Status is Drill Exception, it indicates that the migration drill fails. You need to view the drill report and fix the Critical drill items, and then retry the migration drill. For more information, see Configure a migration test.

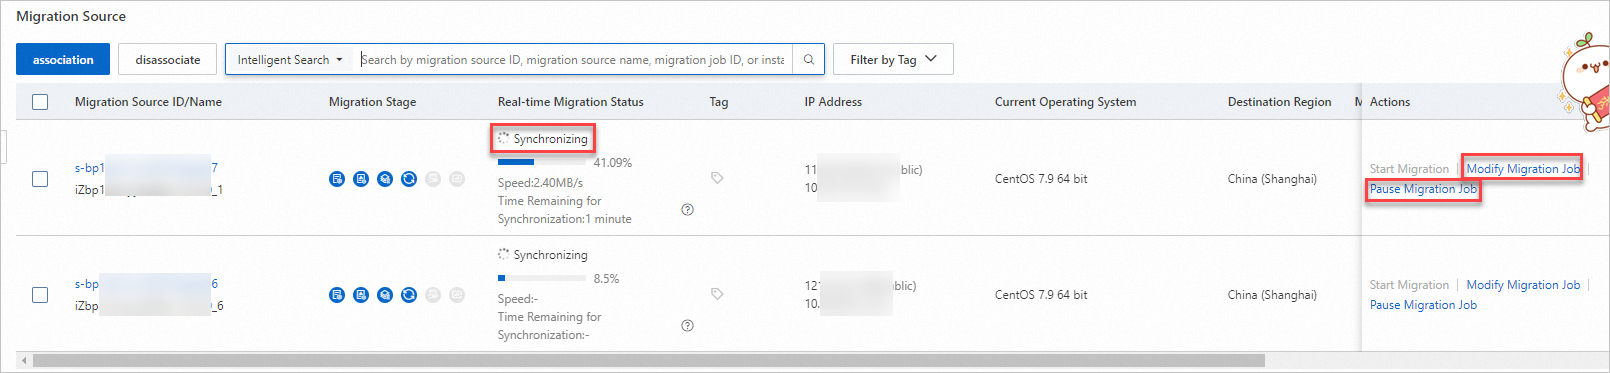
When the Real-time Migration Status is Synchronizing, it indicates that the server data is being migrated.
The time required for data transmission varies based on factors such as the size of the migration source data and the network bandwidth. Wait until the migration job is complete. At this time, you can perform the following steps based on your needs:
Modify migration settings: In the Actions column, click Modify Migration Job to modify the task name, task description, transmission speed limit, compression rate, and Checksum verification parameters.
Pause the migration operation: In the Actions column, click Pause Migration Job to pause migration.
When the Real-time Migration Status is Waiting, it indicates that the first full migration of the server has been completed.
The first migration will involve a full migration of data from the source server system and generate a full ECS custom image.

Step 4: Incremental migration
After the first migration is complete, the migration status is Waiting. SMC will wait for the next frequency cycle based on Synchronization Interval that you set to automatically run incremental migration and generate a new ECS custom image.
Each ECS custom image generated during incremental migration is a full image of the current state of the source server, including the incremental data at the time of migration and all previously migrated data.
Stop the services and run an incremental migration job.
Stop the services on the source server during off-peak hours, and run the incremental migration again. Perform the following operations:
Log on to the source server and stop the system services.
Perform incremental migration.
Automatically perform incremental migration
SMC will automatically run incremental migration based on Synchronization Interval that you set.
Manually perform incremental migration
In the Actions column of the deworkgroup, click startSync, and perform incremental migration in batches as prompted.
 Note
NoteYou can also click the workgroup ID to perform manual incremental synchronization for each server.
Complete incremental synchronization.
After the last incremental migration operation is complete, perform the following steps to complete incremental migration:
In the Actions column of the destination workgroup, select
 > Complete Incremental Synchronization.
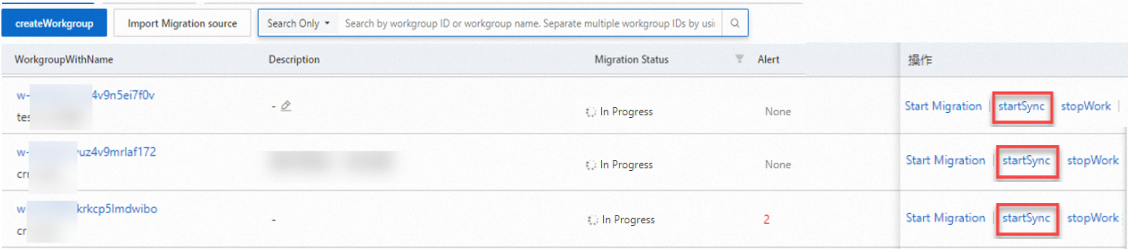
In the Run Incremental Job dialog box, click Next.
You can also select Perform One Last Synchronizatio in the Complete Incremental Synchronization dialog box to complete the last data synchronization.
Click Next to confirm the migration sources.
Click OK to start incremental synchronization.
On the Workgroup Migration page, view the migration status.
The amount of time required for data transmission is subject to factors such as the data size of the migration source and network bandwidth. Wait until the migration job is complete. When the migration status is Completed, the migration is successful.

NoteAfter you complete incremental migration, no more incremental migration operations are automatically performed and you cannot manually run the migration job. If you click Complete Incremental Synchronization and confirm the completion by accident but still need to migrate incremental data, re-create a migration job.
Verify migration results
After the migration is successful, a custom Alibaba Cloud image will be generated.
On the Workgroup Migration page, click the workgroup ID.
In the Migration Deliverables column of the destination migration source, view the ECS custom image.
At the same time, you can click View Report to view the image detection results. For more information, see Configure image check.
Verify the migration results.
(Recommended) Manually verify the migration result
In the Actions column of the destination migration source, click Create Instance to go to the ECS instance creation page in the ECS console. The custom ECS image created after migration is selected by default.
Create an ECS instance using the custom image. For more information, see Create an instance from custom image or shared image.

Use the automatic migration result verification feature
NoteTo use this feature, you must install the Cloud Assistant Agent in your instance, and the system version of the instance must support this feature. For more information, see Install Cloud Assistant Agent.
This feature verifies whether the image generated by the migration job can be used to create and start instances. This verification is based on the CloudOps Orchestration Service (OOS) template named
ACS-SMC-CreateAndVerifyInstanceprovided by Alibaba Cloud.In the Actions column of the destination migration source, click Verify Migration Result.

In the dialog box that appears, read the instructions on the verification process and click Verify Now.
You can also click Customize Verification Parameters to configure the parameters.
In the Verify Migration Result column, view the verification result. Valid values:
Verified: Indicates that the migration is successful. You can click View Output Parameters to check the details.
Not Verified: Indicates that the migration failed. You can click View Cause to view the cause of errors and troubleshoot issues.
You can also click
 in the Actions column, and select View Verification Records in OOS Console to view the template history.
After you migrate the server, perform the following operations to ensure that your business runs normally:
Verify the data to ensure its integrity and correctness. For more information, see How do I check my system after I migrate a Linux server? or How do I check my system after I migrate a Windows server?.
If applications and services on the source server are not configured to start automatically, you must manually start them after the migration.
The IP address changes after migration. If your business involves IP address configurations, you must modify the domain name resolution, ICP filing, and other settings after the migration.
If a domain name is already mapped to the source server, map the domain name to the new public IP address of the server. For more information, see Add a website resolution.
To keep the private IP address unchanged, you can modify the private IP address after the migration is complete.
ECS Image: When you create an ECS instance, you can specify a private IP address. For more information, see Specify the primary private IPv4 address of the primary network interface card when purchasing an ECS instance.
When migrating to a ECS Instance, if you do not modify the private IPv4 address in the advanced configuration during the migration settings step, you can do so after the migration is complete. For more information, see Modify the primary private IPv4 address of the primary network interface card of an existing instance.
Clear resources
During migration, SMC will create a temporary pay-as-you-go intermediate instance named No_Delete_SMC_Transition_Instance under your Alibaba Cloud account to assist with migration. The method to clear resources depends on whether the migration is successful.
If the migration is successful, the intermediate instance is automatically released. No manual operation is required.
If the migration fails, the intermediate instance is not automatically released and incurs fees as long as the migration job exists. You can release the intermediate instance in one of the following ways to reduce costs:
If you confirm that you no longer need the migration task, click the workgroup ID, click the migration source ID, and click Clear Migration Job in the Actions column of the migration task to automatically clear the intermediate instance.
Manually release the intermediate instance. For more information, see Release an instance.
References
If you need to migrate a single server, see: