Playlist mode production studios are used to quickly assemble multiple video programs. This feature lets you create playlist-based live channels to enrich your live streaming scenarios and content formats. You can create, retrieve, update, and delete playlists, and edit program content. This topic describes how to use a playlist mode production studio for live streaming.
Prerequisites
The production studio service is enabled. For more information, see Enable the production studio service.
An accelerated domain name is added and a canonical name (CNAME) record is configured for the domain name. For more information, see Add an accelerated domain name and Configure a CNAME record for a streaming domain.
(Optional) If you want to select a video source from the ApsaraVideo Live console, a streaming domain for the video source is added and a CNAME record is configured. For more information, see Add a streaming domain and Configure a CNAME record for a streaming domain.
(Optional) If you want to select a video source from the media library, a domain name for ApsaraVideo VOD is added and a CNAME record is configured. For more information, see Add a domain name for ApsaraVideo VOD and Configure a CNAME record for an ApsaraVideo VOD domain name.
(Optional) If you want to use the live recording feature, the service for storing recordings is enabled. For more information, see Record live streams to OSS.
You have read the development guide. For more information, see Development guide.
Background information
Playlist mode production studios are used to quickly assemble multiple video programs and create playlist-based live channels. You can create, retrieve, update, and delete playlists, and edit program content. You can flexibly call and easily configure the service to efficiently implement various business scenarios. This topic helps you understand the entire process, from accessing a playlist mode production studio to starting a real-time live stream.
The production studio service provides a series of API operations. These operations allow you to add, edit, modify, query, and stop programs in a playlist mode production studio. This topic describes how to use API operations to quickly integrate the playlist mode production studio service.
You can add up to 1,000 programs to each playlist mode production studio.
Console operations
The console lets you add media files such as VOD videos, images, and live streams. You can also set the playback duration and playlist order. After you add content in batches, you can quickly start streaming. You can also adjust the playlist order and add or delete content in real time.
Log on to the ApsaraVideo Live console. In the navigation pane on the left, choose .
Find your playlist mode production studio and in the Actions column, click Open.
When you enter a production studio instance for the first time, the configuration panel appears. After you complete the configuration, click OK.
If you have entered the production studio before, you can click Live Stream Settings in the upper-right corner of the page to open the configuration panel and modify the configuration.
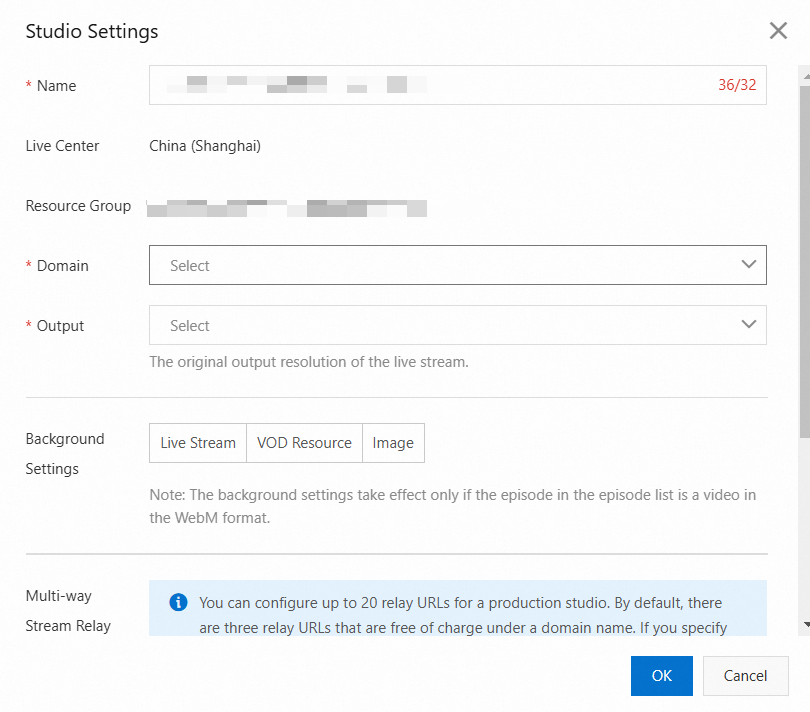
Configuration item
Procedure
Domain
Click the Domain text box. From the Domain drop-down list, select the ApsaraVideo Live domain name that you want to use and for which you have configured a CNAME record.
Output
From the Output drop-down list, select a resolution for the output stream. Options include Low Definition, Standard Definition, High Definition, Ultra High Definition 1080p (1920 × 1080), Portrait Low Definition, Portrait Standard Definition, Portrait High Definition, and Portrait Ultra High Definition 1080p (1080 × 1920).
Background Settings
This setting lets you set a live stream, a VOD resource, or an image as the playlist background.
Live Stream
Select from ApsaraVideo Live Console: After you select a domain name, a list of all live streams under that domain name is automatically displayed. Select the ingest URL that you want to add to the current production studio instance.
Enter Streaming URL: Enter a valid live stream URL. The URL can be in RTMP, FLV, or RTS format.
VOD Resource
Click Select. From the list of video files in the media asset library, select a video.
Image
Select From Media Library: Click Select Image. From the list of image files in the media asset library, select an image.
Local Upload: You can upload a local image. The image must be in JPG or PNG format and cannot exceed 10 MB in size. Uploaded images are stored in the ApsaraVideo VOD media asset library.
NoteThe background setting takes effect only when the VOD videos in the playlist are in WebM format.
Multi-way Stream Relay
(Optional) Click Add URL to set a restreaming address.
ImportantAfter you add or delete a restreaming address, you must disconnect and restart the PGM output for the settings to take effect.
Using third-party platforms incurs extra restreaming fees. By default, you get three free restreaming addresses for each domain name. If you use more than three addresses, you are charged for the extra ones. The billing standards are the same as those for restreaming in the ApsaraVideo Live console. For more information, see Restreaming billing in the Live Center.
Under Playlist, click Add to configure the settings.
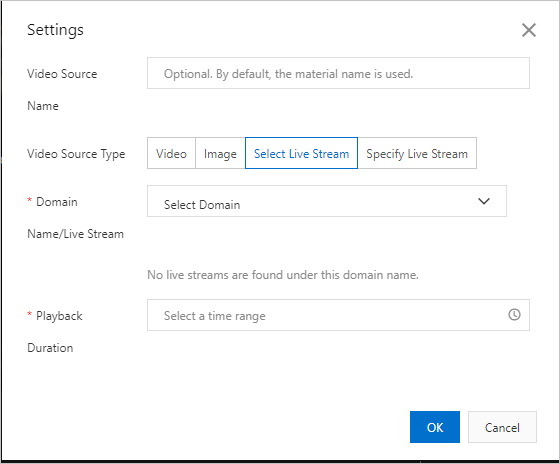
Setting
Description
Video Source Name
Optional. By default, the name of the source file is used.
Video Source Type
The available types are:
Video
Image
Select Live Stream
Enter Live Stream
Video
If you set Video Source Type to Video, click Select to add a VOD video from the media asset library. You can set the number of loops or the loop duration.
Image
If you set Video Source Type to Image, click Select Image to add an image from the media asset library. You must set the playback duration.
Domain Name/Live Stream/Streaming URL
If you set Video Source Type to Select Live Stream or Specify Live Stream, select an online live stream from the Live Center or enter a live stream URL. The URL can be in RTMP, FLV, or RTS format. You can set the playback duration.
Loop
The loop settings vary based on the video source type. Set the number of loops and playback duration as needed.
After you configure the settings, click OK.
Click Start. You can manage the ongoing live stream using the following settings.
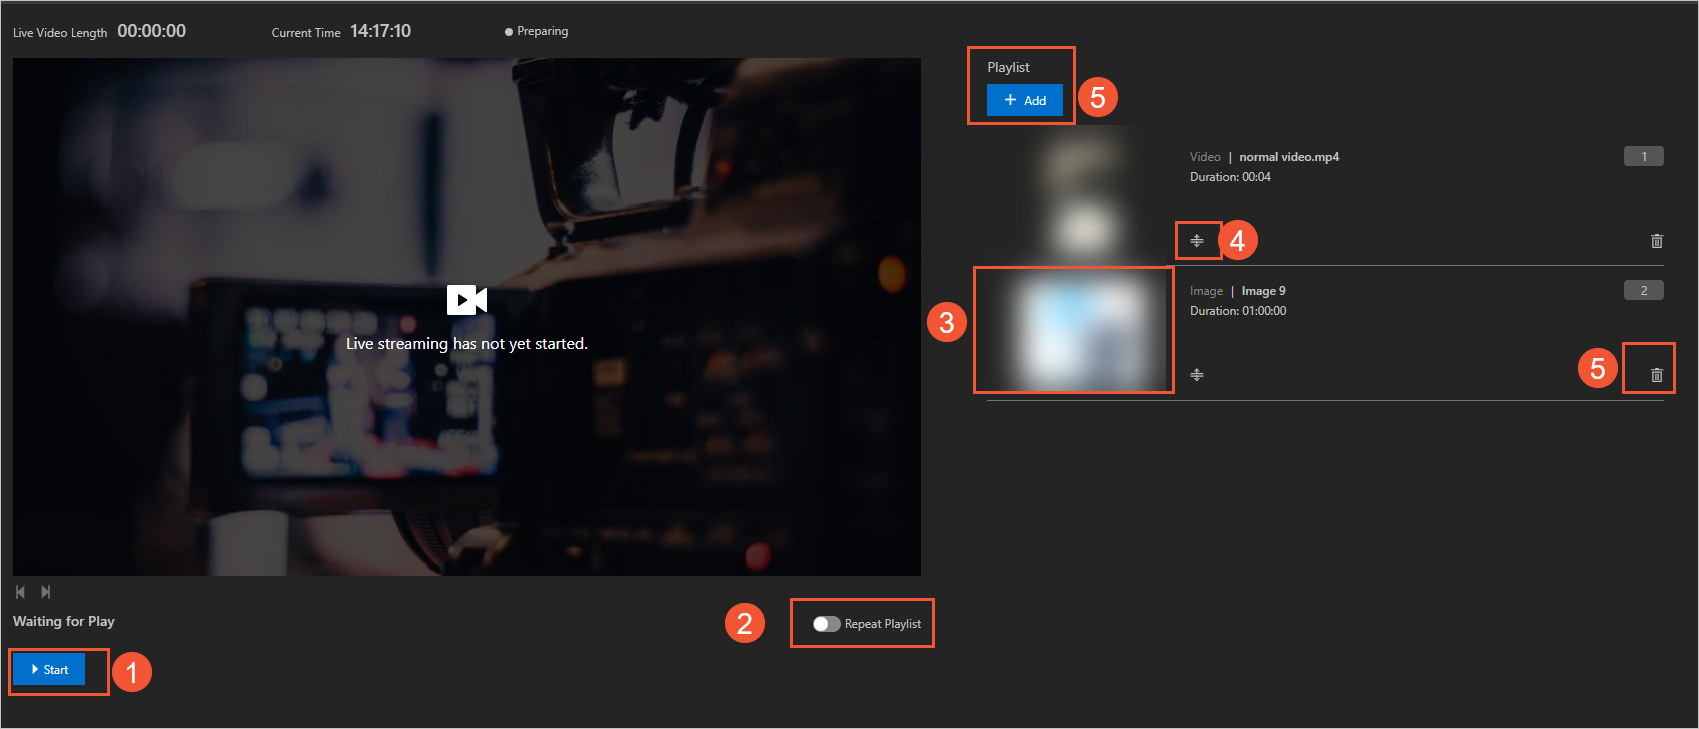
Setting
Procedure
①
Start or stop the live stream at any time.
②
Set the number of loops for the entire playlist.
③
Switch to a specific program.
④
Adjust the playlist order.
⑤
Add or delete individual programs.
API operations
You can call API operations to quickly integrate and use the playlist mode production studio service. The process is as follows:
Create and configure a new playlist mode production studio. For more information, see CreateCaster and SetCasterConfig.
Add a program to or remove a program from the playlist. For more information, see AddShowIntoShowList and RemoveShowFromShowList.
(Optional) Query playlist details and modify playlist properties. For more information, see DescribeShowList and ModifyShowList.
Start a playlist mode production studio. For more information, see StartCaster.
Stop a playlist mode production studio. For more information, see StopCaster.
(Optional) Create a scheduled task to automatically start and stop a playlist. For more information, see InitializeAutoShowListTask.