The production studio in playlist mode lets you assemble various forms of content into a single stream. You can add, remove, modify, and query programs in the playlist, edit video content, and control content delivery in the production studio. This topic introduces how to use a production studio in playlist mode through the ApsaraVideo Live console or API operations.
Prerequisites
The production studio feature is enabled. For more information, see Create a production studio. For feature availability, see Supported regions.
A domain name is added to ApsaraVideo Live and a CNAME record is configured for the domain name. For more information, see Add an accelerated domain name and Configure a CNAME record in Alibaba Cloud DNS.
Optional. If you want to select a video source from ApsaraVideo Live, make sure that the domain name of the video source is added to ApsaraVideo Live and that a CNAME record is configured. For more information, see Add an accelerated domain name and Configure a CNAME record in Alibaba Cloud DNS.
Optional. If you want to select a video source from ApsaraVideo VOD, make sure that the domain name of the video source is added to ApsaraVideo VOD and that a CNAME record is configured. For more information, see Add a domain name for CDN and Add a CNAME record in Alibaba Cloud DNS.
Optional. If you want to record live streams, make sure that the recording feature is enabled. For more information, see Live stream recording.
Use the ApsaraVideo Live console
In the console, you can add media assets such as video-on-demand (VOD) resources, images, and live streams as programs to the playlist. You can also specify the playback duration, sort and adjust the programs even when the playback is started.
Log on to the ApsaraVideo Live console. In the left-side navigation pane, choose .
Select a production studio in playlist mode or click Open in the Actions column.
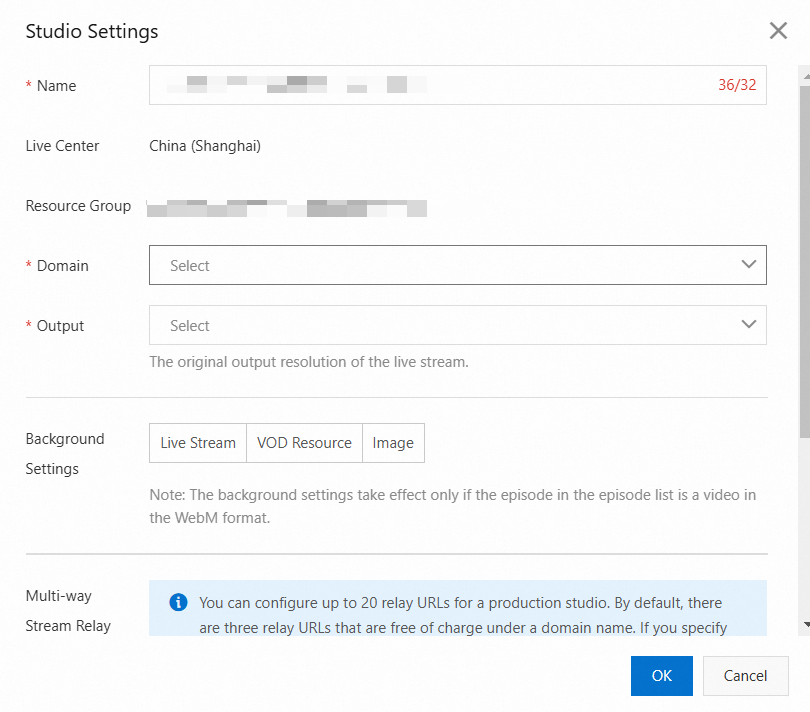
The Studio Settings dialog box is displayed the first time you enter a production studio. Configure the parameters in the dialog box.
You can also click Live Stream Settings in the upper-right corner to open the Studio Settings dialog box.

Parameter
Description
Domain
Select a domain name from the drop-down list. The CNAME record must be configured for the domain name.
Output
Select the original resolution of the live stream. Valid values:
Low Definition 360p (640 × 360)
Standard Definition 480p (854 × 480)
High Definition 720p (1280 × 720)
Ultra High Definition 1080p (1920 × 1080)
Portrait Low Definition 360p (360 × 640)
Portrait Standard Definition 480p (480 × 854)
Portrait High Definition 720p (720 × 1280)
Portrait Ultra High Definition 1080p (1080 × 1920)
Background Settings
You can set the playlist background to a live stream, a VOD resource, or an image.
Live Stream
Select Live Stream: Select a domain name and an ingest URL under the domain name.
Enter Streaming URL: Enter a streaming URL in the Real-Time Messaging Protocol (RTMP), Flash Video (FLV), or Real-Time Streaming (RTS) format.
VOD Resource
Click Select. In the dialog box that appears, select a video from the media library of ApsaraVideo VOD.
Image
Select From Media Library: Click Select Image. In the dialog box that appears, select an image from the media library of ApsaraVideo VOD.
Local Upload: Upload a local image in the JPG or PNG format. The image can be up to 10 MB in size. The uploaded image will be stored in the media library of ApsaraVideo VOD.
NoteThe background settings only apply to VOD programs in the WebM format.
Multi-way Stream Relay
Optional. Click Add URL to add a destination URL.
ImportantAfter you add or delete a URL for stream relay, restart PGM to apply the changes.
If your live stream is relayed to third-party platforms, you are charged additional fees. Each domain name can have three relay destinations free of charge. For excess URLs, the pricing is the same as that of live center stream relay. For more information, see Billing of stream relay.
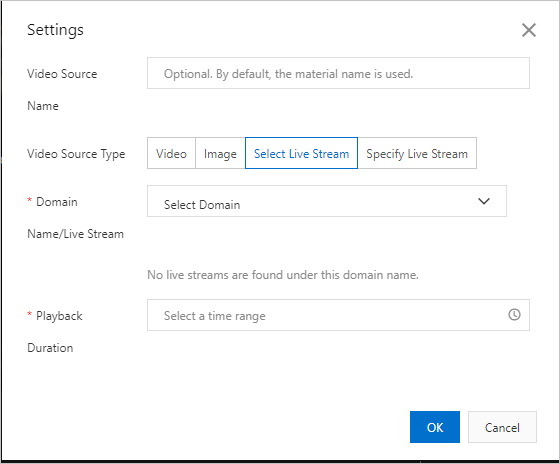
In the Playlist section, click Add to add a program to the playlist. You can add up to 1,000 programs.

Parameter
Description
Video Source Name
Optional. Enter a name for the media asset. By default, the file name is used.
Video Source Type
Valid values:
Video
Image
Select Live Stream
Specify Live Stream
Video
Click Select to add a video from the media library.
Image
Click Select Image to add an image from the media library.
Domain Name/Live Stream or Streaming URL
Select an active live stream from the live center or enter a streaming URL. Streams in the RTMP, FLV, and RTS formats are supported.
Loop
Configure the loop settings, such as the number of loops or playback duration, based on the selected video source type.
Click OK.
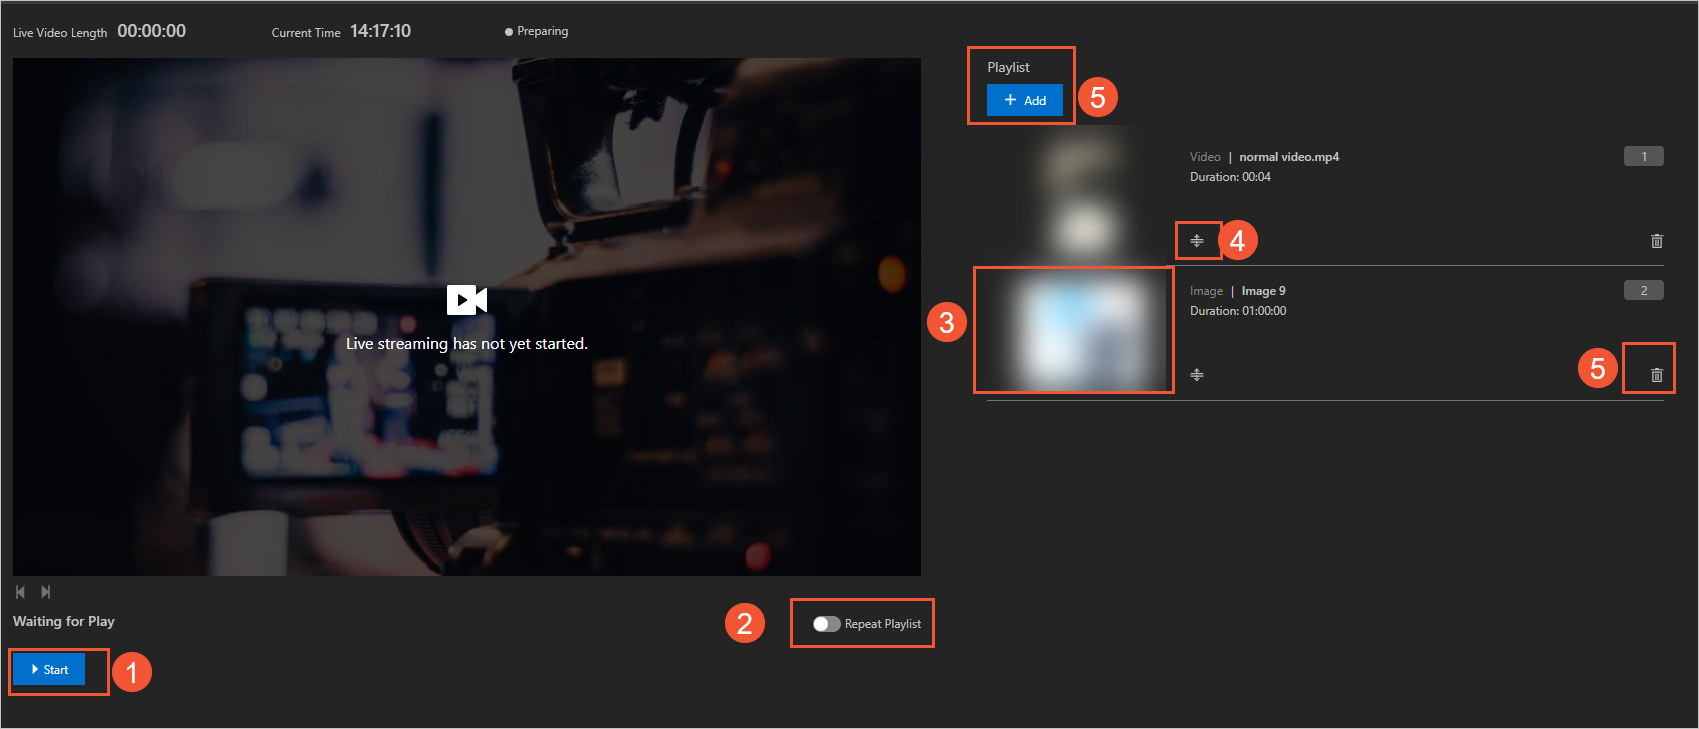
Click Start to start live streaming. You can perform the operations described in the following table as required.

No.
Description
①
Starts or stops live streaming.
②
Specifies the number of loops for the playlist.
③
Switches to a specific program.
④
Adjusts the sequence of programs in the playlist.
⑤
Adds or removes a program.
Call API operations
This section describes the API operations that you can call to configure and use a production studio in playlist mode.
Call the CreateCaster and SetCasterConfig operations to create and configure a production studio in playlist mode.
Call the AddShowIntoShowList or RemoveShowFromShowList operation to add a program to or remove a program from the playlist.
Optional. Call the DescribeShowList operation to query the details of the playlist. Call the ModifyShowList operation to modify the attributes of the playlist.
Call the StartCaster operation to start live steaming.
Call the StopCaster operation to stop live streaming.
Optional. Call the InitializeAutoShowListTask operation to create a scheduled task to start and stop the playback at the specified points in time.