An important objective of Istio is to support the hybrid environment. For example, services can run on the Alibaba Cloud Container Service, a local Kubernetes cluster, or other services of the public cloud.Istio can provide a uniform view for the entire service platform, manage connections between these environments, and ensure security of these connections.The Istio multi-cluster feature allows you to add multiple Kubernetes to a single mesh and enable the service discovery function across clusters.According to the official introduction, Istio will also support global cluster-level load balancing and non-flat networks through gateway equivalent interconnection.
This article uses an example to describe how Alibaba Cloud Container Service implements application and service hybrid orchestration in multiple Kubernetes clusters based on Istio.You will see that after the Istio control plane is installed in a Kubernetes cluster and Istio is connected to two Kubernetes clusters, a mesh network is generated across multiple Kubernetes clusters.

Alibaba Cloud Container Service for Kubernetes V1.10.4 has been released. You can use the container service console to conveniently and quickly create a Kubernetes cluster.For more information about the process, see create a Kubernetes cluster.
Install and configure kubectl. Ensure that kubectl can connect to the Kubernetes clusters and the following network requirements are met:
| Cluster | ContainerCIDR | ServiceCIDR |
| -------------------------| --------------------- | --------------------- |
| Istio-control-plane | 172.16.0.0/16 |172.19.0.0/20 |
| Istio-remote1 | 172.20.0.0/16 |172.21.0.0/20 |
You can obtain files involved in this example by clicking here.
The Istio control plane needs to access all clusters in the mesh to implement service discovery.The following describes how to create a service account in the remote cluster and grant it essential RBAC permissions. Later, the credential of this service account will be used to generate a kubeconfig file. In this way, the remote cluster can be accessed.
The following process should be executed in every cluster to be added to the service mesh.This process must be completed by the administrator of each cluster.Run the generate-kubeconfig.sh command. The parameter is the unique identifier that describes the related cluster.
./generate-kubeconfig.sh myremote1After these steps are completed, the kubeconfig file of the remote cluster is created in the current directory.The file name of the cluster is consistent with the cluster name in the original kubeconfig file.
In the cluster that runs the Istio control plane, create a secret for each remote cluster:
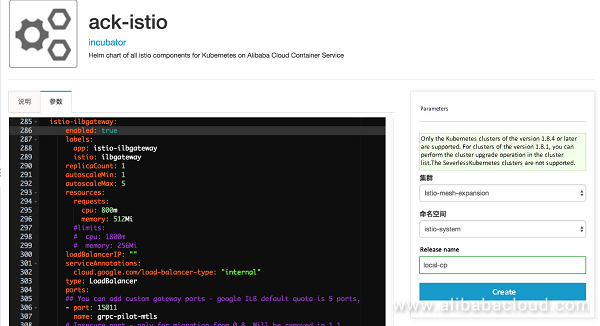
./create-secret.sh myremote1You can use the application catalog to conveniently deploy Istio.Click App Catalog on the left-side navigation bar, and select ack-istio on the right side. On the displayed page,select the namespace istio-system, and click Parameters to modify parameter settings for custom installation.
......
   istio-ilbgateway:
      enabled: true
......
Note: This document provides important information for installation and uninstallation, especially frequently-seen custom resource definition (CRD) version problems.

Run the following script to obtain the connection information of the control plane:
export PILOT_POD_IP=$(kubectl -n istio-system get pod -l istio=pilot -o jsonpath='{.items[0].status.podIP}')
export POLICY_POD_IP=$(kubectl -n istio-system get pod -l istio=mixer -o jsonpath='{.items[0].status.podIP}')
export STATSD_POD_IP=$(kubectl -n istio-system get pod -l istio=statsd-prom-bridge -o jsonpath='{.items[0].status.podIP}')
export TELEMETRY_POD_IP=$(kubectl -n istio-system get pod -l istio-mixer-type=telemetry -o jsonpath='{.items[0].status.podIP}')
export ZIPKIN_POD_IP=$(kubectl -n istio-system get pod -l app=jaeger -o jsonpath='{.items[0].status.podIP}')
echo "remotePilotAddress: $PILOT_POD_IP"
echo "remotePolicyAddress: $POLICY_POD_IP"
echo "remoteStatsdPromBridge: $STATSD_POD_IP"
echo "remoteTelemetryAddress: $TELEMETRY_POD_IP"
echo "remoteZipkinAddress: $ZIPKIN_POD_IP"
Click App Catalog on the left-side navigation bar, and select ack-istio-remote on the right side. On the displayed page,select the namespace istio-system, and click Parameters to modify parameter settings based on the obtained information for custom installation.
envoyStatsd:
      enabled: false
      host: "$remoteStatsdPromBridge"
  # Remote Istio endpoints.Can be hostnames or IP addresses
  # The Pilot address is required.The others are optional.
  remotePilotAddress: "$remotePilotAddress"
  remotePolicyAddress: "$remotePolicyAddress"
  remoteTelemetryAddress: "$remoteTelemetryAddress"
remoteZipkinAddress: "$remoteZipkinAddress"Use the following command line or console to create a namespace bookinfo, and deploy the modified application.In the modified version, the details component is deleted, and ingressgateway is defined.
You can obtain files involved in this example by clicking here.
kubectl create ns bookinfo

kubectl label namespace bookinfo istio-injection=enabled
kubectl apply -n bookinfo -f ./bookinfo/bookinfo-without-details.yaml
kubectl apply -n bookinfo -f ./bookinfo/bookinfo-gateway.yaml
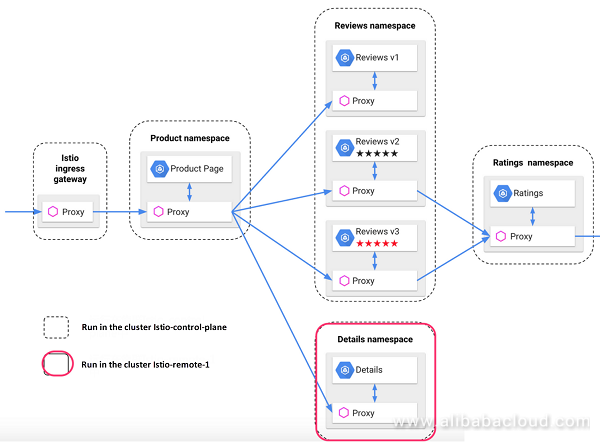
For the deployment modified based on the official example, the details component runs in the Kubernetes cluster Istio-control-plane that is installed on the Istio local control plane, and the details component runs in another Kubernetes cluster Istio-remote-1.

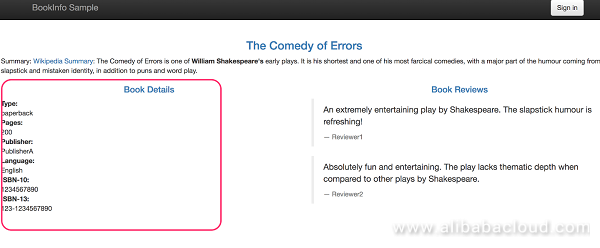
After the application runs normally, use the address exposed by ingressgateway to visit the /productpage page. The page should look similar to the following figure, where the details part cannot be displayed normally. This is because the details component is not installed in the cluster Istio-remote-1 and added to the same mesh yet.

Use the same method to install the details part of the example application in the cluster Istio-remote-1. You can obtain the YAML file by clicking here.
kubectl apply -n bookinfo -f ./bookinfo/bookinfo-details.yamlThen, the details service is registered on the control plane. You can check whether the response of {pilot-ipAddress}:8080/v1/registration contains the details service:

Visit the /productpage page again. The page should look similar to the following figure, where the details part should be displayed normally:

This article uses an official example to describe how Alibaba Cloud Container Service implements application and service hybrid orchestration in multiple Kubernetes clusters based on Istio.You will see that after the Istio control plane is installed in a Kubernetes cluster and Istio is connected to two Kubernetes clusters, a mesh network is generated across multiple Kubernetes clusters.
You are welcome to use Alibaba Cloud Container Service for Kubernetes to quickly build an Istio open platform and integrate Istio to microservice development in your project.
Using Istio on Alibaba Cloud Container Service for Kubernetes

56 posts | 8 followers
FollowXi Ning Wang(王夕宁) - December 16, 2020
Xi Ning Wang(王夕宁) - December 16, 2020
Alibaba Container Service - March 29, 2019
Xi Ning Wang(王夕宁) - July 1, 2021
三辰 - July 6, 2020
Alibaba Clouder - February 14, 2020

56 posts | 8 followers
Follow Container Service for Kubernetes
Alibaba Cloud Container Service for Kubernetes is a fully managed cloud container management service that supports native Kubernetes and integrates with other Alibaba Cloud products.
Learn More ACK One
Provides a control plane to allow users to manage Kubernetes clusters that run based on different infrastructure resources
Learn More Cloud-Native Applications Management Solution
Accelerate and secure the development, deployment, and management of containerized applications cost-effectively.
Learn More Container Registry
A secure image hosting platform providing containerized image lifecycle management
Learn MoreMore Posts by Xi Ning Wang(王夕宁)