By Xining Wang
Use ASM to Manage Knative Services (1): An Overview of Knative on ASM
Use ASM to Manage Knative Services (2): Use Knative on ASM to Deploy Serverless Applications
Use ASM to Manage Knative Services (3): Use Custom Domain in Knative on ASM
Use ASM to Manage Knative Services (4): Use ASM Gateway to Access Knative Services over HTTPS
Use ASM to Manage Knative Services (6): Auto Scaling Based on the Number of Traffic Requests
Knative Pod Autoscaler (KPA) is an out-of-the-box feature that can scale pods for your application to withstand traffic fluctuations. This article describes how to enable auto scaling of pods based on the number of requests.
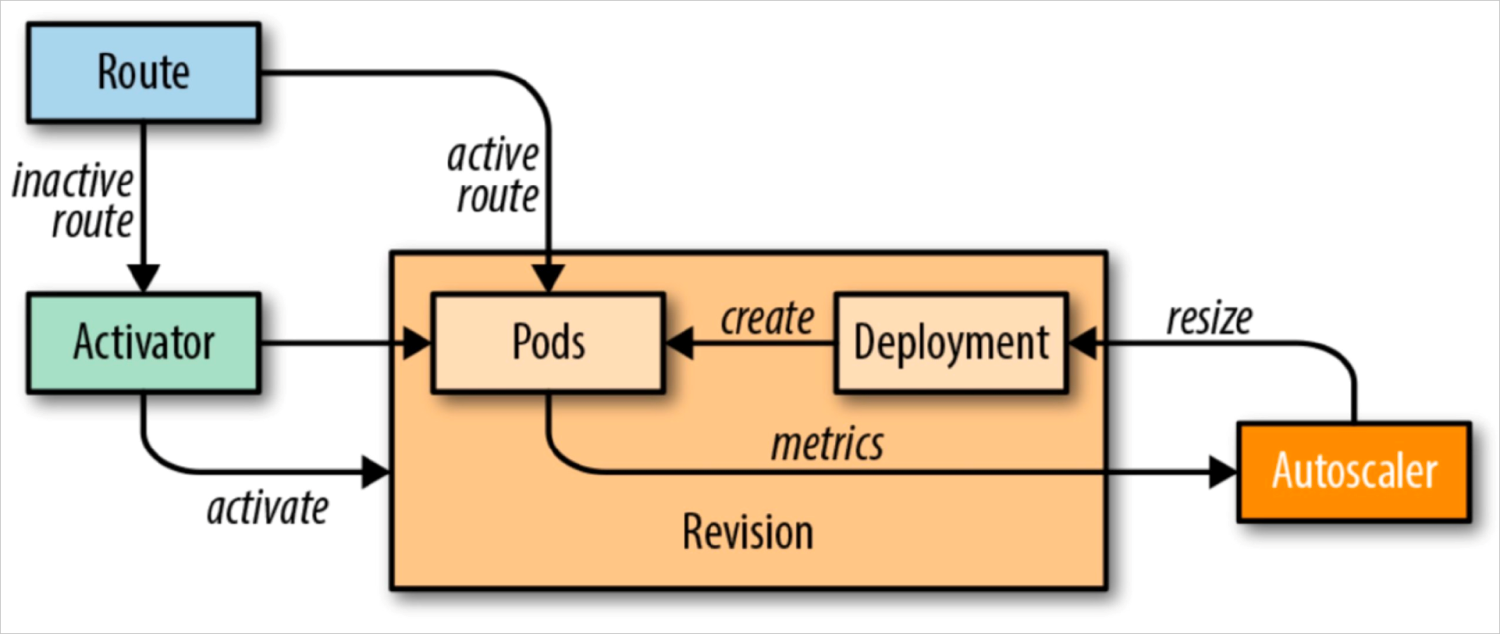
Knative Serving adds the Queue-Proxy container to each pod. The Queue-Proxy container sends concurrency metrics of the application containers to KPA. After KPA receives the metrics, KPA automatically adjusts the number of pods provisioned for a Deployment based on the number of concurrent requests and related algorithms.

The increase in concurrent requests does not necessarily increase the QPS. In scenarios where the access load is heavy, if the concurrency is increased, the QPS may be decreased. This is because the system is overloaded, and CPU and memory usage is high, which downgrades the performance and increases the response latency.
Please visit the link below for specific algorithm: https://www.alibabacloud.com/help/en/container-service-for-kubernetes/latest/enable-automatic-scaling-for-pods-based-on-the-number-of-requests
Please visit the link below for information about how to use HPA in Knative: https://www.alibabacloud.com/help/en/container-service-for-kubernetes/latest/best-practices-use-hpa-in-knative
In order to configure KPA, you must configure config-autoscaler. config-autoscaler is configured by default. The following content describes the key parameters.
Run the following command to query config-autoscaler:
kubectl -n knative-serving get cm config-autoscalerExpected output:
apiVersion: v1
kind: ConfigMap
metadata:
 name: config-autoscaler
 namespace: knative-serving
data:
 container-concurrency-target-default: "100"
 container-concurrency-target-percentage: "0.7"
 enable-scale-to-zero: "true"
 max-scale-up-rate: "1000"
 max-scale-down-rate: "2"
 panic-window-percentage: "10"
 panic-threshold-percentage: "200"
 scale-to-zero-grace-period: "30s"
 scale-to-zero-pod-retention-period: "0s"
 stable-window: "60s"
 target-burst-capacity: "200"
requests-per-second-target-default: "200"| Field | Description | Value |
| scale-to-zero-grace-period | The time when inactive revision keeps running before KPA scales the number of pods to zero. The minimum period is 30 seconds. | 30s |
| stable-window | In stable mode, KPA scales pods based on the average number of concurrent requests per pod within the stable window. You can also specify the stable window using an annotation in the Deployment revision. autoscaling.knative.dev/window: 60s |
60s |
| enable-scale-to-zero | Set enable-scale-to-zero to true | true |
| Field | Description | Value |
| container-concurrency-target-default | It defines how many concurrent requests are required at a given time (soft limit). It is the recommended configuration for Autoscaler in Knative. The concurrency target in the ConfigMap is set to 100 by default. In addition, this value can be modified by the autoscaling.knative.dev/target annotation in the Revision. autoscaling.knative.dev/target: 50 |
100 |
| containerConcurrency | When running in Stable mode, Autoscaler operates under the average number of concurrency during the stable window. You can also configure stable-window in the Revision annotation. autoscaling.knative.dev/window: 60s |
60s |
| container-concurrency-target-percentage | This parameter is known as a concurrency percentage or a concurrency factor. It will directly participate in the calculation of the concurrency number for auto scaling. For example, if the concurrency target or the containerConcurrency is set to 100, the concurrency factor container-concurrency-target-percentage is 0.7. Then, the scale-out will be triggered when the actual concurrency number reaches 70 (100 0.7). Therefore, the actual concurrency number of auto scaling = target (or containerConcurrency) container-concurrency-target-percentage. | 0.7 |
You can use minScale and maxScale parameters to set the minimum and maximum number of Pods served by your application. You can use these two parameters to reduce cold starts and computing costs.
Description:
You can configure the minScale and maxScale parameters in the revision template:
spec:
  template:
    metadata:
      autoscaling.knative.dev/minScale: "2"
autoscaling.knative.dev/maxScale: "10"In this scenario, you can set the number of concurrent requests and use KPA to implement auto scaling. Follow these steps to deploy the autoscale-go application in the cluster.
1) Create autoscale-go.yaml. Set the number of concurrent targets to 10.
apiVersion: serving.knative.dev/v1
kind: Service
metadata:
  name: autoscale-go
  namespace: default
spec:
  template:
    metadata:
      labels:
        app: autoscale-go
      annotations:
        autoscaling.knative.dev/target: "10"
    spec:
      containers:
        - image: registry.cn-hangzhou.aliyuncs.com/knative-sample/autoscale-go:0.1
2) Use kubectl to connect to the cluster and run the following command on the command line to deploy the autoscale-go:
kubectl apply -f autoscale-go.yaml3) Log on to the ASM service mesh console to view the ASM gateway
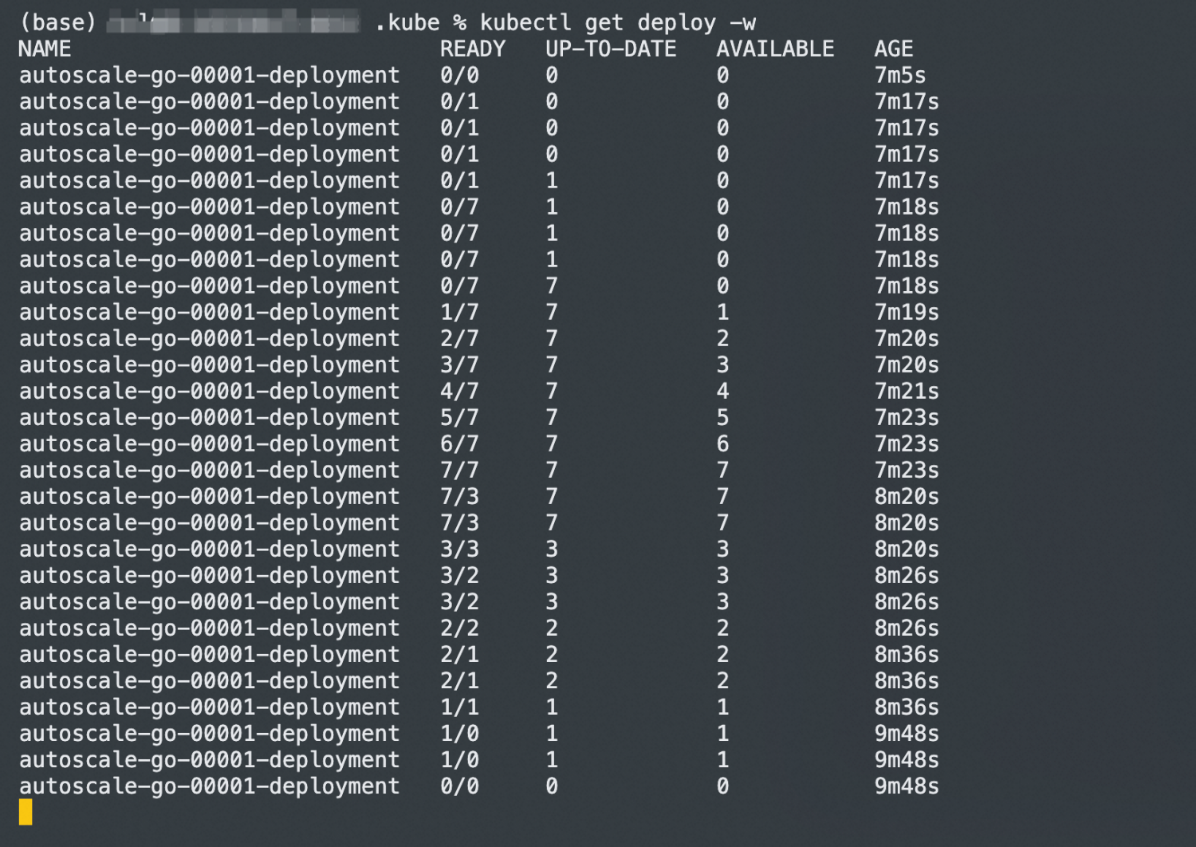
4) Use the Hey stress testing tool to maintain 50 concurrent requests within 30s (please replace xxx.xx.xx.xxx with your gateway IP)
Note: Please see Hey for information about Hey stress testing tools.
hey -z 30s -c 50 -host "autoscale-go.default.example.com" "http://xxx.xx.xx.xxx?sleep=100&prime=10000&bloat=5"Expected output:

As you can see from the results, seven pods are scaled out in the whole process. This is because when the container concurrency is greater than a certain percentage of the target concurrency (70% by default), knative will create more standby pods in advance to avoid a further increase in concurrency, and the target is exceeded.
Scale bounds control the minimum and maximum numbers of pods that can be provisioned for an application. Auto scaling is achieved by setting the minimum and maximum number of Pods that can be provisioned for an application. Follow these steps to deploy the autoscale-go application in the cluster.
1) Create autoscale-go.yaml. Set the maximum number of concurrent requests to 10, set the minimum number of reserved instances of minScale to 1, and set the maximum number of scale-out instances of maxScale to 3.
apiVersion: serving.knative.dev/v1
kind: Service
metadata:
  name: autoscale-go
  namespace: default
spec:
  template:
    metadata:
      labels:
        app: autoscale-go
      annotations:
        autoscaling.knative.dev/target: "10"
        autoscaling.knative.dev/minScale: "1"
        autoscaling.knative.dev/maxScale: "3"
    spec:
      containers:
        - image: registry.cn-hangzhou.aliyuncs.com/knative-sample/autoscale-go:0.1
2) Use kubectl to connect to the cluster and run the following command on the command line to deploy the autoscale-go:
kubectl apply -f autoscale-go.yaml3) Log on to the ASM console to view the ASM gateway.
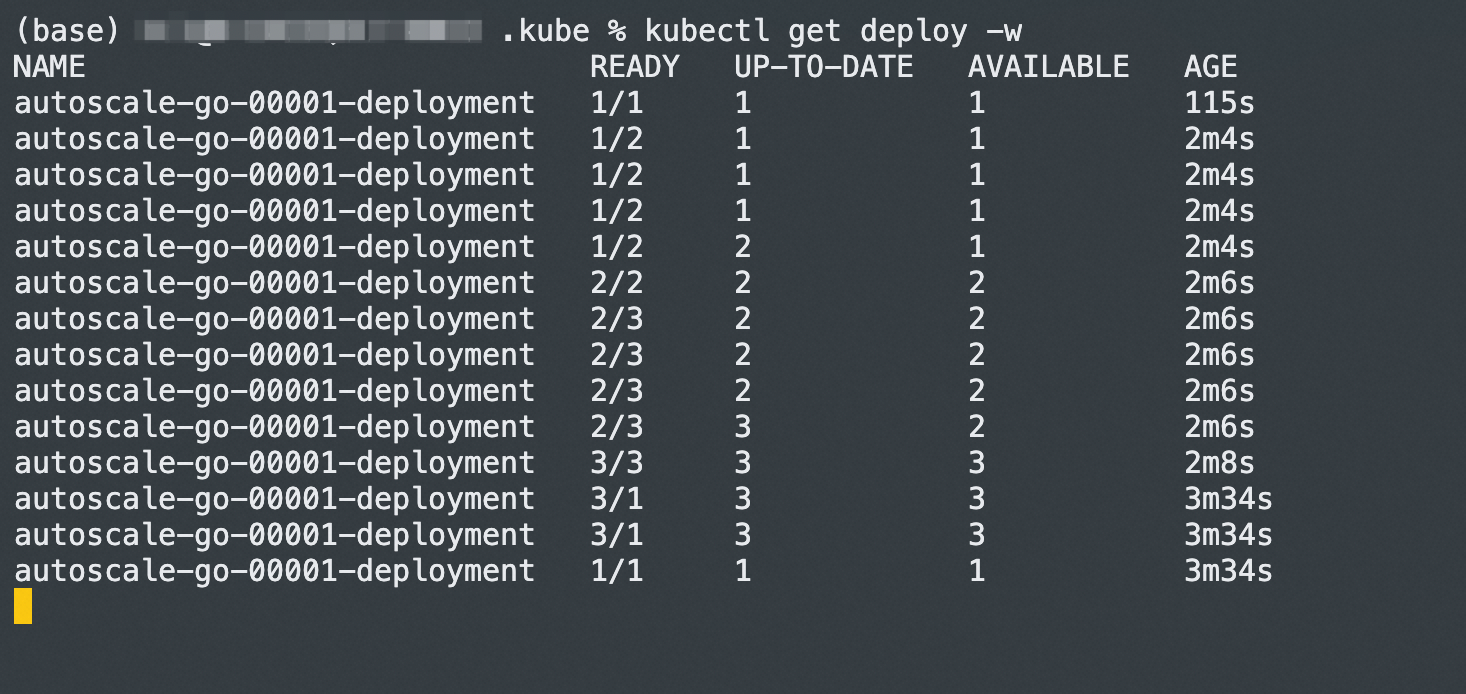
4) Use the Hey stress testing tool to maintain 50 concurrent requests within 30s (please replace xxx.xx.xx.xxx with your gateway IP)
Note: Please see Hey for more information about Hey stress testing tools.
hey -z 30s -c 50 -host "autoscale-go.default.example.com" "http://xxx.xx.xx.xxx?sleep=100&prime=10000&bloat=5"Expected output:

The result is consistent with our configuration, with a maximum of 3 Pods added. Even if there is no access request traffic, one running Pod is maintained.
Traffic Labelling and Routing of ASM (1): The Definition of Traffic Label

56 posts | 8 followers
FollowXi Ning Wang(王夕宁) - August 7, 2023
Xi Ning Wang(王夕宁) - August 7, 2023
Xi Ning Wang(王夕宁) - August 7, 2023
Alibaba Cloud Native Community - April 9, 2024
Xi Ning Wang(王夕宁) - August 7, 2023
Xi Ning Wang(王夕宁) - August 7, 2023

56 posts | 8 followers
Follow Alibaba Cloud Service Mesh
Alibaba Cloud Service Mesh (ASM) is a fully managed service mesh platform that is compatible with Istio.
Learn More Function Compute
Alibaba Cloud Function Compute is a fully-managed event-driven compute service. It allows you to focus on writing and uploading code without the need to manage infrastructure such as servers.
Learn More Container Service for Kubernetes
Alibaba Cloud Container Service for Kubernetes is a fully managed cloud container management service that supports native Kubernetes and integrates with other Alibaba Cloud products.
Learn More Serverless Workflow
Visualization, O&M-free orchestration, and Coordination of Stateful Application Scenarios
Learn MoreMore Posts by Xi Ning Wang(王夕宁)