By Xining Wang
This article describes how to use lanes to manage traffic in the ASM console. For more information about the concept of end-to-end canary release in ASM, see https://www.alibabacloud.com/help/en/alibaba-cloud-service-mesh/latest/implement-label-routing-through-traffic-labels
• An ASM instance of Enterprise Edition or Ultimate Edition is created and the instance is of version 1.17.2.22 or later. For more information, see Create an ASM instance.
• An ACK cluster is created and added to the ASM instance. For more information, see Add a cluster to an ASM instance.
• An ASM gateway named ingressgateway is created. For more information, see Create an ingress gateway service.
• A rule configuration named ingressgateway is created in the istio-system namespace. The rule configuration is defined as follows:
apiVersion: networking.istio.io/v1beta1
kind: Gateway
metadata:
  name: ingressgateway
  namespace: istio-system
spec:
  selector:
    istio: ingressgateway
  servers:
    - port:
        number: 80
        name: http
        protocol: HTTP
      hosts:
- '*'The canary release allows you to incrementally roll out new services or versions. For example, if you want to release a new version, you can first direct a portion of traffic to the version to test its functionality, and increase traffic after the functionality is verified. Canary release primarily routes request traffic over different workflows. You do not need to reconfigure your microservices for this purpose. Only a few rules are needed to build isolated environments for traffic flow from the gateway to services. Canary release facilitates the release of multiple services or multiple versions of a service at the same time.
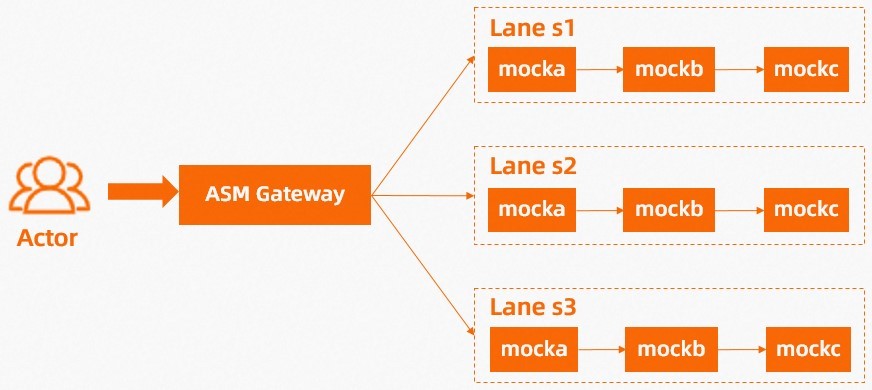
In this example, three lanes, s1, s2, and s3, are deployed, and each lane contains three services mocka, mockb, and mockc. After the lanes are deployed in the ASM console, check whether the traffic is distributed among the lanes as expected.

1. Enable automatic injection for the default namespace.
2. Run the following commands to deploy the sample services in the Container Service for Kubernetes (ACK) cluster.
kubectl apply -f https://alibabacloudservicemesh.oss-cn-beijing.aliyuncs.com/asm-labs/swimlane/v1/application-v1.yaml
kubectl apply -f https://alibabacloudservicemesh.oss-cn-beijing.aliyuncs.com/asm-labs/swimlane/v2/application-v2.yaml
kubectl apply -f https://alibabacloudservicemesh.oss-cn-beijing.aliyuncs.com/asm-labs/swimlane/v3/application-v3.yaml1. Create a lane group.
| Parameter | Description |
| Name of swim lane group | For this example, enter test. |
| Entrance gateway | Select ingressgateway. |
| Swimlane Services | Select the ACK cluster and namespace, select mocka, mockb, and mockc in the service list, and then click the icon to add the services to the selected section. 
|
After the configuration, the corresponding traffic label is generated.
apiVersion: istio.alibabacloud.com/v1beta1
kind: TrafficLabel
metadata:
  labels:
    asm-system: 'true'
    provider: asm
  name: asm-trafficlabel-global
  namespace: istio-system
spec:
  rules:
    - labels:
        - name: asm-label
          valueFrom:
            - $getLabel(ASM_TRAFFIC_TAG)
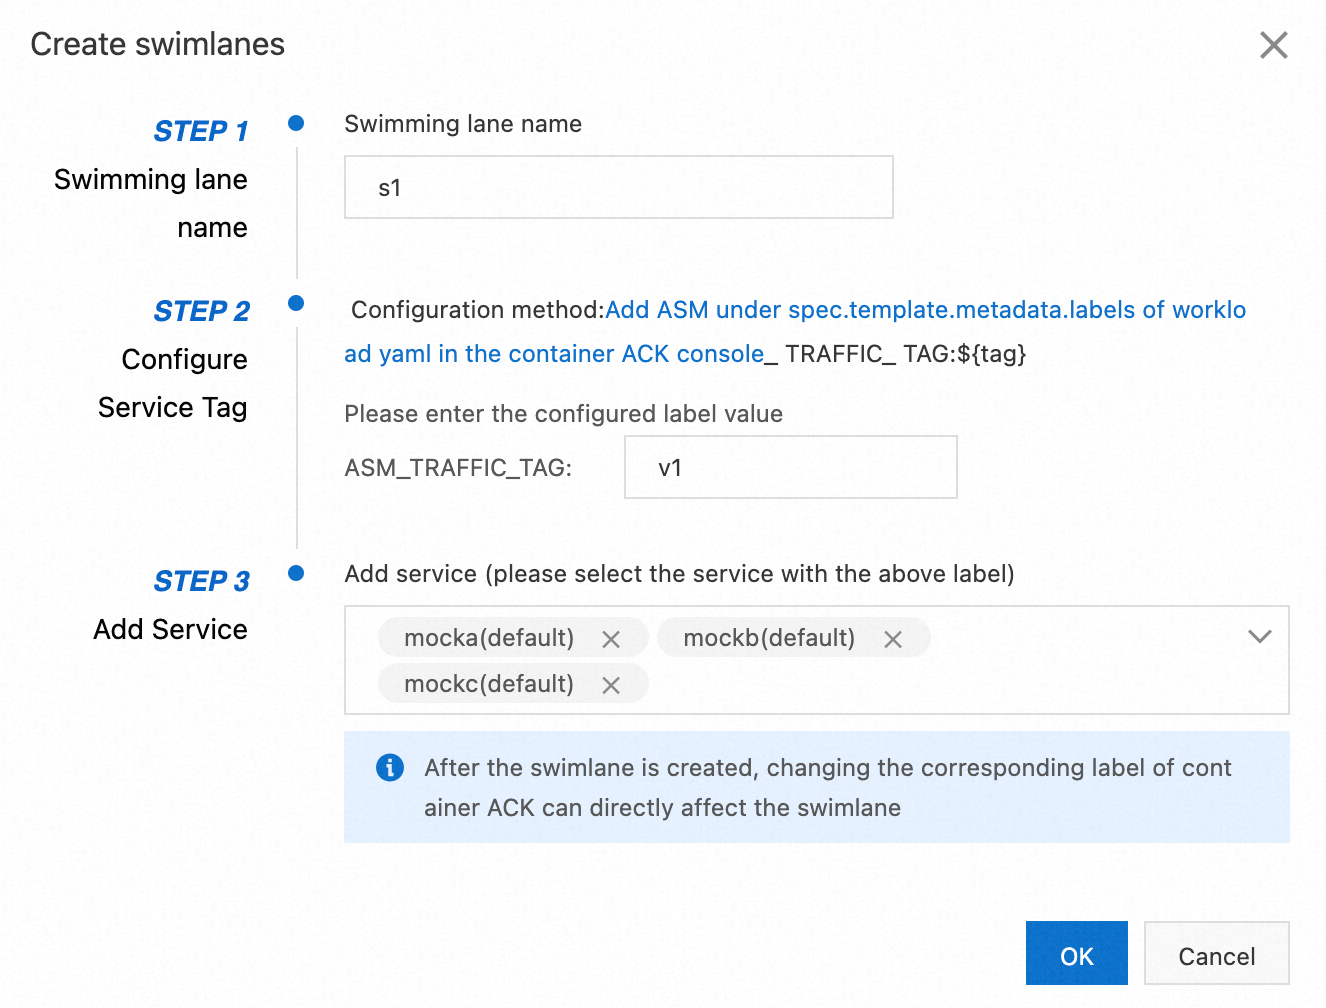
2. Create s1, s2, and s3 lanes and bind the lanes to v1, v2, and v3. This article only describes how to create the s1 lane. You can create s2 and s3 lanes by using the same method.

Some parameters are described as follows. After the creation, the effect is as follows:

| Parameter | Description |
| Swimlane Name | The name must be 1 to 63 characters in length and can contain digits, letters, and hyphens (-). For this example, enter s1. Note: When you access the service, requests with the corresponding header (x-asm-prefer-tag: lane name) are routed to the corresponding version. |
| Configure Service Tag | For this example, enter v1. |
| Add Service | For this example, select the mocka(default), mockb(default), and mockc(default) services. |
Each time you create a lane, the system creates a destination rule. The following code provides an example of the destination rule that is created after you create the s1 lane:
apiVersion: networking.istio.io/v1beta1
kind: DestinationRule
metadata:
  creationTimestamp: '2023-05-29T09:06:09Z'
  generation: 3
  labels:
    asm-system: 'true'
    provider: asm
    swimlane-group: test
  name: trafficlabel-dr-test-default-mocka
  namespace: istio-system
  resourceVersion: '1310364657'
  uid: 7112ce64-0176-4ff3-b5f3-66263085****
spec:
  host: mocka.default.svc.cluster.local
  subsets:
    - labels:
        ASM_TRAFFIC_TAG: v1
      name: s1
    - labels:
        ASM_TRAFFIC_TAG: v1
      name: v1
    - labels:
        ASM_TRAFFIC_TAG: v2
      name: v2
    - labels:
        ASM_TRAFFIC_TAG: v2
      name: s2
    - labels:
        ASM_TRAFFIC_TAG: v3
      name: v3
    - labels:
        ASM_TRAFFIC_TAG: v3
      name: s3
3. Create a traffic routing rule for each lane.

| Parameter | Description |
| Ingress Service | For this example, select mocka.default.svc.cluster.local. |
| Ingress traffic rules | The name is used only as the route name, which can be set as rule1, rule2, or rule3. The domain name indicates the destination hostname to which traffic is routed. For this example, the domain name can be set as *. |
| Matching request URI | For this example, set the Method parameter to Exact and the Content parameter to /mock. |
A virtual service similar to the following one is generated:
apiVersion: networking.istio.io/v1beta1
kind: VirtualService
metadata:
  creationTimestamp: '2023-05-29T09:13:00Z'
  generation: 3
  labels:
    asm-system: 'true'
    istioGateway: ingressgateway
    provider: asm
  name: ingressgateway
  namespace: istio-system
  resourceVersion: '1310388638'
  uid: d60baa2f-3a12-472f-881a-15d21004748f
spec:
  gateways:
    - istio-system/ingressgateway
  hosts:
    - '*'
  http:
    - match:
        - headers:
            x-asm-prefer-tag:
              exact: s2
          uri:
            exact: /mock
      name: swimelane-ingress-route-test-s2-rule2
      route:
        - destination:
            host: mocka.default.svc.cluster.local
            subset: s2
    - match:
        - headers:
            x-asm-prefer-tag:
              exact: s3
          uri:
            exact: /mock
      name: swimelane-ingress-route-test-s3-rule3
      route:
        - destination:
            host: mocka.default.svc.cluster.local
            subset: s3
    - match:
        - headers:
            x-asm-prefer-tag:
              exact: s1
          uri:
            exact: /mock
      name: swimelane-ingress-route-test-s1-rule1
      route:
        - destination:
            host: mocka.default.svc.cluster.local
subset: s11. Run the following command to obtain the public IP address of the gateway in the ASM Console:
export ASM_GATEWAY_IP=xxx.xxx.xxx.xxx2. Check whether the end-to-end canary release feature takes effect in the s1 and s2 lanes. You can perform the following steps to check whether it takes effect in the s3 lane.
Run the following command to access services in the s1 lane: In the command, the value of x-asm-prefer-tag is s1, which is the name of the lane you configured when you created the lane in Step 2.
for i in {
   1..100};  do curl   -H 'x-asm-prefer-tag: s1' http://${
   ASM_GATEWAY_IP}/mock ;  echo ''; sleep 1; done;
Expected output:
-> mocka(version: v1, ip: 172.17.0.54)-> mockb(version: v1, ip: 172.17.0.129)-> mockc(version: v1, ip: 172.17.0.130)Set the HTTP header x-asm-prefer-tag: s1 to declare that the traffic should flow to the relevant services in the s1 lane. According to the expected output, this meets expectations.
3. Run the following command to access services in the s2 lane: s2 is the name of the lane you configured when you created the lane in Step 2.
for i in {
     1..100};  do curl   -H 'x-asm-prefer-tag: s2' http://${ASM_GATEWAY_IP}/mock ;  echo ''; sleep 1; done;
Expected output:
-> mocka(version: v2, ip: 172.17.0.9)-> mockb(version: v2, ip: 172.17.0.126)-> mockc(version: v2, ip: 172.17.0.128)Set the HTTP header x-asm-prefer-tag: s2 to declare that the traffic should flow to the relevant services in the s2 lane. According to the expected output, this meets expectations.
4. Run the following command to access services in the s2 lane: s3 is the name of the lane you configured when you created the lane in Step 2.
for i in {
   1..100};  do curl   -H 'x-asm-prefer-tag: s3' http://${ASM_GATEWAY_IP}/mock ;  echo ''; sleep 1; done;
Expected output:
-> mocka(version: v3, ip: 172.17.0.132)-> mockb(version: v3, ip: 172.17.0.127)-> mockc(version: v3, ip: 172.17.0.69)Set the HTTP header x-asm-prefer-tag: s2 to declare that the traffic should flow to the relevant services in the s2 lane. According to the expected output, this meets expectations.
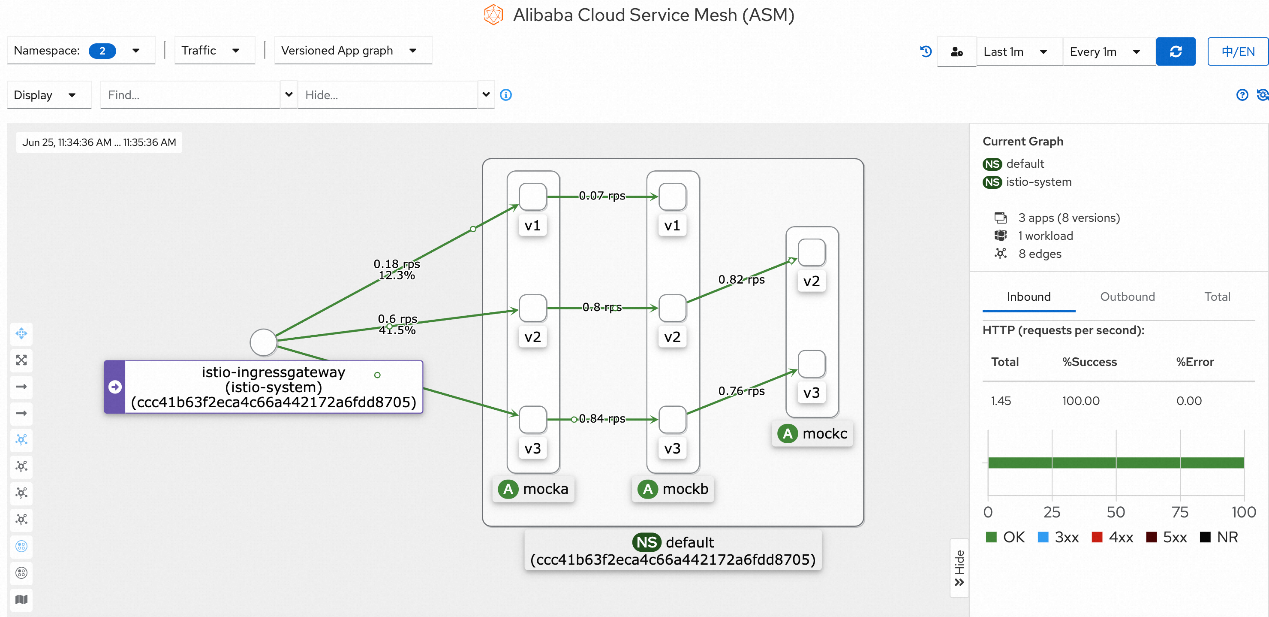
If you have enabled the observability for the ASM topology in the ASM console, see https://www.alibabacloud.com/help/en/alibaba-cloud-service-mesh/latest/enable-kiali-for-asm-to-observe-an-asm-instance-in-the-asm-console
Then, you can check the mesh topology for the preceding request. A similar result is shown below:

Traffic Labelling and Routing of ASM (2): Define a Routing Rule Based on Traffic Labels
Traffic Labeling and Routing of ASM (4): Implement an End-to-end Canary Release Based on ASM

56 posts | 8 followers
FollowXi Ning Wang(王夕宁) - August 17, 2023
Xi Ning Wang(王夕宁) - August 17, 2023
Xi Ning Wang(王夕宁) - August 17, 2023
Alibaba Cloud Native - January 23, 2024
Alibaba Cloud Native - January 18, 2024
Alibaba Cloud Native - August 7, 2024

56 posts | 8 followers
Follow Alibaba Cloud Service Mesh
Alibaba Cloud Service Mesh (ASM) is a fully managed service mesh platform that is compatible with Istio.
Learn More Cloud-Native Applications Management Solution
Accelerate and secure the development, deployment, and management of containerized applications cost-effectively.
Learn More Simple Log Service
An all-in-one service for log-type data
Learn More Managed Service for Prometheus
Multi-source metrics are aggregated to monitor the status of your business and services in real time.
Learn MoreMore Posts by Xi Ning Wang(王夕宁)