By Hang Yin
Canary release is a common method for deploying new versions of application services. It allows us to switch traffic between the stable version and the canary release version of the service at any time, enabling a more reliable service upgrade. During the traffic switching process, we can gradually validate the functional features, reliability, and other aspects of the new service version. If the new version does not meet requirements, we can switch the traffic back to the old version instantly. Therefore, canary release is widely utilized as a release solution in the field of software engineering.
Currently, non-intrusive canary release in service mesh is a mature feature. We can deploy multiple versions of a service simultaneously, define the version of the workload using DestinationRule, and utilize the traffic splitting capability of VirtualService to direct different traffic ratios to different versions of the workload until all traffic is directed to the new service version.
However, with the widespread adoption of cloud-native applications, applications are often no longer in the form of individual services. Instead, they are decomposed into a series of cloud-native services deployed in Kubernetes clusters, with call chains between services collectively providing external services.

When there is a call chain between services, canary release is not limited to individual services. It requires environmental isolation and traffic control for the entire request chain of services. This means ensuring that canary traffic is only sent to the canary version of the service in the call chain, thus isolating the call chain from each other. The traffic management requirements for the entire call chain present new challenges to the non-intrusive traffic management solution of the service mesh:
• Complexity of traffic rules
VirtualService and DestinationRule rules based on the Istio community need to be customized for each service. This increases the chances of configuration errors and maintenance costs for service traffic in end-to-end traffic management scenarios.
• Limited traffic management flexibility
It is difficult to meet all requirements by simply adjusting traffic rules for different end-to-end traffic management needs. For example, in a canary link, only new versions of specific services in the link are released.
ASM allows you to isolate relevant versions or other features of an application into independent runtime environments called lanes. You can then configure lane rules to route requests that meet the rules to the target version or features of the application. The ASM traffic lanes have the following features:
• Simplified configuration
By using the traffic lane feature of ASM, you can establish multiple traffic isolation environments from the gateway to the entire backend service with just a few governance rules. This ensures the smooth and secure release of multiple services and concurrent development of multiple service versions, further accelerating the growth of your business.
• Support end-to-end traffic management requirements in different dimensions
ASM traffic lanes support strict mode and loose mode. Each mode has its own advantages, limitations, and scenarios to meet diverse traffic governance requirements.
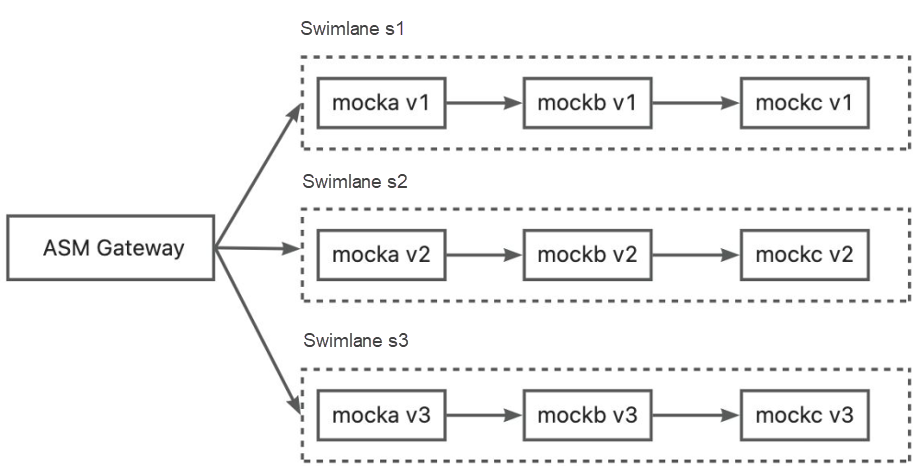
In strict mode, each traffic lane contains all services in relevant call chains. This mode has no requirements for your application. You only need to configure traffic lanes to implement end-to-end traffic management. As shown in the following figure:
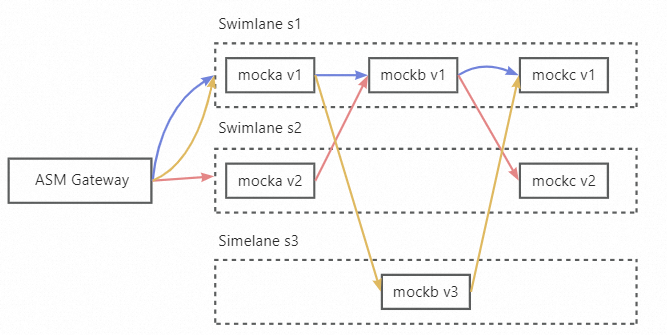
In loose mode, you only need to create a baseline lane that contains all services in relevant call chains. Other lanes are not required to contain all services in relevant call chains. When services in a lane call each other, if the service to be called does not exist in the lane, requests are forwarded to the same service in the baseline lane. When the service to be called becomes available in the lane, requests are forwarded back to the desired service in the lane. When you use the traffic lanes in loose mode, your application must include a request header that can be transparently transmitted in the entire call chain (chain pass-through request header), and use another request routing header to route traffic to different traffic lanes based on the content of the request header. As shown in the following figure:
This article demonstrates the application of traffic lanes in strict mode in ASM.
In this example, three lanes (s1, s2, and s3) are created for the mocka, mockb, and mockc services. s1 represents the call chain of mocka v1, mockb v1, and mockc v1, and this pattern continues with s2 representing the call chain of mocka v2, mockb v2, and mockc v2, and s3 representing the call chain of mocka v3, mockb v3, and mockc v3.
• An ASM instance of Enterprise Edition or Ultimate Edition is created, and the version of the instance is 1.18.2.111 or later. For more information, see Create an ASM instance [1].
• A Container Service for Kubernetes (ACK) cluster is added to your ASM instance. For more information, see Add a cluster to an ASM instance [2].
• An ASM gateway named ingressgateway is created. For more information, see Create an ingress gateway [3].
• An Istio gateway named ingressgateway is created in the istio-system namespace. For more information, see Manage Istio gateways [4].
apiVersion: networking.istio.io/v1beta1
kind: Gateway
metadata:
 name: ingressgateway
  namespace: istio-system
spec:
  selector:
    istio: ingressgateway
  servers:
    - port:
        number: 80
        name: http
        protocol: HTTP
      hosts:
- '*'First, deploy application services in the sample in the ACK cluster to implement the end-to-end canary scenario. Enable automatic sidecar proxy injection for the default namespace. For more information about the procedure, see Enable automatic sidecar proxy injection [5]. Then, run the following command to deploy the sample services in the ACK cluster:
kubectl apply -f https://alibabacloudservicemesh.oss-cn-beijing.aliyuncs.com/asm-labs/swimlane/v1/mock-v1.yaml
kubectl apply -f https://alibabacloudservicemesh.oss-cn-beijing.aliyuncs.com/asm-labs/swimlane/v2/mock-v2.yaml
kubectl apply -f https://alibabacloudservicemesh.oss-cn-beijing.aliyuncs.com/asm-labs/swimlane/v3/mock-v3.yamlIn the example, the v1, v2, and v3 of the mocka->mockb->mockc service call chain are separated into three lanes s1, s2, and s3. The set of the three lanes is called a lane group. In ASM, you can create a lane group and lanes through simple configurations.
• Log on to the ASM console [6]. In the left-side navigation pane, choose Service Mesh > Mesh Management.
• On the ASM Management page, click the name of the target instance. Then, in the left-side navigation pane, choose Traffic Management Center > Traffic Lane.
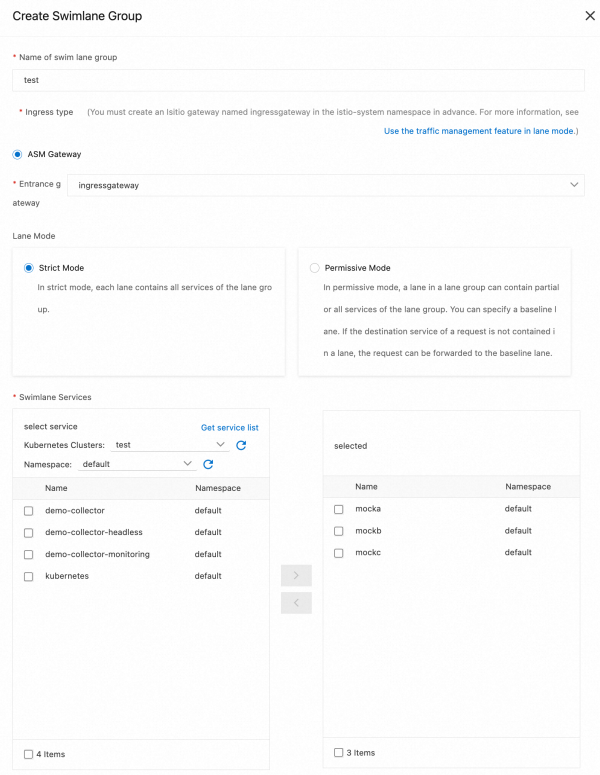
• On the Traffic Lanes page, click Create Swimlane Group. In the Create Swimlane Group panel, configure the parameters and click OK.
| Parameter | Description |
| Name of swim lane group | For this example, enter test. |
| Entrance gateway | Select ingressgateway. |
| Lane Mode | Select Strict Mode |
| Swimlane Services | Select the desired ACK cluster from the Kubernetes Clusters drop-down list and select default from the Namespace drop-down list. Then, select mocka, mockb, and mockc in the service list, and click the icon to add the services to the selected section. |
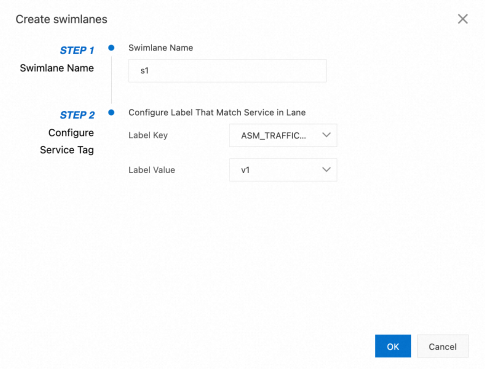
Next, Create s1, s2, and s3 lanes and bind the s1 lane to version 1 (v1) of the sample services, the s2 lane to version 2 (v2) of the sample services, and the s3 lane to version 3 (v3) of the sample services.
• In the Traffic Rule Definition section of the Traffic Lane page, click Create swimlanes.
• In the Create swimlanes dialog box, set the parameters and click OK.
After the three swimlanes are created, the sample effect is as follows:

Each time you create a lane, the system creates a destination rule. For example, after the three lanes are created, the following destination rule is automatically created for the mocka service:
apiVersion: networking.istio.io/v1beta1
kind: DestinationRule
metadata:
 labels:
    asm-system: 'true'
    provider: asm
    swimlane-group: test
  name: trafficlabel-dr-test-default-mocka
  namespace: istio-system
spec:
  host: mocka.default.svc.cluster.local
  subsets:
    - labels:
        ASM_TRAFFIC_TAG: v1
      name: s1
    - labels:
        ASM_TRAFFIC_TAG: v2
      name: s2
    - labels:
        ASM_TRAFFIC_TAG: v3
      name: s3
After the three lanes are created, a virtual service, which defines the corresponding traffic routing rules, is generated for each service in the lane group. For example, the following virtual service is automatically created for the mocka service:
apiVersion: networking.istio.io/v1beta1
kind: VirtualService
metadata:
 labels:
    asm-system: 'true'
    provider: asm
    swimlane-group: test
  name: trafficlabel-vs-test-default-mocka
  namespace: istio-system
spec:
  hosts:
    - mocka.default.svc.cluster.local
  http:
    - match:
        - sourceLabels:
            ASM_TRAFFIC_TAG: v1
      route:
        - destination:
            host: mocka.default.svc.cluster.local
            subset: s1
    - match:
        - sourceLabels:
            ASM_TRAFFIC_TAG: v2
      route:
        - destination:
            host: mocka.default.svc.cluster.local
            subset: s2
    - match:
        - sourceLabels:
            ASM_TRAFFIC_TAG: v3
      route:
        - destination:
            host: mocka.default.svc.cluster.local
            subset: s3
Finally, create a traffic routing rule for each lane. Through different traffic routing rules, the ASM gateway can route requests with different characteristics to different lane isolation environments. This way, service call chains in the lanes are completely isolated. The following example describes how to create a traffic routing rule for the s1 lane. Follow these steps to create traffic routing rules for the s2 and s3 lanes.
• In the Traffic Rule Definition section of the Traffic Lane page, find the lane for which you want to create a traffic routing rule, and click Ingress traffic rules in the Actions column.
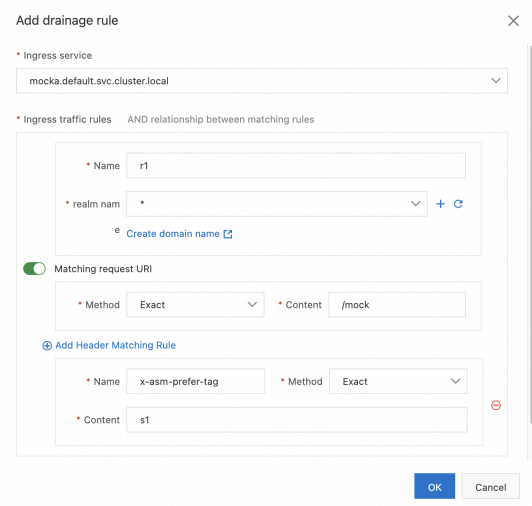
• In the Add drainage rule dialog box, set the parameters and click OK. This example assumes that the inbound request path of all services in the lanes is /mock, and the same traffic routing rule is configured for each lane.
| Parameter | Description |
| Ingress service | Select mocka.default.svc.cluster.local. |
| Ingress traffic rules | For this example, set the Name parameter to r1 and the realm name parameter to *. |
| Matching request URI | For this example, set the Method parameter to Exact and the Content parameter to /mock. |
| Add Header Matching Rule | Click Add Header Matching Rule. Set Name to x-asm-prefer-tag, Method to Exact, and Content to s1. |
After traffic routing rules are created, you can view them in the Traffic Rule Definition section, as shown in the following figure.

After the three lanes are created, a virtual service, which defines the corresponding traffic routing rules, is generated for each service in the lane group. For example, the following virtual service is generated for lane s1:
apiVersion: networking.istio.io/v1beta1
kind: VirtualService
metadata:
 labels:
    asm-system: 'true'
    provider: asm
    swimlane-group: test
  name: swimlane-ingress-vs-test-s1
  namespace: istio-system
spec:
  gateways:
    - istio-system/ingressgateway
  hosts:
    - '*'
  http:
    - match:
        - headers:
            x-asm-prefer-tag:
              exact: s1
          uri:
            exact: /mock
      name: r1
      route:
        - destination:
            host: mocka.default.svc.cluster.local
subset: s1After you configure the preceding rules, traffic rules are automatically created in the traffic lane of ASM to isolate different call chains from each other. You can use a simple access to verify whether the end-to-end canary release through the traffic lane takes effect.
1) Obtain the IP address of the ASM gateway. For more information, see Obtain the IP address of the ASM gateway [7].
2) Run the following command to configure an environment variable. xxx.xxx.xxx.xxx to the IP address obtained in substep 1.
export ASM_GATEWAY_IP=xxx.xxx.xxx.xxx3) Verify whether the end-to-end canary release feature takes effect.
• Run the following command to access the services in the s1 lane: In the command, the value of x-asm-prefer-tag is s1, which is the name of the s1 lane that you configured when you created the s1 lane in Step 2.
for i in {1..100}; do curl -H 'x-asm-prefer-tag: s1' http://${ASM_GATEWAY_IP}/mock ; echo ''; sleep 1; done;Expected output:
-> mocka(version: v1, ip: 172.17.0.54)-> mockb(version: v1, ip: 172.17.0.129)-> mockc(version: v1, ip: 172.17.0.130)The output indicates that traffic specified by the HTTP header x-asm-prefer-tag: s1 flows to the relevant services in the s1 lane. This meets expectations.
• Run the following command to access the services in the s2 lane: In the command, the value of x-asm-prefer-tag is s2, which is the name of the s2 lane that you configured when you created the s2 lane in Step 2.
for i in {1..100}; do curl -H 'x-asm-prefer-tag: s2' http://${ASM_GATEWAY_IP}/mock ; echo ''; sleep 1; done;Expected output:
-> mocka(version: v2, ip: 172.17.0.9)-> mockb(version: v2, ip: 172.17.0.126)-> mockc(version: v2, ip: 172.17.0.128)The output indicates that traffic specified by the HTTP header x-asm-prefer-tag: s2 flows to the relevant services in the s2 lane. This meets expectations.
• Run the following command to access the service in the s3 lane. In the command, the value of x-asm-prefer-tag is s3, which is the name of the s3 lane that you configured when you created the s3 lane in Step 2.
for i in {1..100}; do curl -H 'x-asm-prefer-tag: s3' http://${ASM_GATEWAY_IP}/mock ; echo ''; sleep 1; done;Expected output:
-> mocka(version: v3, ip: 172.17.0.132)-> mockb(version: v3, ip: 172.17.0.127)-> mockc(version: v3, ip: 172.17.0.69)The output indicates that traffic specified by the HTTP header x-asm-prefer-tag: s3 flows to the relevant service in the s3 lane. This meets expectations.
The article briefly discusses the challenges and limitations of using service mesh to manage cloud-native application traffic in end-to-end traffic management scenarios. It also introduces the advantages and features of the traffic lane capability in ASM for end-to-end traffic management. We provide a detailed demonstration and explanation of traffic lanes in strict mode in ASM. In the next article, we will further delve into the traffic lanes in loose mode in ASM.
[1] Create an ASM instance
https://www.alibabacloud.com/help/en/doc-detail/147793.html#task-2370657
[2] Add the cluster to the ASM instance
https://www.alibabacloud.com/help/en/doc-detail/148231.html#task-2372122
[3] Create an ingress gateway
https://www.alibabacloud.com/help/en/doc-detail/150510.html#task-2372970
[4] Manage Istio gateways
https://www.alibabacloud.com/help/en/doc-detail/150504.html
[5] Enable automatic sidecar proxy injection
https://www.alibabacloud.com/help/en/doc-detail/186136.html#task-1962690
[6] ASM console
https://servicemesh.console.aliyun.com/
[7] Obtain the IP address of the ASM gateway
https://www.alibabacloud.com/help/en/doc-detail/444079.html#section-ida-zt6-md7
Observability | Key Metrics to Focus On When Using Prometheus to Monitor E-MapReduce
Manage End-to-end Traffic Based on Alibaba Cloud Service Mesh (ASM): Traffic Lanes in Loose Mode

212 posts | 13 followers
FollowAlibaba Cloud Native - January 23, 2024
Alibaba Cloud Native - August 7, 2024
Alibaba Container Service - January 14, 2025
Xi Ning Wang(王夕宁) - August 17, 2023
Alibaba Container Service - April 3, 2025
Alibaba Cloud Community - January 26, 2024

212 posts | 13 followers
Follow Cloud-Native Applications Management Solution
Accelerate and secure the development, deployment, and management of containerized applications cost-effectively.
Learn More Function Compute
Alibaba Cloud Function Compute is a fully-managed event-driven compute service. It allows you to focus on writing and uploading code without the need to manage infrastructure such as servers.
Learn More Alibaba Cloud Service Mesh
Alibaba Cloud Service Mesh (ASM) is a fully managed service mesh platform that is compatible with Istio.
Learn More Global Traffic Manager
Allows you to access the nearest node based on the Domain Name System (DNS) architecture.
Learn MoreMore Posts by Alibaba Cloud Native