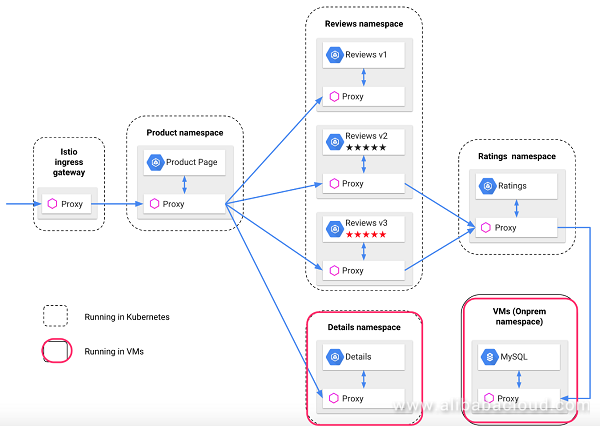
Istio V0.2 or later provides a function called mesh expansion.This function integrates some non-Kubernetes services into the Istio service mesh that runs in a Kubernetes cluster. These services often run on some virtual machines (VMs) or bare metal hosts.
Alibaba Cloud Container Service for Kubernetes supports integration with Istio mesh expansion. This article uses an example to describe how to use Istio to enable the application and service hybrid orchestration on the Kubernetes and Alibaba Cloud ECS instances.
In short, mesh expansion is a method provided by the Istio service mesh deployed on Kubernetes for integrating VMs or bare metal hosts into the service mesh.
Mesh expansion plays an important role in migrating users from a legacy system onto the cloud. In the microservice architecture, it is impossible to run all the workloads on Kubernetes. Users may complete O&M of some applications on Kubernetes, and O&M of other applications on VMs or bare metal hosts.
Only an Istio control plane is needed to manage multiple services across Kubernetes, VMs, and bare metal hosts.This not only ensures normal operation of original services, but also implements application and service hybrid orchestration on Kubernetes and VMs.
Alibaba Cloud Container Service for Kubernetes V1.10.4 has been released. You can use the container service console to conveniently and quickly create a Kubernetes cluster.For more information about the process, see create a Kubernetes cluster.
Install and configure kubectl and ensure that kubectl can connect to the Kubernetes cluster
As described in the previous articles, you can use the application catalog to conveniently deploy Istio.First, use the command line or console to create a namespace istio-system. Then, click App Catalog on the left-side navigation bar, and select ack-istio on the right side. On the displayed page,select the namespace istio-system, and click Parameters to modify parameter settings for custom installation.
Note: This document provides important information for installation and uninstallation, especially frequently-seen custom resource definition (CRD) version problems.
Use the following command line or console to create a namespace bookinfo, and deploy the modified application.In the modified version, the details component is deleted, and ingressgateway is defined.
You can obtain files involved in this example by clicking here.
kubectl create ns bookinfo

kubectl label namespace bookinfo istio-injection=enabled
kubectl apply -n bookinfo -f ./bookinfo/bookinfo-without-details.yaml
kubectl apply -n bookinfo -f ./bookinfo/bookinfo-gateway.yaml
In the deployment modified based on the official example, the details component and database run on the ECS instance beyond Kubernetes.

After the application runs normally, use the address exposed by ingressgateway to visit the /productpage page. The page should look similar to the following figure, where the details part cannot be displayed normally:

kubectl apply -f ./mesh-expansion.yamlThe four services are created as follows:

The command is as follows:
./setupMeshEx.sh generateClusterEnvAndDnsmasqExample of the generated cluster.env configuration file:

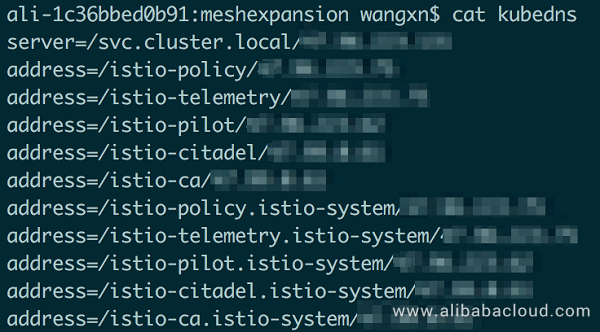
Example of the generated kubedns configuration file:

Configure your working environment to enable ECS VM authorization. Generate an SSHkey and distribute it to the ECS instance.You can run ssh root@<ECS_HOST_IP> to confirm that the ECS VM is successfully connected.
Generate a public key:
ssh-keygen -b 4096 -f ~/.ssh/id_rsa -N ""To ensure that the ECS instance can be connected to the Kubernetes network, add the ECS instance and Kubernetes to the same security group.
Alibaba Cloud Container Service provides good user experience for ECS instance configuration. You can run the following script to complete the ECS instance configuration:
export SERVICE_NAMESPACE=default
./setupMeshEx.sh machineSetup root@<ECS_HOST_IP>
Check that the processes are running:
ps aux |grep istio
The Istio auth node agent is healthy:
sudo systemctl status istio-auth-node-agentAs shown in the example deployment chart, two services need to run on the ECS instance. One is the Details service, and the other is the database service.
Run the following command to simulate (using Docker only for simulation) a Details service. The service runs on the ECS instance and port 9080 is exposed.
docker pull istio/examples-bookinfo-details-v1:1.8.0
docker run -d -p 9080:9080 --name details-on-vm istio/examples-bookinfo-details-v1:1.8.0
Configure a sidecar to intercept the port. This configuration is available in /var/lib/istio/envoy/sidecar.env, and the environment variable ISTIO_INBOUND_PORTS is used for configuration.
Example (on the VM where the service is running):
echo "ISTIO_INBOUND_PORTS=9080,8080" > /var/lib/istio/envoy/sidecar.env
systemctl restart istioFind the IP address of the VM, which is used to add the VM to the service mesh:
hostname -IManually configure a selector-less service and endpoints. The selector-less service is used for services that are not backed by Kubernetes pods.For example, on a server with permissions to use the istioctl command, register the Details service:
istioctl -n bookinfo register details 192.168.3.202 http:9080Visit the /productpage page again. The page should look similar to the following figure, where the details part should be displayed normally:

By default, the ratings service does not access the database. You can run the following command to change the version so that the ratings service is switched to the database version:
kubectl apply -f ./bookinfo/bookinfo-ratings-v2-mysql-vm.yaml
kubectl apply -f ./bookinfo/virtual-service-ratings-mysql-vm.yaml
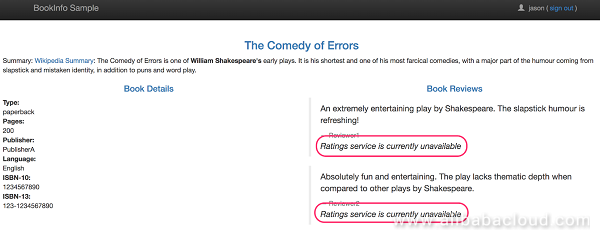
Then, visit the /productpage page. The page should look similar to the following figure, where the ratings part cannot be displayed normally. The next step is to build the database service on the ECS instance and add it to Istio.

Run MariaDB on the VM, and use it as the backend of the ratings service. Configure MariaDB so that MariaDB can be remotely accessed.
apt-get update && apt-get install -y mariadb-server
sed -i 's/127\.0\.0\.1/0\.0\.0\.0/g' /etc/mysql/mariadb.conf.d/50-server.cnf
sudo mysql
# Grant the root permissions
GRANT ALL PRIVILEGES ON *.* TO 'root'@'localhost' IDENTIFIED BY 'password' WITH GRANT OPTION;
quit;
sudo systemctl restart mysql
Initialize the ratings database on the VM.
curl -q https://raw.githubusercontent.com/istio/istio/master/samples/bookinfo/src/mysql/mysqldb-init.sql | mysql -u root -ppasswordTo better observe the differences in outputs of the Bookinfo application, run the following command to modify the rating records so that different rating information is displayed:
mysql -u root -ppassword test -e "select * from ratings;"
mysql -u root -ppassword test -e "update ratings set rating=2;select * from ratings;"Configure a sidecar to intercept the port. This configuration is available in /var/lib/istio/envoy/sidecar.env, and the environment variable ISTIO_INBOUND_PORTS is used for configuration.
Example (on the VM where the service is running):
echo "ISTIO_INBOUND_PORTS=3306,9080,8080" > /var/lib/istio/envoy/sidecar.env
systemctl restart istio
Similarly, on a server with permissions to use the istioctl command, register the data service:
istioctl -n bookinfo register mysqldb 192.168.3.202 3306After the setup, Kubernetes pods and other servers contained in the mesh expansion should be able to access the database service running on the server.
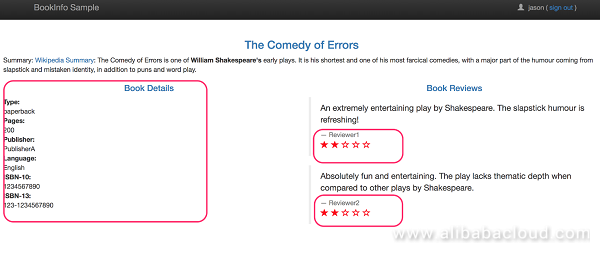
Then, visit the /productpage page. The page should look similar to the following figure, where the details and ratings parts should be displayed normally, and both services come from the ECS instance:

Alibaba Cloud Container Service for Kubernetes supports integration with Istio mesh expansion. This article uses an official example to describe how to use Istio to enable the application and service hybrid orchestration on the Kubernetes and Alibaba Cloud ECS instances.
You are welcome to use Alibaba Cloud Container Service for Kubernetes to quickly build an Istio open platform and integrate Istio to microservice development in your project.

56 posts | 8 followers
FollowAlibaba Container Service - March 29, 2019
Alibaba Cloud Native Community - September 20, 2023
Xi Ning Wang(王夕宁) - July 1, 2021
JeffLv - December 2, 2019
Xi Ning Wang(王夕宁) - December 16, 2020
Alibaba Clouder - July 15, 2020

56 posts | 8 followers
Follow Container Service for Kubernetes
Alibaba Cloud Container Service for Kubernetes is a fully managed cloud container management service that supports native Kubernetes and integrates with other Alibaba Cloud products.
Learn More ACK One
Provides a control plane to allow users to manage Kubernetes clusters that run based on different infrastructure resources
Learn More Cloud-Native Applications Management Solution
Accelerate and secure the development, deployment, and management of containerized applications cost-effectively.
Learn More Container Registry
A secure image hosting platform providing containerized image lifecycle management
Learn MoreMore Posts by Xi Ning Wang(王夕宁)