By Sai Sarath Chandra, Alibaba Cloud Community Blog author
In this tutorial, we will go through process of setting up the Nuclio, a serverless framework made to make serverless functions development easier. Nuclio also provides several other unique features, not found on equivalent open-source technologies out there. It's a robust framework that is compatible with your current cloud services.
To give some context, several of the open-source frameworks had and have rather limiting service models. Many of them require organizations use the service only on local, on-premises networks, which is actually a big black eye for any organizations interested in migrating to the cloud or that have already invested in cloud computing. Nuclio has solved this problem by implementing a framework that is compatible with all major cloud services.
Nuclio is an open-source serverless framework aimed at the three major goals of scalability, simplicity and developer productivity. Nuclio addresses the drawbacks of the public cloud serverless frameworks. Nuclio has no vendor lock-in but yet provides the full monitoring and management capabilities of every component of your platform. Nuclio is also compatible to work on a private network if that is a requirement of your services.
The virtual machines (VMs) of Nuclio are much easier to maintain when compared with a typical container, which in my opinion probably one major cause for the rise to Kubernetes as a management platform for containers with tons of added features. Compared with containers management using serverless, serverless management is much more complex as there are so many units and functions to manage and maintain. Nuclio has done a great job in solving this issue. The below image shows the core architecture of Nuclio.
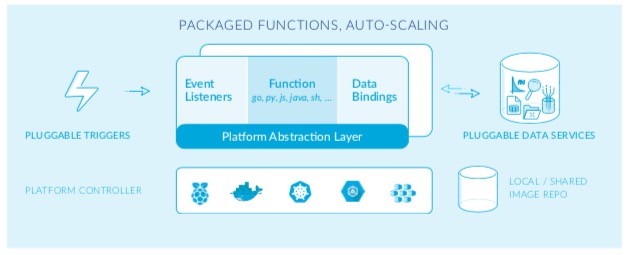
The Nuclio platform is created in such a way that all the components are created so that it can be monitored and managed. Next, given the performance and manageability of Nuclio, the combination of Nuclio with Kubernetes or another container orchestrator can yield what can be said as being one of the best combinations of different capabilities for building microservice based applications.
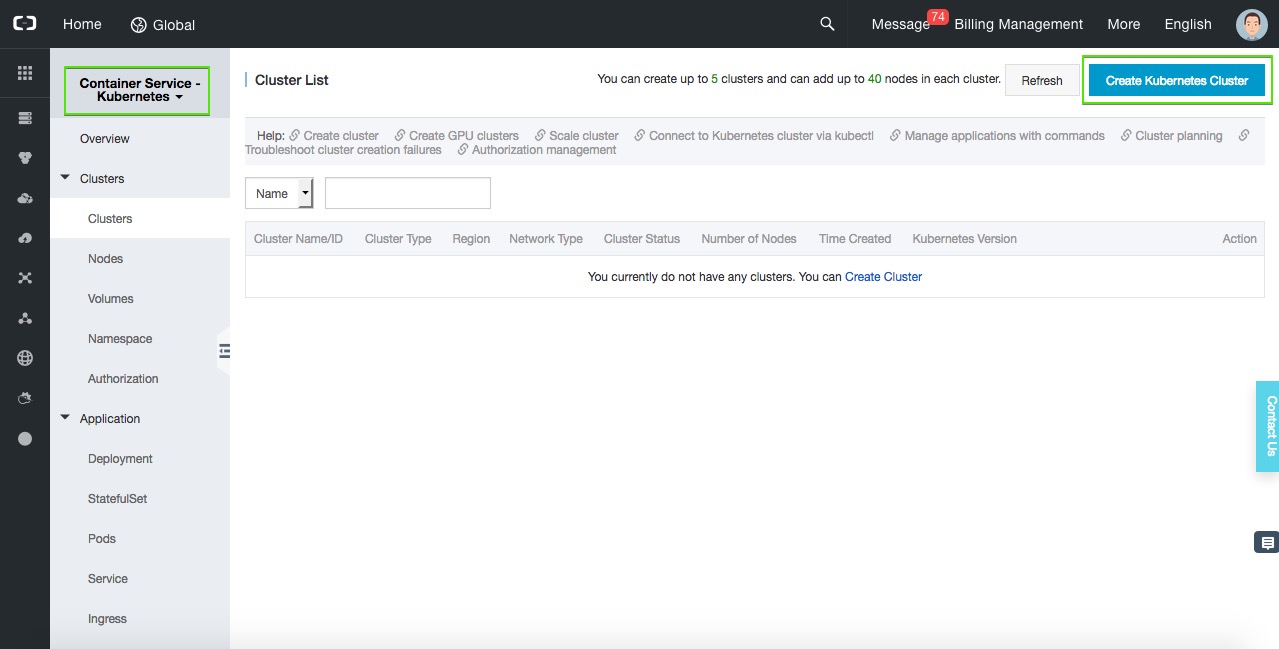
For this tutorial, navigate to the Alibaba Cloud Container Service for Kubernetes console. Then, in the console click, click Create Kubernetes Cluster.
Next, give the cluster a name in this case I named it Nuclio and choose Mumbai for the region, as you can see below. I left the Zone to default and opted for creating a new VPC only for this Cluster.
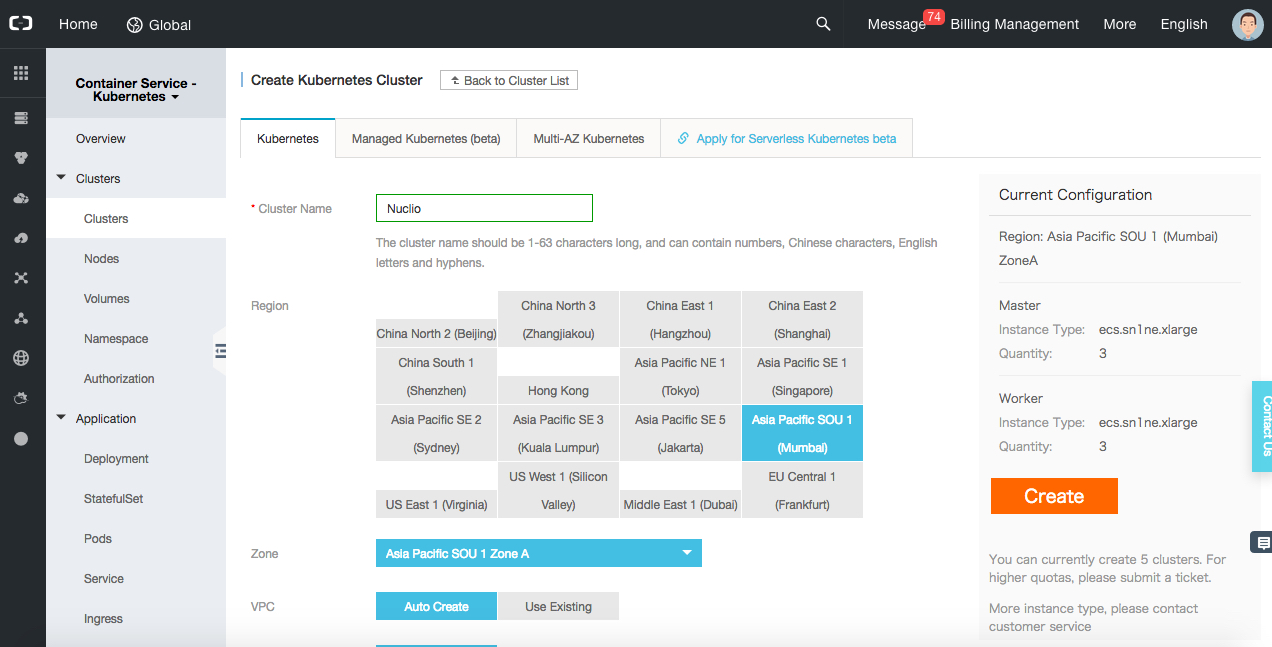
The below are the default configurations I chose:
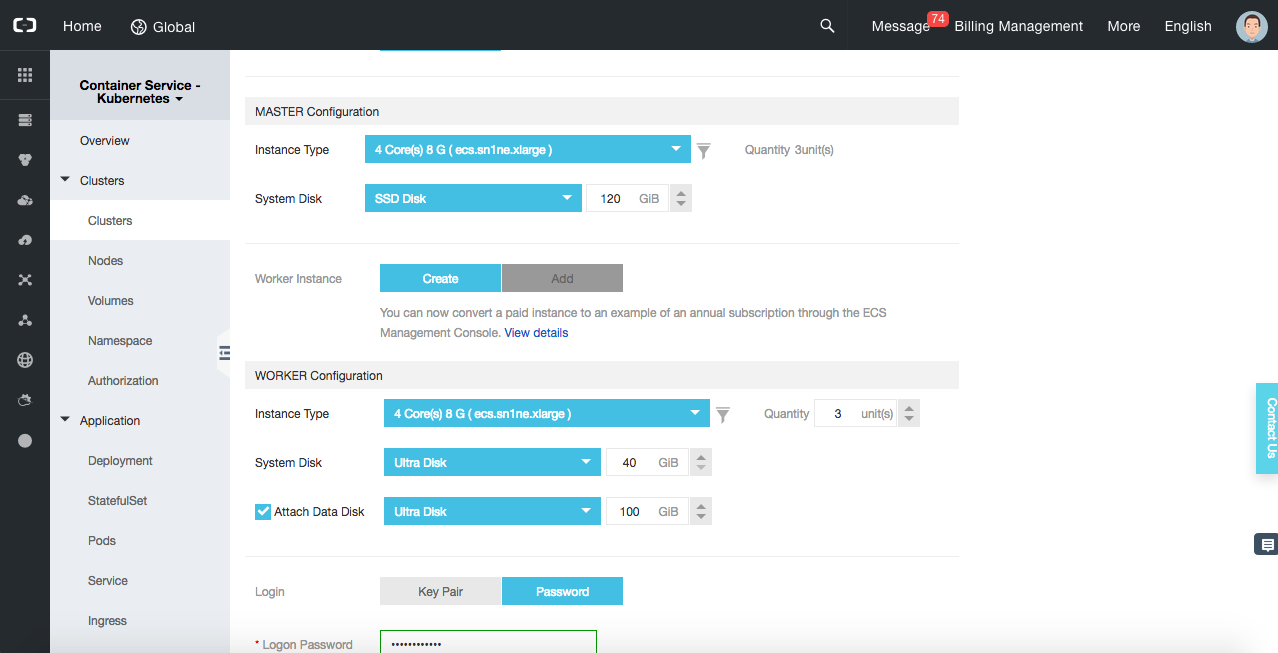
For configuration of a Master node, I chose to keep the instance type as ecs.n4.xlarge (4Core, 8GB of RAM) quantity of 3 units. I chose similar configurations for Worker nodes as well.
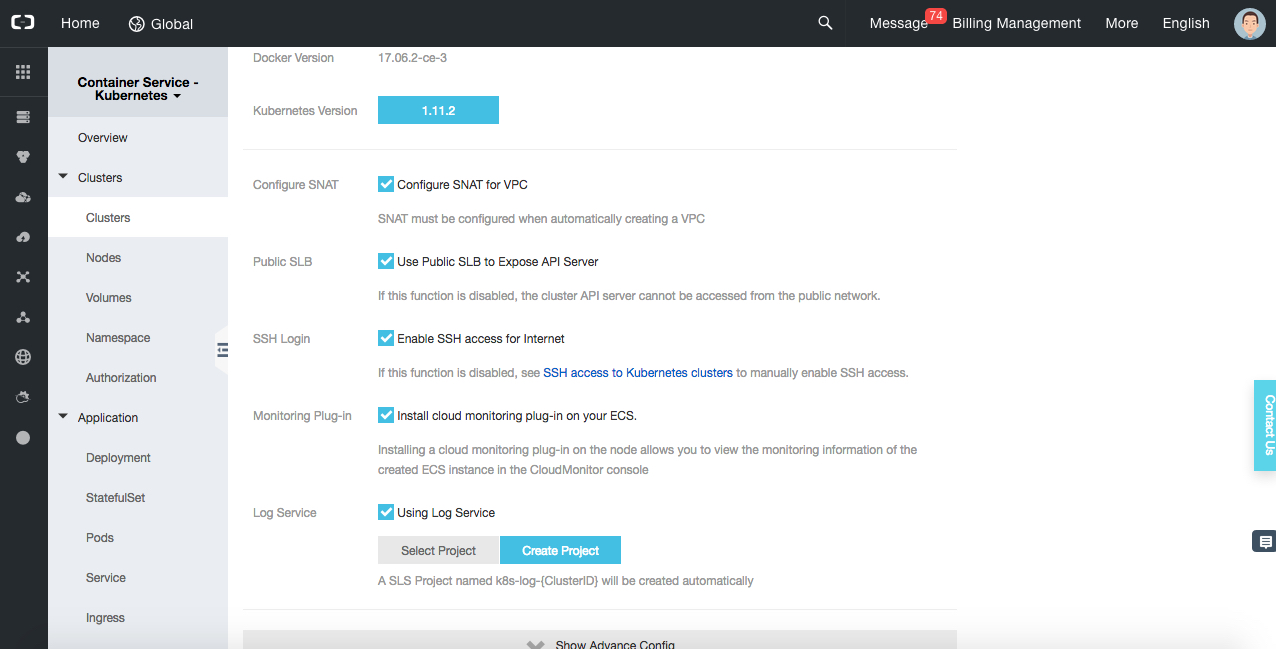
I choose password-based authentication for my Cluster. Currently, container service supports Docker Version 17.06.2-ce-3 and Kubernetes version 1.11.2. There are several options of choosing whether we want the SNAT for VPC, exposing SLB to API Server. For all of these settings, I have chosen the default configurations.
After you click Create Project, there will be a popup window that requires to confirm your information.
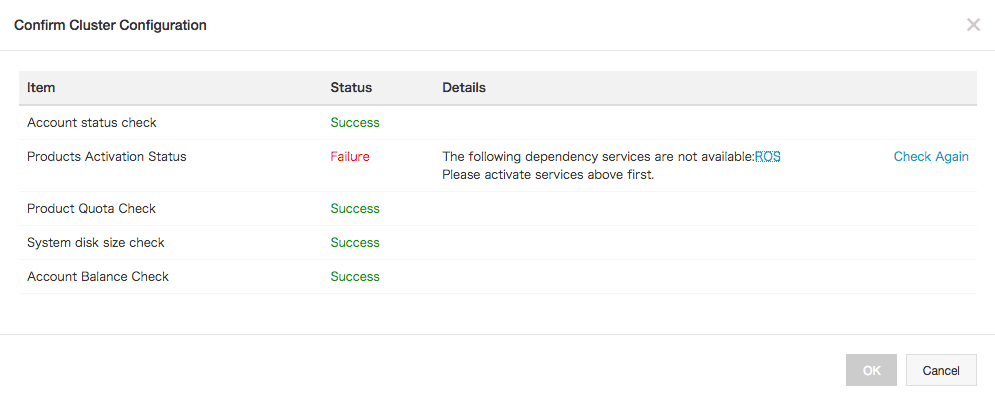
If you are using the container service for the first time, then you might get the error asking to activate the Resource Orchestration Service (ROS) service. You can do this easily by clicking the link provided. Last, selecting the checkbox to show that you accept all the terms and conditions and click Activate Now.
After you click Create, it will take some time to spin up all the pods and containers. Post that you will see your cluster created.

Now you'll be able to see that there are six nodes running. If you click on manage you will be able to see all the related information such as the Intranet, Internet and Master Node IP address. Keep this information handy, as we need this information to connect later on.
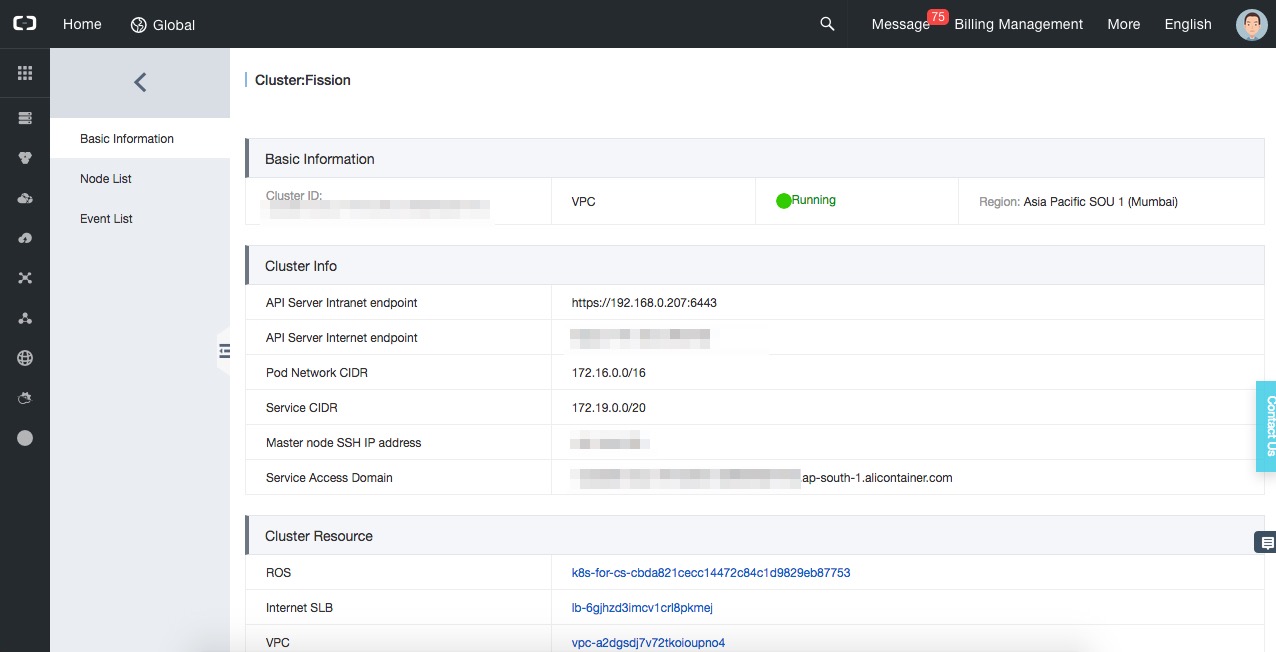
If you are on MacOS and have bew installed on your system, run the brew install kubernetes-cli command to install kubectl. After it is installed, check the version by running the following command:
kubectl version

Client Version: version.Info{Major:"1", Minor:"12", GitVersion:"v1.12.2", GitCommit:"17c77c7898218073f14c8d573582e8d2313dc740", GitTreeState:"clean", BuildDate:"2018-10-30T21:39:38Z", GoVersion:"go1.11.1", Compiler:"gc", Platform:"darwin/amd64"}
Alternaitvely, if you are using Ubuntu, you can run the following command for installing kubectl:
sudo apt-get update && sudo apt-get install -y apt-transport-https
curl -s https://packages.cloud.google.com/apt/doc/apt-key.gpg | sudo apt-key add -
echo "deb https://apt.kubernetes.io/ kubernetes-xenial main" | sudo tee -a /etc/apt/sources.list.d/kubernetes.list
sudo apt-get update
sudo apt-get install -y kubectl
To connect to the kubernetes cluster, run the following command:
scp root@<master-public-ip>:/etc/kubernetes/kube.conf $HOME/.kube/configThis will the download configuration file from the master node to the local system safely where the kubectl credentials reside. During this process, you will see the system will ask for you to authenticate this. It will use the authentication method you chose previously in this tutorial. After you have authenticated the action, you can connect to your server and interact with your cluster.
The authenticity of host 'AAA.BB.C.DD (AAA.BB.C.DD)' can't be established.
ECDSA key fingerprint is SHA256:RBE0tFLhJy8B52gkxY/wep65/tXa1s4AwGACsheYJP4.
Are you sure you want to continue connecting (yes/no)? yes
Warning: Permanently added AAA.BB.C.DD (ECDSA) to the list of known hosts.

root@AAA.BB.C.DD's password:
/etc/profile.d/lang.sh: line 19: warning: setlocale: LC_CTYPE: cannot change locale (UTF-8): No such file or directory
This will download the kubernetes configuration file, or kube.conf. After you configuration file is downloaded, try running the kubectl version command.
kubectl version
Client Version: version.Info{Major:"1", Minor:"12", GitVersion:"v1.12.2", GitCommit:"17c77c7898218073f14c8d573582e8d2313dc740", GitTreeState:"clean", BuildDate:"2018-10-30T21:39:38Z", GoVersion:"go1.11.1", Compiler:"gc", Platform:"darwin/amd64"}
Server Version: version.Info{Major:"1", Minor:"11", GitVersion:"v1.11.2", GitCommit:"bb9ffb1654d4a729bb4cec18ff088eacc153c239", GitTreeState:"clean", BuildDate:"2018-08-07T23:08:19Z", GoVersion:"go1.10.3", Compiler:"gc", Platform:"linux/amd64"}
After all of this, you will be able to see both client and server version in the kubectl version
Create a namespace named nuclio by running the following command:
kubectl create namespace nuclio
namespace/nuclio created
You can read a password using the command line.
read -s dockerhubpasswordThis will read your dockerhub password, and also make sure the password is not displayed in the console. We will use this docker hub password in the next step.
Next, we will create the configuration file, which holds all the information related to your container registry to pull and push images. Run the following command to do so by replacing all the necessary details. If you are using the docker hub, the url is https://registry.hub.docker.com.
kubectl create secret docker-registry registry-credentials --namespace nuclio \
>     --docker-username <username> \
>     --docker-password $dockerhubpassword \
>     --docker-server <URL> \
>     --docker-email email@domain.com
secret/registry-credentials created
We can remove the password read by running the following command:
unset mypasswordNow we need to run the following command which configures the kubernetes workspace for the Nuclio namespace and several other settings.
kubectl apply -f https://raw.githubusercontent.com/nuclio/nuclio/master/hack/k8s/resources/nuclio-rbac.yaml
role.rbac.authorization.k8s.io/nuclio-function-deployer created
rolebinding.rbac.authorization.k8s.io/nuclio-function-deployer-rolebinding created
clusterrole.rbac.authorization.k8s.io/nuclio-functioncr-admin created
clusterrolebinding.rbac.authorization.k8s.io/nuclio-functioncr-admin-clusterrolebinding created
Now run the following command to deploy the Nuclio controller and dashboard to the containers.
kubectl apply -f https://raw.githubusercontent.com/nuclio/nuclio/master/hack/k8s/resources/nuclio.yaml
error: error validating "https://raw.githubusercontent.com/nuclio/nuclio/master/hack/k8s/resources/nuclio.yaml": error validating data: ValidationError(CustomResourceDefinition): unknown field "description" in io.k8s.apiextensions-apiserver.pkg.apis.apiextensions.v1beta1.CustomResourceDefinition; if you choose to ignore these errors, turn validation off with --validate=false
If you encounter error like this, you have to add the --validate=false flag, run again and see if you can see the successful deployments.
kubectl apply -f https://raw.githubusercontent.com/nuclio/nuclio/master/hack/k8s/resources/nuclio.yaml
customresourcedefinition.apiextensions.k8s.io/functions.nuclio.io created
customresourcedefinition.apiextensions.k8s.io/projects.nuclio.io created
customresourcedefinition.apiextensions.k8s.io/functionevents.nuclio.io created
serviceaccount/nuclio created
deployment.apps/nuclio-controller created
deployment.apps/nuclio-dashboard created
service/nuclio-dashboard created
We need to forward the port 8070 to the localhost to access dashboard and deploy the functions.
kubectl port-forward -n nuclio $(kubectl get pods -n nuclio -l nuclio.io/app=dashboard -o jsonpath='{.items[0].metadata.name}'
) 8070:8070
Forwarding from 127.0.0.1:8070 -> 8070
Forwarding from [::1]:8070 -> 8070
You can access the dashboard at the localhost:8070.
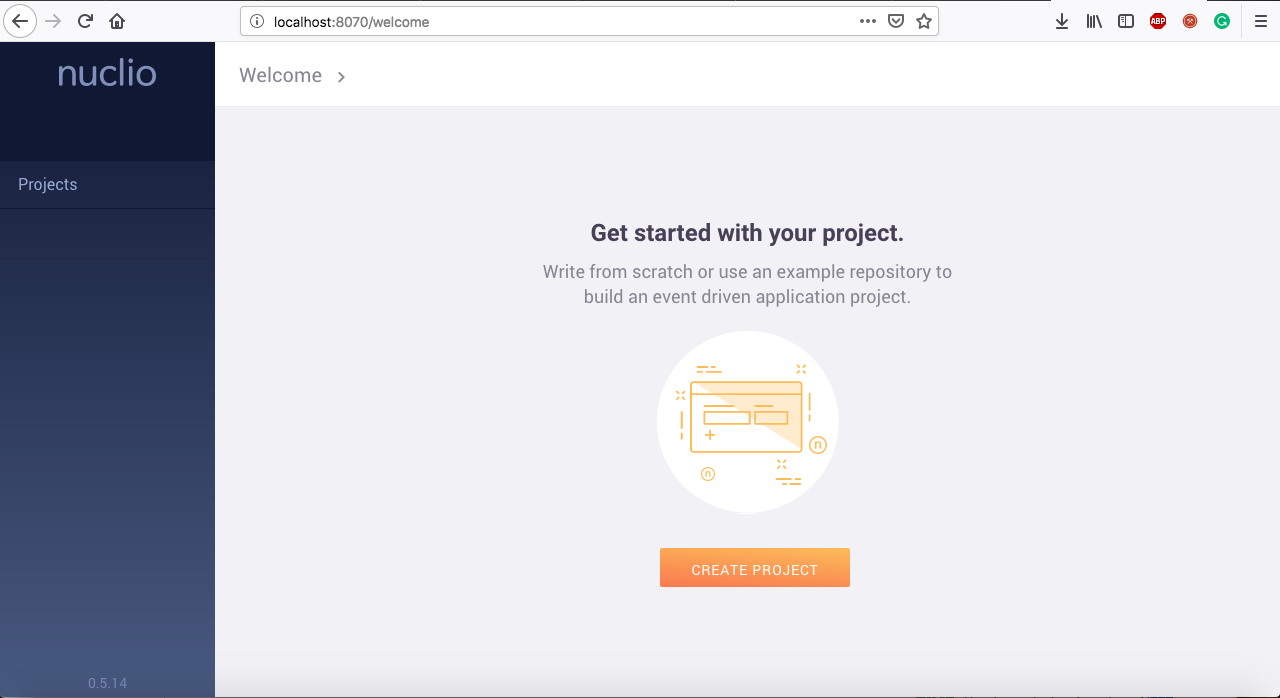
This is the first look of the Nuclio dashboard, the web page looks fully polished and well tested. Now let's create a project named Nuclio-test.
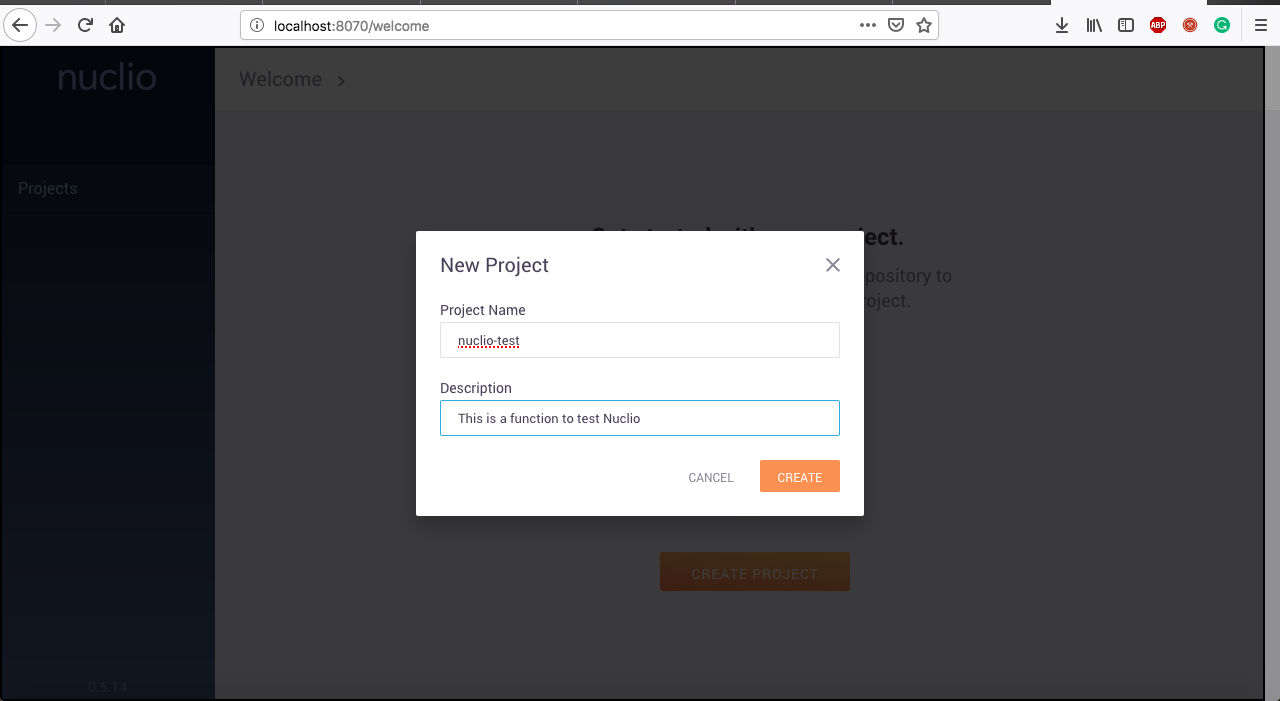
After the project is created, you will be able to see that the project is created.
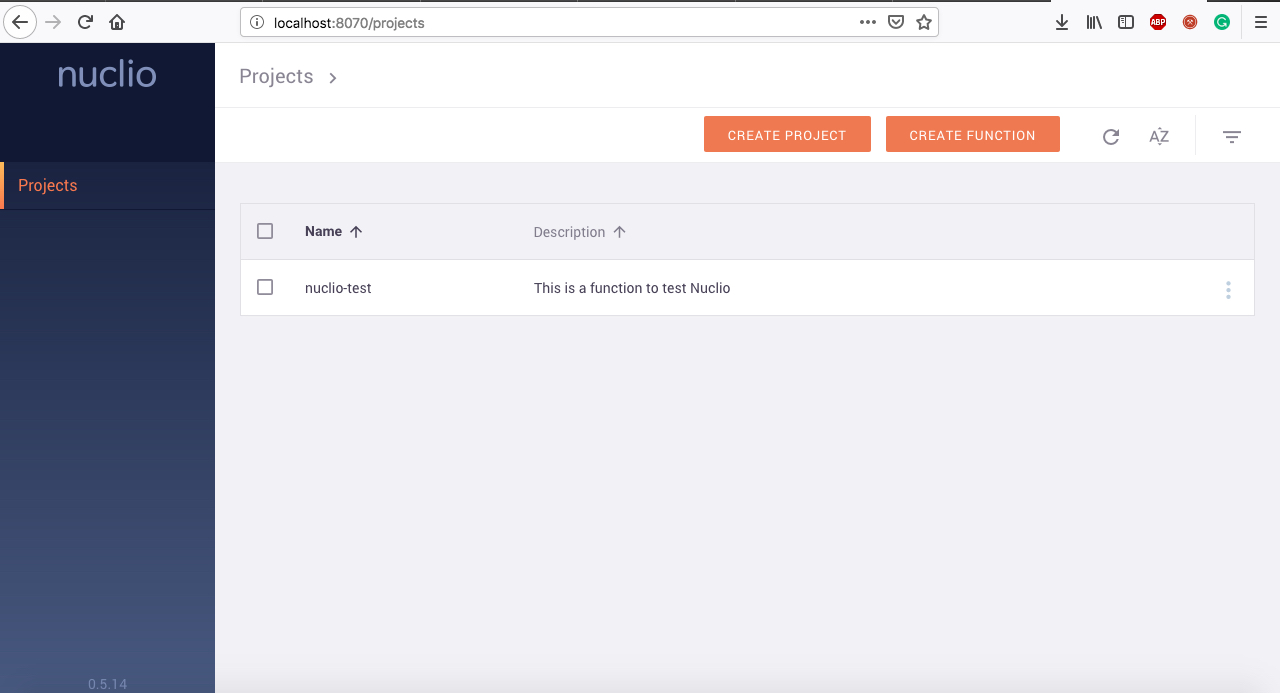
Click on project to create a function inside it.
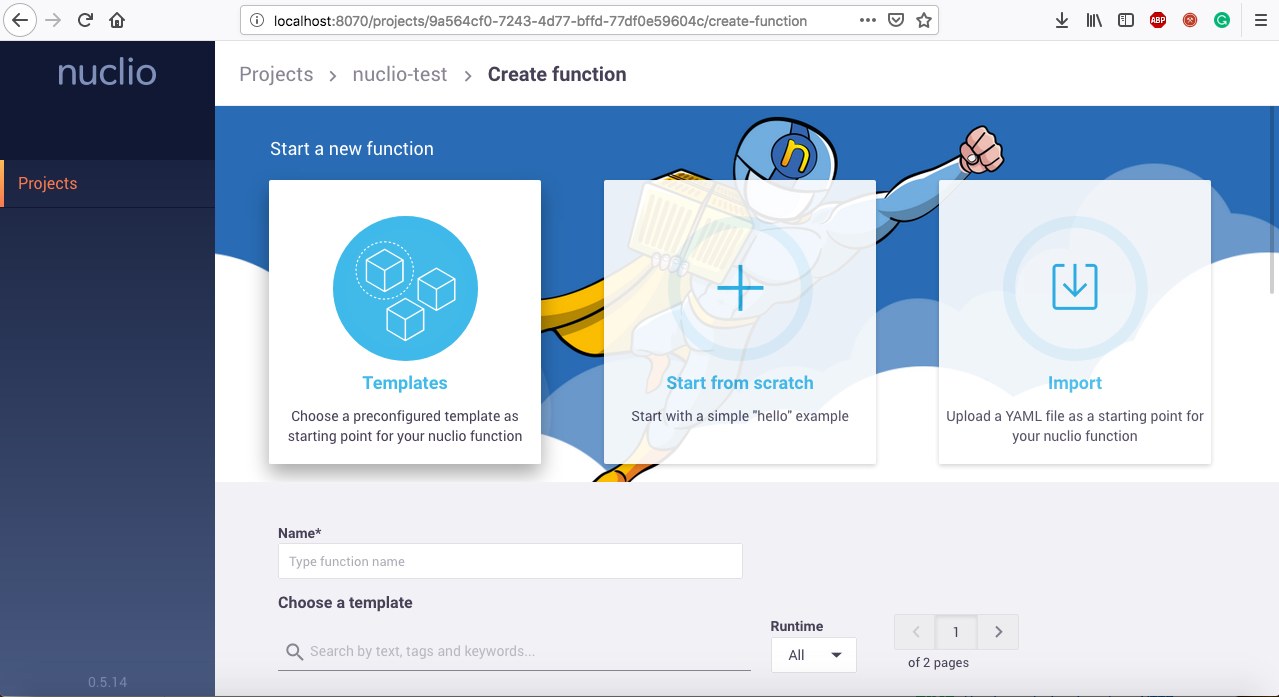
There are three options to choose from
1.Templates – There are tons of templates available across different runtimes to get started.
2.Start from scratch – You can create the whole function from scratch which helps unlike templates, which gives full control
3.Import – You can import YAML files to start of with the basic things of a function
For this tutorial, we are choosing the Templates and create a function out of it
I have chosen helloworld sample based on the python environment
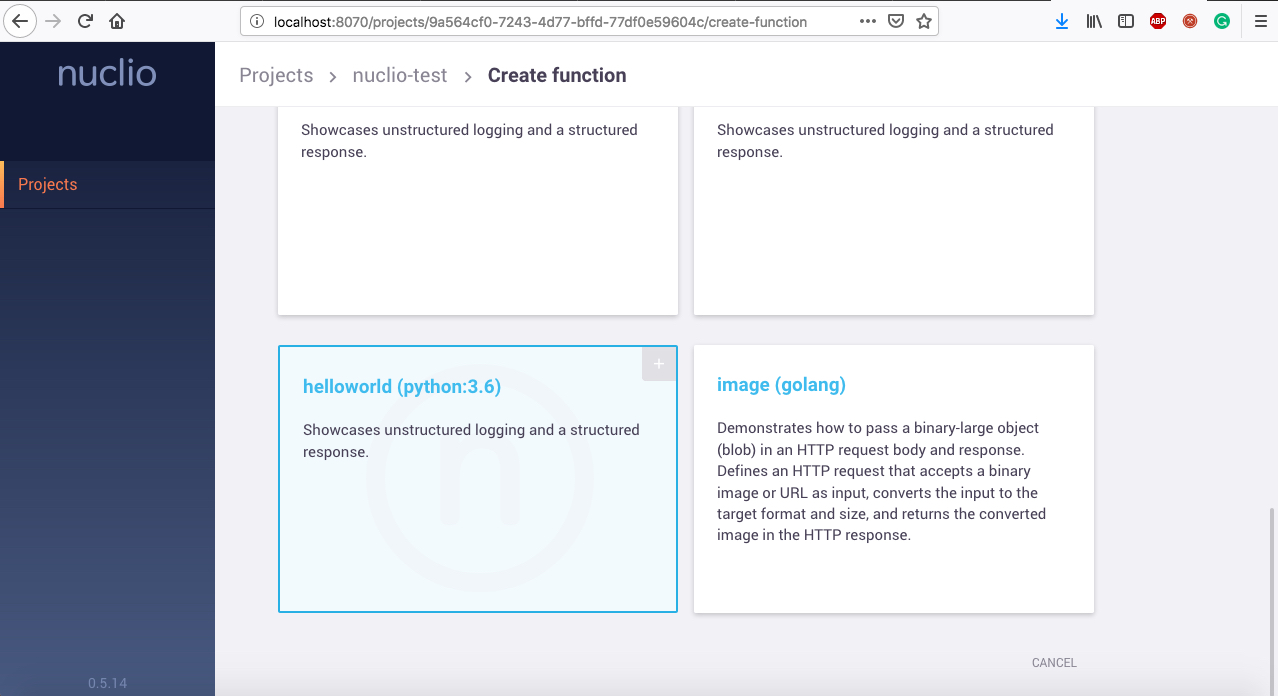
Click on the template helloworld (python:3.6) the function will be deployed and you will see the following screen in your function screen. Below are the environments supported by Nuclio are .NET 2.0, Java, NodeJS, Shell, Python, Go.
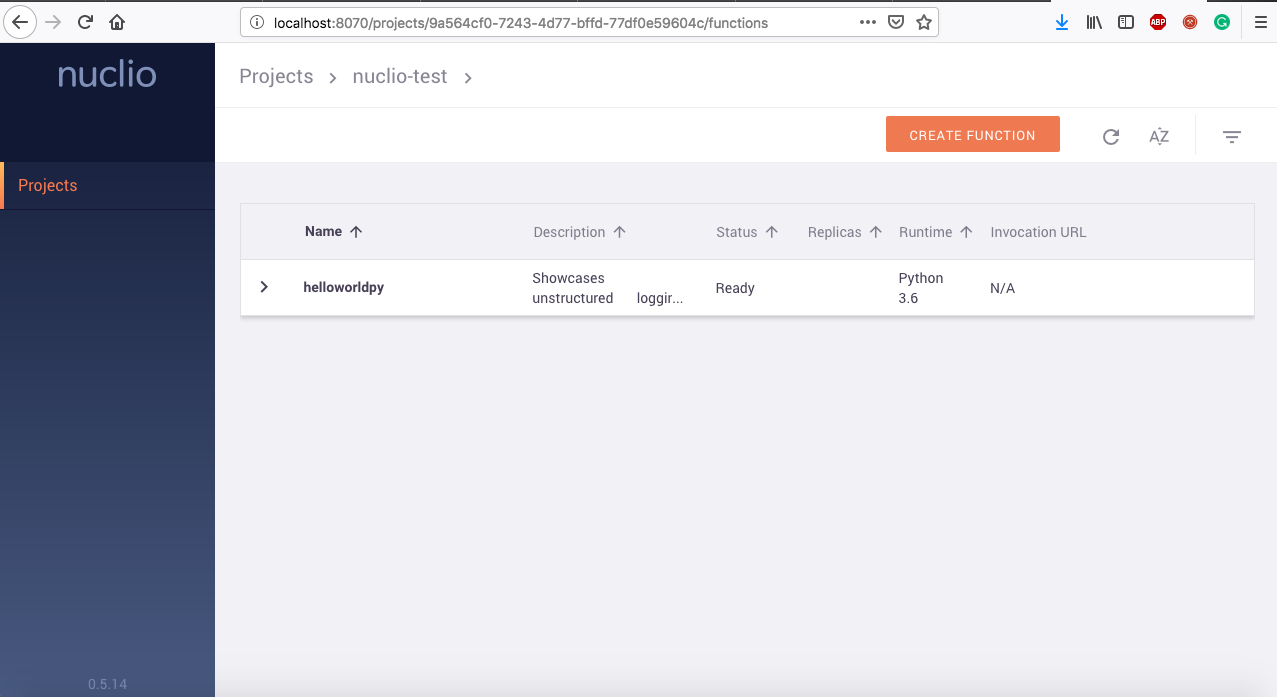
Now we can click on the function and edit the function as needed like below.
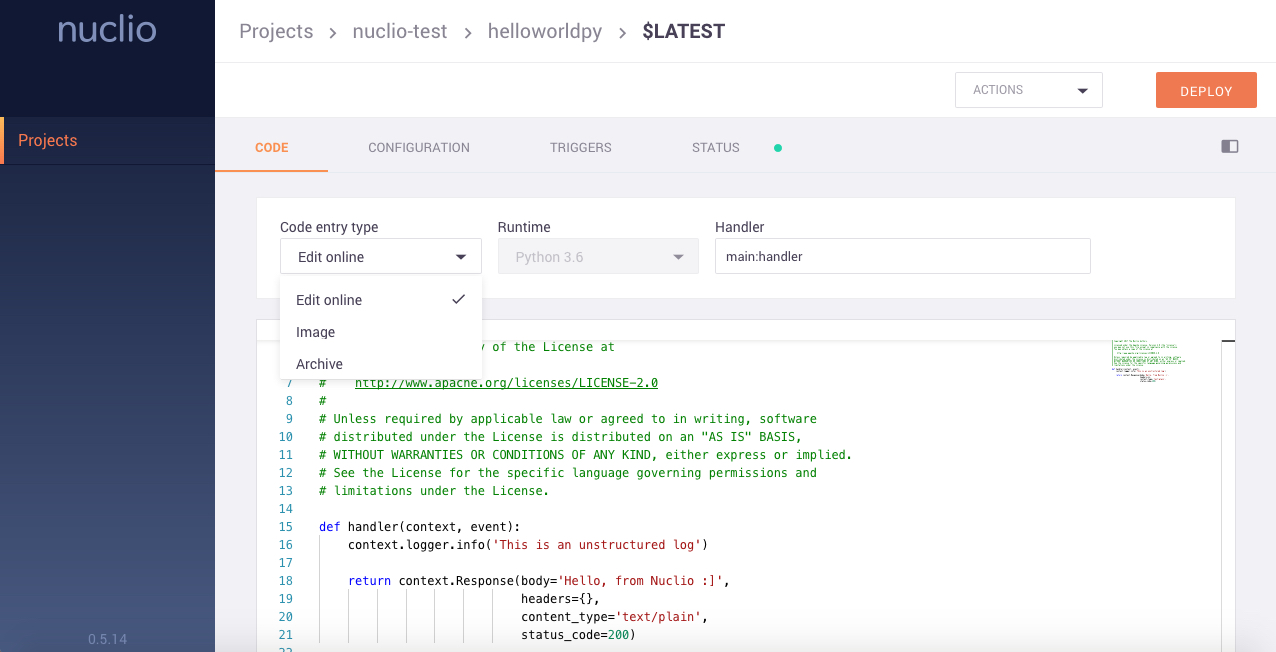
We have three options to create functions:
1.Edit Online: You can edit the function directly in the embedded editor
2.Image: Import functions as an image
3.Archive: functions in a compressed format
Once you click the DEPLOY button, you will see the build is running and the image is deployed on the container.
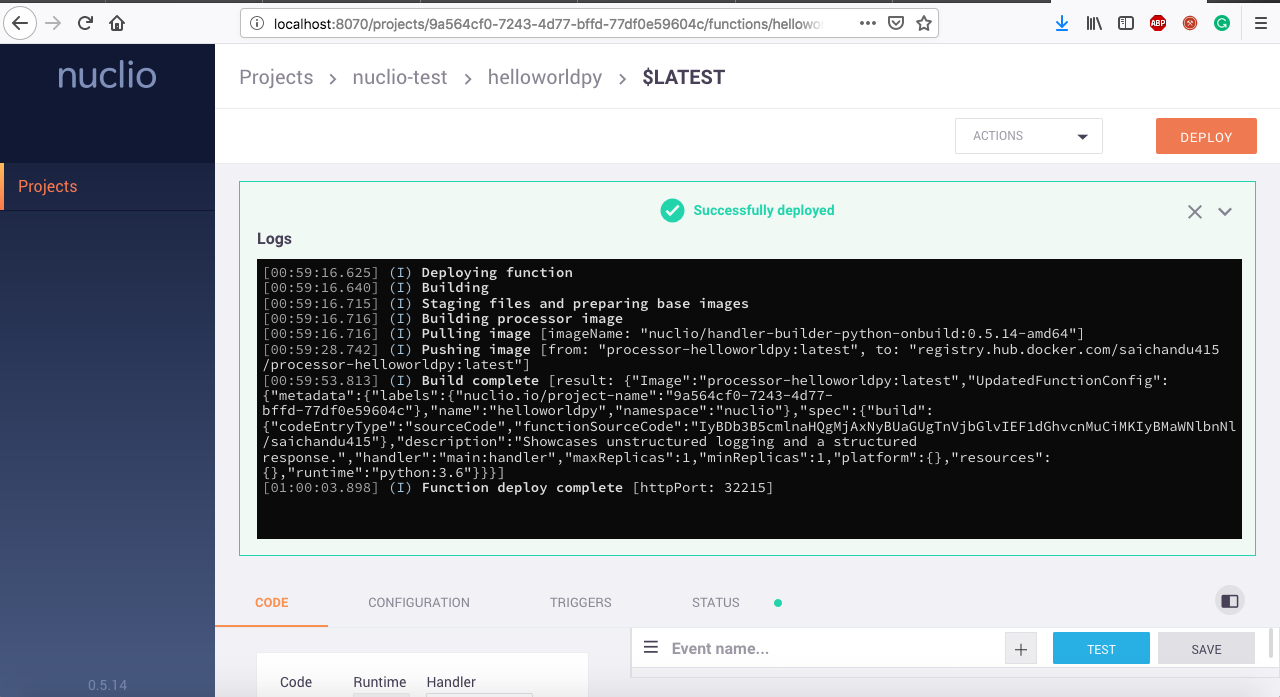
After this is done, you will see the image is deployed. You can test the function using the console.
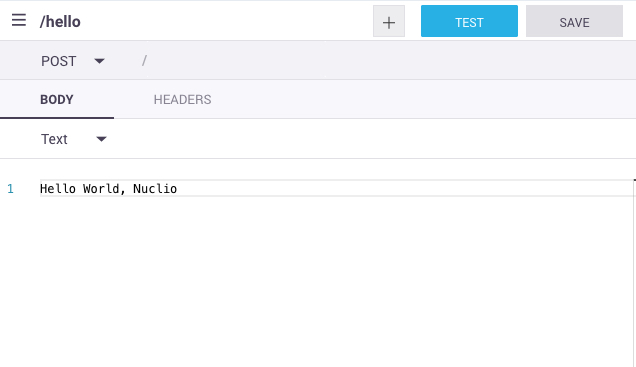
You can test the function make a request in the console as shown below.
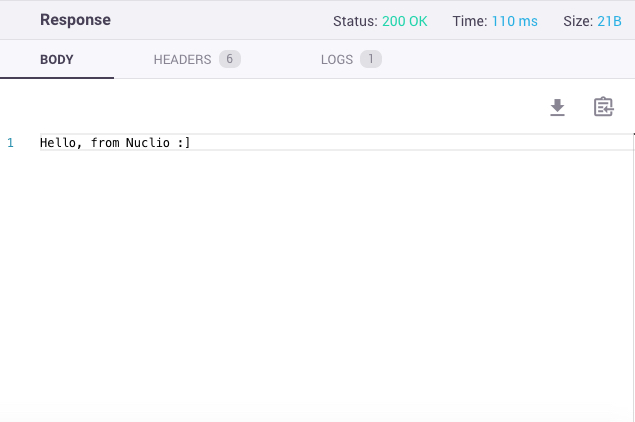
In this tutorial, you have setup Nuclio using the Alibaba Cloud Container Service for Kubernetes, having implemented Nuclio on a Kubernetes cluster.
Some takeaways from this tutorial is the versatility and usefulness of Nuclio, especially when combined with the powerful and flexible Kubernetes ecosystem.
Nuclio is a much more robust production grade tool compared with its open-source counterparts that can work in or off the cloud. Nuclio can be used in a number of applications, supporting debugging, regression and multi-version CI/CD pipelines, enterprise security ensuring security, and logging and monitoring, among several other things.
Setup Fission on Alibaba Cloud Container Service for Kubernetes
Installing IronFunctions Serverless Framework on Alibaba Cloud

2,599 posts | 769 followers
FollowAlibaba Clouder - December 7, 2018
Alibaba Clouder - November 20, 2017
iilness - February 18, 2020
JDP - September 10, 2021
Alibaba Clouder - February 21, 2020
Alibaba Clouder - July 3, 2019

2,599 posts | 769 followers
Follow ECS(Elastic Compute Service)
Elastic and secure virtual cloud servers to cater all your cloud hosting needs.
Learn More Function Compute
Alibaba Cloud Function Compute is a fully-managed event-driven compute service. It allows you to focus on writing and uploading code without the need to manage infrastructure such as servers.
Learn MoreLearn More
More Posts by Alibaba Clouder