By Sai Sarath Chandra, Alibaba Cloud Community Blog author.
Containerizing applications have proven to be rather successful recently. For instance, Docker has come to great popularity recently, with a countless number of applications that are now running on Docker. However, despite its several advantages for restructuring applications with Docker, there are also several pain points to using this application. For instance, large organizations want to monitor these containers more effectively, but this is hard to do with Dockers because things can get messy and disorganized when the number of Dockers increase.
In contrast to this, Kubernetes is a system developed by Google, for managing containers and applications in a clustered environment. Its deployments offer a much more organized, less messy system when in mass. We can also say that Kubernetes is an orchestrator for Containers. Some important features of Kubernetes are:
Following this, Fission is an open-source and Kubernetes-native serverless framework that lets developers run code functions easily without much need to configure Kubernetes clusters. It can help make things even neater. We can deploy an application anywhere, using Fission, say for example a private or public cloud. Fission supports many programming languages, like Python, NodeJS, Go, C#, and PHP. Fission can help immensely in the abstraction of containers while allowing for great flexibility in implementation.
To create a Kubernetes cluster on Alibaba Cloud, follow these steps:
Navigate to Alibaba Cloud Console, then to the Container Service. By default, you will see the Container Service for Kubernetes at the top-right corner of the page.
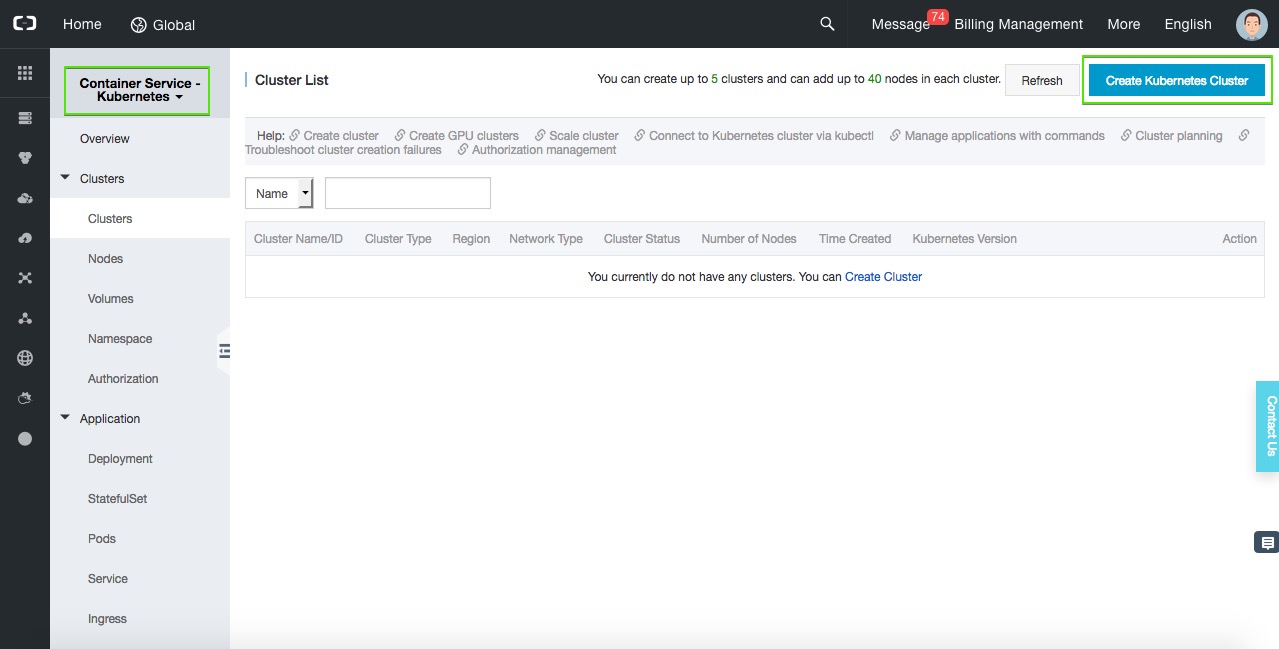
Now click Create Kubernetes Cluster.
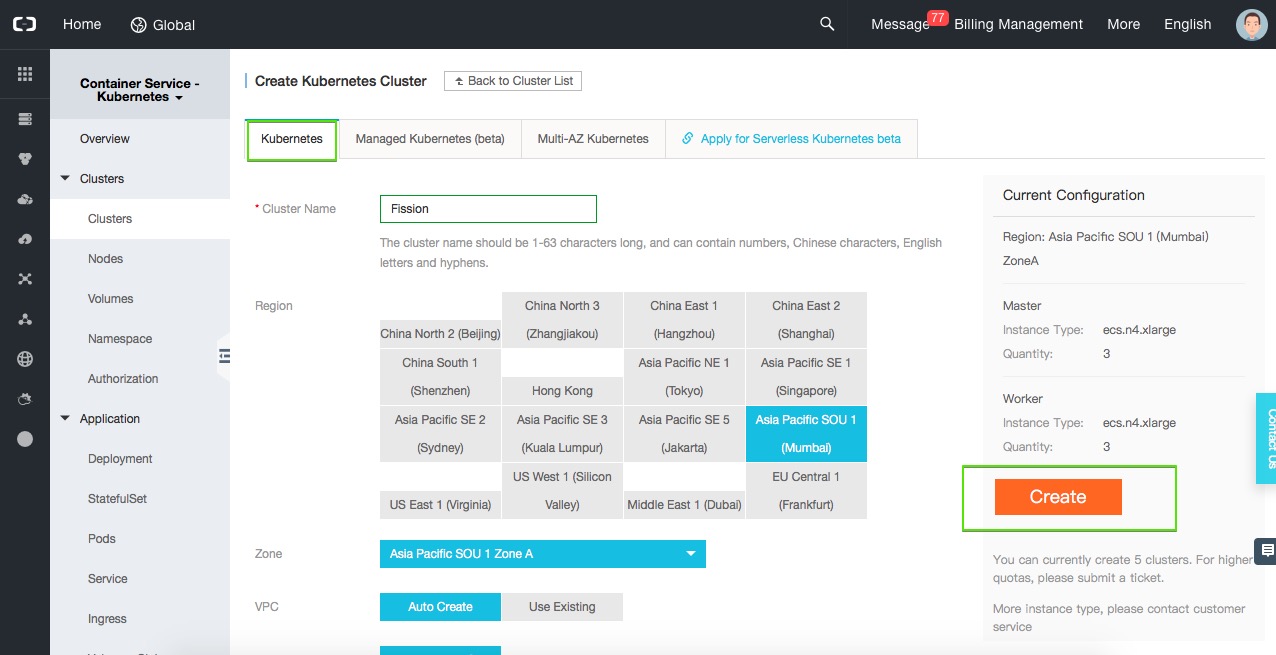
Give the cluster a name. For this tutorial, I named it Fission and chose Mumbai as the region. I left the Zone as the default setting, and opted for creating a new VPC only for this Cluster. The below are the default configurations I chose for this tutorial.
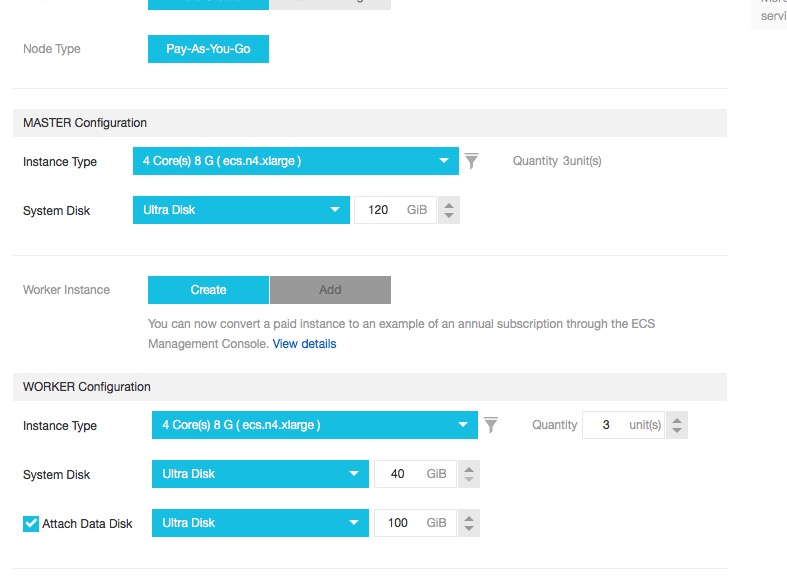
For the Master Configuration, I chose to keep the instance type as ecs.n4.xlarge (4Core, 8GB of RAM) quantity of 3 units, and chose the same configurations for the Worker as well.
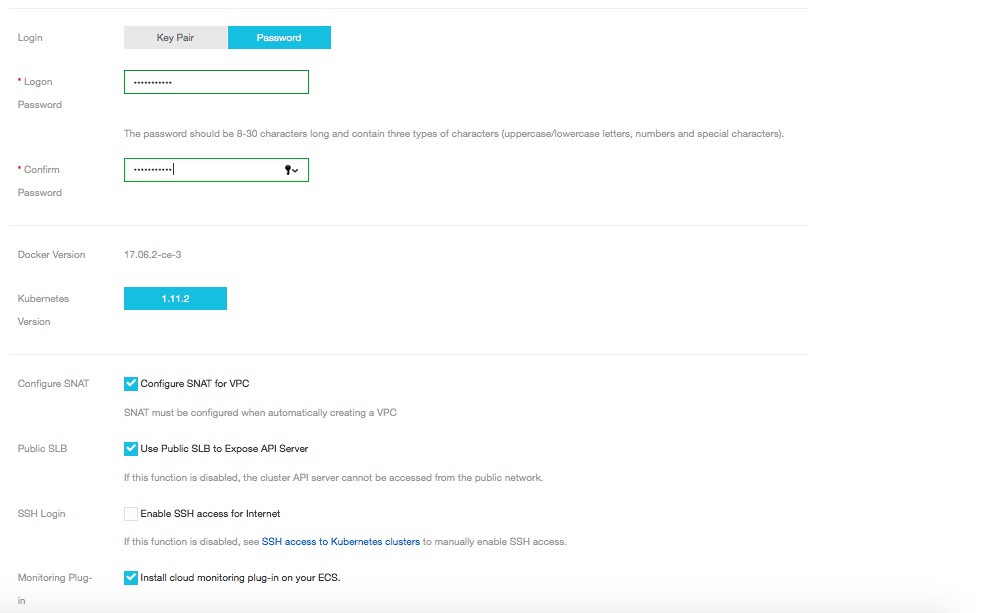
Also, I choose password-based authentication for my Cluster. I recommend that you do the same. Currently, container service supports Docker Version 17.06.2-ce-3 and Kubernetes version 1.11.2. There are several options of choosing whether we want the SNAT for VPC, exposing SLB to API Server, etc.. I have chosen the defaults.
Once after you click Create, it will take some time to spin up all the pods and containers. Once it's finished, you will see that your cluster has been created.

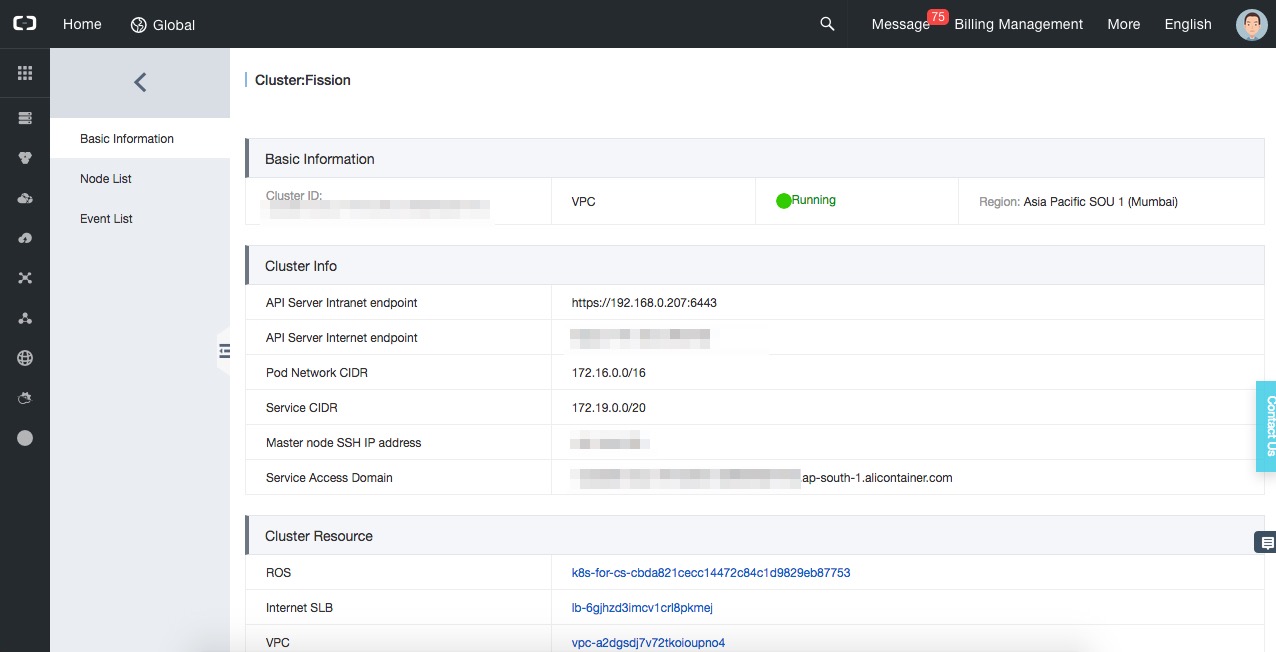
You can see there are six nodes running. If you click on manage you will see all the related information including the Intranet, Internet and Master Node IP address information. We need this information to connect later on. Keep it handy.
If you are on MacOS and have brew installed, you can run the following commands to install kubectl.
brew install kubernetes-cliNext, you can check the version by running the following command:
kubectl version

Client Version: version.Info{Major:"1", Minor:"12", GitVersion:"v1.12.2", GitCommit:"17c77c7898218073f14c8d573582e8d2313dc740", GitTreeState:"clean", BuildDate:"2018-10-30T21:39:38Z", GoVersion:"go1.11.1", Compiler:"gc", Platform:"darwin/amd64"}
Alternatively, you can run the following commands for installing kubectl on Ubuntu:
sudo apt-get update && sudo apt-get install -y apt-transport-https
curl -s https://packages.cloud.google.com/apt/doc/apt-key.gpg | sudo apt-key add -
echo "deb https://apt.kubernetes.io/ kubernetes-xenial main" | sudo tee -a /etc/apt/sources.list.d/kubernetes.list
sudo apt-get update
sudo apt-get install -y kubectl
To connect to the kubernetes cluster run the following command:
scp root@<master-public-ip>:/etc/kubernetes/kube.conf $HOME/.kube/configThis will download configuration file from the master node to the local system safely where the kubectl credentials reside. During that you will see the system prompts for an authentication based on option you selected during the creation, once it is done successfully you can connect to your server and interact with your cluster.
The authenticity of host 'AAA.BB.C.DD (AAA.BB.C.DD)' can't be established.
ECDSA key fingerprint is SHA256:RBE0tFLhJy8B52gkxY/wep65/tXa1s4AwGACsheYJP4.
Are you sure you want to continue connecting (yes/no)? yes
Warning: Permanently added AAA.BB.C.DD (ECDSA) to the list of known hosts.

root@AAA.BB.C.DD's password:
/etc/profile.d/lang.sh: line 19: warning: setlocale: LC_CTYPE: cannot change locale (UTF-8): No such file or directory
This will download the kubernetes configuration file (kube.conf). Once you configuration file is successfully downloaded try running the kubectl version command:
kubectl version
Client Version: version.Info{Major:"1", Minor:"12", GitVersion:"v1.12.2", GitCommit:"17c77c7898218073f14c8d573582e8d2313dc740", GitTreeState:"clean", BuildDate:"2018-10-30T21:39:38Z", GoVersion:"go1.11.1", Compiler:"gc", Platform:"darwin/amd64"}
Server Version: version.Info{Major:"1", Minor:"11", GitVersion:"v1.11.2", GitCommit:"bb9ffb1654d4a729bb4cec18ff088eacc153c239", GitTreeState:"clean", BuildDate:"2018-08-07T23:08:19Z", GoVersion:"go1.10.3", Compiler:"gc", Platform:"linux/amd64"}

You will see both client and server version in the kubectl version.Now you can follow these steps to install Helm, which can help to manage your Kubernetes applications.
First, you'll need to download the helm binaries with the following command:
curl -LO https://storage.googleapis.com/kubernetes-helm/helm-v2.11.0-darwin-amd64.tar.gzNext, unzip the binary:
tar xzf helm-v2.11.0-darwin-amd64.tar.gzNext, move the binaries to the path directory:
mv darwin-amd64/helm /usr/local/binLast, initialize Helm:
helm init
helm init
Creating /Users/sarathchandrap/.helm
Creating /Users/sarathchandrap/.helm/repository
Creating /Users/sarathchandrap/.helm/repository/cache
Creating /Users/sarathchandrap/.helm/repository/local
Creating /Users/sarathchandrap/.helm/plugins
Creating /Users/sarathchandrap/.helm/starters
Creating /Users/sarathchandrap/.helm/cache/archive
Creating /Users/sarathchandrap/.helm/repository/repositories.yaml
Adding stable repo with URL: https://kubernetes-charts.storage.googleapis.com
Adding local repo with URL: http://127.0.0.1:8879/charts
$HELM_HOME has been configured at /Users/sarathchandrap/.helm.
Warning: Tiller is already installed in the cluster.
(Use --client-only to suppress this message, or --upgrade to upgrade Tiller to the current version.)
Happy Helming!
You can create a namespace and installing fission on the pods with this command:
helm install --name fission --namespace fission https://github.com/fission/fission/releases/download/0.12.0/
fission-all-0.12.0.tgz
Error: incompatible versions client[v2.11.0] server[v2.9.1]
To resolve the error that showed up, upgrade the Helm version:
helm init --upgrade
$HELM_HOME has been configured at /Users/sarathchandrap/.helm.

Tiller (the Helm server-side component) has been upgraded to the current version.
Happy Helming!
Next, run the following command:
helm install --name fission --namespace fission https://github.com/fission/fission/releases/download/0.12.0/fission-all-0.12.0.tgzYou will see the output consists of such information as you can see below:
NAME                                                    READY  STATUS            RESTARTS  AGE
fission-prometheus-node-exporter-7kphr                  1/1    Running           0         58s
fission-prometheus-node-exporter-9m4kt                  1/1    Running           0         58s
fission-prometheus-node-exporter-qg9t5                  1/1    Running           0         58s
logger-f7zvj                                            0/1    Error             2         58s
logger-lrdhg                                            0/1    CrashLoopBackOff  2         58s
logger-xw4m6                                            0/1    Error             2         58s
fission-prometheus-alertmanager-c859cfc8d-76xd9         0/2    Pending           0         58s
fission-prometheus-kube-state-metrics-6f7b84879c-xfpmd  1/1    Running           0         58s
fission-prometheus-pushgateway-68bb876774-qf5ss         1/1    Running           0         58s
fission-prometheus-server-6c7564697-qlzls               0/2    Pending           0         58s
controller-859877599c-qfxs5                             1/1    Running           0         58s
influxdb-7fb45f87b6-vlrwt                               1/1    Running           0         58s
router-6ff8f9b9d5-mn9lg                                 1/1    Running           0         58s
timer-554858c667-slltx                                  1/1    Running           0         58s
nats-streaming-559f95cb85-tzntf                         1/1    Running           0         58s
buildermgr-6c95f4997-glr46                              1/1    Running           0         57s
executor-5fb4c7d769-nm24s                               1/1    Running           0         57s
kubewatcher-758d84577c-gxvl5                            1/1    Running           0         57s
storagesvc-596cc894bd-h9dwm                             0/1    Pending           0         57s
mqtrigger-nats-streaming-99cd86654-ckdnn                1/1    Running           0         57s
redis-0                                                 1/1    Running           0         58s
There is detail about what is being installed and what is required as part of the Fission environment. We can see there's the builder manager, nats streaming, Prometheus server, Prometheus gateway, redis, kubewatcher, so on and so forth. We need to make sure that we have all the pods running.
To solve this, the first thing we need to do is install the client CLI.
Install the client CLI.

Mac:
  $ curl -Lo fission https://github.com/fission/fission/releases/download/0.12.0/fission-cli-osx && chmod +x fission && sudo mv fission /usr/local/bin/

Linux:
  $ curl -Lo fission https://github.com/fission/fission/releases/download/0.12.0/fission-cli-linux && chmod +x fission && sudo mv fission /usr/local/bin/

Windows:
  For Windows, you can use the linux binary on WSL. Or you can download this windows executable: https://github.com/fission/fission/releases/download/0.12.0/fission-cli-windows.exe
Next, let's create a function with nodejs as environment:
fission env create --name nodejs --image fission/node-env
environment 'nodejs' created
Download the function with the following command:
curl -LO https://raw.githubusercontent.com/fission/fission/master/examples/nodejs/hello.jsCreate the function:
fission function create --name hello --env nodejs --code hello.jsThe below is the function that hello.js contains:
module.exports = async function(context) {
    return {
        status: 200,
        body: "Hello, world!\n"
    };
}
This is an asynchronous function exported as a module. This function responds with "Hello, world!" for any request. Fission guarantees a solid performance with maximum delay of 100ms, this is achievable by maintaining the pool of warm containers that each contain a dynamic loader, whenever a function is called for the first time, the running container will be chosen and the function is loaded. This is what fission calls it as a cold-start method.
We can test the function by directly invoking it from the command line:
fission function test --name hello
hello, world!
Once we created the namespaces, we can see the related information in the Alibaba Cloud console:
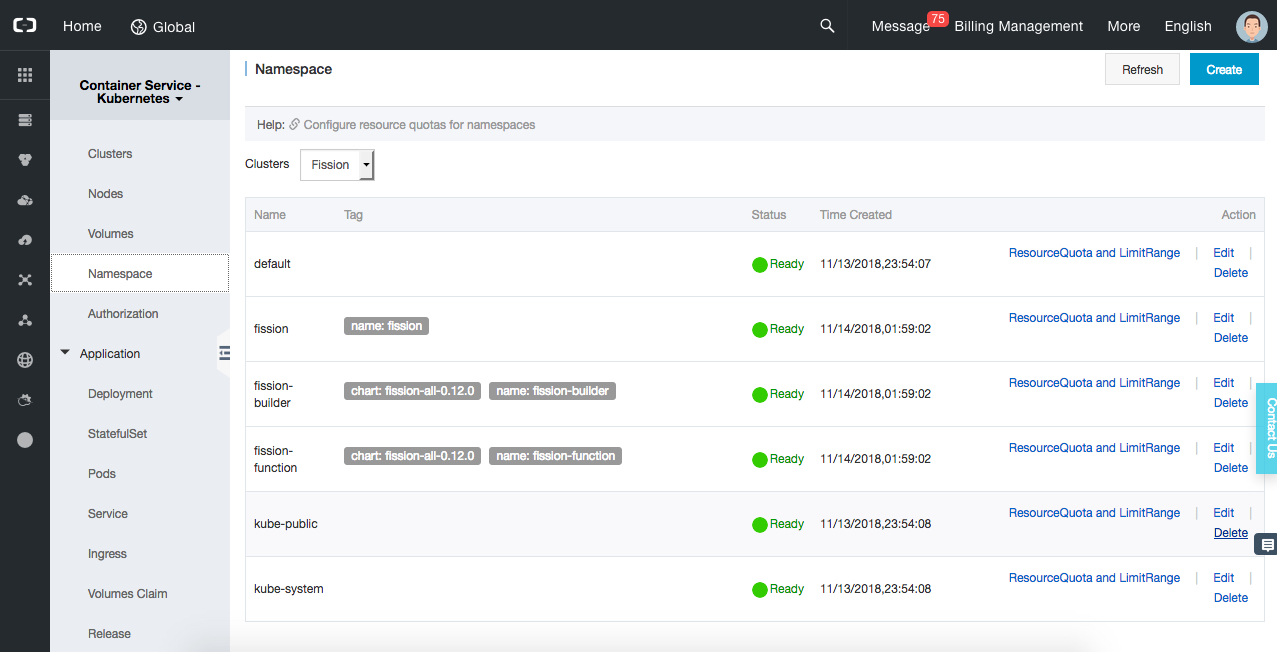
There are different namespaces available once we install Fission. Specifically, we have fission, fission-builder, fission-function installed by fission and default, kube-public, kube-system are available as part of Kubernetes.
Using Alibaba Cloud console, we can also see the different statistics about the master and worker nodes like below:
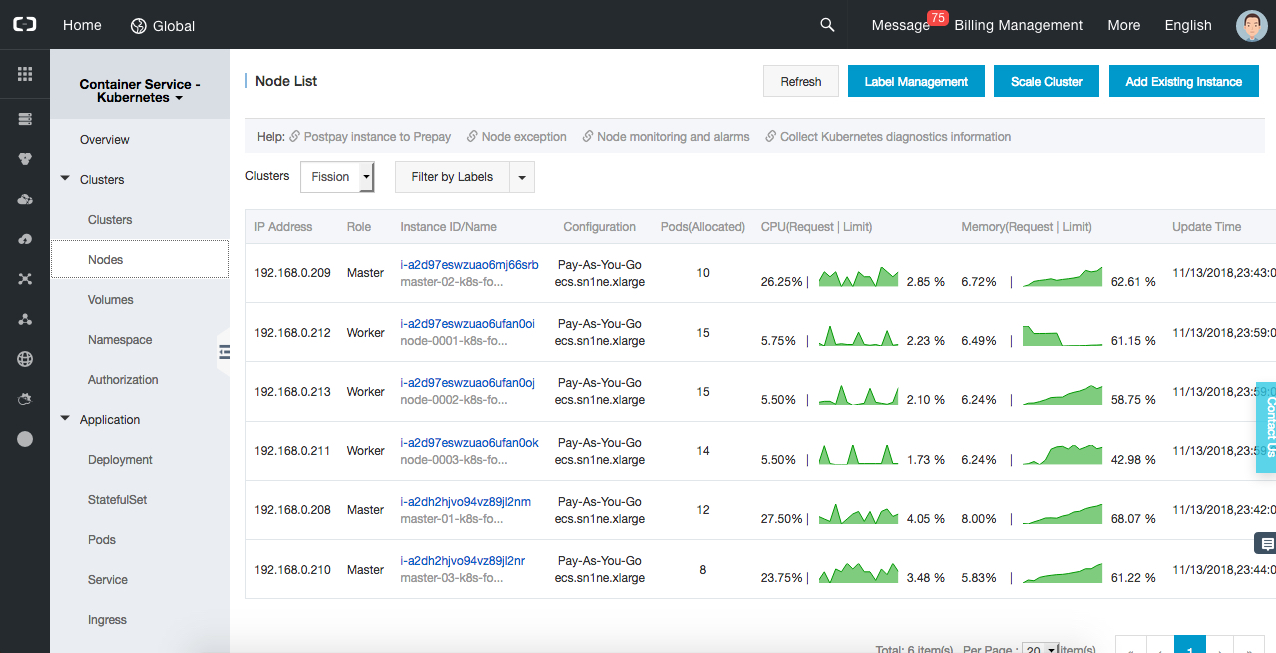
This gives us much in-depth information about the nodes such as the Pods Allocated, CPU Utilization, Memory, the Billing Method. You can also view the interactive dashboard from the console to see the status of the entire cluster.
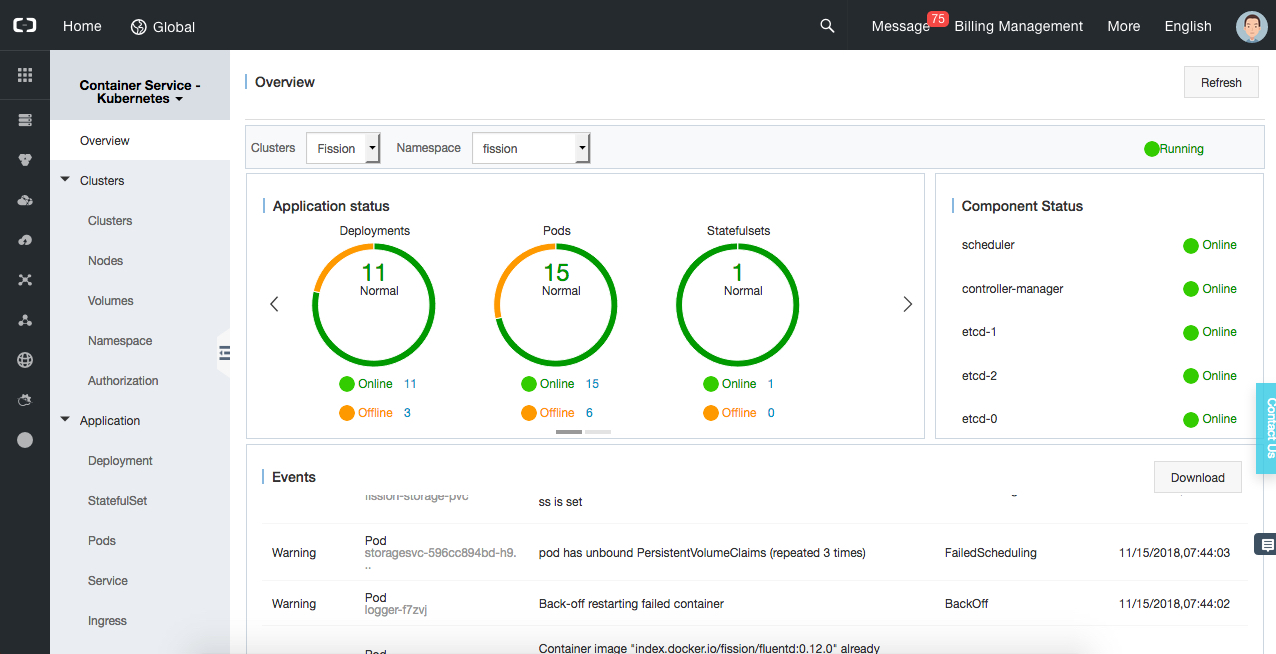
We have all the events triggered the deployments, pods and their statuses, different components and their associated statuses and list of events and their type.
Fission is a versatile framework that can be used with many different programming languages, thus making it popular among many developers working with Kubernetes applications. Additionally, this is much community support for Fission. In summary, Fission showcases many great benefits, such as high performance, simple operation and support for Kubernetes, which makes it a very attractive option among serverless frameworks nowadays.

2,599 posts | 769 followers
FollowAlibaba Cloud Storage - June 4, 2019
Alibaba Developer - August 8, 2019
Alibaba Clouder - September 21, 2018
Alibaba Clouder - November 30, 2018
Alibaba Clouder - May 14, 2018
Alibaba Cloud Native - November 15, 2022

2,599 posts | 769 followers
Follow ECS(Elastic Compute Service)
Elastic and secure virtual cloud servers to cater all your cloud hosting needs.
Learn More Function Compute
Alibaba Cloud Function Compute is a fully-managed event-driven compute service. It allows you to focus on writing and uploading code without the need to manage infrastructure such as servers.
Learn MoreLearn More
More Posts by Alibaba Clouder
Start building with 50+ products and up to 12 months usage for Elastic Compute Service
Get Started for Free Get Started for Free