By Temidayo Oyedele, Alibaba Cloud Tech Share Author. Tech Share is Alibaba Cloud's incentive program to encourage the sharing of technical knowledge and best practices within the cloud community.
Jenkins is a self-contained, open source automation server which can be used to automate all sorts of tasks related to building, testing, and delivering or deploying software.
Jenkins can be installed through native system packages, Docker, or even run standalone by any machine with a Java Runtime Environment (JRE) installed.
Docker is a platform for developers and sysadmins to develop, deploy, and run applications with containers. The use of Linux containers to deploy applications is called containerization. Containers are not new, but their use for easily deploying applications is.
In this guide, we will setup a continuous integration and deployment pipeline for a PREN (PostgreSQL, ReactJS, Express, NodeJS) application. We will be using Jenkins to detect code changes on GitHub and continuous delivery, the PREN application will be containerized using Docker and pushed to Alibaba Cloud Container Registry. The PREN app we will be using is hosted on GitHub here.
We will setup our Jenkins server on an Alibaba cloud elastic compute service. Login to the Alibaba Cloud ECS console. If you don't have an instance running, you can click on this link to get an Alibaba Cloud compute service running.
Java runtime environment (JRE) is a requirement for installing Jenkins and we will install it first.
I prefer you install the JDK (Java development kit) which also contains the Java runtime environment as you may need to compile Java programs or other programs may require it. The only downside is it is larger in size.
You can SSH into the ECS instance from your local terminal using your SSH key pair or login via the VNC console depending on your set or preferred method and follow these steps to install Jenkins:
Add the Oracle PPA and update your package index by running the command below:
sudo apt-get update
sudo apt-get install software-properties-common
sudo add-apt-repository ppa:webupd8team/java
sudo apt-get update
The software properties common is needed to be install so we can use add-apt-repository later. Finally, we install the JDK 8 by running:
sudo apt-get install oracle-java8-installerNote: Jenkins specifically requires Java version 8 installed.
Add the repository key to the system using the following command:
wget -q -O - https://pkg.jenkins.io/debian/jenkins-ci.org.key | sudo apt-key add -Next, we'll append the Debian package repository address to the server's sources.list:
echo deb https://pkg.jenkins.io/debian-stable binary/ | sudo tee /etc/apt/sources.list.d/jenkins.listWhen both of these are in place, we'll run update so that apt-get will use the new repository:
sudo apt-get updateFinally, we'll install Jenkins and its dependencies:
sudo apt-get install jenkinsUsing service, we'll start Jenkins:
sudo service jenkins startYou can check Jenkins status with:
sudo service jenkins statusYou should see something similar to Jenkins automation server is running amidst the output.

Next, we will need to set up our installation from the Jenkins web console. Navigate to the Jenkins web console by visiting http://internet_ip_address_of_your_instance:8080. Port 8080 is the default port for Jenkins.
You should see the "Unlock Jenkins" page, which displays the location of the initial password in red text. Something similar to this:
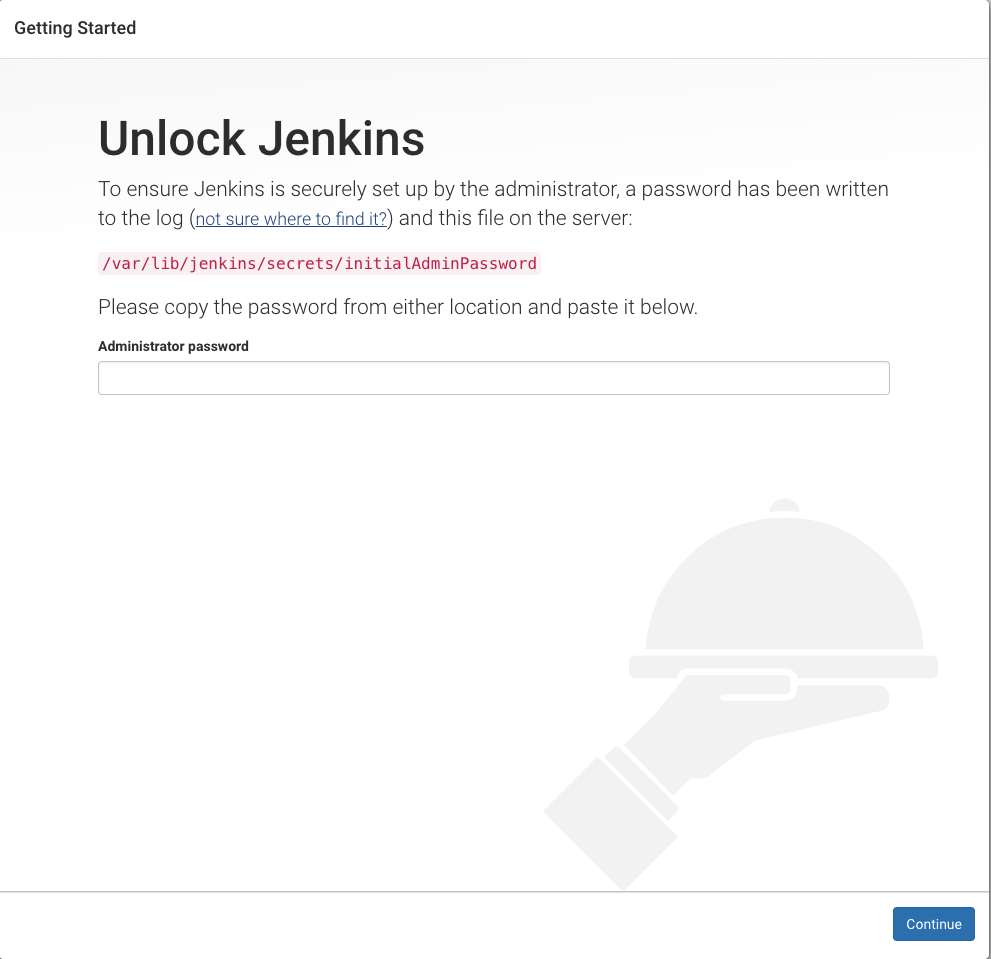
Go to the VNC terminal or your local terminal window where you logged in to the ECS instance, we'll use the cat command to display the password:
sudo cat /var/lib/jenkins/secrets/initialAdminPasswordWe'll copy the 32-character alphanumeric password output from the terminal and paste it into the "Administrator password" field in the Jenkins console, then click "Continue". The next screen presents the option of installing suggested plugins or selecting specific plugins. We will be selecting the option to install suggested plugins.
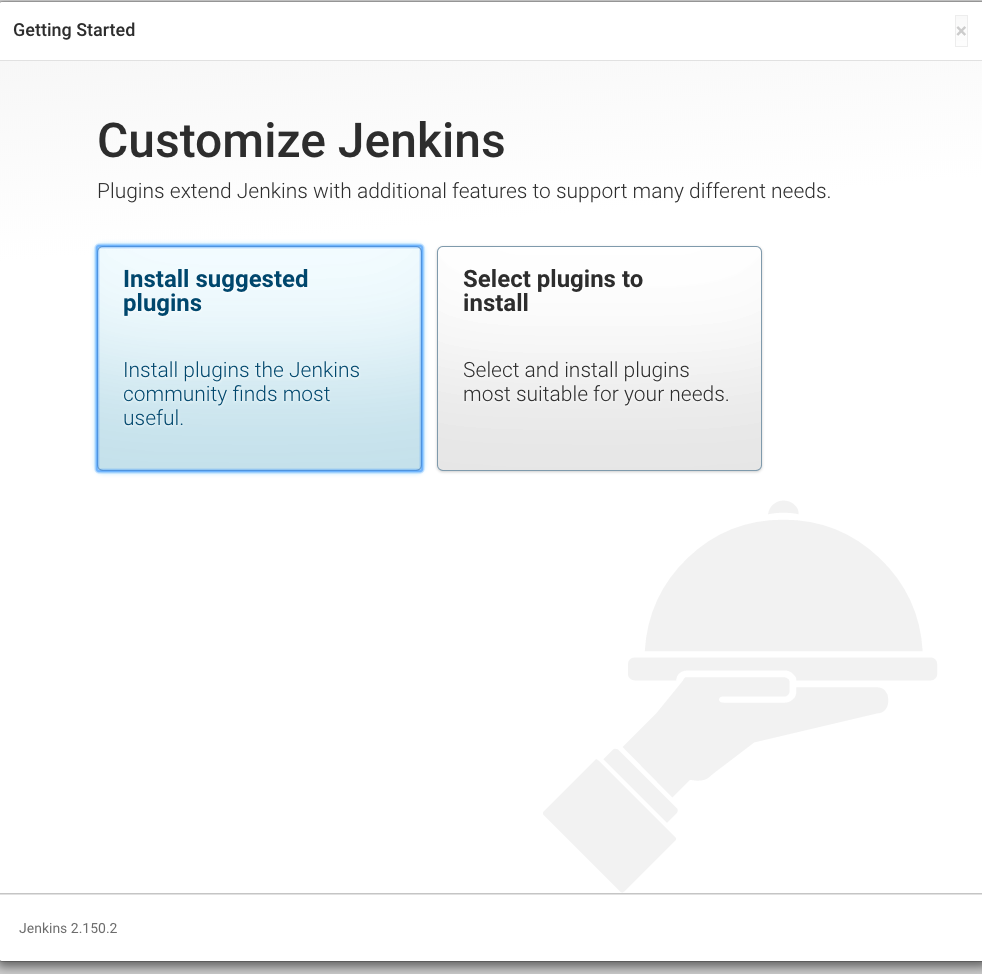
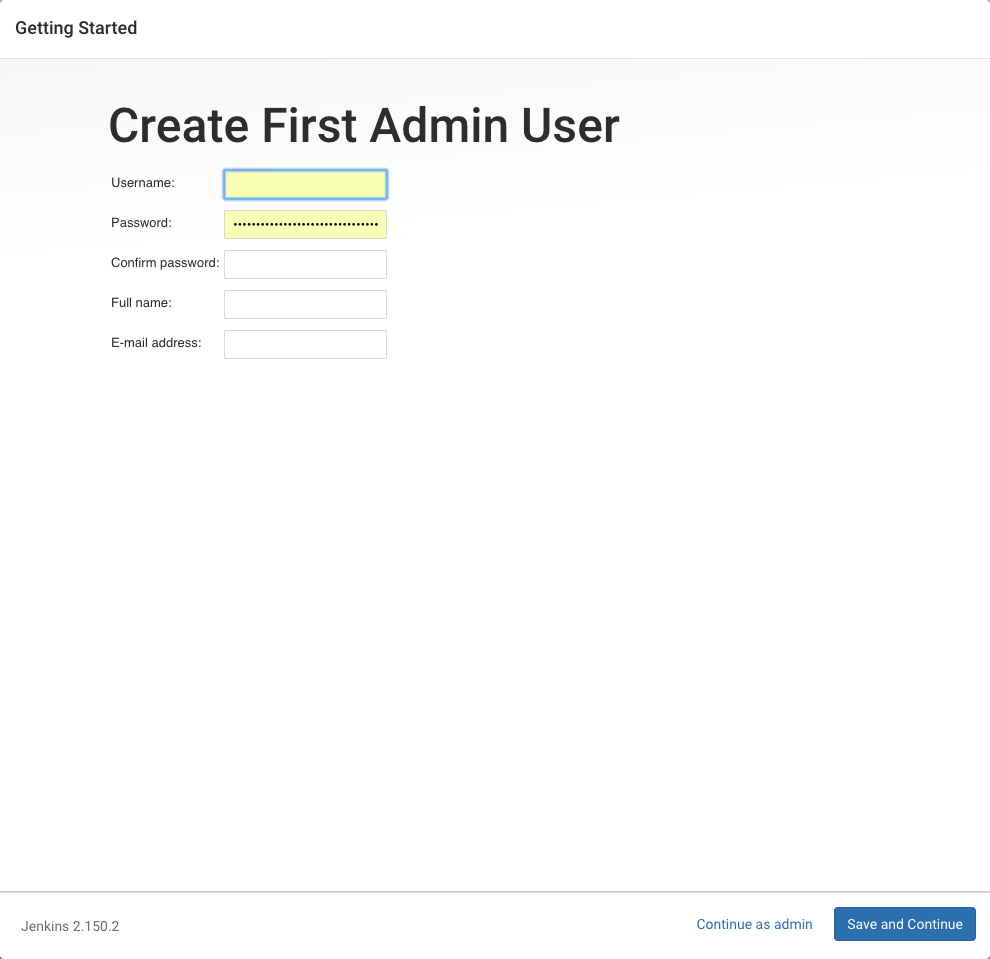
When the installation is complete, we'll be prompted to set up the first administrative user. It's possible to skip this step and continue as admin using the initial password we used above, but we'll take a moment to create the user.
Fill in the details that you will remember then save and continue.
At this stage, you should see a page similar to this:
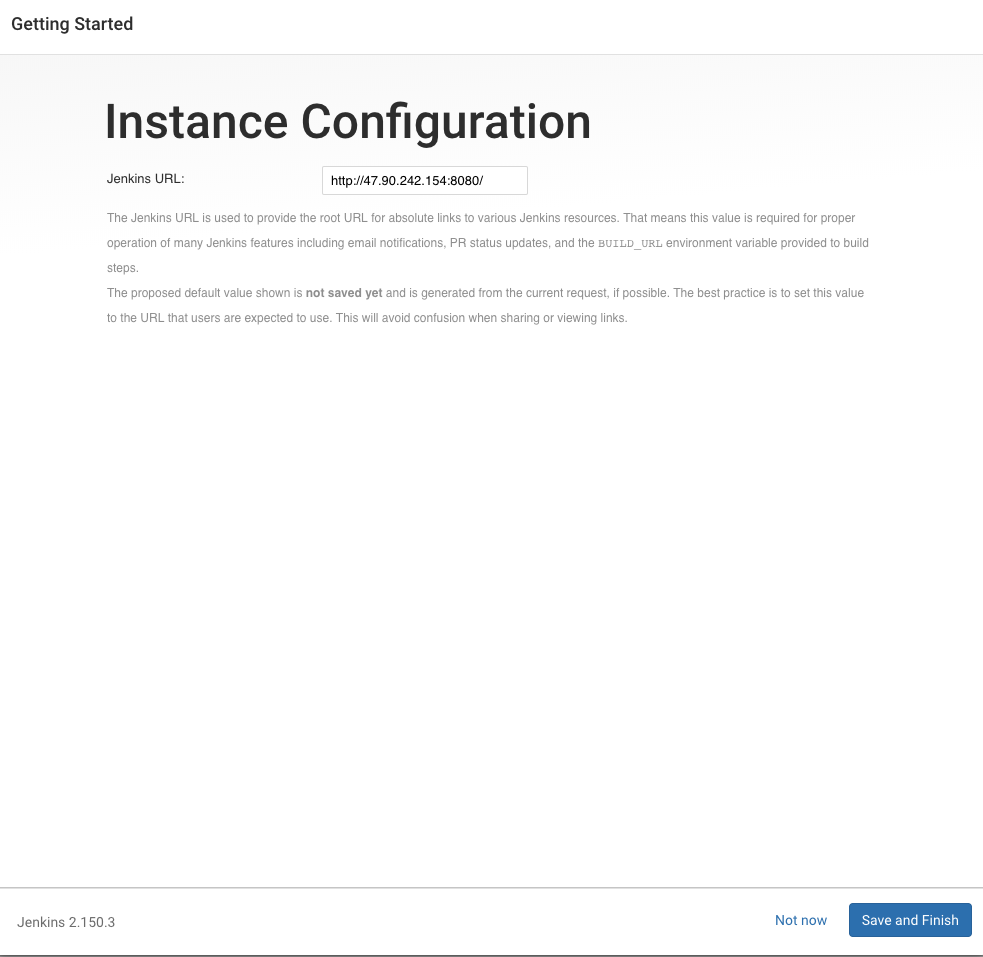
Click on Save and Finish then Start using Jenkins on the next page. You will be redirected to the dashboard. The installation is done at this stage.
Still on the ECS instance from the VNC or your terminal/command prompt. To ensure we get a valid docker download, add the GPG key for the official Docker repository to your system:
curl -fsSL https://download.docker.com/linux/ubuntu/gpg | sudo apt-key add -Add the Docker repository to APT sources:
sudo add-apt-repository "deb [arch=amd64] https://download.docker.com/linux/ubuntu $(lsb_release -cs) stable" Next, update the package database with the Docker packages from the newly added repository:
sudo apt-get updateFinally, install Docker with this command:
sudo apt-get install -y docker-ceDocker should now be installed, the daemon started, and the process enabled to start on boot. Check that it's running using:
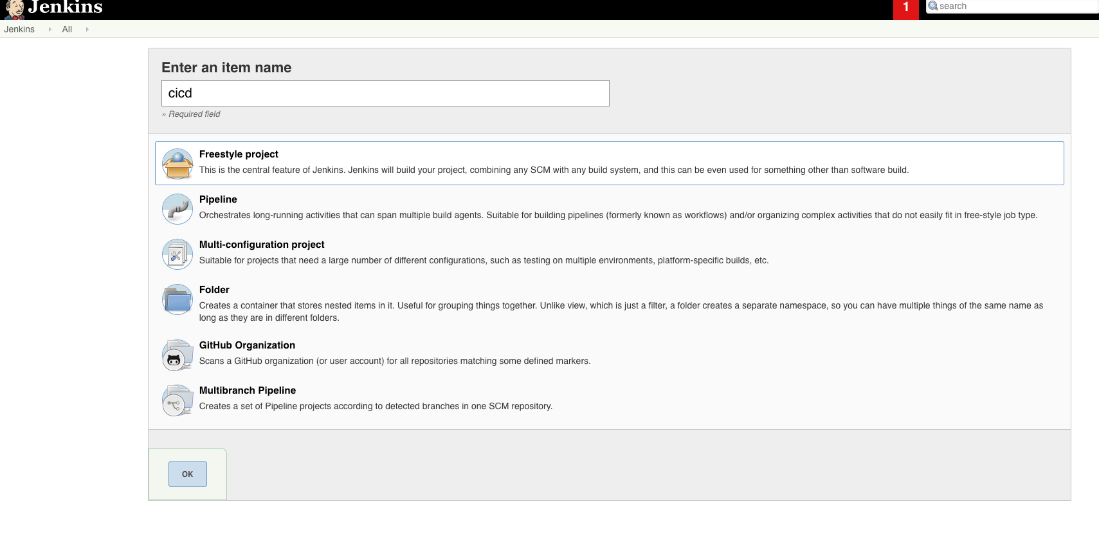
sudo service docker statusFrom your web browser, go to your Jenkins dashboard (http://ECS_URL:8080) and click on new item to create a new Jenkins job. Type a suitable name, select freestyle project and click on ok to move to the next page.
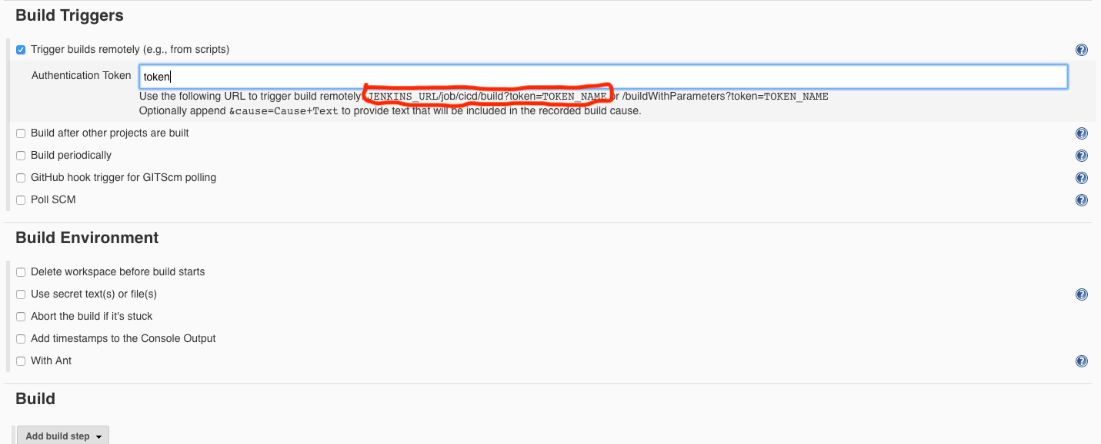
On the next page, under build triggers, check the trigger builds remotely box (e.g., from scripts), you will be required to provide an authentication token. Fill in any token of your choice (more like password) easy for you to remember and quite difficult for other people. This token is required to make push events (in our case from GitHub) to the Jenkins server. Take note of the URL under the input field. I will call it build URL and it will be needed later for GitHub webhook.
For the build section, select Add build step and Execute shell from the dropdown. Paste the following command in the text area:
set +x
if [ -d HelloBooks-Alibaba ]; then rm -rf HelloBooks-Alibaba; fi
git clone https://github.com/babadee001/HelloBooks-Alibaba
cd HelloBooks-Alibaba
sudo docker build -t hellobooks .
sudo docker login --username=yourusername registry-intl.yourregion.aliyuncs.com -p $password
sudo docker tag [ImageId] registry-intl.yourregion.aliyuncs.com/yournamespace/yourrepositoryname:[tag]
sudo docker push registry-intl.yourregion.aliyuncs.com/yournamespace/yourrepositoryname:[tag]
If you are following this guide with the sample project I am using, you can leave the first five commands as it is otherwise modify accordingly. The next three commands are directly from the Alibaba ECR (Elastic Container Registry) repository. This is explained better in the next step (step 4) slated for setting up the ECR.
Set +x makes sure commands and their arguments are not printed or returned to the terminal. The next line checks if the project folder exists and deletes if true. This will make sure we always have an updated repo folder. Then next, we clone the repo and cd (change directory) to the project folder or directory. After that, the docker command to build the image is ran.
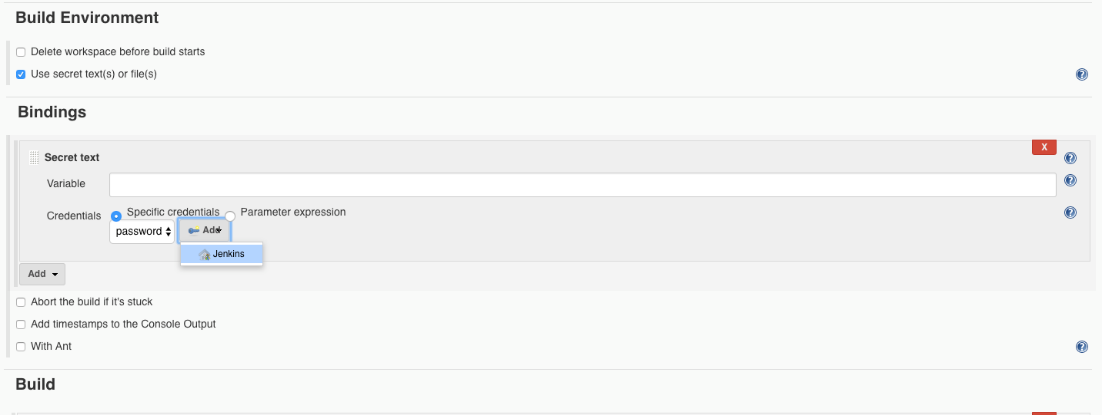
Finally, before we save the Jenkins job, we need to add an environment variable; the password to login to the ECR repository. Under the Build Environment check the Use secret text(s) or file(s) box. A new section will be shown right beneath it (Bindings). Fill the variable field with a name for the secret text. Click on the Add dropdown and select secret text. Click on Add, then Jenkins. Change the kind to secret text and paste your ECR Docker login password. Fill the ID field (take note of this name as it will be what we will use to reference the secret file later and must be the same as the variable name). Save.
Lots of source-code hosting services like GitHub, Gitlab, Bitbucket etc. have the ability to send webhooks when new commits are pushed to a repository. The webhooks are usually HTTP POST requests with a JSON payload.
By default, Jenkins 2.x and later enables a security feature called "Prevent Cross Site Request Forgery exploits" that rejects all POST requests that don't have a valid 'crumb' token associated with them. This is a great security feature.
Since most Git hosting services don't have any mechanism to retrieve or handle a crumb, that means that their POST requests get blocked on a Jenkins installation with default settings. "Prevent Cross Site Request Forgery exploits" needs to be manually disabled in order to allow the host's webhooks to work with Jenkins out-of-the-box, or a service-specific plugin needs to be installed.
There are plugins built for a lot of common hosts like Bitbucket and GitHub that provide Crumb Exclusions for them. These plugins make sure CSRF is enabled and push notification can still be made but for the purpose of this tutorial, we won't be installing any third-party plugin but disable CSRF manually.
To disable CSRF on Jenkins dashboard, click on manage Jenkins from the Jenkins dashboard, then configure global security. Scroll up under Authorization, select Logged-in users can do anything then check the Allow anonymous read access box. Continue Scrolling up and you should see CSRF protection, uncheck the box. Save and we are all done there.
Lastly, we need to give the Jenkins user sudo permission as the docker commands to send our images to the container registry requires a sudoer privilege. This can be done by modify the sudoers file by running the command below:
visudo -f /etc/sudoersThen add the following line at the end of the file and save.
jenkins ALL= NOPASSWD: ALLGo to your repository on GitHub and click on the settings tab then webhooks from the left navigation pane.
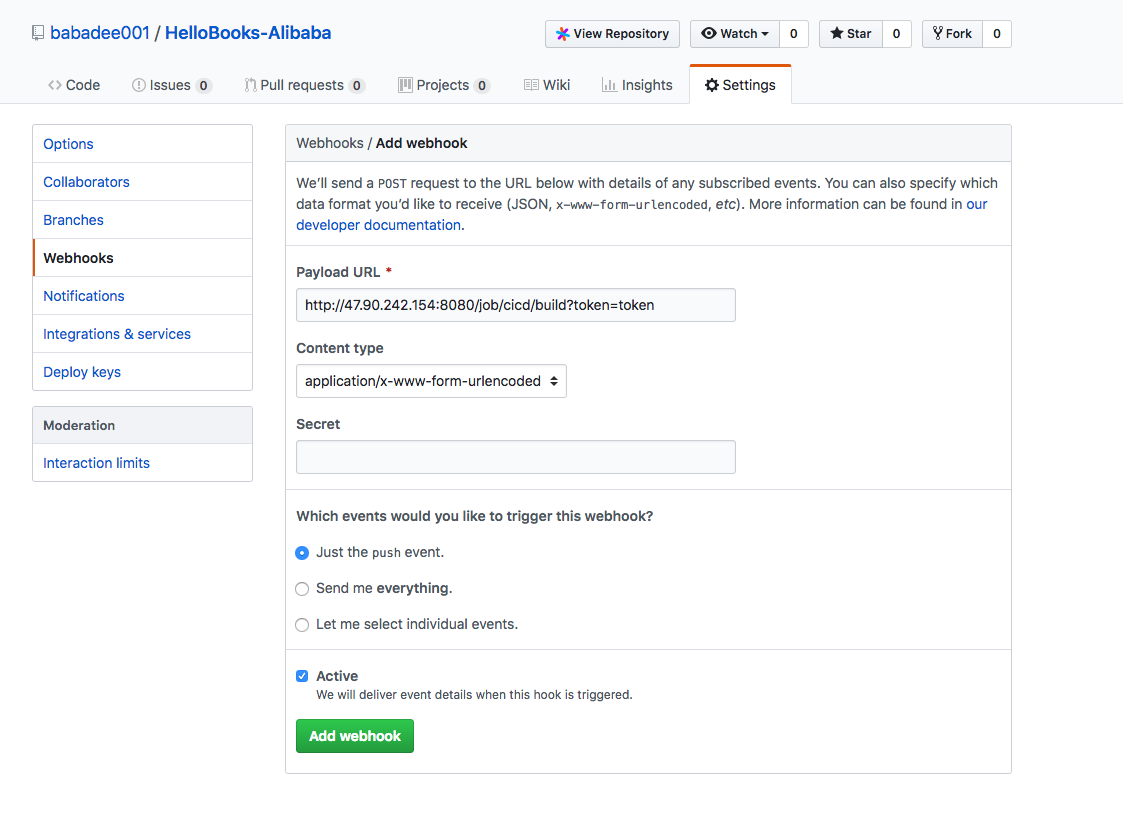
Click on add webhook to create our Jenkins webhook. The payload URL will be our Jenkins build URL from step 3. Check the Just the push event box. For the purpose of this tutorial we will do just that. You can explore and configure events that fits your project by selecting the Let me select individual events box. Now click on Add webhook to create. This will enable our Jenkins job to build whenever there is a change (push) to this repository.
Go to your ECR dashboard and click on manage. Scroll up to the push image to the repository section. You should see something like this;
sudo docker login --username=yourusername registry-intl.yourregion.aliyuncs.com
sudo docker tag [ImageId] registry-intl.yourregion.aliyuncs.com/yournamespace/yourrepositoryname:[tag]
sudo docker push registry-intl.yourregion.aliyuncs.com/yournamespace/yourrepositoryname:[tag]
This is what we added to the build step in the Jenkins job in the previous step.
At this stage, you can test the whole setup by making a simple change to your application and make a push to GitHub. GitHub will notify Jenkins of the changes and our Jenkins job will build a docker image and send to our ECR repository. You can check this out on the ECR repository dashboard. Click on manage then Tags.

Phew. Now we have everything set up and running.
You can login to your ECR, pull the image and start the application, it runs on port 8000. You can also deploy it to a container cluster like Kubernetes or Swarm.

2,593 posts | 792 followers
FollowAlibaba Clouder - February 21, 2020
Alibaba Container Service - July 24, 2024
JJ Lim - September 17, 2021
Neel_Shah - August 8, 2025
Alibaba Clouder - June 24, 2019
Alibaba Clouder - March 5, 2019

2,593 posts | 792 followers
Follow Container Registry
A secure image hosting platform providing containerized image lifecycle management
Learn More ACK One
Provides a control plane to allow users to manage Kubernetes clusters that run based on different infrastructure resources
Learn More Container Service for Kubernetes
Alibaba Cloud Container Service for Kubernetes is a fully managed cloud container management service that supports native Kubernetes and integrates with other Alibaba Cloud products.
Learn More Elastic Container Instance
An agile and secure serverless container instance service.
Learn MoreMore Posts by Alibaba Clouder