By Nuzair Nuwaiz, Alibaba Cloud Tech Share Author. Tech Share is Alibaba Cloud's incentive program to encourage the sharing of technical knowledge and best practices within the cloud community.
Elasticsearch is an open-source search engine used mainly for full-text search and analytic purposes. If you are here then you already know what ElasticSearch offers and you just want to see it in action. Most Elasticsearch cloud hosting providers offer a short trial period of a prebuilt instance for developers to get familiar with it but they all come with some restrictions and limited features.
In this tutorial, we will go through the step-by-step process of installing Elasticsearch on an Alibaba Cloud Elastic Compute Service (ECS) instance. If you are new to Alibaba Cloud then you can take advantage of the free trial to spin up an instance with no charges or you can use this link to get some free credits to start off with. This will give you an Elasticsearch test environment for a month. Plenty of time to get your training wheels off.
We will also install Kibana, which is a visual insight to the elastic search engine that will help immensely.
By default ECS cloud instances are built and added to a Security Group that has been defined at the "Create Instance" process. For the purpose of this tutorial we will create a new Security Group and add new rules so that these do not affect your existing instances.
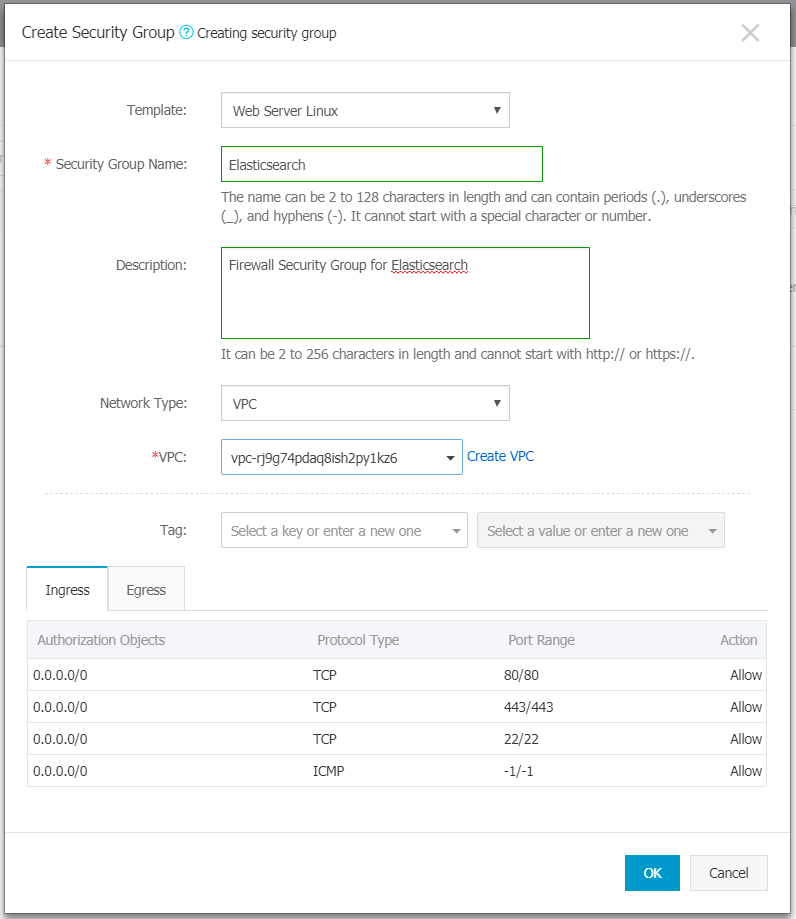
Go to Elastic Compute Service -> Security Groups. Next, click on Create Security Group on the top right corner. Fill in information as follows.

After creating the group, you will be prompted to add rules. Click Create Rules Now.
For the purpose of this tutorial we will be running elasticsearch cluster locally but we will have Kibana accessible using the public IP address. In order to allow access to Kibana from a web browser we need to add the following security rule.
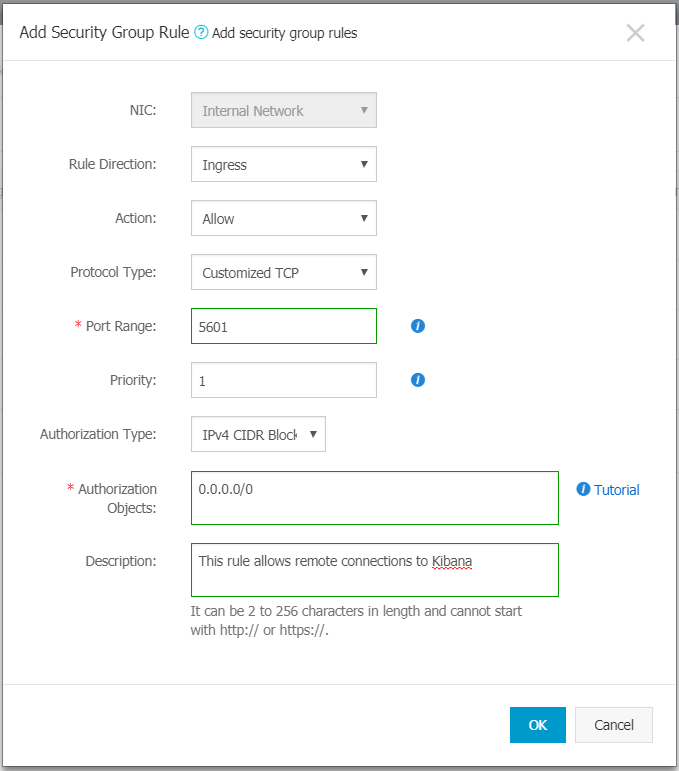
Add a Security Group Rule with the following values.

The Port Range is the port 5601 that Kibana service will be listening on and Authorization Objects would have 0.0.0.0/0 which allows any IP address to access our Kibana service. If you want to add more security you can add specific IP addresses in this field.
Now that we have added the rule we need, let's clean up the other rules in this Security Group. Since we used a Web Server Linux template to create the security group we have a couple of security rules that are not needed. Let's remove the following rules by using the Delete action for each row on the right corner.

That completes our prep work on the Security Group. Now lets add our ECS instance to this Security Group.
Go to Elastic Compute Service -> Instances. Select our instance and click on the dropdown More. Select Network and Security Group -> Configure Security Group. In this screen you'll see the Security Groups assigned to this instance. Alibaba Cloud dictates that an ECS instance must have at a minimum one security group, so let's add our security group before removing the existing one. Click Add to Security Group. This will prompt you to select a Security Group. Select the group you created and click OK. Now remove the previously existing rule from your instance.
You have now successfully added your ECS to the elasticsearch security group and ready move on with the installs.
First, let's update our system.
sudo apt-get update
sudo apt-get upgrade -y
Once the system is up to date we are ready begin with the installs. Elasticsearch recommends installing Java version 8 or higher. Also keep in mind that if you plan to add multiple nodes later on after this tutorial you are required to maintain the same JVM version on all nodes.
Let's install Oracle Java with the following commands.
sudo apt-get install software-properties-common -y
sudo add-apt-repository ppa:webupd8team/java
sudo apt-get update
sudo apt-get install oracle-java8-installer -y
Accept the license terms for Oracle and complete the installation.
After installation run the following to verify the java version.
java -versionAlso lets' confirm the JAVA_HOME variable has been set.
root@elasticServer:~# echo "$JAVA_HOME"
/usr/lib/jvm/java-8-oracle
If you can see the above output then you have successfully completed this step. If nothing shown in the output simply log out of the terminal and log back in again to refresh the environment variables. Even after logging back into a new terminal does not print out the variable properly please run the following and try again.
sudo apt-get install oracle-java8-set-defaultOnce the $JAVA_HOME variable has been confirmed we are ready to proceed to Step 3.
It's time to install the crown jewel! Run the following to install Elasticseach.
wget -qO - https://artifacts.elastic.co/GPG-KEY-elasticsearch | sudo apt-key add -

echo "deb https://artifacts.elastic.co/packages/6.x/apt stable main" | sudo tee -a /etc/apt/sources.list.d/elastic-6.x.list

sudo apt-get update
sudo apt-get install elasticsearch -y
At this point elasticsearch has been successfully installed. Let's reload background services and include elasticsearch to be run on startup.
sudo systemctl daemon-reload
sudo systemctl enable elasticsearch
Now let's start elasticsearch server.
sudo systemctl start elasticsearch The service might take a couple of seconds to initialize depending on the performance of your instance. Once the server is running you can get a status check with the following command.
curl -XGET 'localhost:9200/?pretty' You should see a similar output as following.
root@elasticServer:~# curl -XGET 'localhost:9200/?pretty'
{
  "name" : "J1RnCG4",
  "cluster_name" : "elasticsearch",
  "cluster_uuid" : "kHS3dFF2RfijJRgQeUBYvA",
  "version" : {
    "number" : "6.6.0",
    "build_flavor" : "default",
    "build_type" : "deb",
    "build_hash" : "a9861f4",
    "build_date" : "2019-01-24T11:27:09.439740Z",
    "build_snapshot" : false,
    "lucene_version" : "7.6.0",
    "minimum_wire_compatibility_version" : "5.6.0",
    "minimum_index_compatibility_version" : "5.0.0"
  },
  "tagline" : "You Know, for Search"
}
If you get the above results then you have done everything correct up to this point and are doing a great job. You can now proceed to Step 4.
Now that we have successfully installed Elasticsearch let's make some customizations. Elasticsearch configurations are stored in a file named elasticsearch.yml. Let's open it up using vim editor.
sudo vim /etc/elasticsearch/elasticsearch.ymlOnce you execute the command the configuration file will be opened in an editor. As you can see most of the file is commented out with # at the beginning of the line, but settings in this file allows you to change ports, cluster information etc. Let's make a minor change by renaming our cluster. At the moment our cluster name is "elasticsearch" which is the default configuration.
Press the i key to start making changes to the file. Find the following line with your arrow keys.
#cluster.name: my-applicationChange it to:
cluster.name: Alibaba-Dev-ClusterOnce changed press Esc to exit the 'edit mode'. Then type in :wq which will be shown in the bottom left corner. This is the Save & Exit command. Press enter to execute. In order to let the changes take effect, let's restart the elasticsearch service.
sudo systemctl restart elasticsearchLet's try getting a status check again. It might take a couple of seconds to restart.
curl -XGET 'localhost:9200/?pretty' You should see that the cluster name now reflects "Alibaba-Dev-Cluster". You have made your first customization to your elastic cluster. Feel free to play around with the other settings in the configuration file as you gain more experience.
Let's move on to installing Kibana.
Kibana is an open source tool that provides a friendly web interface to interact with elasticsearch engine. We will now install Kibana on our server. Run the following.
wget -qO - https://artifacts.elastic.co/GPG-KEY-elasticsearch | sudo apt-key add -

echo "deb https://artifacts.elastic.co/packages/6.x/apt stable main" | sudo tee -a /etc/apt/sources.list.d/elastic-6.x.list

sudo apt-get update
sudo apt-get install kibana -y
We have successfully installed Kibana. Next we will refresh background services and add Kibana to run on server startup.
sudo systemctl daemon-reload
sudo systemctl enable kibana
Lets start the Kibana application server.
sudo systemctl start kibanaWe are almost there. Both Elasticseach and Kibana have been successfully installed. Once kibana starts it will communicate with elasticsearch using default credentials. Since we have not customized authentication settings in elasticsearch these two modules would interface without a problem.
Next we want kibana server to be accessible remotely using a browser. We have opened the firewall using Security Groups in Step 1 and 2 but the kibana application is still running as localhost. Let's change that.
Let's open up the Kibana configuration file in Vim editor.
sudo vim /etc/kibana/kibana.ymlJust like the configuration file before, we will make some changes in kibana.yml. Press the i key to start making changes to the file. Find the following line.
#server.host: "localhost"Change it to:
server.host: "0.0.0.0"Once you have finished changing the file press Esc to exit to 'edit mode'. Then type the save and exit command, "wq"
Press enter to execute. By adding "0.0.0.0" in the server.host field we told kibana to use the public facing IP address instead of running locally.
Let's restart Kibana for the changes to take effect.
sudo systemctl restart kibanaWe are done! Now you can access your kibana application using the public ip of your server. In a web browser type in http://[your public IP]:5601
Make sure you type in http and not https. The kibana service in this tutorial is not configured with SSL.
You will be redirected to the Kibana startup page where you will be asked to add sample data into your elasticsearch engine to start exploring.

In this tutorial we have created elasticsearch and kibana instances at its most basic level. These should only be used for testing purposes because of its lack of authentication modules.
Setting up CI/CD for a PREN app with Jenkins, Docker and GitHub Webhooks on Container Registry

2,593 posts | 791 followers
FollowAlibaba Cloud Indonesia - August 1, 2023
Alibaba Clouder - January 4, 2021
Alibaba Clouder - March 23, 2018
Alibaba Clouder - April 11, 2018
Data Geek - February 17, 2025
Data Geek - May 13, 2024

2,593 posts | 791 followers
Follow Big Data Consulting for Data Technology Solution
Alibaba Cloud provides big data consulting services to help enterprises leverage advanced data technology.
Learn More Big Data Consulting Services for Retail Solution
Alibaba Cloud experts provide retailers with a lightweight and customized big data consulting service to help you assess your big data maturity and plan your big data journey.
Learn More Alibaba Cloud Elasticsearch
Alibaba Cloud Elasticsearch helps users easy to build AI-powered search applications seamlessly integrated with large language models, and featuring for the enterprise: robust access control, security monitoring, and automatic updates.
Learn More ApsaraDB for HBase
ApsaraDB for HBase is a NoSQL database engine that is highly optimized and 100% compatible with the community edition of HBase.
Learn MoreMore Posts by Alibaba Clouder