By Anish Nath, Alibaba Cloud Tech Share Author. Tech Share is Alibaba Cloud's incentive program to encourage the sharing of technical knowledge and best practices within the cloud community.
This tutorial explains how to use nginx-ingress as an Ingress controller for a Kubernetes cluster and covers topic like
You only need to have running Kubernetes cluster. In case you are new to Alibaba Cloud, you can get $10 worth in credit through my referral link to get started. Then, head on to this tutorial to learn how you can set up a fully functioning Kubernetes cluster.
These are the defined ways to make service accessible externally in Kubernetes.
NodePort)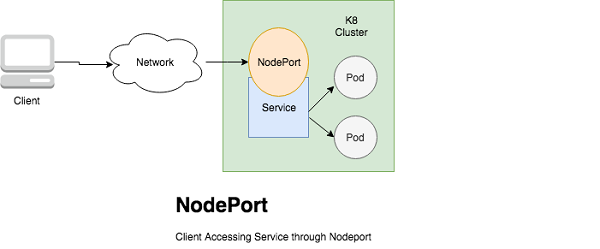
NodePort and ClusterIP services, to which the external load balancer will route, are automatically created.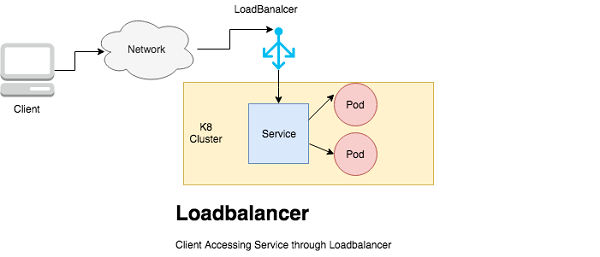
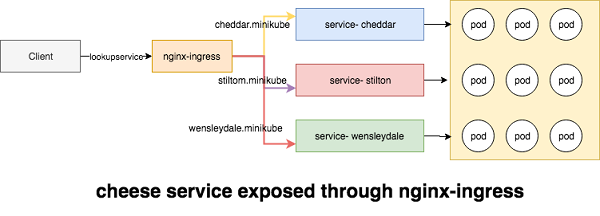
This tutorial is dedicated to using Ingress Resource through the nginx-ingress Kubernetes Ingress Controller.
An Ingress Controller is a daemon, deployed as a Kubernetes Pod, that watches the apiserver's /ingresses endpoint for updates to the Ingress resource. Its job is to satisfy requests for Ingresses.
Helm is a tool for managing Kubernetes charts. Charts are packages of pre-configured Kubernetes resources. so before setting up nginx-ingress, we need to setup helm first install helm and then configure it on k8 cluster, you can ignore these steps and jump directly to helm nginx-ingress installation if the helm is already configured.
Download the latest version of helm
root@kube-master:# gunzip helm-v2.8.1-linux-amd64.tar.gz**
root@kube-master:# tar -xvf helm-v2.8.1-linux-amd64.tar**
root@kube-master:# sudo mv l*/helm /usr/local/bin/.**
Then, initialize helm to both set up the local environment and to install the server portion, Tiller, on your cluster
root@kube-master:# helm init
root@kube-master:# kubectl create serviceaccount --namespace kube-system tiller
root@kube-master:# kubectl create clusterrolebinding tiller-cluster-rule  --clusterrole=cluster-admin --serviceaccount=kube-system:tiller
root@kube-master:# kubectl patch deploy --namespace kube-system tiller-deploy  -p '{"spec":{"template":{"spec":{"serviceAccount":"tiller"}}}}'
Make sure Tiller, on your cluster is up and running.
root@kube-master:# kubectl get pods -n kube-system
NAME                                  READY     STATUS    RESTARTS   AGE
coredns-78fcdf6894-jvmlb              1/1       Running   0          1h
coredns-78fcdf6894-xstbn              1/1       Running   0          1h
etcd-kube-master                      1/1       Running   0          1h
kube-apiserver-kube-master            1/1       Running   0          1h
kube-controller-manager-kube-master   1/1       Running   0          1h
kube-flannel-ds-5gzn9                 1/1       Running   0          1h
kube-flannel-ds-tlc8j                 1/1       Running   0          1h
kube-proxy-kl4fg                      1/1       Running   0          1h
kube-proxy-krt6n                      1/1       Running   0          1h
kube-scheduler-kube-master            1/1       Running   0          1h
tiller-deploy-85744d9bfb-wh98g 1/1 Running 0 1hThe below command will setup the nginx-ingress in the kube-system namespace, and setup necessary RBAC in k8 cluster to operated ingress correctly
root@kube-master:# helm install stable/nginx-ingress --name nginx-ingress --set controller.stats.enabled=true --namespace kube-systemThis command produces a lot of output, so let's take it one step at a time. First, we get information about the release that's been deployed
NAME: nginx-ingress
LAST DEPLOYED: Thu Jan 24 14:00:16 2019
NAMESPACE: kube-system
STATUS: DEPLOYED
Next, we get the resources that were actually deployed by the stable/nginx-ingress chart
RESOURCES:
==> v1beta1/ClusterRoleBinding
NAME           AGE
nginx-ingress  4s

==> v1beta1/RoleBinding
NAME           AGE
nginx-ingress  4s

==> v1/Service
NAME                            TYPE          CLUSTER-IP    EXTERNAL-IP  PORT(S)                     AGE
nginx-ingress-controller        LoadBalancer  10.98.81.209  <pending>    80:32437/TCP,443:30692/TCP  4s
nginx-ingress-controller-stats  ClusterIP     10.96.0.80    <none>       18080/TCP                   4s
nginx-ingress-default-backend   ClusterIP     10.106.7.213  <none>       80/TCP                      4s

==> v1beta1/ClusterRole
NAME           AGE
nginx-ingress  4s

==> v1/ServiceAccount
NAME           SECRETS  AGE
nginx-ingress  1        4s

==> v1beta1/Role
NAME           AGE
nginx-ingress  4s

==> v1beta1/Deployment
NAME                           DESIRED  CURRENT  UP-TO-DATE  AVAILABLE  AGE
nginx-ingress-controller       1        1        1           0          4s
nginx-ingress-default-backend  1        1        1           0          4s

==> v1/Pod(related)
NAME                                            READY  STATUS             RESTARTS  AGE
nginx-ingress-controller-ff7cb987-lj4j5         0/1    Pending            0         3s
nginx-ingress-default-backend-544cfb69fc-xtl2p  0/1    ContainerCreating  0         4s

==> v1/ConfigMap
NAME                      DATA  AGE
nginx-ingress-controller  1     4s
The chart also enables the developer to add notes:
NOTES:
The nginx-ingress controller has been installed.
It may take a few minutes for the LoadBalancer IP to be available.
You can watch the status by running 'kubectl --namespace kube-system get services -o wide -w nginx-ingress-controller'
An example Ingress that makes use of the controller:
  apiVersion: extensions/v1beta1
  kind: Ingress
  metadata:
    annotations:
      kubernetes.io/ingress.class: nginx
    name: example
    namespace: foo
  spec:
    rules:
      - host: www.example.com
        http:
          paths:
            - backend:
                serviceName: exampleService
                servicePort: 80
              path: /
    # This section is only required if TLS is to be enabled for the Ingress
    tls:
        - hosts:
            - www.example.com
          secretName: example-tls

If TLS is enabled for the Ingress, a Secret containing the certificate and key must also be provided:

  apiVersion: v1
  kind: Secret
  metadata:
    name: example-tls
    namespace: foo
  data:
    tls.crt: <base64 encoded cert>
    tls.key: <base64 encoded key>
  type: kubernetes.io/tls
Well if everything goes well then, Check the nginx-ingress pods are running in the kube-system namespace
root@kube-master:# kubectl --namespace kube-system get services -o wide -w nginx-ingress-controller
NAME                       TYPE           CLUSTER-IP     EXTERNAL-IP   PORT(S)                      AGE       SELECTOR
nginx-ingress-controller   LoadBalancer   10.98.81.209   172.16.2.13   80:32437/TCP,443:30692/TCP   3m        app=nginx-ingress,component=controller,release=nginx-ingress
Once 'EXTERNAL-IP' is no longer '': your nginx-ingress is ready for use
Up to this point we have successfully installed and configured nginx-ingress , now let's define the routing (name based and path based ) of your application.
We are going here to setup three sample nginx cheese web application, the docker images are located here .
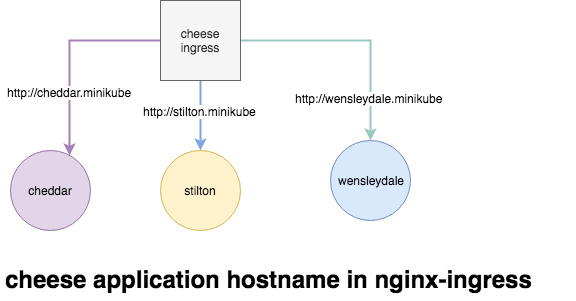
The Name-Based Routing performs routing by name and support routing HTTP traffic to multiple host names at the same IP address but different domain names. Let's start by launching the pods for the cheese websites.
The YAML file for the cheese application
---
kind: Deployment
apiVersion: extensions/v1beta1
metadata:
  name: stilton
  labels:
    app: cheese
    cheese: stilton
spec:
  replicas: 2
  selector:
    matchLabels:
      app: cheese
      task: stilton
  template:
    metadata:
      labels:
        app: cheese
        task: stilton
        version: v0.0.1
    spec:
      containers:
      - name: cheese
        image: errm/cheese:stilton
        resources:
          requests:
            cpu: 100m
            memory: 50Mi
          limits:
            cpu: 100m
            memory: 50Mi
        ports:
        - containerPort: 80
To provide some explanations about the file content:
kind: Deployment)name: stilton)replicas: 2)selector: matchLabels: app:cheese)template: ...)metadata:labels:app:cheese)image: errm/cheese:stilton)Now provision these nginx cheese application.
root@kube-master:# kubectl apply -f https://raw.githubusercontent.com/containous/traefik/master/examples/k8s/cheese-deployments.yaml
deployment.extensions/stilton created
deployment.extensions/cheddar created
deployment.extensions/wensleydale created
Make sure all the cheese deployment pods are up and running
root@kube-master:/home/ansible# kubectl get pods
NAME READY STATUS  RESTARTS AGE
cheddar-6c895c7cc7-2qztp 1/1 Running 0  7m
cheddar-6c895c7cc7-mzq9v 1/1 Running 0  7m
stilton-7989d7c86f-62wrt 1/1 Running 0  7m
stilton-7989d7c86f-fjttz 1/1 Running 0  7m
wensleydale-58784fc6f7-f8szd 1/1 Running 0  7m
wensleydale-58784fc6f7-prb8z 1/1 Running 0 7mNext we need to setup a Service for each of the cheese pods.
root@kube-master:# kubectl apply -f https://raw.githubusercontent.com/containous/traefik/master/examples/k8s/cheese-services.yaml
service/stilton created
service/cheddar created
service/wensleydale created
All the necessary service is created in k8 cluster.
root@kube-master:/home/ansible# kubectl get svc
NAME  TYPE  CLUSTER-IP EXTERNAL-IP PORT(S) AGE
cheddar ClusterIP 10.108.200.238 <none>  80/TCP  30s
kubernetes  ClusterIP 10.96.0.1  <none>  443/TCP 1h
stilton ClusterIP 10.102.20.8  <none>  80/TCP  30s
wensleydale ClusterIP 10.109.58.21 <none>  80/TCP  30s
At this point, we have deployment and Service ready in the K8 cluster, and we're about to define the ingress rules so that the world can eat the required service.
root@kube-master:# echo "
apiVersion: extensions/v1beta1
kind: Ingress
metadata:
  name: cheese
  annotations:
    kubernetes.io/ingress.class: nginx
spec:
  rules:
  - host: stilton.minikube
    http:
      paths:
      - path: /
        backend:
          serviceName: stilton
          servicePort: http
  - host: cheddar.minikube
    http:
      paths:
      - path: /
        backend:
          serviceName: cheddar
          servicePort: http
  - host: wensleydale.minikube
    http:
      paths:
      - path: /
        backend:
          serviceName: wensleydale
          servicePort: http
" | kubectl apply -f -
The command output
ingress.extensions/cheese createdTo provide some explanations about the file content:
kind: Ingress) and add ingress class in the annotationname: cheese)rules: ...)Verify the Ingress, all the hosts can be accessed with the ingress port 80
root@kube-master:/home/ansible# kubectl get ingress
NAME  HOSTS  ADDRESS PORTS AGE
cheese  stilton.minikube,cheddar.minikube,wensleydale.minikube 80  31s
Open the web browser and start eating your favorite cheese


Path based routing differ from Name based routing in a sense, we don't have multiple domains names, all the URI is distinguished and routed from the PATH prefix under a single domain, for example the above cheese application can be access through the single URI.
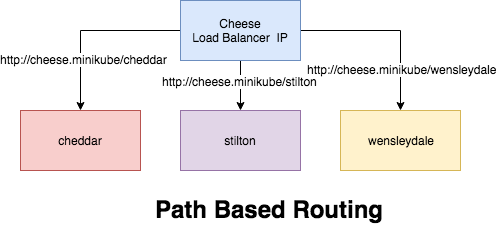
Let's create the PATH base routing for the cheese application
Let's create the PATH base routing for the cheese application
root@kube-master:# echo "
apiVersion: extensions/v1beta1
kind: Ingress
metadata:
  name: cheeses
  annotations:
    nginx.ingress.kubernetes.io/rewrite-target: /
spec:
  rules:
  - host: cheeses.minikube
    http:
      paths:
      - path: /stilton
        backend:
          serviceName: stilton
          servicePort: http
      - path: /cheddar
        backend:
          serviceName: cheddar
          servicePort: http
      - path: /wensleydale
        backend:
          serviceName: wensleydale
          servicePort: http
" | kubectl apply -f -
The command output
ingress.extensions/cheese createdYou should now be able to visit the websites in your browser.
How to Configure Traefik for Routing Applications in Kubernetes

2,593 posts | 792 followers
FollowAlibaba Clouder - June 28, 2020
Alibaba Cloud Blockchain Service Team - December 26, 2018
Alibaba Clouder - July 1, 2020
Alibaba Cloud Native Community - May 22, 2025
Alibaba Cloud Native Community - May 17, 2022
Alibaba Cloud Native - February 15, 2023

2,593 posts | 792 followers
Follow Container Service for Kubernetes
Alibaba Cloud Container Service for Kubernetes is a fully managed cloud container management service that supports native Kubernetes and integrates with other Alibaba Cloud products.
Learn More ECS(Elastic Compute Service)
Elastic and secure virtual cloud servers to cater all your cloud hosting needs.
Learn More Container Registry
A secure image hosting platform providing containerized image lifecycle management
Learn MoreMore Posts by Alibaba Clouder