Stable Diffusion is an open source text-to-image model that can generate images based on text prompts. Elastic Algorithm Service (EAS) of Platform for AI (PAI) provides a stable-diffusion-webui image. You can use EAS to deploy a Stable Diffusion model as an AI-powered web application and use the deployed application to perform model inference and generate images.
This article describes how to use an image to deploy Stable Diffusion as a web application in EAS, perform model inference with the web application and generate images based on text prompts.
If you encounter any issues during model deployment and inference, see FAQ section.
EAS is activated and the default workspace is created. For more information, see Activate PAI and create the default workspace.
If you use a RAM user to deploy the model, make sure that the RAM user is granted the management permissions on EAS. For more information, see Grant the permissions that are required to use EAS.
The following section describes how to deploy the Stable Diffusion model as an AI-powered web application.
1. Go to the EAS-Online Model Services page.
a) Log on to the PAI console.
b) In the left-side navigation pane, click Workspaces. On the Workspaces page, click the name of the workspace to which the model service that you want to manage belongs.
c) In the left-side navigation pane, choose Model Deployment>Elastic Algorithm Service (EAS) to go to the EAS-Online Model Services page.

2. On the PAI-EAS Model Online Service page, click Deploy Service. In the dialog box that appears, select Custom Deployment and click OK.
3. On the Deploy Service page, configure the parameters. The following table describes the parameters.
| Parameter | Description |
| Service Name | The name of the service. In this topic, sdwebui_demo is specified. |
| Deployment Method | Select Deploy Web App by Using Image. |
| Select Image | Select PAI Image. Then, select stable-diffusion-webui from the image drop-down list and 4.1-standard from the image version drop-down list. Note You can select the latest version of the image when you deploy the model service. |
| Command to Run | After you configure the image, the system automatically specifies a command to run. You can use the default setting. |
| Resource Group Type | Select Public Resource Group from the drop-down list. |
| Resource Configuration Mode | Select General. |
| Resource Configuration | Select an Instance Type on the GPU tab. In terms of cost-effectiveness, we recommend that you use the ml.gu7i.c16m60.1-gu30 instance type. |
| System Disks | Set the additional system disk capacity to 100 GB. |
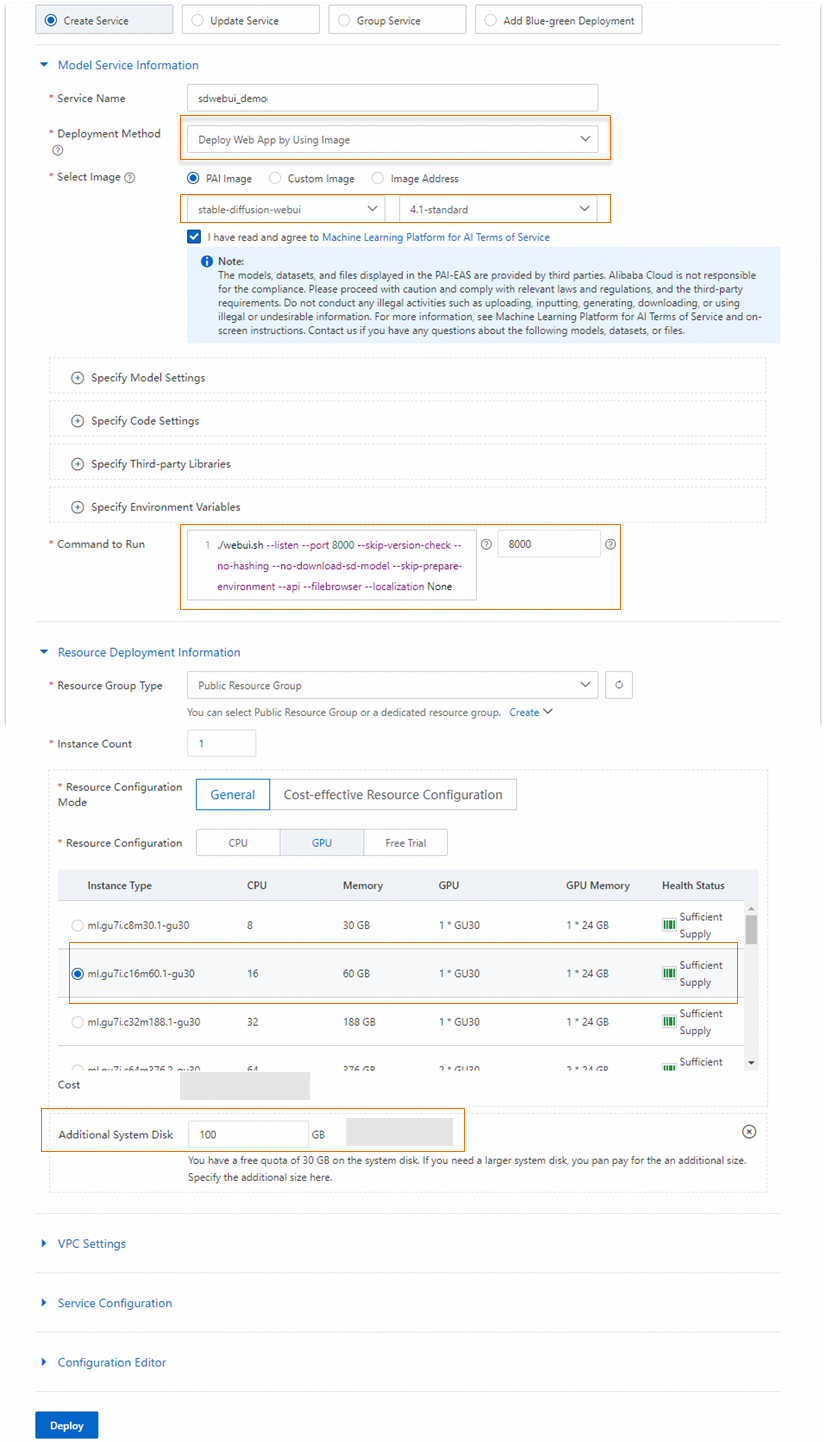
4. Click Deploy. The deployment requires approximately five minutes to complete.
When the Model Status changes to Running, the service is deployed.
1. Find the service that you want to manage and click View Web App in the Service Type column.

2. Perform model inference on the web application page.
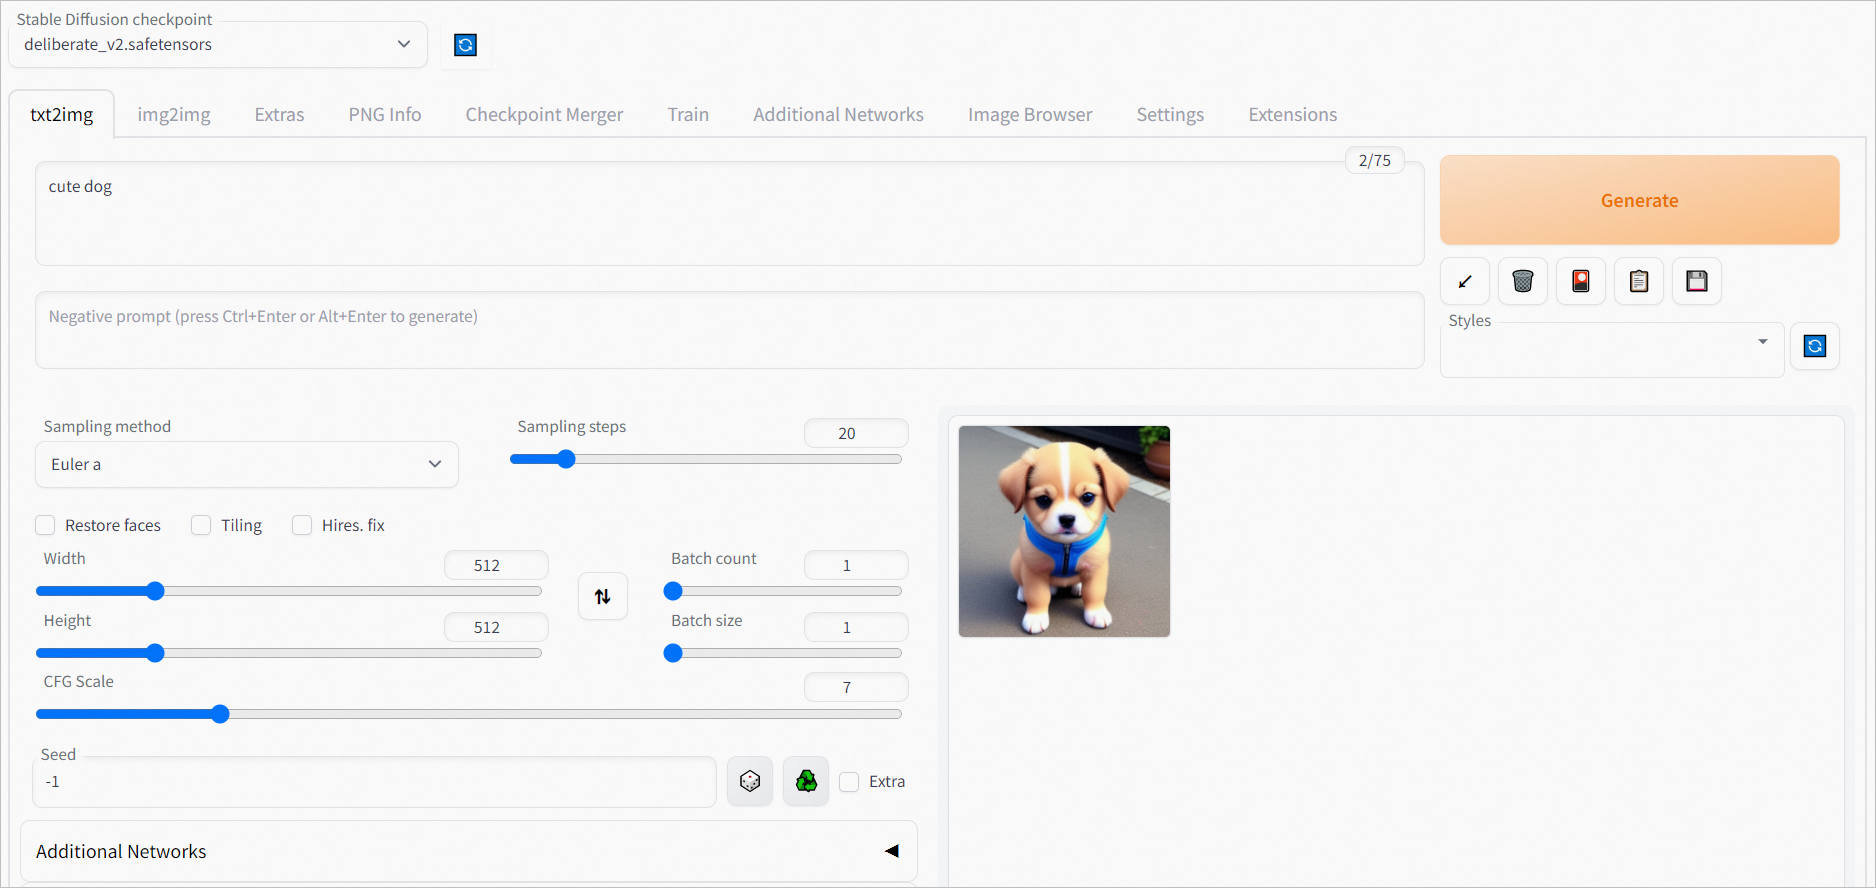
In the Prompt section of the txt2img tab, enter your input and click Generate.
In this example, cute dog is used as a sample input specified in the Prompt section. The following figure shows the inference result.
You can enable Blade or xFormers to accelerate image generation.
The following section describes the benefits of using Blade and xFormers.
To enable Blade or xFormers, perform the following steps.
a) Click Update Service in the Actions column of the service.
b) On the Deploy Service page, enter the ./webui.sh --listen --port=8000 --blade command in the Command to Run field.

c) Click Deploy.
a) Click Update Service in the Actions column of the service.
b) On the Deploy Service page, enter the ./webui.sh --listen --port=8000 --xformers command in the Command to Run field.

c) Click Deploy.
You can use the following method to mount your file in scenarios where you want to use your own model or Object Storage Service (OSS) bucket, such as when downloading a model from the open source community or training a model like Low-Rank Adaptation of Large Language Models (LoRA) or Stable Diffusion for use in the Stable Diffusion web application. You may also need to save output data to your own OSS bucket directory, configure specific third-party library files, or install plug-ins.
1. Log on to the OSS console. Create a bucket and an empty directory.
Example: oss://bucket-test/data-oss/, where: bucket-test is the name of the OSS bucket, and data-oss is the empty file directory in the bucket. For information about how to create a bucket, see Create buckets. For information about how to create an empty directory, see Manage directories.
2. Click Update Service in the Actions column of the service.
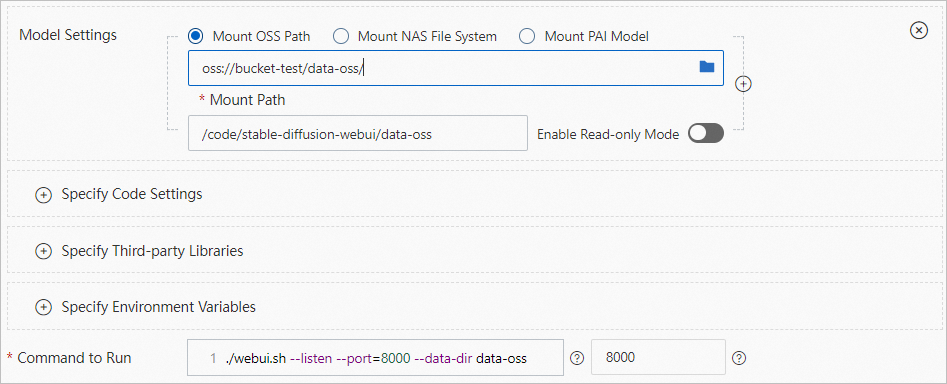
3. In the Model Service Information section, configure the following parameters.
| Parameter | Description |
| Model Settings | Click Specify Model Settings to configure the model. • In the Model Settings section, select Mount OSS Path. In the Mount Path field, specify the OSS bucket path that you created in Step 1. Example: oss://bucket-test/data-oss/.• Mount Path: Mount the OSS file directory to the /code/stable-diffusion-webui path of the image. Example: /code/stable-diffusion-webui/data-oss.• Enable Read-only Mode: turn off the read-only mode. |
| Command to Run | Add the --data-dir mount directory in the Command to Run field. The mount directory must be the same as the last-level directory of the Mount Path in the Model Settings section. Example: ./webui.sh --listen --port=8000 --data-dir data-oss. |
4. Click Deploy to update the model service.
The following figure shows the directory that PAI automatically creates in the empty OSS directory you specified and copies the required data to the directory. We recommend that you upload data to the specified directory after the service is started.
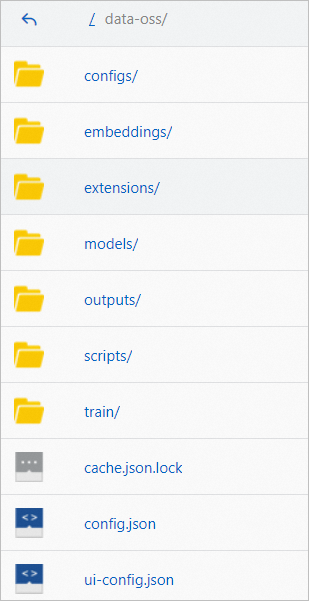
After the OSS directory is created, you can upload the downloaded or trained model to the specified directory under the models section. Click  > Restart Service in the Actions column. The configuration takes effect after the service is restarted.
After the configuration takes effect, you can click View Web Application in the Service Type column of the service that you want to use to start the web UI. On the web UI page, select the model from the Stable Diffusion Model (ckpt) drop-down list. Then, you can use the selected model to perform model inference.

You can reopen the Stable Diffusion web application page or restart the EAS service.
 >Restart Service in the Actions column of the service to restart the EAS service.
The preceding deployment method supports only individual users. If multiple users access the Stable Diffusion web page at the same time, incompatibility issues may occur. If you want to enable multiple users to access the Stable Diffusion web page by using the same web application at the same time, you can deploy the cluster edition of Stable Diffusion web UI in EAS. You only need to select the stable-diffusion-webui:3.1-cluster image when you deploy the service. We recommend that you use multiple service instances for multi-user operations to ensure the speed and stability of AI image generation.

The cluster edition has the following benefits:
When the Model Status changes from Waiting to Running, refresh the web page. The page is displayed in English.
To conveniently manage your file systems, such as directly opening the file systems on the web page, perform the following steps.
1. Make sure that an OSS path is mounted. For more information, see How do I use my own model and output directory?. When you create or update a service, you can add the ./webui.sh --listen --port=8000 --blade --data-dir data-oss --filebrowser command in the Command to Run field.

2. After the service is deployed, click View Web App in the Service Type column.
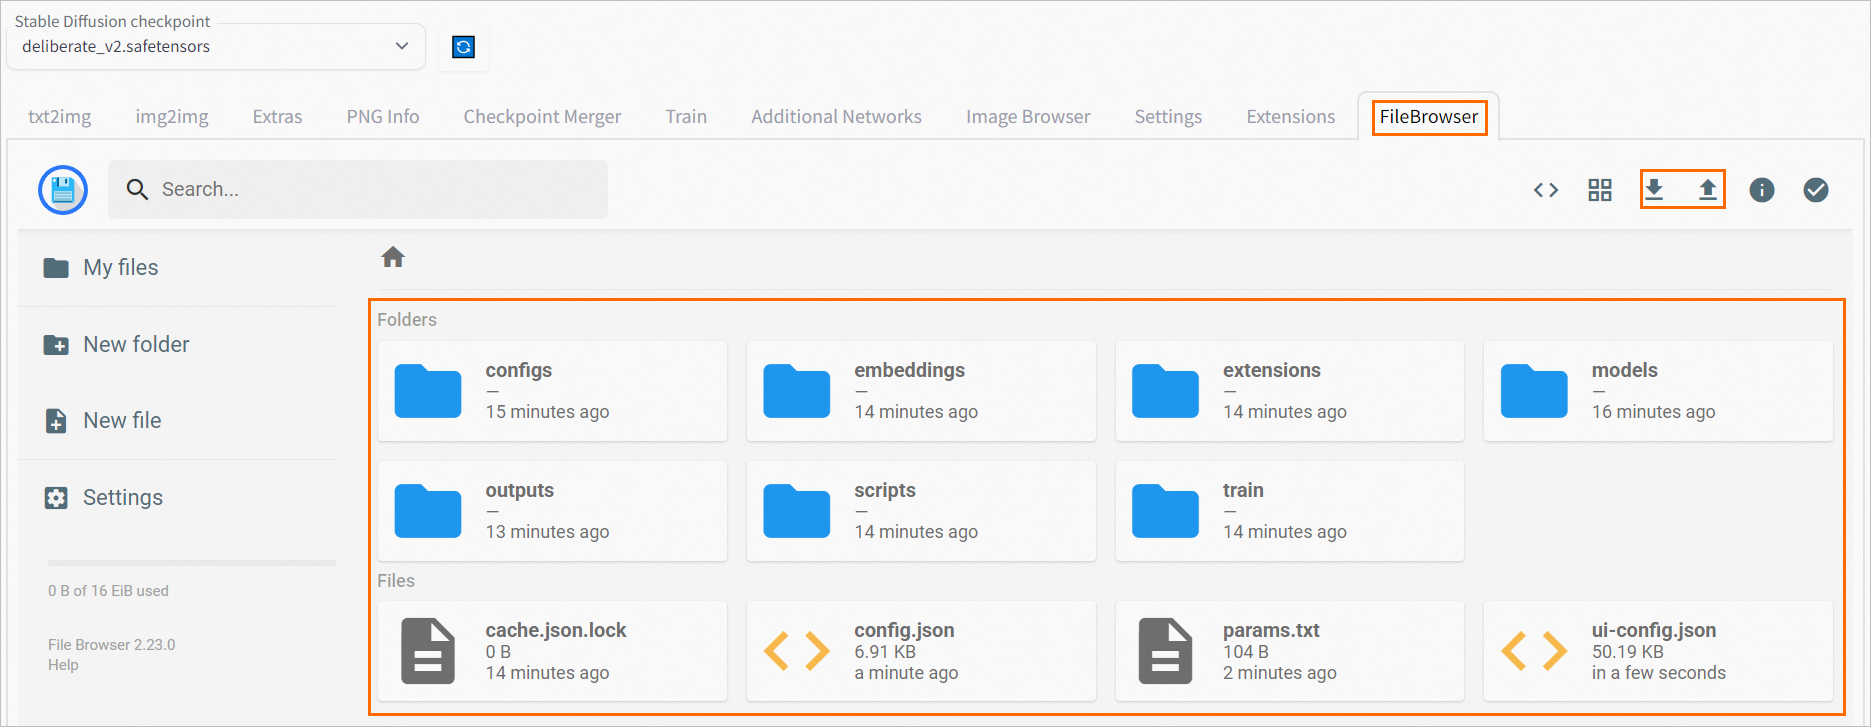
3. On the web UI page, click the FileBrowser tab. The file system page is displayed. You can upload on-premises files to the file system, or download files to your on-premises computer.
44 posts | 1 followers
FollowFarruh - October 1, 2023
Farruh - October 2, 2023
Alibaba Cloud Data Intelligence - December 5, 2023
Alibaba Cloud Community - December 8, 2023
Alibaba Cloud Data Intelligence - April 23, 2024
Alibaba Cloud Community - November 14, 2022
44 posts | 1 followers
Follow Platform For AI
A platform that provides enterprise-level data modeling services based on machine learning algorithms to quickly meet your needs for data-driven operations.
Learn More AI Acceleration Solution
Accelerate AI-driven business and AI model training and inference with Alibaba Cloud GPU technology
Learn More Offline Visual Intelligence Software Packages
Offline SDKs for visual production, such as image segmentation, video segmentation, and character recognition, based on deep learning technologies developed by Alibaba Cloud.
Learn More Tongyi Qianwen (Qwen)
Top-performance foundation models from Alibaba Cloud
Learn MoreMore Posts by Alibaba Cloud Data Intelligence