You can use Elastic Algorithm Service (EAS) to deploy a web application for AI video generation based on ComfyUI and Stable Video Diffusion models. You can quickly implement an AI-powered text-to-video solution that helps you complete tasks such as generating short videos or animation on social platforms. This article describes how to deploy an AI video generation application, related inference services and answers to FAQ during the deployment.
As generative AI gains more attention, AI-powered video generation has become a popular application industry. There are lots of open source foundation models for video generation in the market. You can select a foundation model based on the model performance and the specific scenario. ComfyUI, a node-based web UI tool for generative AI, divides AI-powered content generation into worker nodes to achieve precise workflow customization and reproducibility. This article describes how to deploy an AI video generation application and related inference services in the following steps:
1. Deploy model service in EAS
Deploy an AI video generation application in EAS.
2. Use ComfyUI to perform model inference
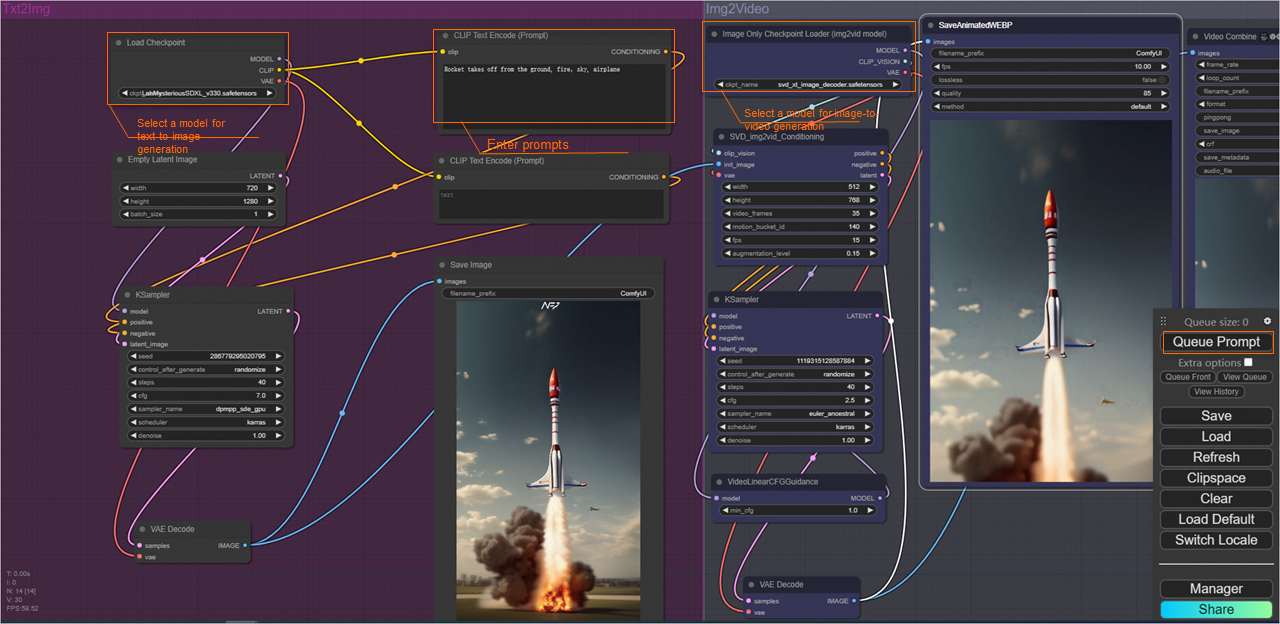
After you start ComfyUI, you can perform model inference on a web UI page that generates images and videos based on text prompts.
3. FAQ
This section describes how to load other open source models or custom models that you trained, and perform model inference.
This feature is currently available only in the China (Hangzhou) and Singapore regions.
1. Go to the EAS-Online Model Services page.

2. On the PAI-EAS Model Online Service page, click Deploy Service. In the dialog box that appears, select Custom Deployment and click OK.
3. On the Create Service page, configure the required parameters. The following table describes key parameters.
| Parameter | Description |
| Service Name | The name of the service. The name comfyui_svd_demo is used in this example. |
| Deployment Method | Select Deploy Web App by Using Image. |
| Select Image | Click PAI Image. Select comfyui from the image drop-down list, and select 0.1 from the image version drop-down list. Note You can select the latest version of the image when you deploy the model service. |
| Command to Run | • After you configure the image version, the system automatically sets the parameter to python main.py --listen --port 8000.• Port number: 8000. |
| Resource Group Type | Select Public Resource Group. |
| Resource Configuration Mode | Select General. |
| Resource Configuration | Select an Instance Type on the GPU tab. In terms of cost-effectiveness, we recommend that you use the ml.gu7i.c16m60.1-gu30 instance type. If the resources are insufficient, you can also select the ecs.gn6i-c16g1.4xlarge instance type. |
4. Click Deploy. The deployment requires several seconds to complete.
When the Model Status changes to Running, the service is deployed.
1. Find the service that you want to manage and click View Web App in the Service Type column.
2. Perform model inference on the web UI page.
Select a model for text-to-image generation and a model for image-to-video generation based on your business requirements. This example uses the default settings. Enter text prompts in the CLIP Text Encode (Prompt) section, for example, Rocket takes off from the ground, fire, sky, airplane and click Queue Prompt. The system starts to run the workflow and generate the video.

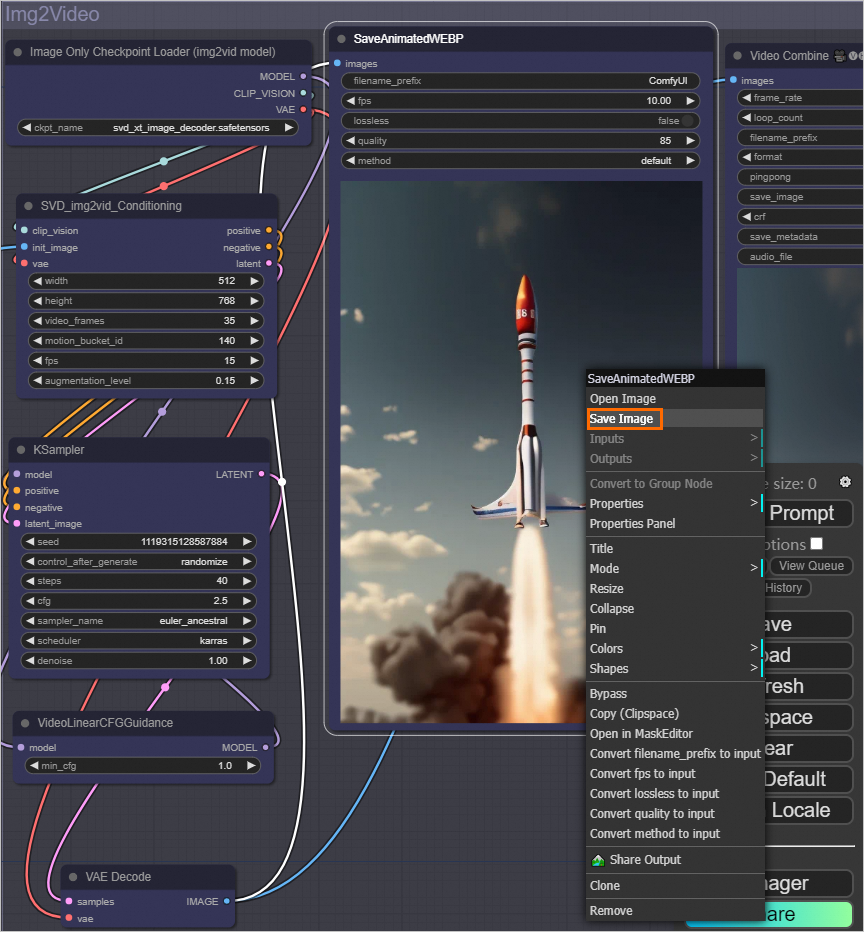
3. Right-click the generated video and select Save Image to save the generated video to your on-premises machine.

The following section provides an example of the generated video:
Assume that you obtained a model such as SDXL, LoRA, or SVD from the open-source community, or you have a custom model that you trained, if you want to save the generated model files to your Object Storage Service (OSS) bucket directory and load the model files by mounting the file, perform the following steps:
1. Log on to the OSS console. Create a bucket and an empty directory.
Example: oss://bucket-test/data-oss/, where: bucket-test is the name of the OSS bucket, and data-oss is the empty file directory in the bucket. For more information about how to create a bucket, see Create buckets. For more information about how to create an empty directory, see Manage directories.
2. On the EAS-Online Model Services page, find the service for which you want to add a version and click Update Service in the Actions column.
3. In the Model Service Information section, configure the following parameters.
| Parameter | Description |
| Model Settings | Click Specify Model Settings to configure the model. • Select OSS Mount and set OSS Path to the path of the OSS bucket that you created in Step 1. Example: oss://bucket-test/data-oss/.• Mount Path: Mount the OSS file directory to the /code/data-oss path of the image. Example: /code/data-oss.• Enable Read-only Mode: turn off the read-only mode. |
| Command to Run | Add the --data-dir mount directory in the Command to Run field, where mount directory must be the same as the Mount Path in the Model Settings section.Example: python main.py --listen --port 8000 --data-dir /code/data-oss. |
4. Click Update to update the model service.
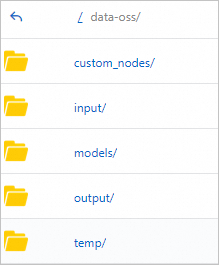
The following figure shows the directory that PAI automatically creates in the empty OSS directory you specified and copies the required data to the directory. We recommend that you upload data to the specified directory after the service is started.

5. Upload the on-premises model file to the OSS path ~/models/checkpoints/ that is generated in Step 4. For more information, see the Upload an object section in the Get started by using the OSS console topic.
6. Load the model and perform model inference.
 > Restart Service in the Actions column.
Quickly Deploy Stable Diffusion for Text-to-Image Generation in EAS
44 posts | 1 followers
FollowFarruh - October 2, 2023
Alibaba Cloud Community - September 6, 2024
Alibaba Cloud Data Intelligence - April 22, 2024
Farruh - June 23, 2025
Alibaba Cloud Data Intelligence - November 27, 2024
Farruh - October 1, 2023
44 posts | 1 followers
Follow Platform For AI
A platform that provides enterprise-level data modeling services based on machine learning algorithms to quickly meet your needs for data-driven operations.
Learn More Alibaba Cloud for Generative AI
Accelerate innovation with generative AI to create new business success
Learn More Tongyi Qianwen (Qwen)
Top-performance foundation models from Alibaba Cloud
Learn More AI Acceleration Solution
Accelerate AI-driven business and AI model training and inference with Alibaba Cloud GPU technology
Learn MoreMore Posts by Alibaba Cloud Data Intelligence