Platform for AI (PAI) provides preset images that you can use to deploy community models and acceleration mechanisms for model distribution and image startup in Elastic Algorithm Service (EAS). You can quickly deploy a community model in EAS by configuring a few parameters. This article describes how to deploy a Hugging Face model in EAS.
Open source model communities, such as Hugging Face, provide various machine learning models and code implementations. You can access the encapsulated models, frameworks, and related processing logic through interfaces of related libraries. You can perform end-to-end operations such as model training and calling with only a few lines of code without the need to consider environment dependencies, preprocessing and post-processing logic, or framework types. For more information, visit the official site of Hugging Face. This ecology is an upgrade of deep learning frameworks such as TensorFlow and PyTorch.
EAS provides optimized capabilities to facilitate community model deployment.
PAI allows you to deploy the pipelines in Hugging Face library as an online model service in EAS. Perform the following steps:
1. Select the model that you want to deploy in the pipelines library. The text classification model distilbert-base-uncased-finetuned-sst-2-english is used in this example. Obtain the values of the MODEL_ID, TASK, and REVISION parameters as shown in the following figure.

The following table provides the mapping relationship between the TASK that is displayed on the Hugging Face website and the TASK parameter that you need to specify when you deploy services in EAS:
| TASK displayed on the Hugging Face page | TASK to specify in EAS |
|---|---|
| Audio Classification | audio-classification |
| Automatic Speech Recognition(ASR) | automatic-speech-recognition |
| Feature Extraction | feature-extraction |
| Fill Mask | fill-mask |
| Image Classification | image-classification |
| Question Answering | question-answering |
| Summarization | summarization |
| Text Classification | text-classification |
| Sentiment Analysis | sentiment-analysis |
| Text Generation | text-generation |
| Translation | translation |
| Translation (xx-to-yy) | translation_xx_to_yy |
| Text-to-Text Generation | text2text-generation |
| Zero-Shot Classification | zero-shot-classification |
| Document Question Answering | document-question-answering |
| Visual Question Answering | visual-question-answering |
| Image-to-Text | image-to-text |
2. On the EAS-Online Model Services page, deploy the Hugging Face model.
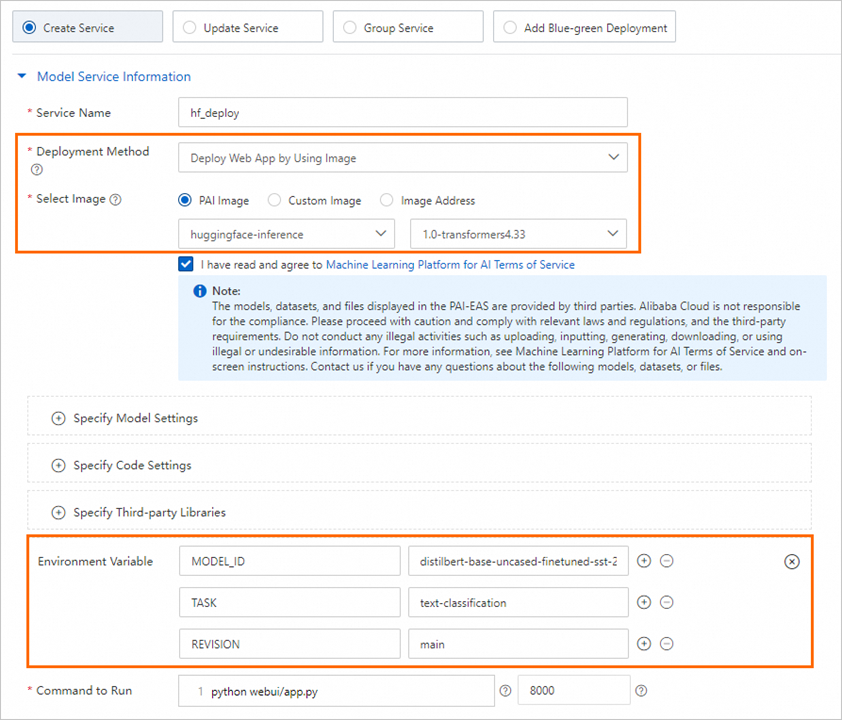
a) On the Deploy Service page, configure the required parameters. The following table describes key parameters. For more information about other parameters, see Model service deployment by using the PAI console.

| Parameter | Description |
|---|---|
| Service Name | The name of the service. |
| Deployment Method | Select Deploy Web App by Using Image. |
| Select Image | Click PAI Image, select huggingface-inference from the drop-down list, and select an image version based on your actual requirements. |
| Environment Variable | Use the following information that is obtained in Step 1: • MODEL_ID: distilbert-base-uncased-finetuned-sst-2-english • TASK: text-classification • REVISION: main |
| Command to Run | The system automatically configures the command to run after you specify the Image Version parameter. You can use the default setting. |
b) Click Deploy. When the Service Status changes to Running, the service is deployed.
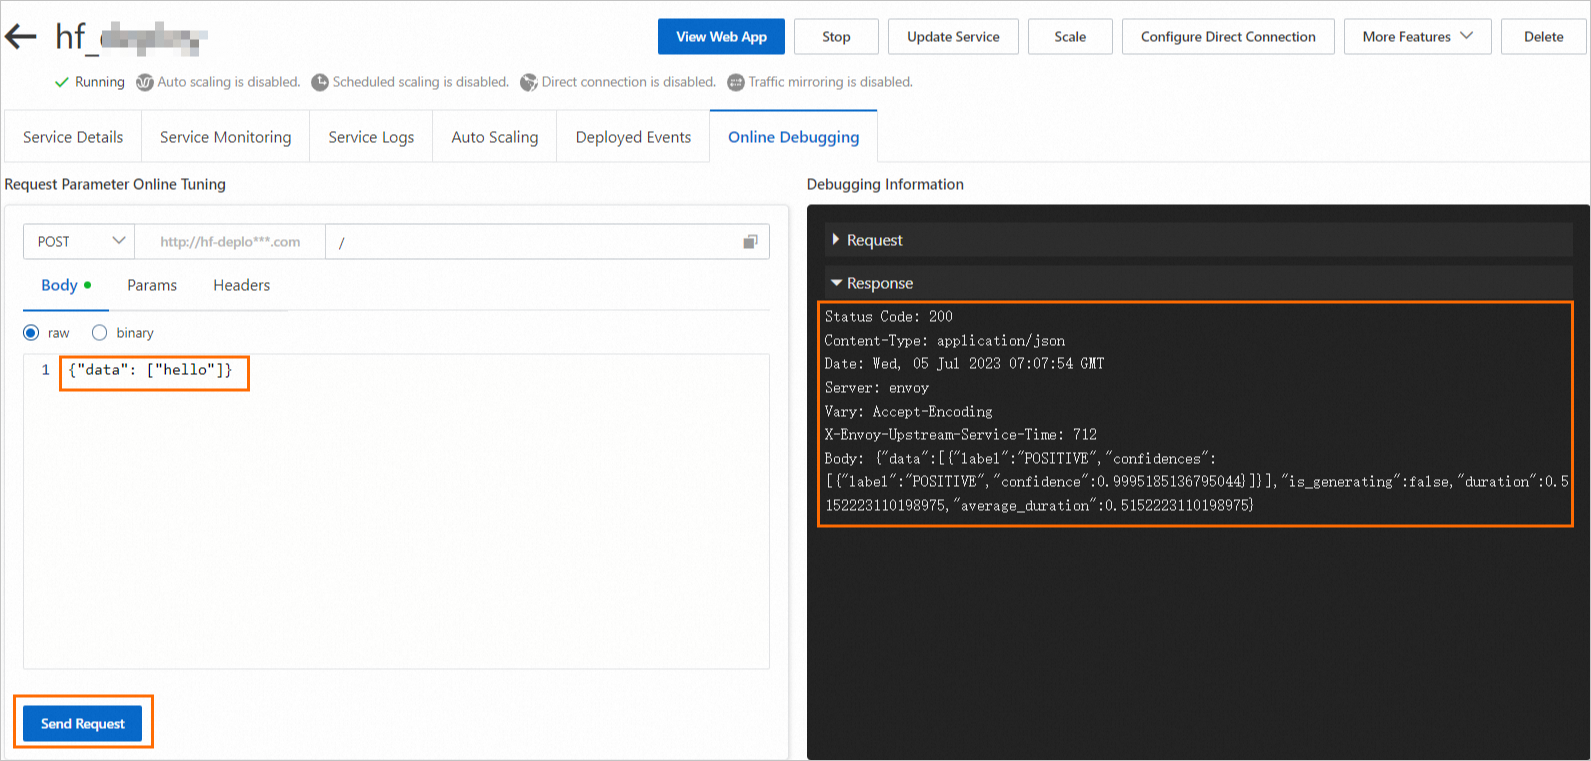
3. Call the deployed model service.

{"data": ["hello"]}, and click Send Request.

Note
The format of the input data ({"data": ["XXX"]}) of a text classification model is defined by the /api/predict of the Gradio framework. If you use other types of models, such as image classification or speech data processing, you can construct the request data by referring to the /api/predict.
a) Click the service name to go to the Service Details page. On the page that appears, click View Endpoint Information.
b) On the Public Endpoint tab of the Invocation Method dialog box, obtain the URL and Token.
c) Use the following code to call the service:
import requests

resp = requests.post(url="<service_url>",
              headers={"Authorization": "<token>"},
              json={"data": ["hello"]})

print(resp.content)

# resp: {"data":[{"label":"POSITIVE","confidences":[{"label":"POSITIVE","confidence":0.9995185136795044}]}],"is_generating":false,"duration":0.280987024307251,"average_duration":0.280987024307251}
Replace the <service_url> and <token> with the values obtained in Step b.
44 posts | 1 followers
FollowJustin See - November 7, 2025
Alibaba Cloud Community - September 6, 2024
ray - April 16, 2025
Alibaba Cloud Data Intelligence - November 27, 2024
Alibaba Cloud Data Intelligence - June 18, 2024
Alibaba Cloud Data Intelligence - June 20, 2024
44 posts | 1 followers
Follow Platform For AI
A platform that provides enterprise-level data modeling services based on machine learning algorithms to quickly meet your needs for data-driven operations.
Learn More AI Acceleration Solution
Accelerate AI-driven business and AI model training and inference with Alibaba Cloud GPU technology
Learn More Tongyi Qianwen (Qwen)
Top-performance foundation models from Alibaba Cloud
Learn More Alibaba Cloud for Generative AI
Accelerate innovation with generative AI to create new business success
Learn MoreMore Posts by Alibaba Cloud Data Intelligence