By Jeff Cleverley, Alibaba Cloud Tech Share Author. Tech Share is Alibaba Cloud's incentive program to encourage the sharing of technical knowledge and best practices within the cloud community.
In this series of tutorials we will implement a modern development and deployment workflow for WordPress on an Alibaba Cloud Elastic Compute Service (ECS) instance with LEMP (Linux, Nginx, MariaDB, PHP) installed. This workflow will create and utilize staging and local development environments, alongside the live production site. It will use the <>Git version control system to push changes to the staging environment for testing before updating the live site. In Part 1, we will create and secure a staging site subdomain.
We will create the staging site on the same server as the production site. Although, with minor adjustments, the steps in this guide could be used to configure a staging site to deploy to on a different server.
This tutorial follows on from the previous series of 5 tutorials that instructed you how to set up WordPress on a LEMP stack. These are:
The live site used in the present tutorials does differ from the above tutorials, in that is has been created in its own directory within the /var/www directory, and uses its own Nginx configuration file located within /etc/nginx/sites-available/ directory (symlinked into the /etc/nginx/sites-enabled/ directory). In the previous tutorials the WordPress site files were located within the /var/www/ directory and used the /etc/nginx/sites-available/default configuration file appropriate for that directory.
That being said, this step by step guide and the methodology in this tutorial will work on any LEMP stack for WordPress, assuming that all the required components are installed. There may be slight differences in configuration files, which may require alterations on the reader's part, but these should not hinder completion.
All instructions in this tutorial will be issued by my superuser, 'new_user', using the sudo command where necessary. Please replace my superuser with your own when issuing the tutorial's commands yourself.
The tutorial examples will also be using 'another-example-domain.com' as my main site domain, and 'staging.another-example-domain.com' as my staging site domain, remember to replace these with your own site domains and staging site domains in the relevant files and commands.
Login to your server by SSH, (remember to replace my superuser and domain with your own):
$ ssh new_user@another-example-domain.comLogin to your MySQL database as your superuser.
$ sudo mysql -u root -pThese tutorials are using MariaDB as a drop-in replacement for MySQL, so we will receive the welcome from the MariaDB monitor, and the command prompt will change to the MariaDB prompt.
Create the database required for your WordPress staging site, in my case I will call this 'staging'.
Do so with the following MySQL command:
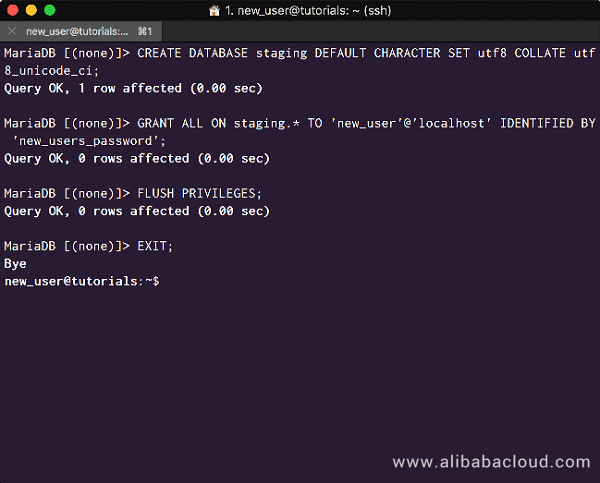
CREATE DATABASE staging DEFAULT CHARACTER SET utf8 COLLATE utf8_unicode_ci;You should receive a 'Query OK' response from the MariaDB monitor, indicating the rows affected and the time for processing your query. This indicates that the 'staging' database has been created successfully.
Now create a database user and password, and then grant the user all access to the 'staging' database:
GRANT ALL ON staging.* TO 'new_user'@'localhost' IDENTIFIED BY 'new_users_password';Of course you should replace my simple password with a very secure password of your own. Now flush privileges:
FLUSH PRIVILEGESAnd exit MariaDB:
EXIT
Your terminal should now look something like this:
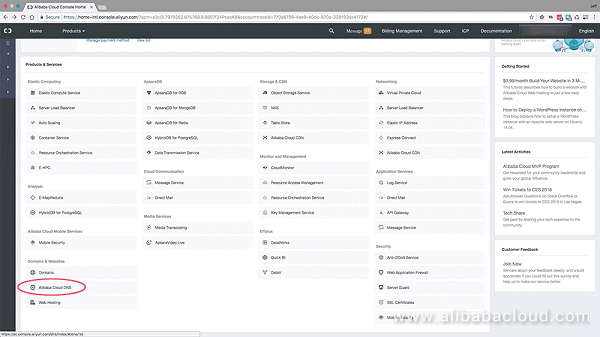
Log in to your Alibaba Cloud Console Home and visit the Alibaba Cloud DNS panel by clicking on its link in the 'Domains & Websites' section of the main 'Products & Services' panel:
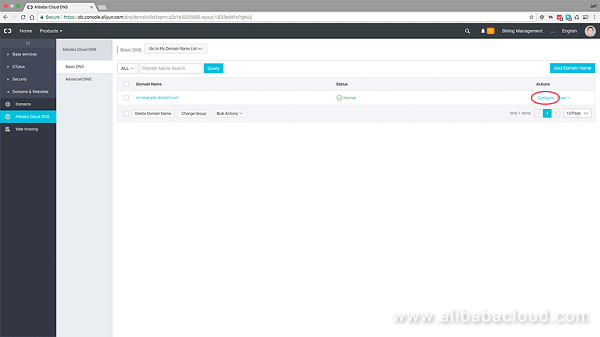
You will see your websites main domain in the list. Click configure:
Click 'Add Record' to add the new DNS record for your staging domain:
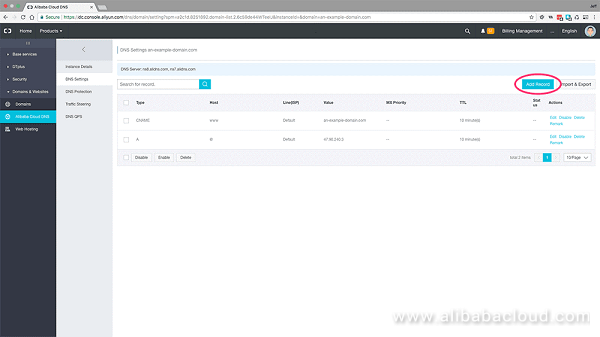
Add a new 'A' record for the 'staging' host, with your server IP as the value:
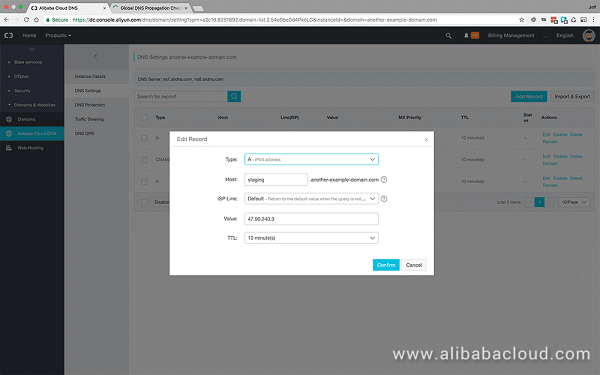
On your server, copy the Nginx configuration file for your main production domain, and rename it to your staging subdomain's name:
$ sudo cp /etc/nginx/sites-available/another-example-domain.com /etc/nginx/sites-available/staging.another-example-domain.comCreate a symlink for your staging sites newly created Nginx configuration file in the /etc/nginx/site-available/ directory to the /etc/nginx/sites-enabled/ directory:
$ sudo ln -s /etc/nginx/sites-available/staging.another-example-domain.com /etc/nginx/sites-enabled/staging.another-example-domain.comIf you cd into your /etc/nginx/sites-enabled/ directory and list all contained files with the ls command, your terminal should now look like this:
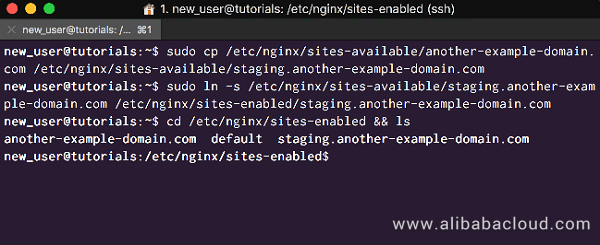
Open your newly created configuration file for editing with root privileges:
$ sudo nano /etc/nginx/staging.another-example-domain.comAs this file is a direct copy of your main site's Nginx configuration file, it will contain settings for that domain's 'root' folder and for its 'server_name'. These will need changing.
Change:
root /var/www/another-example-domain.com;
server_name another-example-domain.com www.another-example-domain.com;
To:
root /var/www/staging.another-example-domain.com;
server_name staging.another-example-domain.com;
The configuration file will also contain several directives for your main sites Let's Encrypt SSL certificate and HTTPS implementation, as configured by Certbot - these will be marked with '# managed by certbot'. Remove them all, later we will use Certbot to issue a separate SSL certificate for our staging site, and it will re-add the correct directives itself.
Your Nginx configuration file for your staging site subdomain should now look something like this:
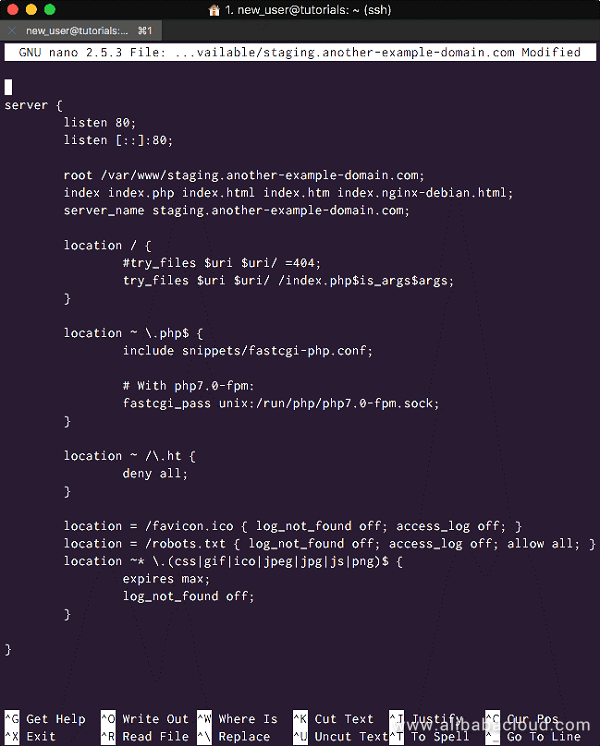
Whenever you edit your Nginx configuration files, remember to check the syntax for errors with the following command:
$ sudo nginx -tAssuming all is well, reload Nginx:
$ sudo systemctl reload nginxIf you have already installed Certbot, please ignore the next section and move ahead to the following section. Alternatively, if you are not interested in the recommended security of using HTTPS and enjoying the additional benefits of HTTP2, then please ignore this step entirely and move ahead to Step.5.
If you haven't already installed Certbot, you will need to install a package that is required to add external repositories to the 'apt' package manager. Do that with the following command:
$ sudo apt-get install -y software-properties-commonNow we can install 'certbot', do that with the following commands.
Add the 'certbot' repository:
$ sudo add-apt-repository ppa:certbot/certbotUpdate your 'apt' package list to pick up the new repository's package information:
$ sudo apt-get updateAnd finally, install 'certbot':
$ sudo apt-get install python-certbot-nginxAfter completing these commands, you will be able to continue on to the next section and issue SSL certificates using 'certbot'.
However I advise you to follow the following commands and issue an SSL certificate for your main site. It would be good to go through the process in this tutorial.
Assuming you previously installed the Let's Encrypt Certbot to issue the SSL certificate for your main site domain, it is very easy to repeat the process and issue a separate certificate for your staging site subdomain.
To issue an SSL certificate for your staging site subdomain issue the following command:
$ sudo certbot --nginx -d staging.another-example-domain.comCertbot will ask you for an email address to register the certificate to, and ask if you would like to enable HTTPS redirect.
Assuming everything has been configured properly, your certificate will be created and certbot will add the necessary directives to your staging site's subdomain Nginx configuration file. These will allow Nginx to serve your site over HTTPS, alongside a directive for the HTTPS redirect if you enabled it.
Even though the domain is now protected by an SSL and can/will be served by HTTPS, it is still using weak Diffie-Hellman parameters, meaning the initial key exchange is still more vulnerable than it should be.
To fix this, we will create a new 'dhparem.pem' file and replace the certbot managed 'ssl_dhparam' directive in the NGINX configuration file with our own.
Create the new file using 'openssl':
$ sudo openssl dhparam -out /etc/ssl/certs/dhparam.pem 2048This may take some time. We could increase security by adjusting the bits from 2048 to 4096, and the time taken would increase accordingly.
Open your staging sites Nginx configuration file with root privileges:
$ sudo nano /etc/nginx/sites-available/staging.another-example-domain.comLocate and remove the 'ssl_dhparam' directive that is '# managed by certbot', and add the following directive in its place:
ssl_dhparam /etc/ssl/certs/dhparam.pem;Now your configuration file it should now look something like this:
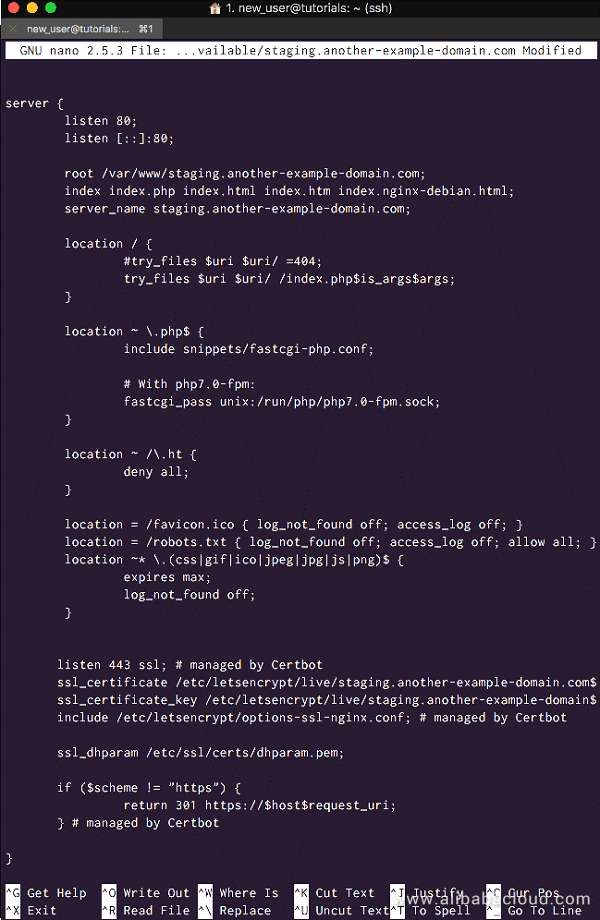
Remember to check your Nginx configuration files for syntax errors, and reload them if they are okay:
$ sudo nginx -t
$ sudo systemctl reload nginxWe have not yet created a site root directory for our Staging site within the /var/www/ directory. This is because how we create this directory will depend on the method we use to complete the installation of the Staging Site.
We have a choice to make, we can create the staging site two ways. Tutorials Part2 and Part 3 will each explore a different way:
After completing both of these processes in the next two tutorials, we will move on to creating a version control deployment workflow using Git, in the final tutorial.
We Already Follow the Sun: Alibaba Cloud's Chief Warns Competitors
Implementing a Modern WordPress Workflow on Alibaba Cloud - Part 2

2,593 posts | 793 followers
FollowAlibaba Clouder - July 4, 2018
Alibaba Clouder - July 3, 2018
Alibaba Clouder - July 4, 2018
Alibaba Clouder - May 9, 2018
Alibaba Clouder - May 17, 2019
Alibaba Clouder - February 21, 2020

2,593 posts | 793 followers
Follow ECS(Elastic Compute Service)
Elastic and secure virtual cloud servers to cater all your cloud hosting needs.
Learn More Domains
Over 20 million domain, free WHOIS privacy protection.
Learn MoreLearn More
More Posts by Alibaba Clouder
5395917313331904 June 11, 2019 at 10:44 am
Using the Staging environment helps in speeding up the complete process of updating and migrating from staging to live, I am using Cloud platform, This guide also helped me in creating WordPress staging environment on the cloud platform. https://www.cloudways.com/blog/wordpress-staging-environment/