By Francis Ndungu, Alibaba Cloud Tech Share Author. Tech Share is Alibaba Cloud's incentive program to encourage the sharing of technical knowledge and best practices within the cloud community.
ownCloud is a free and open-source file hosting software for storing, accessing and sharing files, calendars, contacts and emails on the cloud.
Since its development in 2010, ownCloud allows creation of private on-demand cloud that offers similar functionalities like those of Dropbox. The application has desktop versions for Windows, macOS and Linux that offer synchronization capabilities with local computers.
You can setup your ownCloud server on Alibaba Cloud Elastic Compute Service (ECS) running Ubuntu 16.04. The cloud software is written in PHP and JavaScript and requires MariaDB/MySQL database alongside a web server like Apache to function.
In this guide, we will take you through the steps of installing ownCloud on your Alibaba Cloud Elastic Compute Service (ECS) instance with Ubuntu 16.04.
Apache is the most widely used web server. It is fast, secure and easy to configure. To install it on your Alibaba Cloud ECS instance running Ubuntu 16.04, run the commands below:
$ sudo apt-get update
$ sudo apt-get install apache2
Press Y and hit Enter when prompted to confirm the installation.
After the installation, you can enter your Alibaba ECS instance public IP address on a browser and you should see the default Apache web page.
http://server_public_ip_addressSince ownCloud stores the data in directories, you should disable directory listing on Apache to avoid malicious users from accessing your files without visiting the login page. To do this, run the command below
$ sudo a2dismod autoindexAlso enable the below Apache modules for ownCloud to work well with your Apache environment:
$ sudo a2enmod rewrite
$ sudo a2enmod headers
$ sudo a2enmod env
$ sudo a2enmod dir
$ sudo a2enmod mime
Then, restart Apache web server for the changes to take effect:
$ sudo service apache2 restartMySQL is the most comprehensive Relational Database Management System (RDMS) with a lot of modern features. It is also secure and scalable. Therefore, it works pretty well with ownCloud allowing you to scale up and down depending with your needs.
To install MySQL server on your Alibaba ECS instance running Ubuntu 16.04, run the command below:
$ sudo apt-get install mysql-serverPress Y and hit Enter when prompted to confirm the installation.
Towards the end of the installation, you will be prompted to enter a root password for your MySQL server. This should not be confused with the password of your ECS instance. Enter a strong value and hit Enter to proceed.
On the next screen, repeat the same password and hit Enter again. MySQL server installation should be completed successfully.
The default installation of MySQL is not secure at all. You should run the command below to enhance its security.
$ sudo mysql_secure_installationEnter the root password of your MySQL server that you setup earlier and press Enter.
You will be prompted to answer a series of questions. Select the answers as shown below:
Setup Validate Password plugin? : Y
Password validation policy level:2
Change the password for root? N
Remove anonymous users? : Y
Disallow root login remotely? : Y
Remove test database and access to it? : Y
Reload privilege tables now? : Y
You should get a success message at the end.
Next, you need to create a database that ownCloud will use for administrative purposes. First, login to your MySQL server on the command line using the command below:
$ sudo mysql -uroot -pEnter your MySQL server root password and press Enter to continue.
You should get the MySQL prompt as shown below:
mysql>To create the ownCloud database run the SQL command below:
mysql> create database owncloud;Output:
Query OK, 1 row affected (0.00 sec)Then, you need to create a user for accessing the above database. Run the below SQL command and replace ¡®PASSWORD' with a strong value. In this case, ¡®oc_user' is the database user:
mysql> create user 'oc_user'@'localhost' identified by 'PASSWORD';Output:
Query OK, 0 rows affected (0.00 sec)
Next, grant full privileges to the database user we have created above.
mysql>grant all on owncloud.* to 'oc_user'@'localhost';
Output:
Query OK, 0 rows affected (0.00 sec)Then, you need to flush privileges for the changes to take effect
mysql>flush privileges;Output:
Query OK, 0 rows affected (0.00 sec)You can now exit from the MySQL prompt and go back to the Linux terminal prompt. Just issue the command below:
mysql>exit;PHP is one of the most widely used server-side scripting language. The open source general purpose programming language is powerful for running dynamic and interactive web applications like ownCloud
By the time of writing this guide, the highest PHP version supported by ownCloud was PHP 7.1.
To, install it, run the command below:
$ sudo apt-get install software-properties-commonPress Y and hit Enter when prompted to confirm the installation
$ sudo add-apt-repository ppa:ondrej/phpPress Enter when prompted to add the repository.
Then, update the repository information using the command below:
$ sudo apt-get updateYou can now go ahead and install PHP 7.1
$ sudo apt-get install php7.1 Press Y and hit Enter when prompted to confirm the installation
For ownCloud to work with PHP 7.1, you need to run the command below to make sure all the required PHP modules are installed:
$ sudo apt-get install php7.1-cli php7.1-common php7.1-mbstring php7.1-gd php7.1-intl php7.1-xml php7.1-mysql php7.1-zip php7.1-curl php7.1-xmlrpcPress Y and hit Enter when prompted to confirm the installation.
You can now restart Apache so that it loads PHP:
$ sudo systemctl restart apache2You have now setup a web server, a database server and PHP scripting language. The server environment is now ready for running ownCloud software.
The latest ownCloud software can be downloaded from the link below in zip format:
https://download.owncloud.org/community/owncloud-10.0.3.zipFirst, CD to the /tmp folder of your Ubuntu server:
$ cd /tmp Then use Linux wget utility to download the file from the link.
$ wget https://download.owncloud.org/community/owncloud-10.0.3.zipThe zip file should now be saved on the /tmp directory, you need to unzip it and copy it to the root of your web server /var/www/html using the unzip command:
First, install the unzip tool:
$ sudo apt-get install unzipThen, unzip the file and send the content to the root of the website:
$ sudo unzip owncloud-10.0.3.zip -d /var/www/html/Allow a few seconds for the unzip utility to finalizing the process.
Apache runs under the default user www-data. We need to associate the ownCloud directory with this user using the command below:
$ sudo chown -R www-data:www-data /var/www/html/owncloud/Then, we can issue the below permissions to the directory and files recursively using the -R option:
$ sudo chmod -R 755 /var/www/html/owncloud/The 755 file permission gives Apache web server read, write and execute permissions for the ownCloud directory.
You can now visit the address below on a web browser to finalize ownCloud installation
http://public_ip_address/owncloudRemember to replace public_ip_address with the public IP address associated with your Alibaba Cloud ECS instance.
You should see a configuration screen similar to the below image. Enter your preferred admin username and a strong password to continue. Leave the data folder intact.
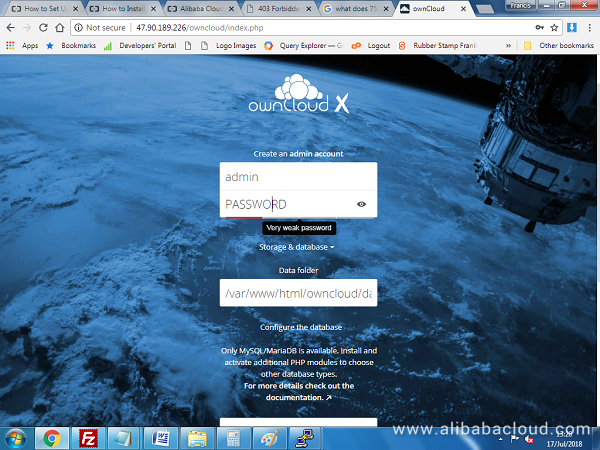
Then, scroll down to configure the database by enter the username and password that you created on the MySQL server and click Finish Setup.
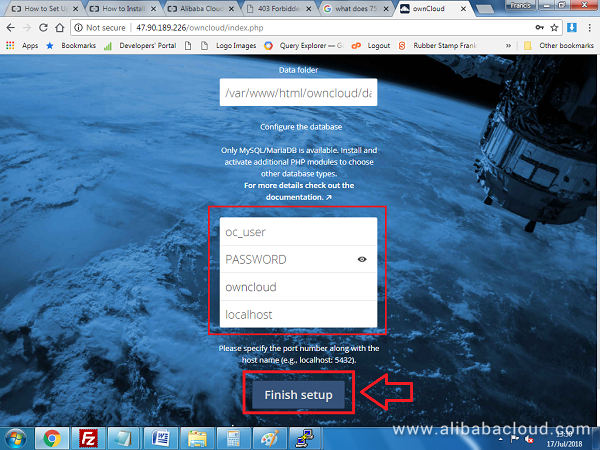
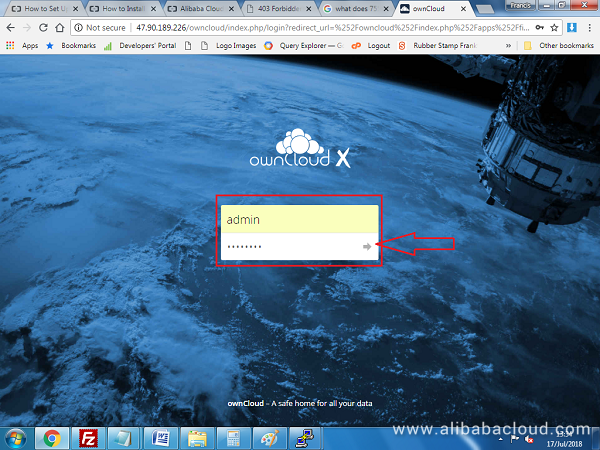
The installation should be finalized without any problems. On the next screen, you will be prompted to enter ownCloud username and password that you created above. Enter the details and click the Login arrow.
Congratulations, you now have a safe home for your data in the cloud
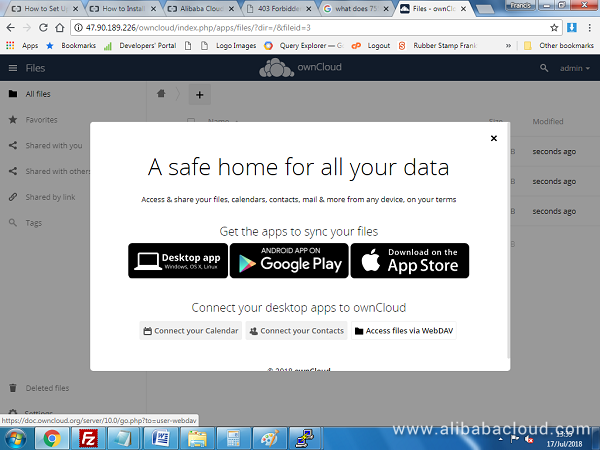
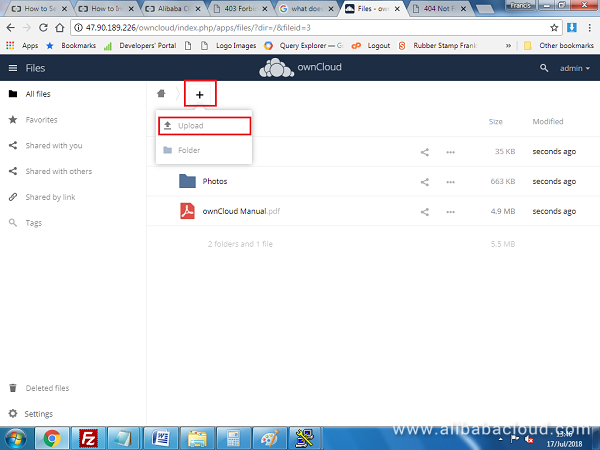
You can now start uploading files by click the + icon on the dashboard:
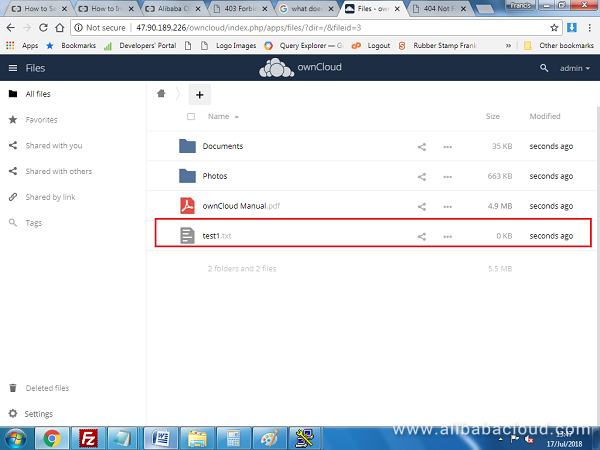
Any file you upload should now be available on your ownCloud server! In this case, a test1.txt file as uploaded for demonstration purposes.
In the above tutorial, we have described how to setup ownCloud on your Alibaba Cloud Elastic Compute Service (ECS) instance running Ubuntu 16.04 Operating System. We have gone through the steps of setting up Apache web server, PHP scripting language, MySQL server and finally downloaded and installed ownCloud.
You now have your own private cloud server that you can use to host your important files and share them for collaboration purposes.
How to Manage Your Alibaba Cloud Linux Server from the Command Line Interface (CLI)
How to Secure Apache Web Server with ModEvasive on Ubuntu 16.04

31 posts | 8 followers
FollowAlibaba Clouder - May 9, 2019
Alibaba Clouder - May 10, 2019
Alibaba Clouder - October 29, 2018
JDP - September 2, 2021
Alibaba Clouder - May 9, 2019
francisndungu - December 10, 2019

31 posts | 8 followers
Follow Storage Capacity Unit
Plan and optimize your storage budget with flexible storage services
Learn More Hybrid Cloud Storage
A cost-effective, efficient and easy-to-manage hybrid cloud storage solution.
Learn More Function Compute
Alibaba Cloud Function Compute is a fully-managed event-driven compute service. It allows you to focus on writing and uploading code without the need to manage infrastructure such as servers.
Learn More Managed Service for Prometheus
Multi-source metrics are aggregated to monitor the status of your business and services in real time.
Learn MoreMore Posts by francisndungu