By Arslan Ud Din Shafiq, Alibaba Cloud Tech Share Author. Tech Share is Alibaba Cloud's incentive program to encourage the sharing of technical knowledge and best practices within the cloud community.
Monica is an easy-to-use, open source web based personal management system. Developed in Laravel PHP framework, Monica allows you to organize, manage and track the interactions with your contacts in a centralized place. You can also easily import or export your contacts by using Monica's REST API.
In this tutorial, we will be installing and setting up Monica using Alibaba Cloud Elastic Compute Service (ECS) with Ubuntu 16.04 installed.
Before proceeding with installation of any kind of package, use the following command to update your Ubuntu system. To execute this command, remember to login from non-root user with sudo privileges. After execution of this command, you will be prompted to Is this ok? Type 'y' and hit Enter.
# sudo apt update && sudo apt upgradeTo install build-essential execute the command.
# sudo apt-get install build-essentialYou will need to install Git on your server as well as local machine. To install and configure Git, follow the steps below.
Step 1: To install Git execute the command.
# sudo apt-get install gitStep 2 (Optional): Execute the commands below to configure Git by providing your name and valid email address so that commit messages may contain your correct information.
# git config --global user.name "Aareez"
# git config --global user.email "xyz@example.com"To install libpng-dev execute the command.
# sudo apt-get install libpng-devMonica requires installation of PHP 7.1 or newer version of PHP. In this tutorial, you will install PHP 7.2. To install PHP 7.2, execute the following steps.
First, you will need to install python software properties and software properties common. To do so, execute the command below.
# sudo apt-get install software-properties-common python-software-properties You will need to add repository for newer versions of PHP. To do so, execute the commands below.
# sudo add-apt-repository ppa:ondrej/phpNext, update the system to refresh the available repositories. To do so, execute the command for updating Ubuntu system.
# sudo apt updateNow install PHP 7.2. To install PHP 7.2, execute the following command.
# sudo apt install -y php7.2Monica requires the following PHP extensions:
To install the above extensions of PHP, execute the following command.
# sudo apt install -y php7.2-cli php7.2-fpm php7.2-common php7.2-mbstring php7.2-xml php7.2-mysql php7.2-curl php7.2-zip php7.2-intl To check PHP installation, you can execute the following command to check the installed PHP version.
# php --versionAs Monica is developed in Laravel PHP framework, Laravel supports MySQL, MS SQL, SQLite, MariaDB, Redis and PostgreSQL databases. In this tutorial, you will install MySQL server for Monica database. Follow the steps below to install MySQL.
Install MySQL using the following command.
# sudo apt install -y mysql-serverRun the following command to enhance security of MySQL server and set password for the root user.
# sudo mysql_secure_installationConnect to the MySQL shell as root user using the command below and enter your password.
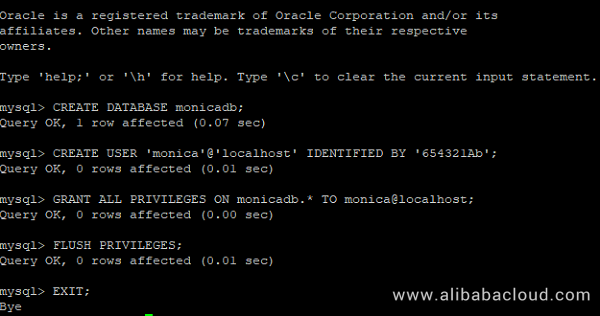
# sudo mysql -u root -p

CREATE DATABASE monicadb;
CREATE USER 'monica'@'localhost' IDENTIFIED BY '654321Ab';
GRANT ALL PRIVILEGES ON monicadb.* TO monica@localhost;
FLUSH PRIVILEGES;
EXIT;
Before starting installation of Nginx server, you will need to stop apache service. To do so, execute the command below.
# sudo systemctl stop apache2Execute the command below to install Nginx server.
# sudo apt-get install nginxStart Nginx server by executing command below.
# sudo systemctl start nginxTo check installation of Nginx server, you can execute the following command.
# sudo nginx -vCreate Nginx configuration file for Monica. Execute the following command, a file will be opened in nano text editor.
# sudo nano /etc/nginx/sites-available/monica.confCopy and paste the following code and save the file.
server {
    listen 80;
    listen [::]:80;

    server_name softpedia.xyz;
    root /var/www/monica/public;

    index index.php;

    location / {
        try_files $uri $uri/ /index.php?$args;
    }

    location ~ \.php$ {
        include snippets/fastcgi-php.conf;
        fastcgi_pass unix:/var/run/php/php7.2-fpm.sock;
    }
}
Create symlink of newly created file's configuration to enabled-sites directory. To do so, execute the command below.
# sudo ln -s /etc/nginx/sites-available/monica.conf /etc/nginx/sites-enabled/Execute the following command to test the syntax of Nginx configuration file.
# sudo nginx -tExecute the following command to reload the updated configurations.
# sudo systemctl reload nginxMonica requires 10.x version of Node.JS. To install it, add the source and then install Node.JS. To do so, execute the following commands.
# curl -sL https://deb.nodesource.com/setup_10.x | sudo -E bash -
# sudo apt-get install nodejs
To verify successful installation of node and node package manager, run the following command.
# node -v && npm -vLaravel requires composer. As Monica is Laravel based application, to install composer, follow the steps below.
Execute the following command to fetch the installer for composer setup.
# php -r "copy('https://getcomposer.org/installer', 'composer-setup.php');"Execute the following command to verify the installer for composer.
# php -r "if (hash_file('SHA384', 'composer-setup.php') === '544e09ee996cdf60ece3804abc52599c22b1f40f4323403c44d44fdfdd586475ca9813a858088ffbc1f233e9b180f061') { echo 'Installer verified'; } else { echo 'Installer corrupt'; unlink('composer-setup.php'); } echo PHP_EOL;"Execute the following commands to install and configure composer.
# php composer-setup.php
# php -r "unlink('composer-setup.php');"
# sudo mv composer.phar /usr/local/bin/composer
To verify installation of composer, execute the following command.
# composer --versionNavigate to root document directory.
# cd /var/wwwClone the files of Monica from Git repository by executing commands below.
# sudo git clone https://github.com/monicahq/monica.gitNavigate to /var/www/monica
# cd monica
# sudo git checkout tags/v2.1.1
Change the ownership of newly created directory to your username.
# sudo chown -R aareez:aareez /var/www/monicaExecute the following command to create .env (environment variables file). This will be your own version of environmental variables.
# cp .env.example .envExecute the following command to open the created .env file in nano text editor and update the values of environmental variables like DB_USERNAME and DB_PASSWORD and save the file.
# sudo nano .env
Install all required packages using composer by executing the command.
# composer install --no-interaction --no-suggest --no-dev --ignore-platform-reqsCompile CSS and JS assets by running the command below.
# npm run productionExecute the following command to generate an application key that will correct APP_KEY to correct value automatically.
# php artisan key:generateRun the following command, it will run migrations, seed database and symlink folders.
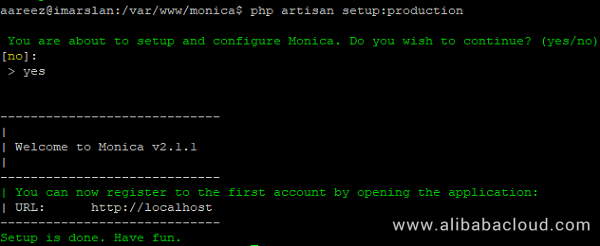
# php artisan setup:productionAfter execution of the above command, you will see the following output screen.

Change the ownership of monica folder and assign Nginx user so that Nginx can access files of your application.
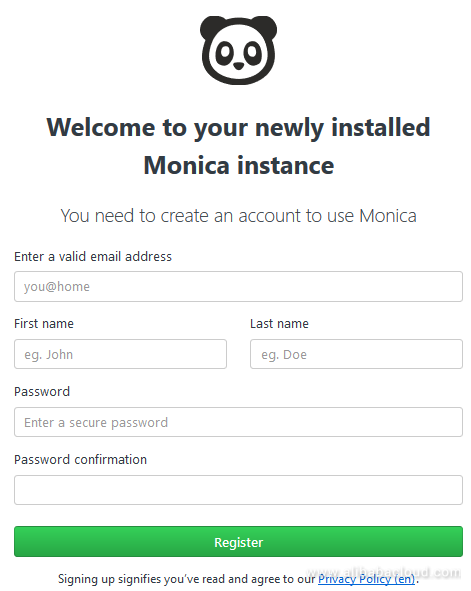
# sudo chown -R www-data:www-data /var/www/monicaYou can access Monica via ECS IP address or your domain name. In my case, I have setup domain. After accessing Monica, you will be redirected to sign up page to create account as shown below.

After registering your first account, you will see the following screen which is dashboard of Monica.

Congratulations! You can now use Monica: Personal Relationship Management System on your Alibaba Cloud Elastic Compute Service (ECS) instance.
Alibaba Partners with Shanghai Municipal Government to Develop Yangtze River Delta Region

2,599 posts | 764 followers
FollowAlibaba Clouder - November 27, 2019
Alibaba Cloud Community - October 10, 2024
Alibaba Clouder - December 3, 2019
Alibaba Clouder - November 21, 2019
Alibaba Clouder - July 19, 2018
GhulamQadir - January 1, 2020

2,599 posts | 764 followers
Follow ECS(Elastic Compute Service)
Elastic and secure virtual cloud servers to cater all your cloud hosting needs.
Learn More OSS(Object Storage Service)
An encrypted and secure cloud storage service which stores, processes and accesses massive amounts of data from anywhere in the world
Learn MoreLearn More
More Posts by Alibaba Clouder