By Nadaraj Prabhu, Alibaba Cloud Tech Share Author. Tech Share is Alibaba Cloud's incentive program to encourage the sharing of technical knowledge and best practices within the cloud community.
Step 1: Sign in to the Alibaba Cloud Console at Link.
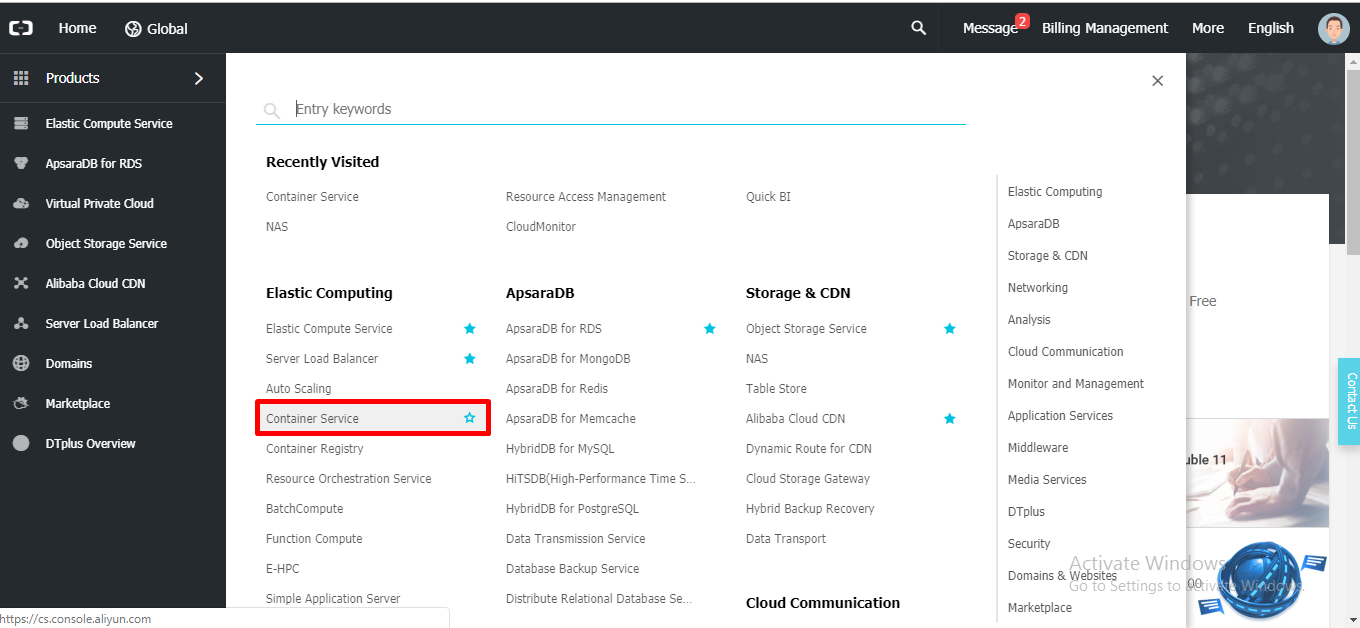
Step 2: Go to Products and select "Container Service" under "Elastic Computing" category as containers and choose Kubernetes Service.
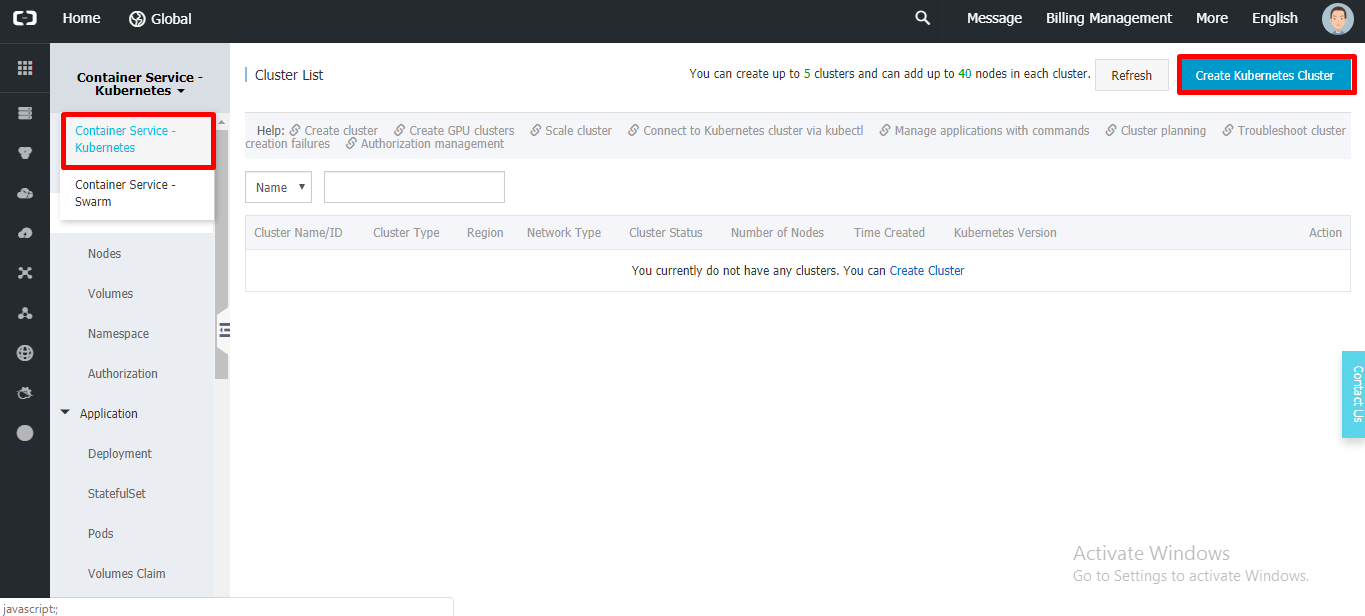
Step 3: Now select container service as "Kubernetes", after that on the extreme right click on "Create Kubernetes Cluster"
Step 4: Provide Cluster Name, Region (Location), Zone, VPC (Virtual Private Connection, you can use an existing one or create a new one). Node type is your default subscription type hence for me "Pay-As-You-Go"
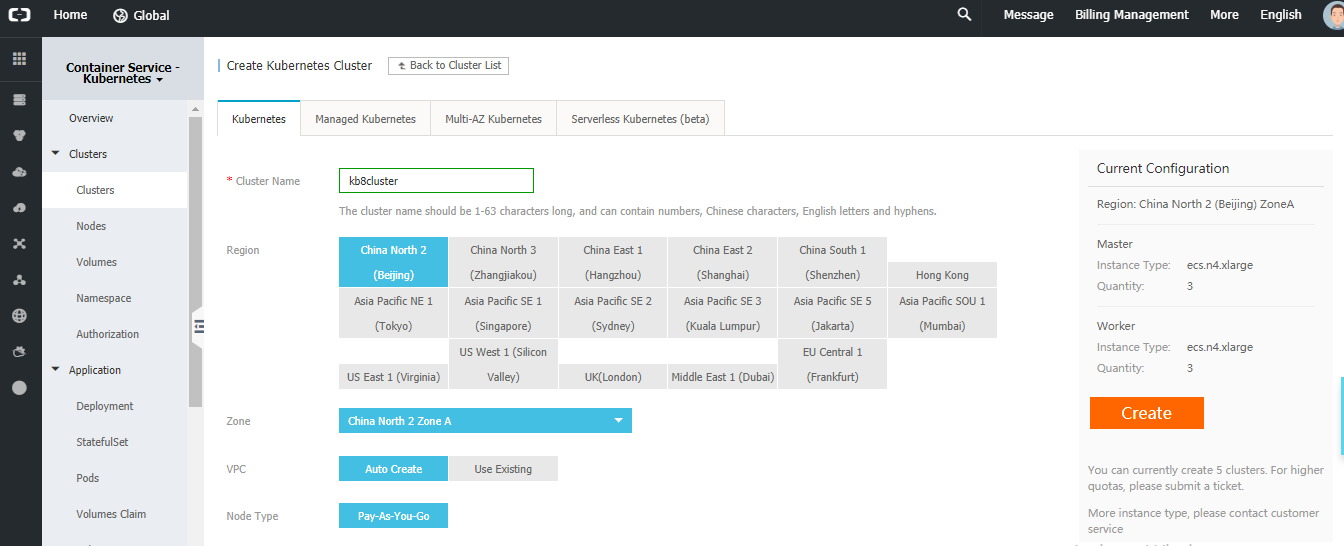
Note: Currently Alibaba Container Service for Kubernetes only support "Pay-As-You-Go" subscription.
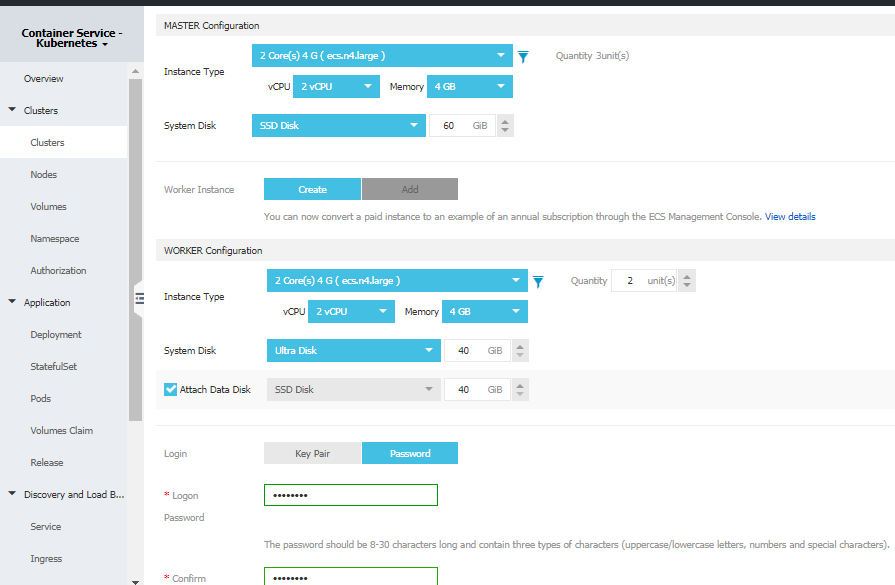
Step 5: Next scroll down and go to "MASTER Configuration", select master instance SKU size (CPU and RAM) and Disk Type and Disk Size.
Next for Worker configuration select instance SKU size (CPU and RAM), no of node/agents and Disk Type and Disk Size (Include Data disk also if necessary)
I have selected Password authentication, since I'm planning to use Password rather than key Pair, but you can select authentication of your choice.
Note: By default, Master instance will have 3 nodes, you cannot change the no of master node. Where as in Worker/ Agent instances can me reduces to 2 nodes.
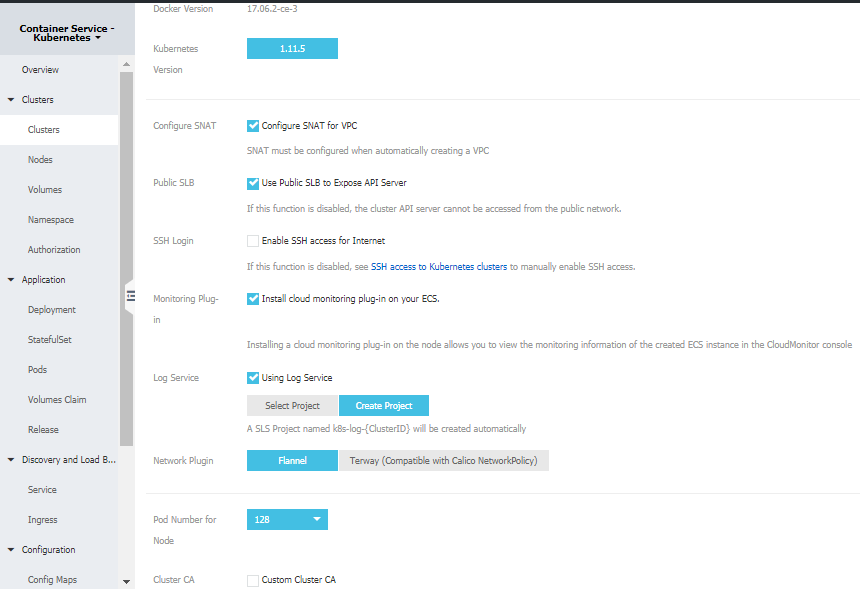
Step 6: Currently Alibaba cloud does not provide you an option to change the "Docker Version" or "Kubernetes Version"
Configure SNAT if required, Use Public SLB if you are using frontend website or application hosted in the cluster.
Enable SSH access if you not Site-toSite or Point-to-Site VPN set up.
Enable Cloud Monitor . This helps you to monitor you cluster and see you metrics and create alerts based on the report.
Select "Log Service" to collect the telemetry for the cluster.
Select you "Network Plugin"
Select the custom port ( or leave it default as 128) , Also if you have any custom CA (Signed certificated) you can enable and attach it over here.
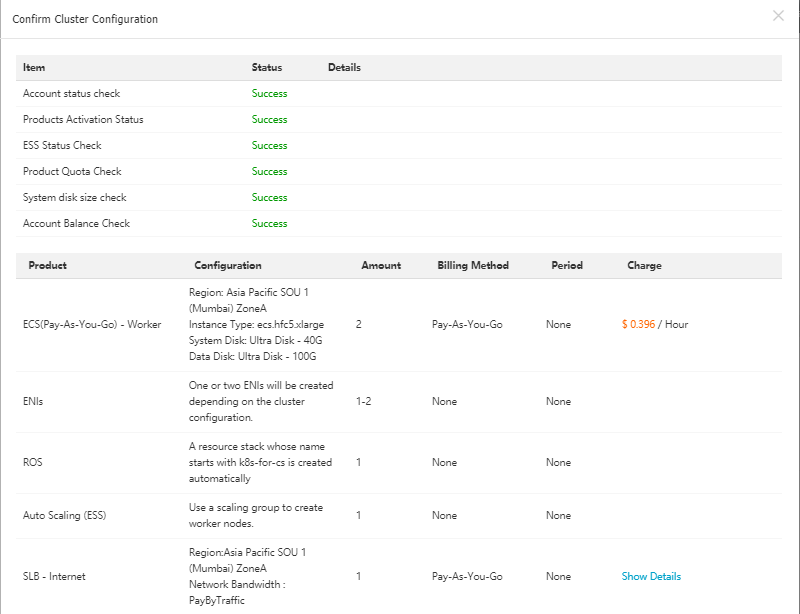
Step 7: Click of create button on the right, and check for request validation and click on "Create"
Step 8: Now Wait for the deployment to complete.
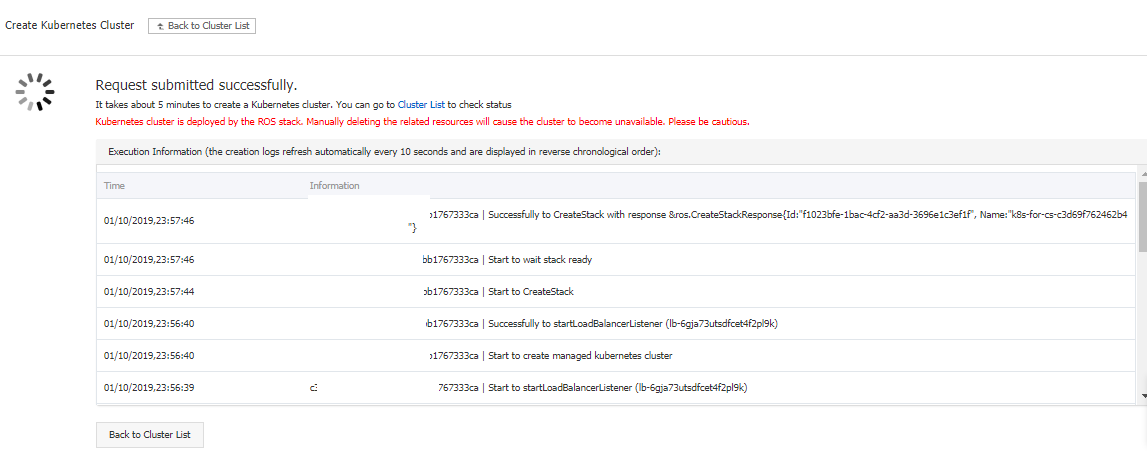
After successful deployment you should have go the below mentioned message with green mark.

Now click on cluster on the left navigation panel and you should be able to see your "Kubernetes Cluster"

To manage the cluster and create applications and pods efficiently, it's better to do this using DevOps practices. VSTS (Azure DevOps) helps you connect and deploy to Kubernetes cluster using "kubectl" task.
Step 1: To connect Kubernetes Services from VSTS, you need kube config file. Go to your Alibaba Container Service, select your cluster and click on "Manage".

Step 2: Scroll down and navigate to "Cluster Resource" Section and copy the key (kube config code).

Note:
Step 3: Go to your Azure DevOps Link, if you do not already have project setup, create a new project.
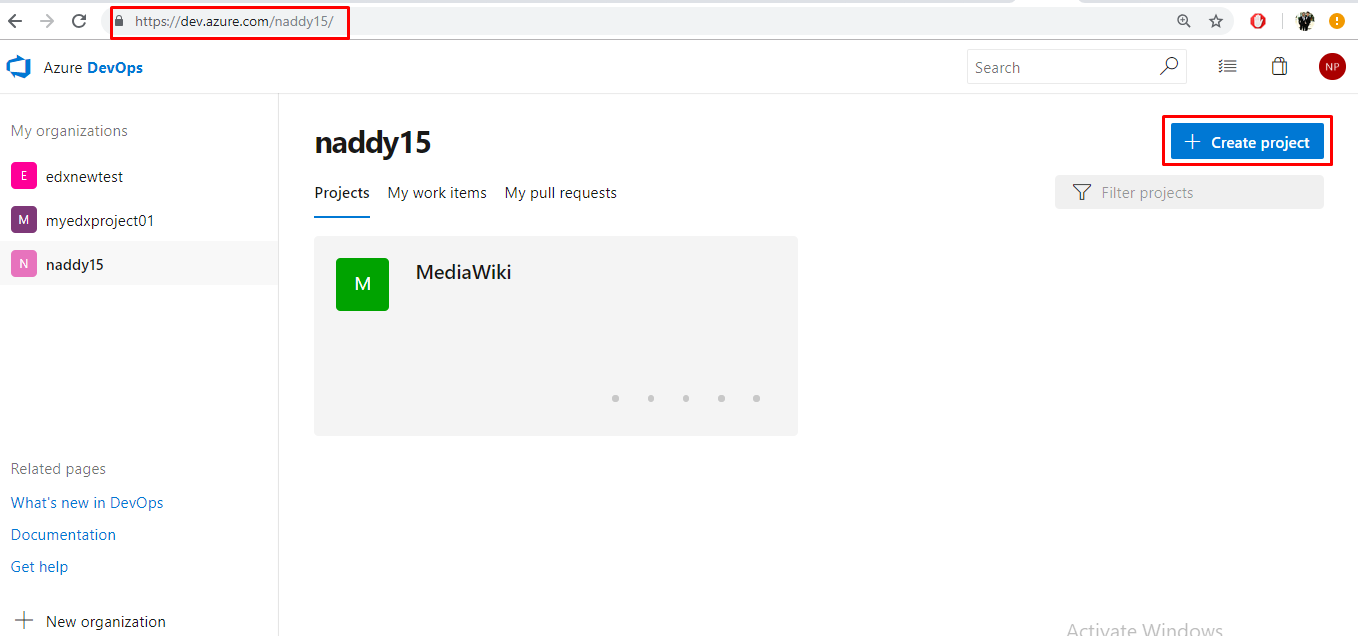
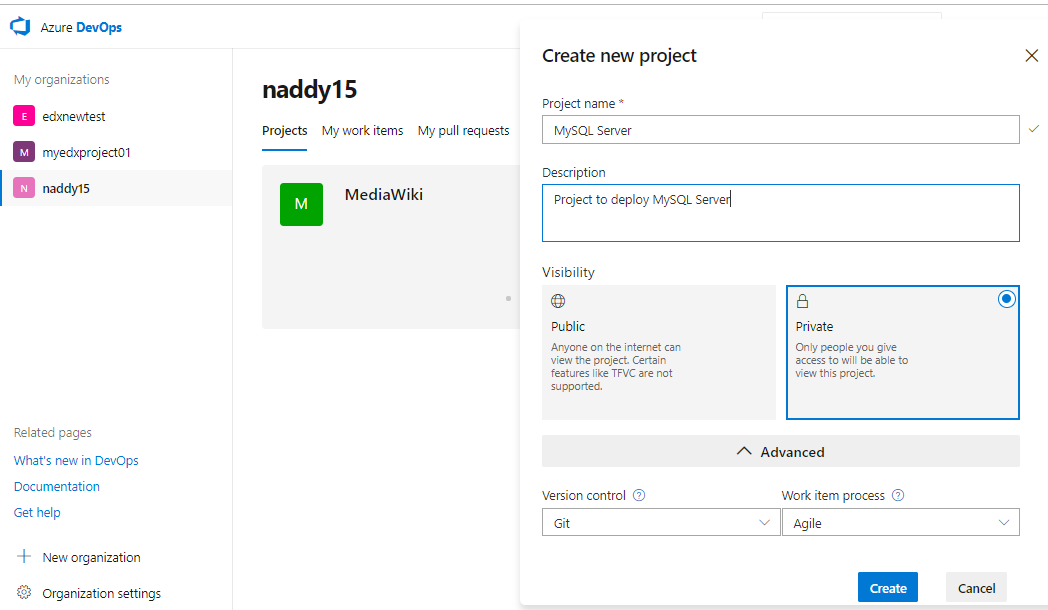
Step 4: Provide a project name, description, version control as "Git" and Work Item.
Step 5: Next, let's build the pipeline from the repository from Git Hub Link
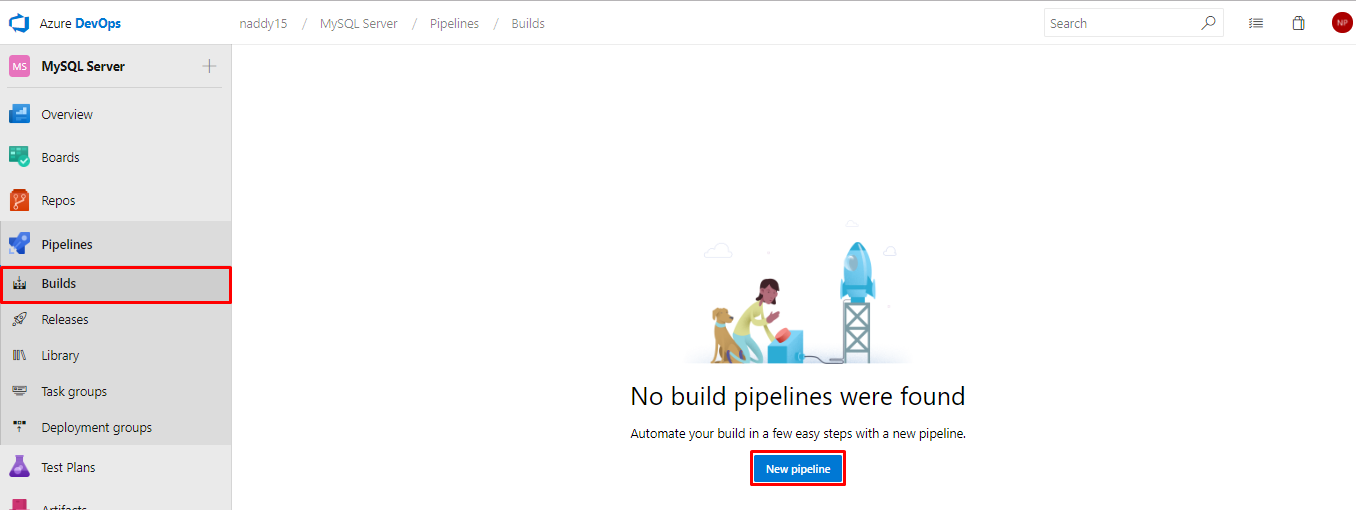
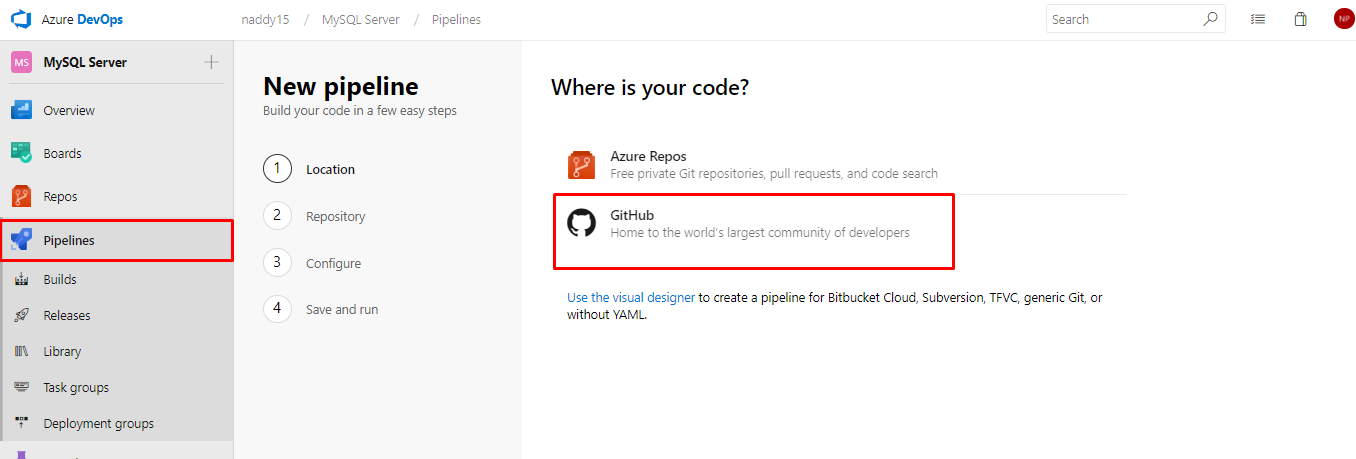
Step 6: Now go you have 2 option either you can import the code to VSTS Repo and deploy from it or use the code directly from GitHub
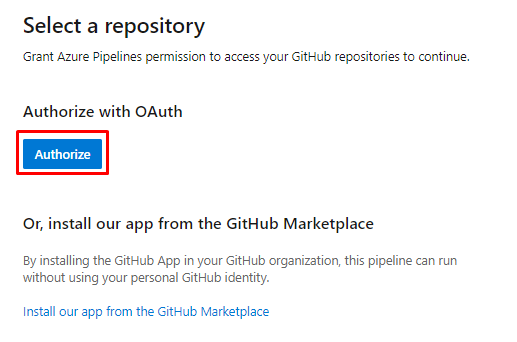
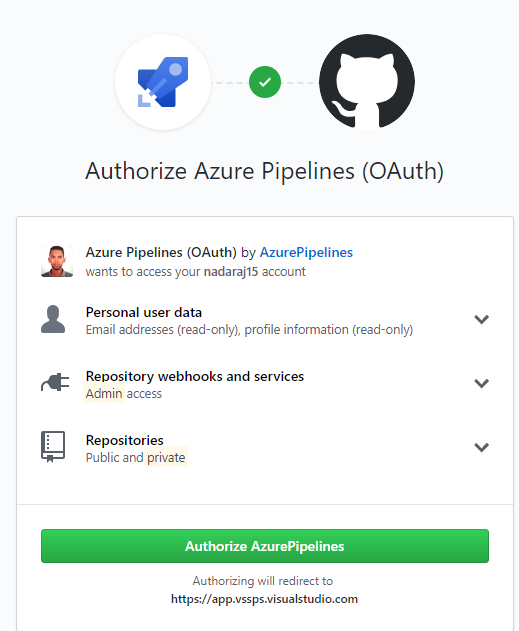
Step 7: Authorize using OAuth by allowing the permission or install GitHub app from market place. For this demo I'm going to use OAuth.
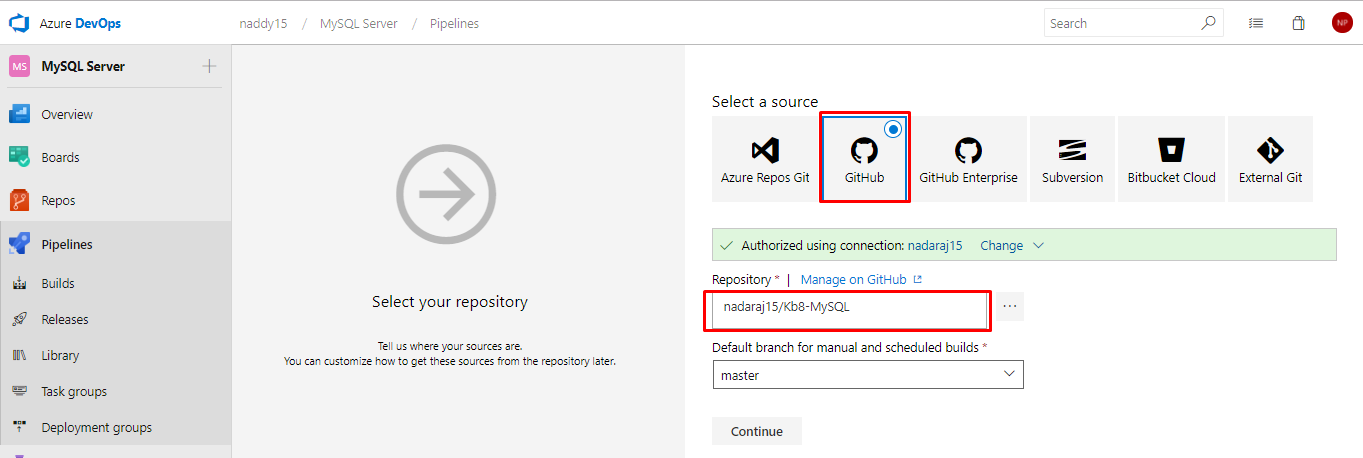
Step 8: Select "Kb8-MySQL" repository. Click on continue.
Step 9: Select Empty job, Next select the Agent as "Hosted Ubuntu 1604". Click on + symbol to add the task.


Step 10: Select "Copy task" and enter the values for "copy task" as mentioned below:
Parameters: -
Display name: Copy Files Secret (or Any Name as per your requirement)
Source Folder: (leave it empty since file is in root folder, else give the path)
Contents: **/Secret.yml
Target Folder: $(Build.ArtifactStagingDirectory)
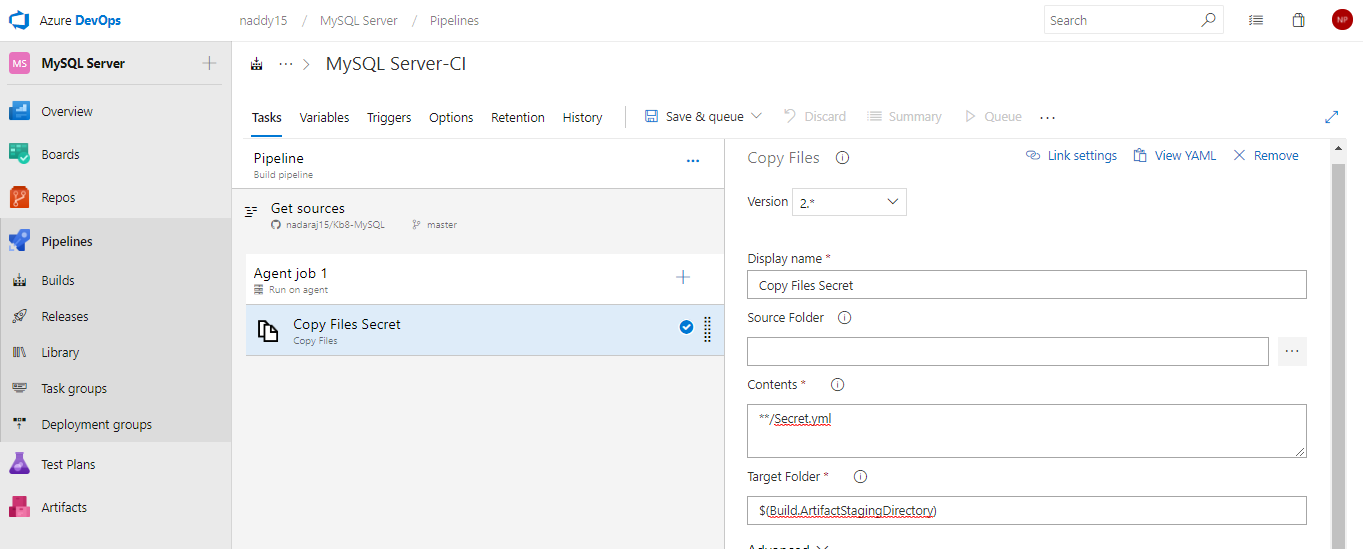
Step 11: Add 3 more "Copy task" and enter the values for "copy task" as mentioned below for each task:
Parameters: -
Display name: Copy Files StorageClass (or Any Name as per your requirement)
Source Folder: (leave it empty since file is in root folder, else give the path)
Contents: **/StorageClass.yml
Target Folder: $(Build.ArtifactStagingDirectory)
Display name: Copy Files PersitantVolume and claim (or Any Name as per your requirement)
Source Folder: (leave it empty since file is in root folder, else give the path)
Contents: **/PersitantVolumeandclaim.yml
Target Folder: $(Build.ArtifactStagingDirectory)
Display name: Copy Files mysql (or Any Name as per your requirement)
Source Folder: (leave it empty since file is in root folder, else give the path)
Contents: **/MySQl.yml
Target Folder: $(Build.ArtifactStagingDirectory)
Step 11: Next add "Publish Build Artifacts task" and no need to make any changes in the task:
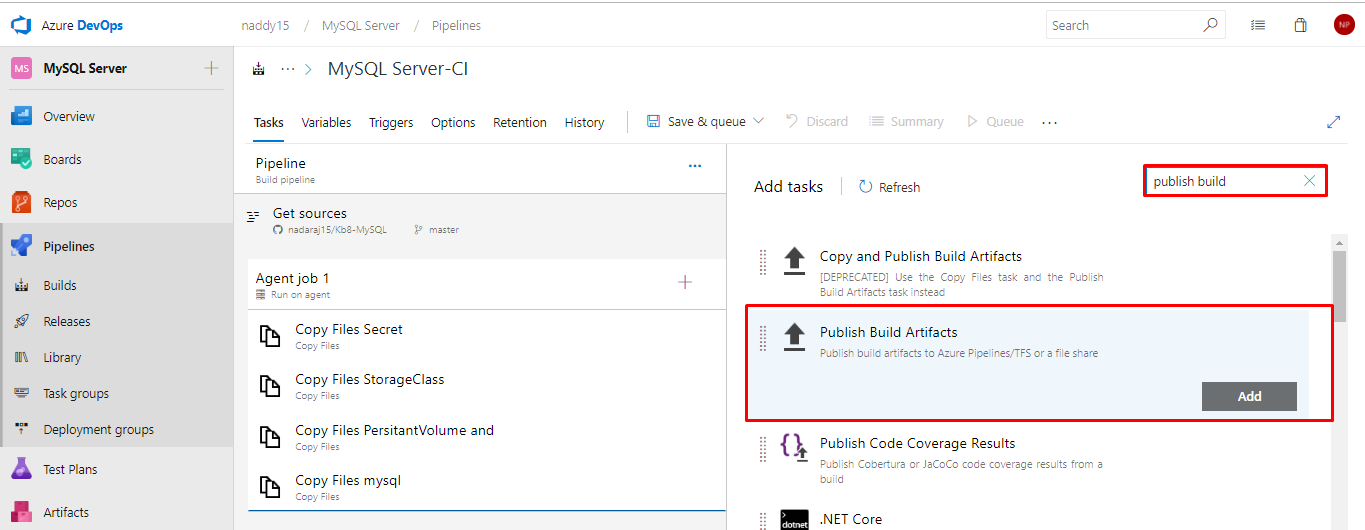
Step 12: Save and queue this build.
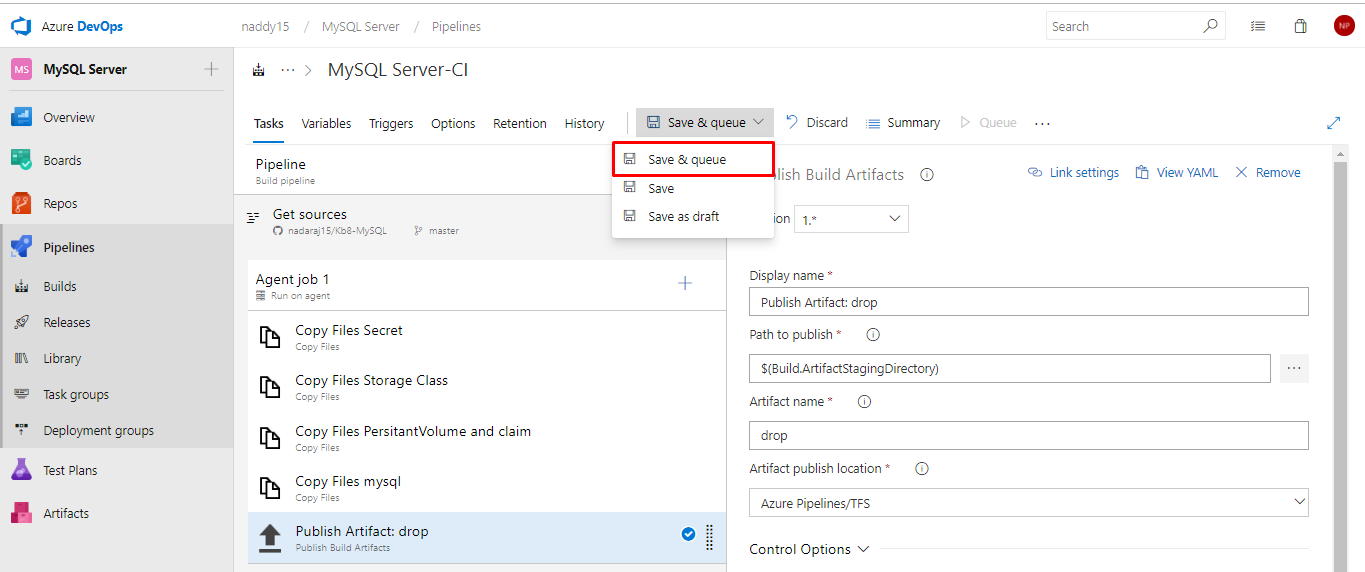
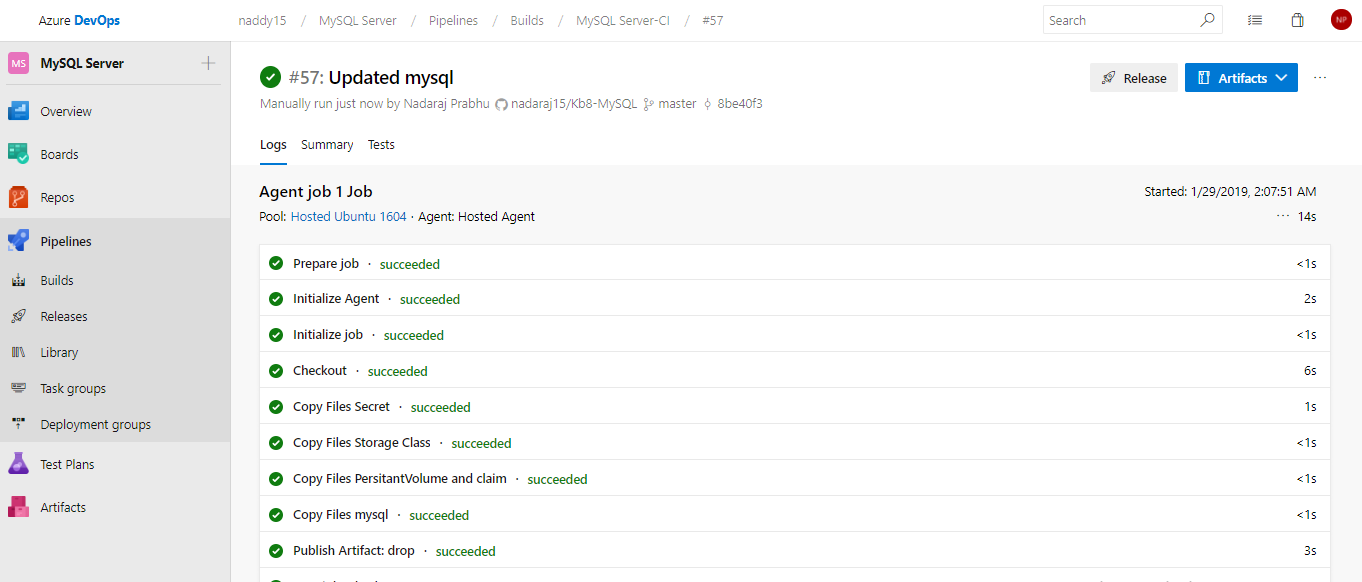
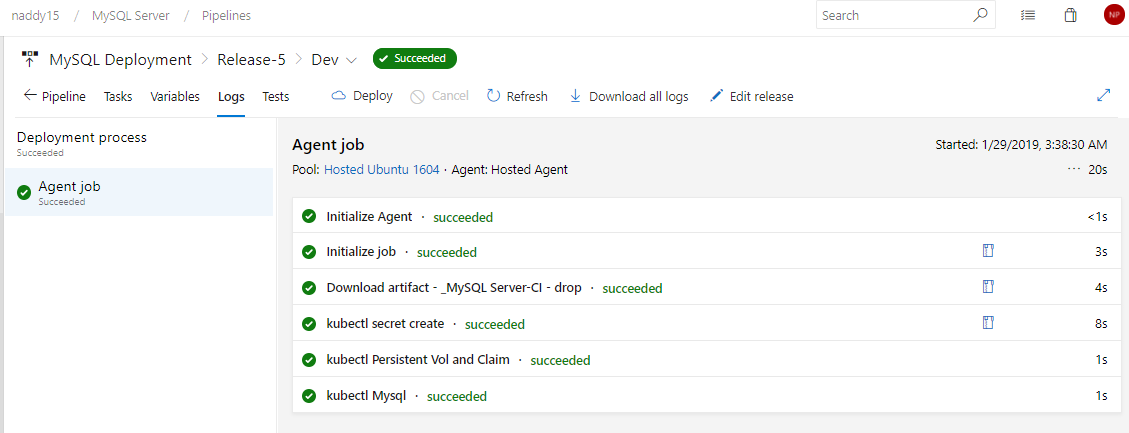
Step 13: Go to logs and check the build the status. It should be succeeded as shown below:
Step 14: Next, we need to deploy the build using "release" management in "pipeline"

Step 15: Create an empty job, create a name for the stage, release and add the "artifact"


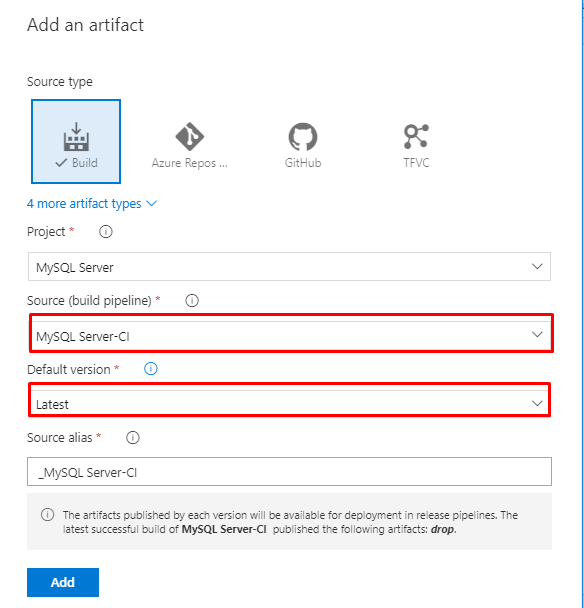
Step 16: Select your build in "Source" and change "Default version" as Latest. Click on add to save the settings
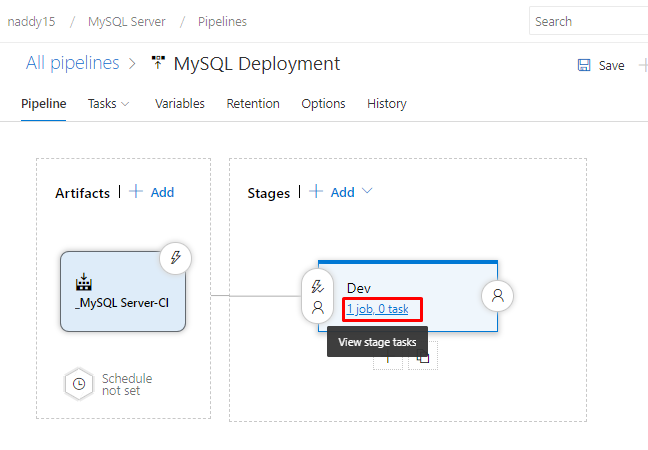
Step 17: Click on "1 job 0 task" to create task for deployment.
Step 18: Select "Deploy to Kubernetes" task. Next change "Service connection Type" to Kubernetes Service Connection. Click manage to add the Kubernetes connection.

Note: Make sure you run this deployment in Linux agent, since its build in Linux environment.

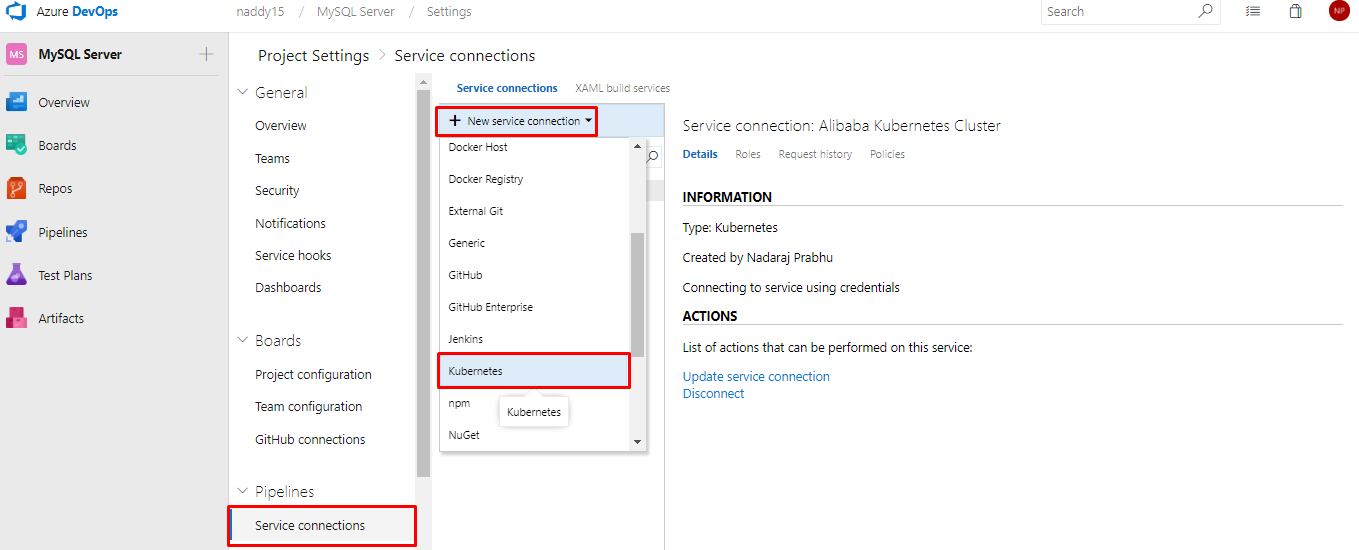
Step 19: Select "Service Connection", navigate to "New Service Connection" and select Kubernetes.
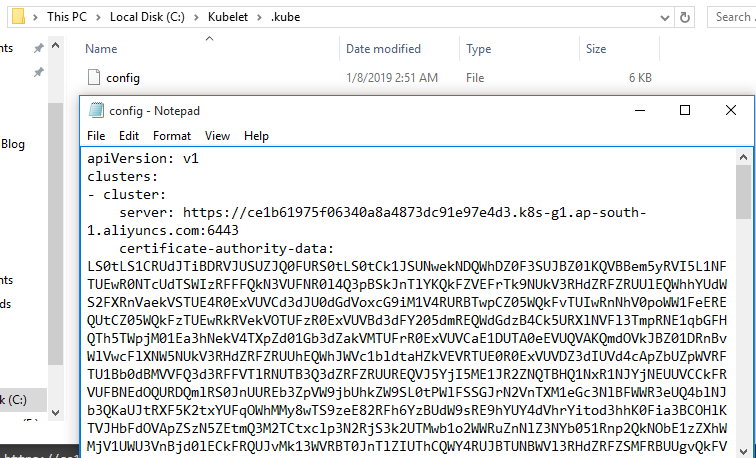
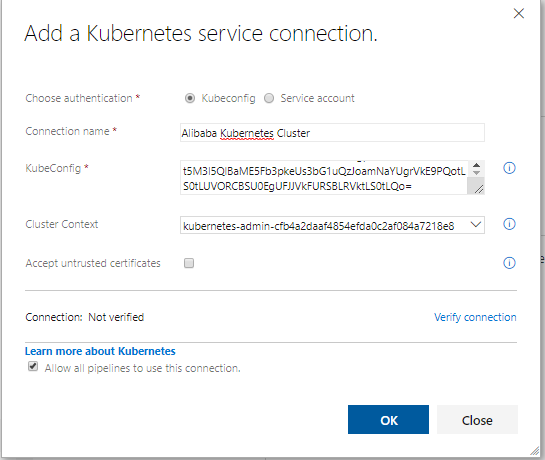
Step 20: Open the kubeconfig file, copy and paste the value as show below in Azure DevOps "kubeconfig" field.
Give a connection name and click on ok
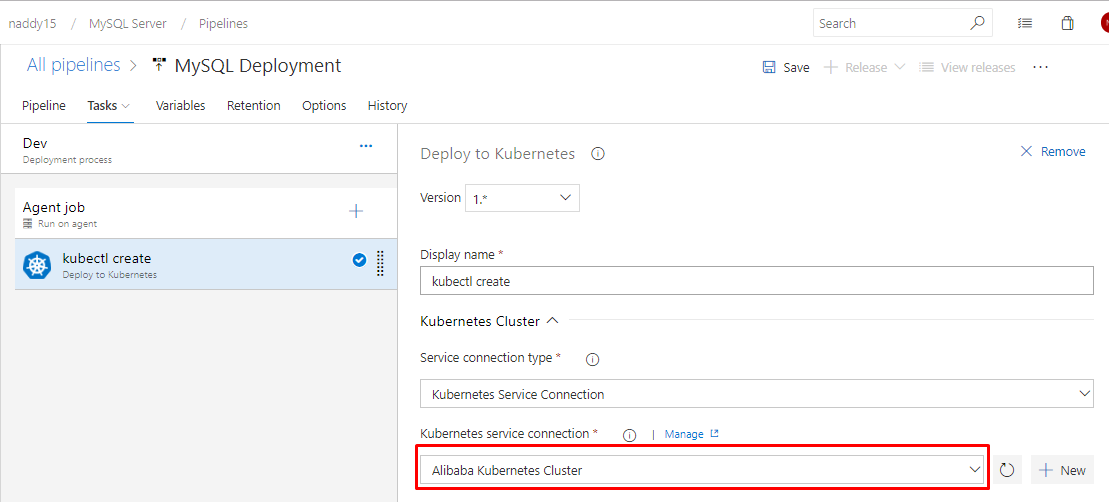
Step 21: Navigate back to your release configuration and click on refresh. Select the created connection "Alibaba Kubernetes Cluster".
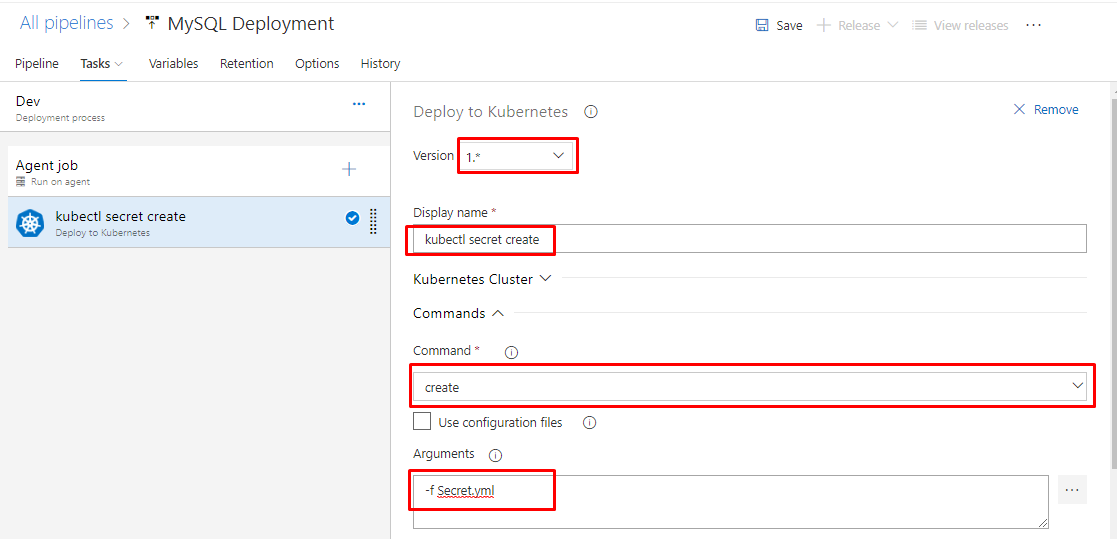
Step 22: Now let's configure the Kubectl task for deploying Secret:
Parameters: -
Version: 1.*
Display Name: kubectl secret create
Command: create
Arguments: -f Secret.yml
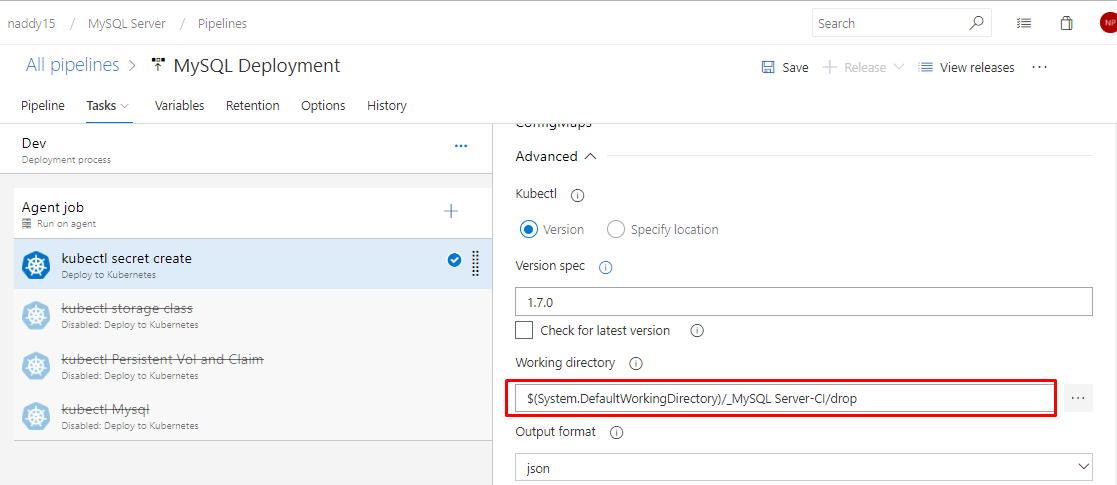
Advanced:
Working directory: $(System.DefaultWorkingDirectory)/_MySQL Server-CI/drop (your drop location)
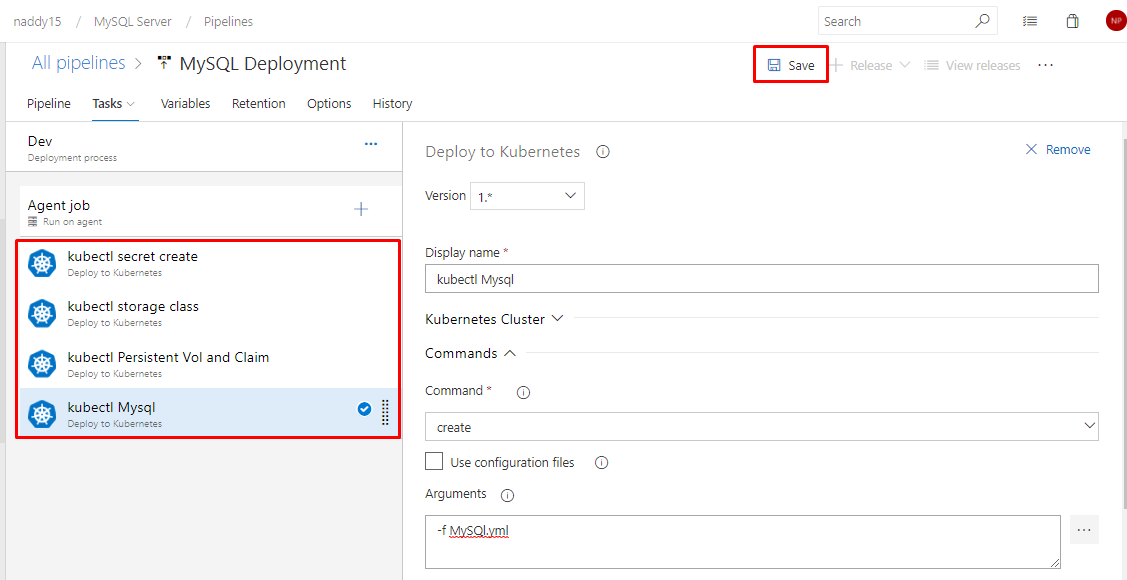
Step 23: Same way configure the Kubectl task for rest 3 task (Storage Class, Persistent Volume Claim, MySQL):
Parameters: -
Version: 1.*
Display Name: kubectl storage class
Command: create
Arguments: -f StorageClass.yml
Advanced:
Working directory: $(System.DefaultWorkingDirectory)/_MySQL Server-CI/drop (your drop location)
Version: 1.*
Display Name: kubectl Persistent Vol and Claim
Command: create
Arguments: -f PersitantVolumeandclaim.yml
Advanced:
Working directory: $(System.DefaultWorkingDirectory)/_MySQL Server-CI/drop (your drop location)
Version: 1.*
Display Name: kubectl Mysql
Command: create
Arguments: -f MySQl.yml
Advanced:
Working directory: $(System.DefaultWorkingDirectory)/_MySQL Server-CI/drop (your drop location)
Click on save after setting the configuration
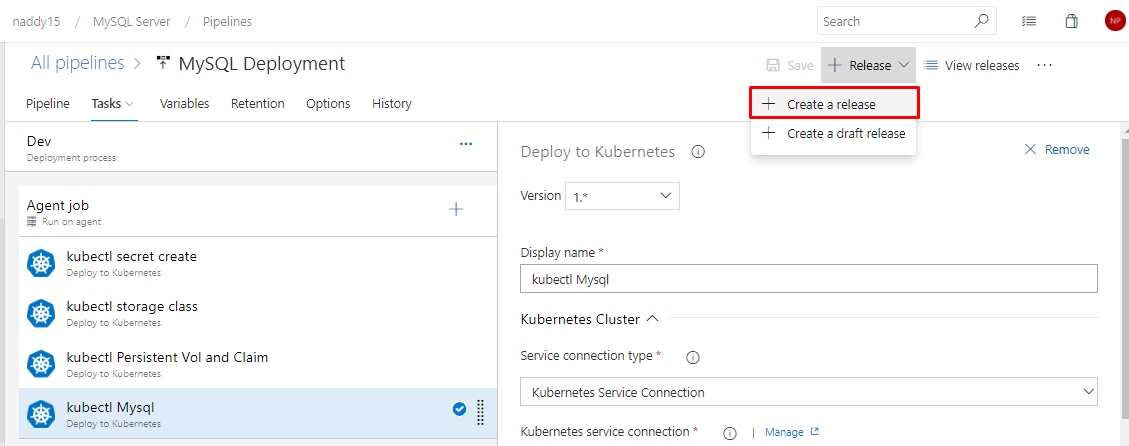
Step 24: Now create a release to deploy the environment to Alibaba Kubernetes Cluster.
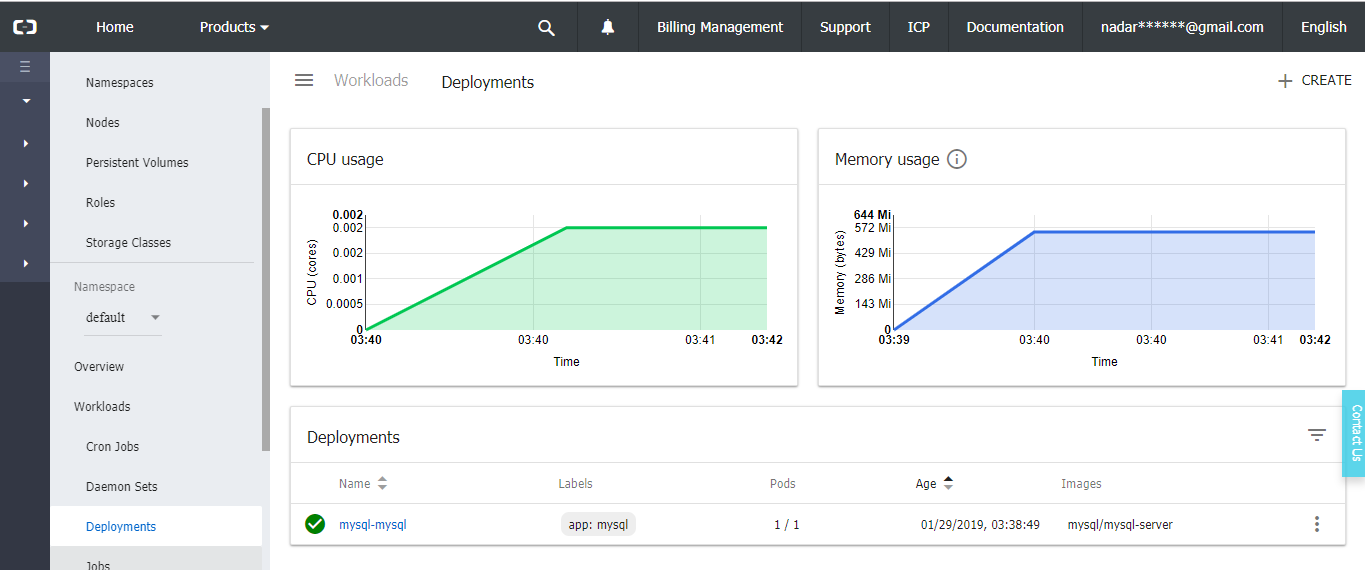
Step 25: Go to Alibaba console to see the successful deployment of the MySQL Server.
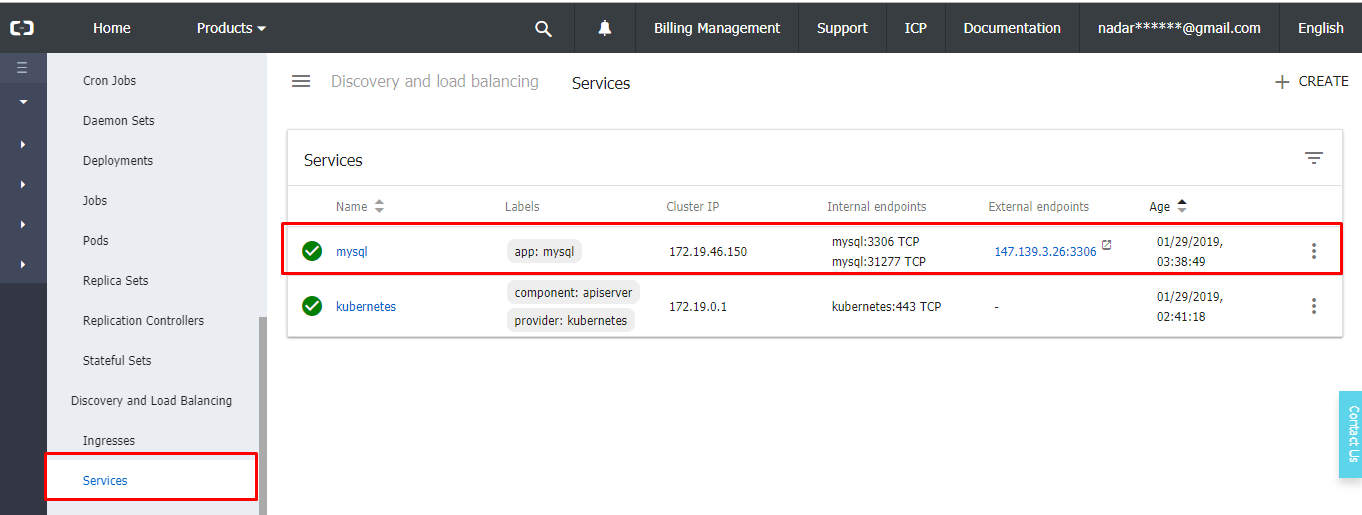
Now we have deployed MySQL Server on Alibaba Cloud Kubernetes Container using VSTS (Azure DevOps). With the help VSTS, we can have continuous integration and continuous deployment (CICD) for any kind of environment.
How to Deploy a SQL Server Container in Alibaba Container Service Kubernetes

2,593 posts | 791 followers
FollowAlibaba Cloud Community - January 31, 2022
Alibaba Container Service - July 16, 2019
Alibaba Cloud Storage - June 4, 2019
Alex - January 22, 2020
Xi Ning Wang - August 16, 2018
H Ohara - September 1, 2023

2,593 posts | 791 followers
Follow ECS(Elastic Compute Service)
Elastic and secure virtual cloud servers to cater all your cloud hosting needs.
Learn MoreLearn More
Learn More
More Posts by Alibaba Clouder