PingCAP's TiDB has gained significant popularity in Japan. It is an open-source database that has been ranked the number one database users want to try in the future in Japan. This article explains how to deploy TiDB on Alibaba Cloud ASK.
Please note that the resources, such as ClusterIP and PublicIP, displayed in this article are only for reference and demonstration purpose. They have already been released.
TiDB is a hybrid transactional/analytical processing (HTAP) database based on the architecture of Google F1 and Spanner. It uses the Multi-Raft protocol, an improved version of Raft instead of Paxos used in the Spanner architecture, to synchronize transaction logs. It also uses RocksDB storage instead of a distributed file system, and offers horizontal scalability, consistency constraints similar to traditional relational databases, automatic failovers for high availability, schema changes without service interruptions, and support for different storage engines.
In addition, TiDB supports connections and SQL operations based on MySQL, making it easy for those familiar with MySQL to learn and use. This article provides detailed information about TiDB. It is recommended to use it as a reference.
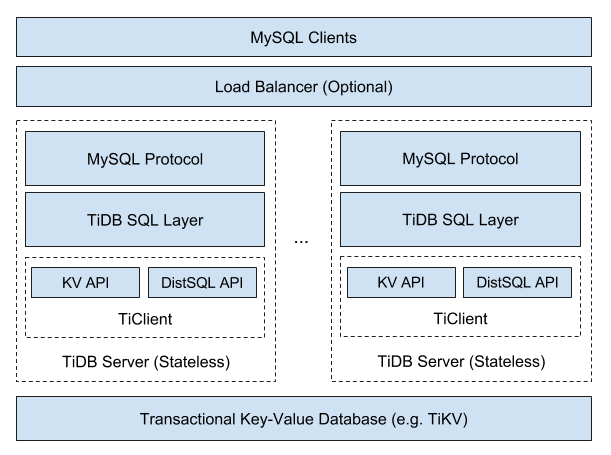
TiDB is an open-source software under the Apache 2.0 license and developed using Go and Rust languages.
The following figure shows the configuration of TIDB databases in ASK.
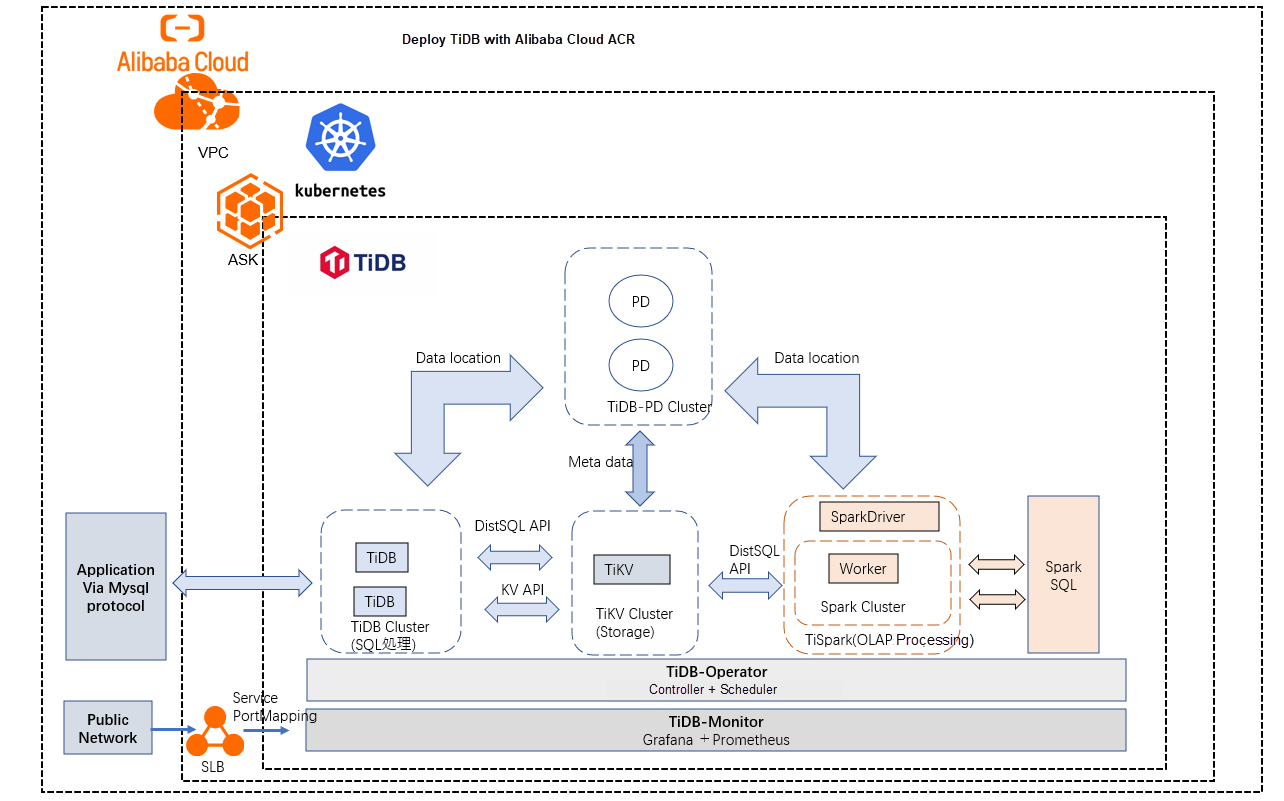
TiDB can also be created by using the fully managed Kubernetes clusters of Alibaba Cloud Container Service for Kubernetes (ACK). However, ASK allows deployment of containerized applications without the need to purchase nodes, which can save significant costs. Additionally, large-scale TiDB server configurations can be configured in ASK clusters.
The following figure shows the architecture of TiDB.
To configure TiDB servers, it is necessary to set up one Persistent Volume Claim (PVC) for TiDB-PD and another for TiKV. Therefore, two storage units need to be created before configuring TiDB servers.
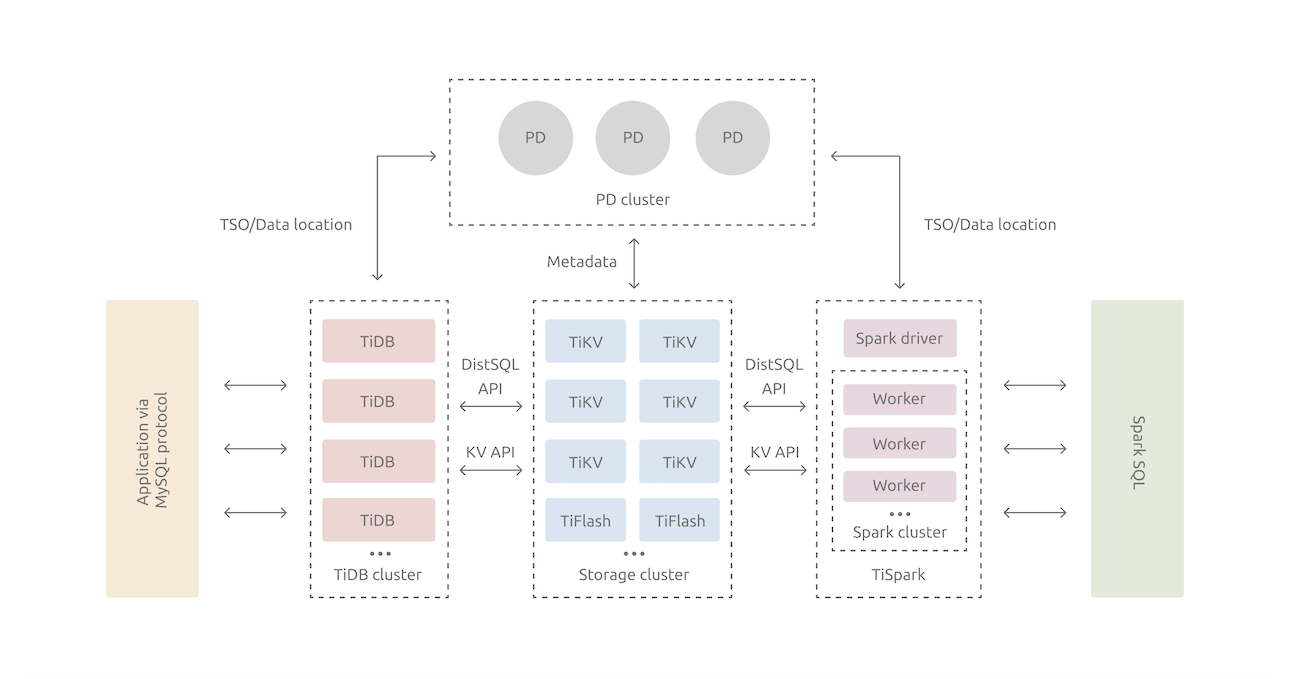
The following table describes the roles of the components:
| TiDB server | SQL processing platform |
| PD server | Cluster management platform used to store metadata |
| TiKV server | Data storage platform |
| TiSpark | OLAP processing platform |
This article refers to Get Started with TiDB on Kubernetes for the construction.
The versions and specifications are described in the following table.
Please note that if you plan to use TiDB, it is necessary to follow the specifications and version listed on the official website. Any hardware can be used, but Kubernetes is recommended on the official website. This setup will be based on Alibaba Cloud Kubernetes for testing purposes.
| Library | Version |
| Helm | v3.5.0 |
| aliyun-cli | v3.0.140 |
| kubectl Client | v1.23.2 |
| kubectl Server | v1.24.6-aliyun.1 |
| tidb | v6.1.0 |
| Configuration | Specification |
| ASK | 2 CPU / 4GB |
| Disk | 20GB × 2 |
| Server Load Balancer (SLB) | Small I (slb.s1.small) |
You may wonder, "Why build on Alibaba Cloud in the first place?" The biggest reason is that Alibaba Cloud offers a range of options, including dedicated Kubernetes clusters, fully managed Kubernetes clusters, and serverless Kubernetes clusters. This makes it easy to build services and applications by using Kubernetes clusters.
The high stability of Alibaba Cloud's Kubernetes infrastructure also reduces the engineering effort required for implementation and operation, making it another compelling reason to use it.
Related Readings:
Step 1: Create a virtual private cloud (VPC) and vSwitch
Step 2: Create an ASK cluster
Step 3: Create storage space for PVC
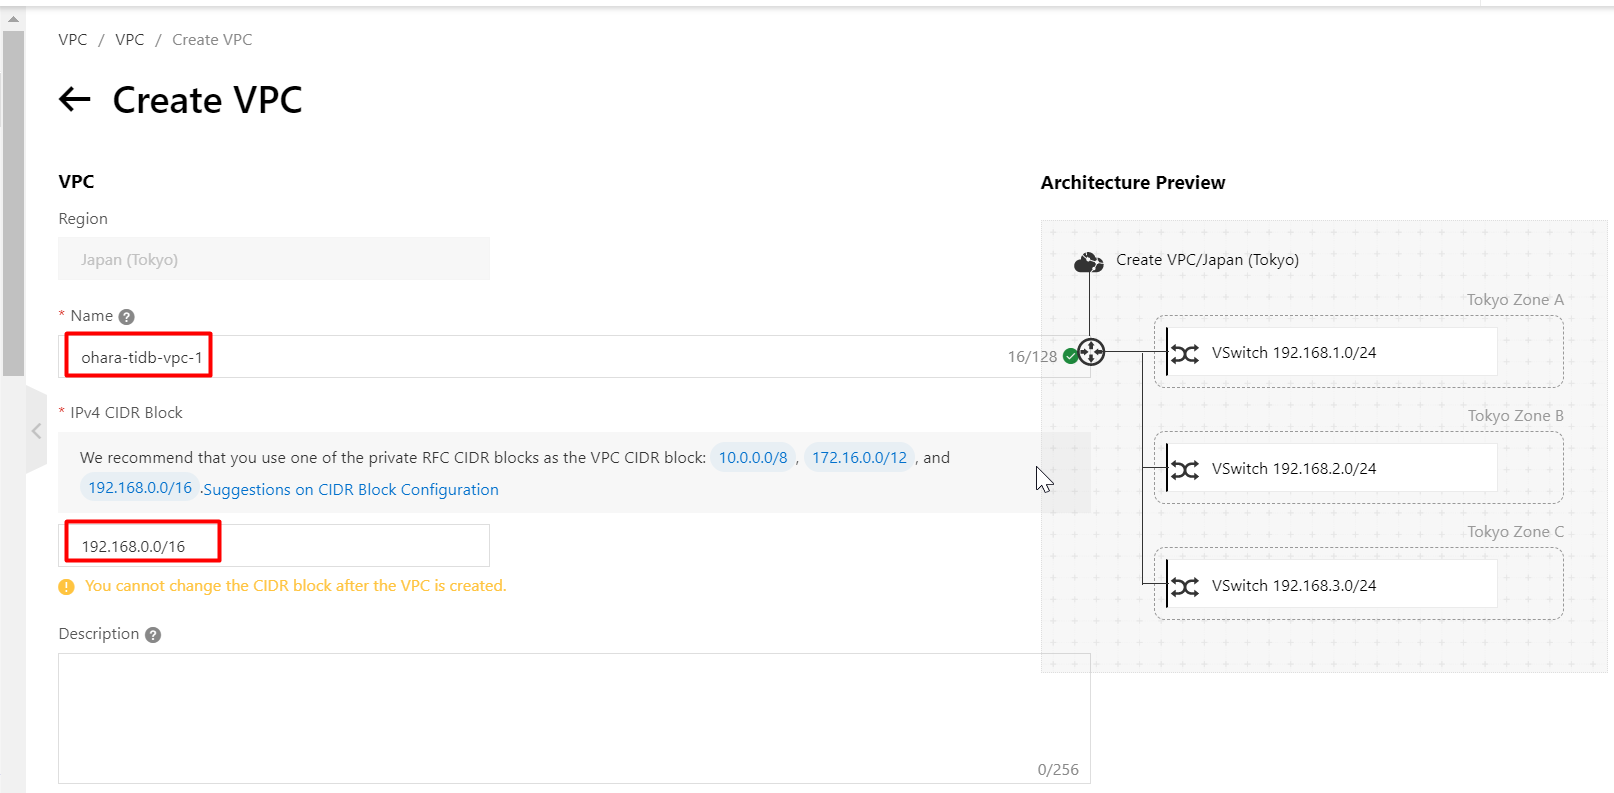
Before you create an ASK cluster to deploy a TiDB database, you must create a VPC and vSwitch in the Alibaba Cloud console.
The PROXY protocol is used to connect to TiDB and access its internal component. This is the key point here. So, it’s necessary to set up a private IP address range based on RFC1918. Otherwise, you need to use the -proxy-protocol parameter as described in the TiDB documentation and adjust DNS processing accordingly.
In this example, a small-sized server is used. The private IP address is in the range of 192.168.0.0 to 192.168.255.255. The CIDR block of the VPC is 192.168.0.0/16. The CIDR blocks of the vSwitch are 192.168.1.0/24, 192.168.2.0/24, and 192.168.3.0/24. If you want to use a large-scale server to configure TiDB databases, the private IP address range should follow the RFC1918 and requirements in TiDB documents. This way, you can ensure data security, reduce latency, and improve throughput.
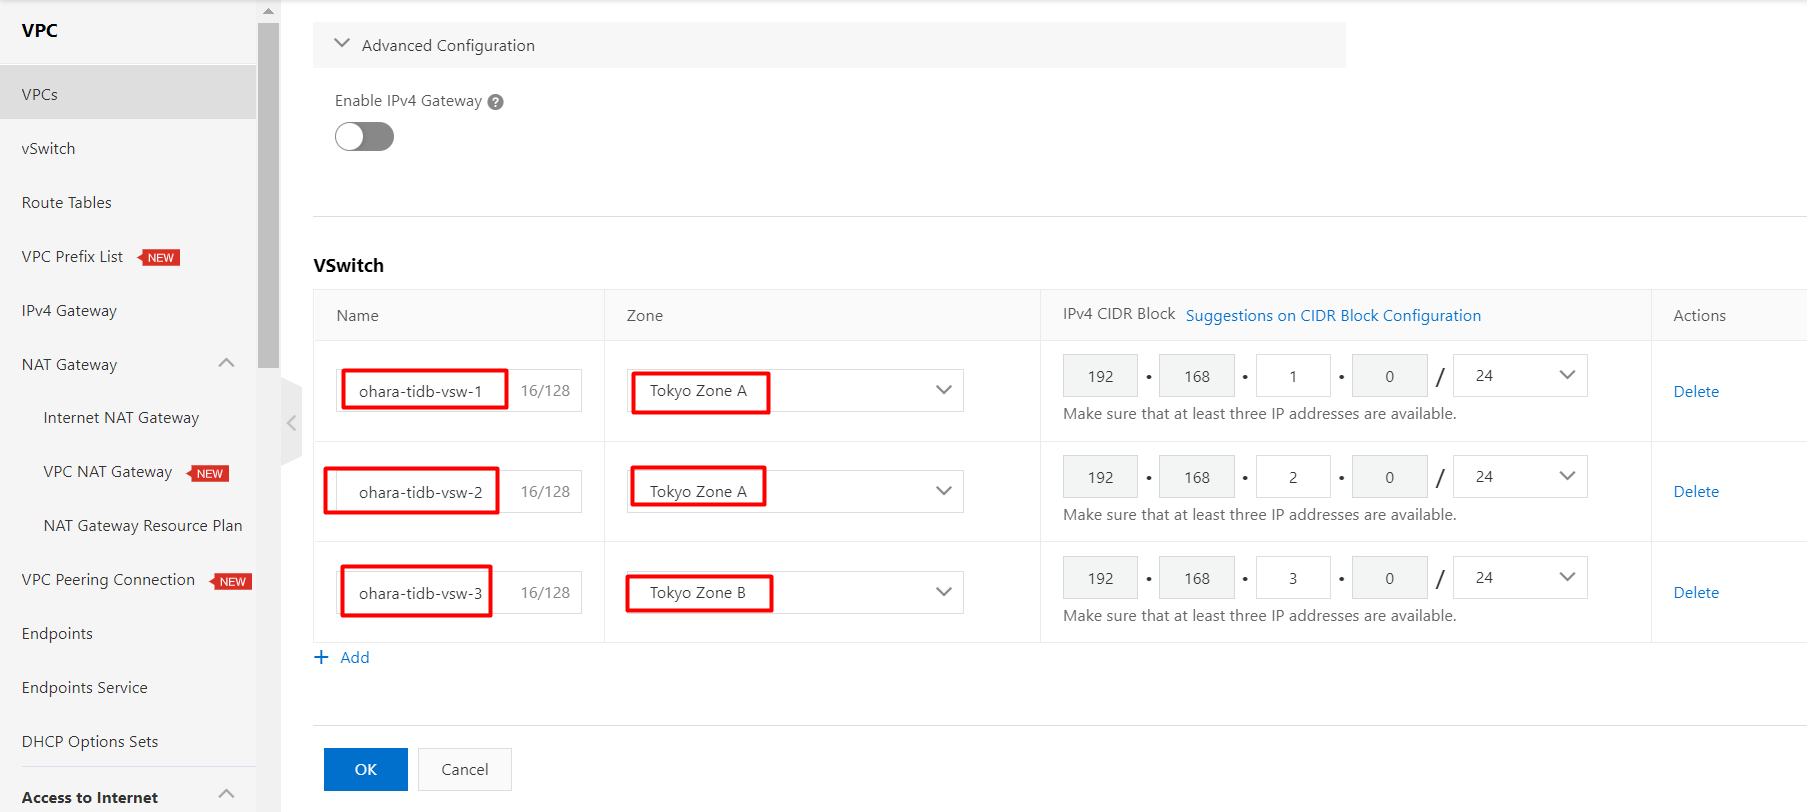
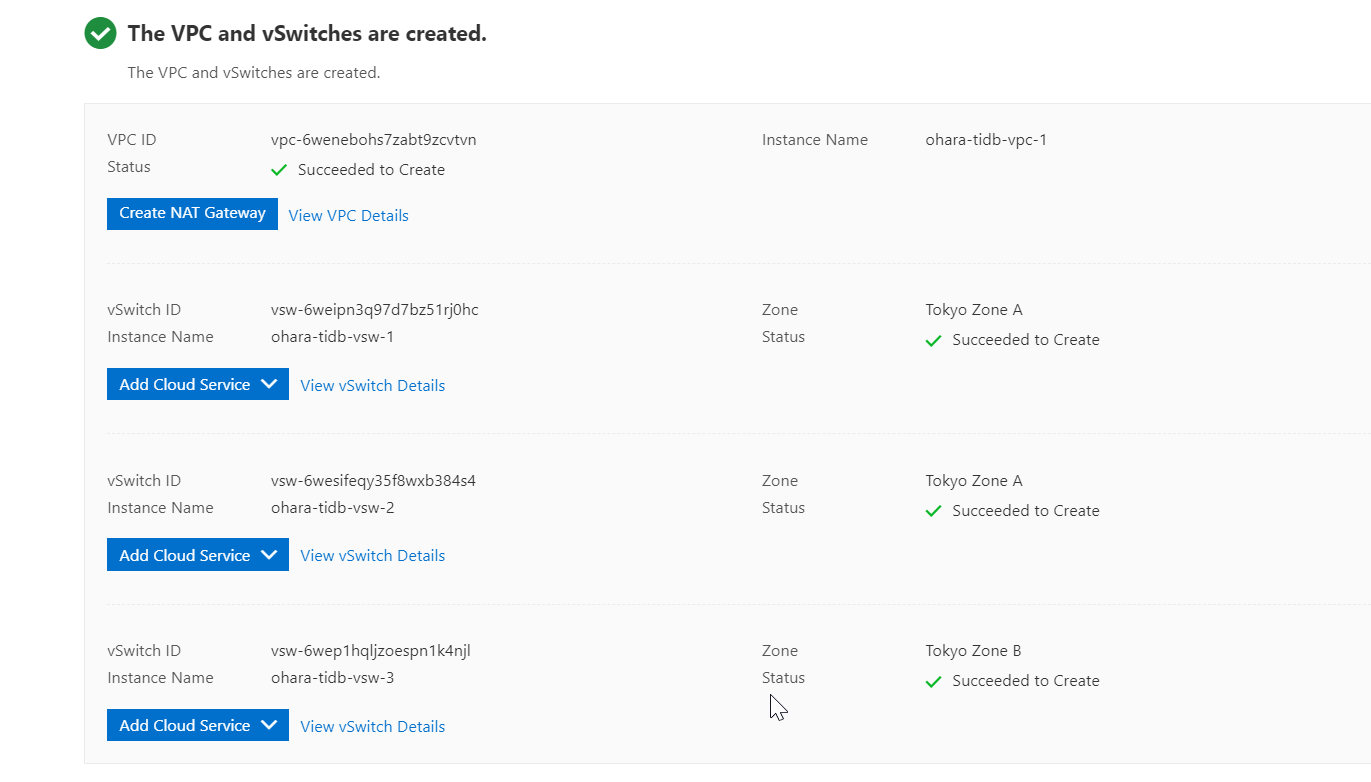
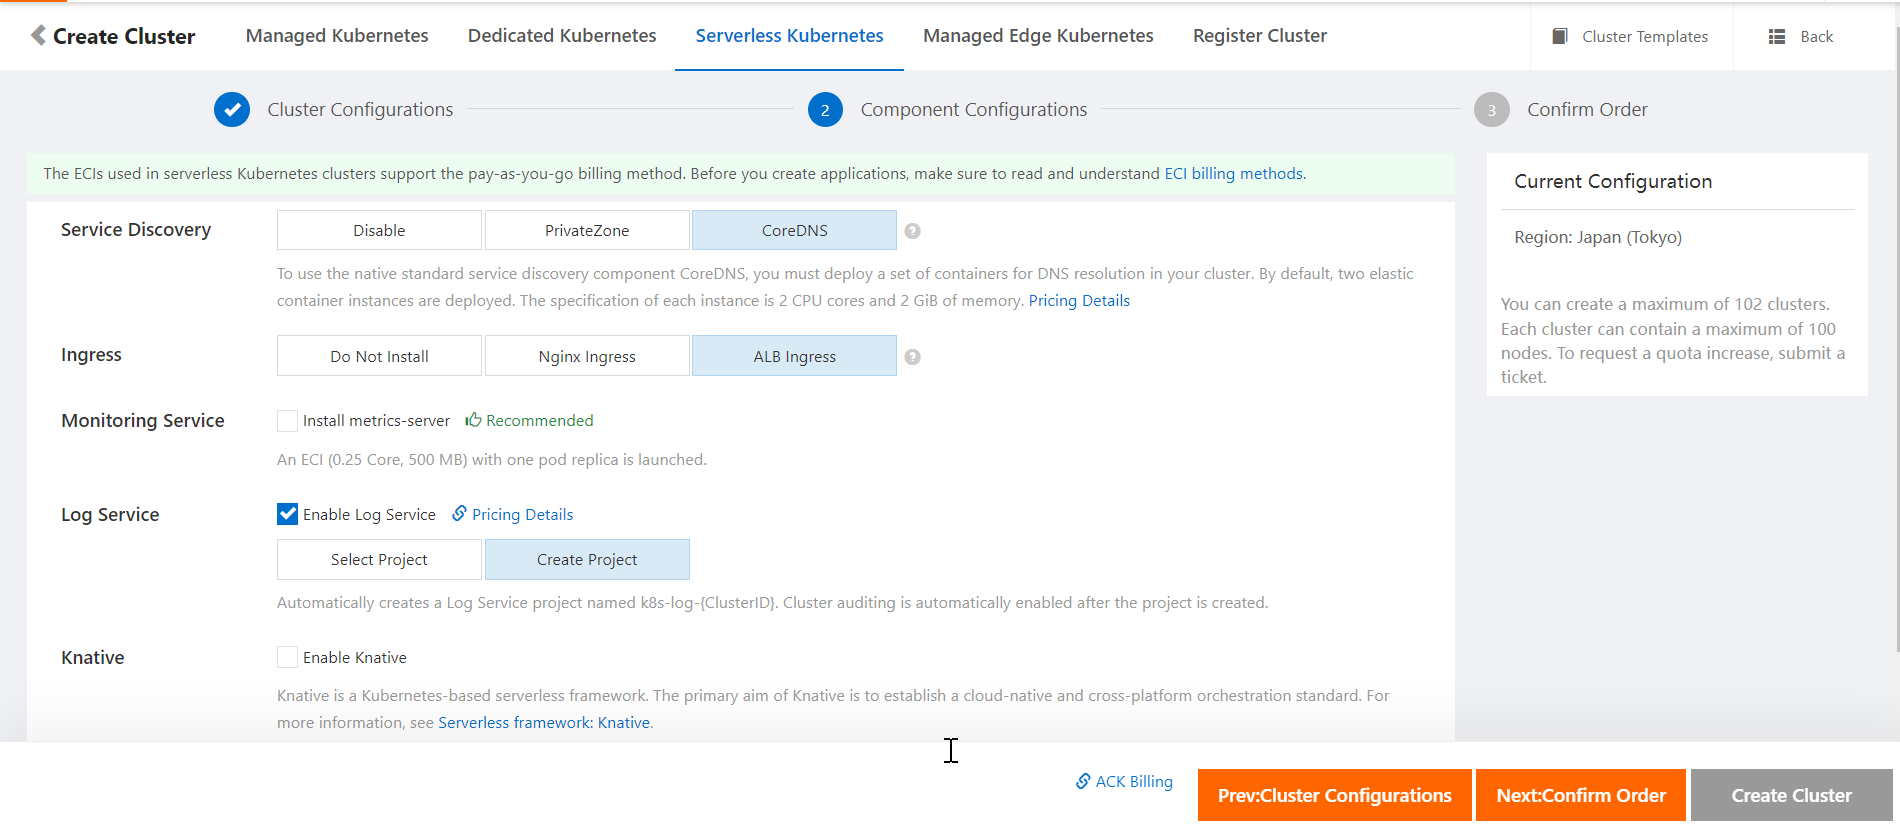
After you create the VPC and vSwitch, you must create an ASK cluster. To do so, perform the following steps: Log on to the ACK console. In the left-side navigation pane, click Clusters. On the Clusters page, click Create Kubernetes Cluster. On the page that appears, click the Serverless Kubernetes tab. The following figures show how to create an ASK cluster.
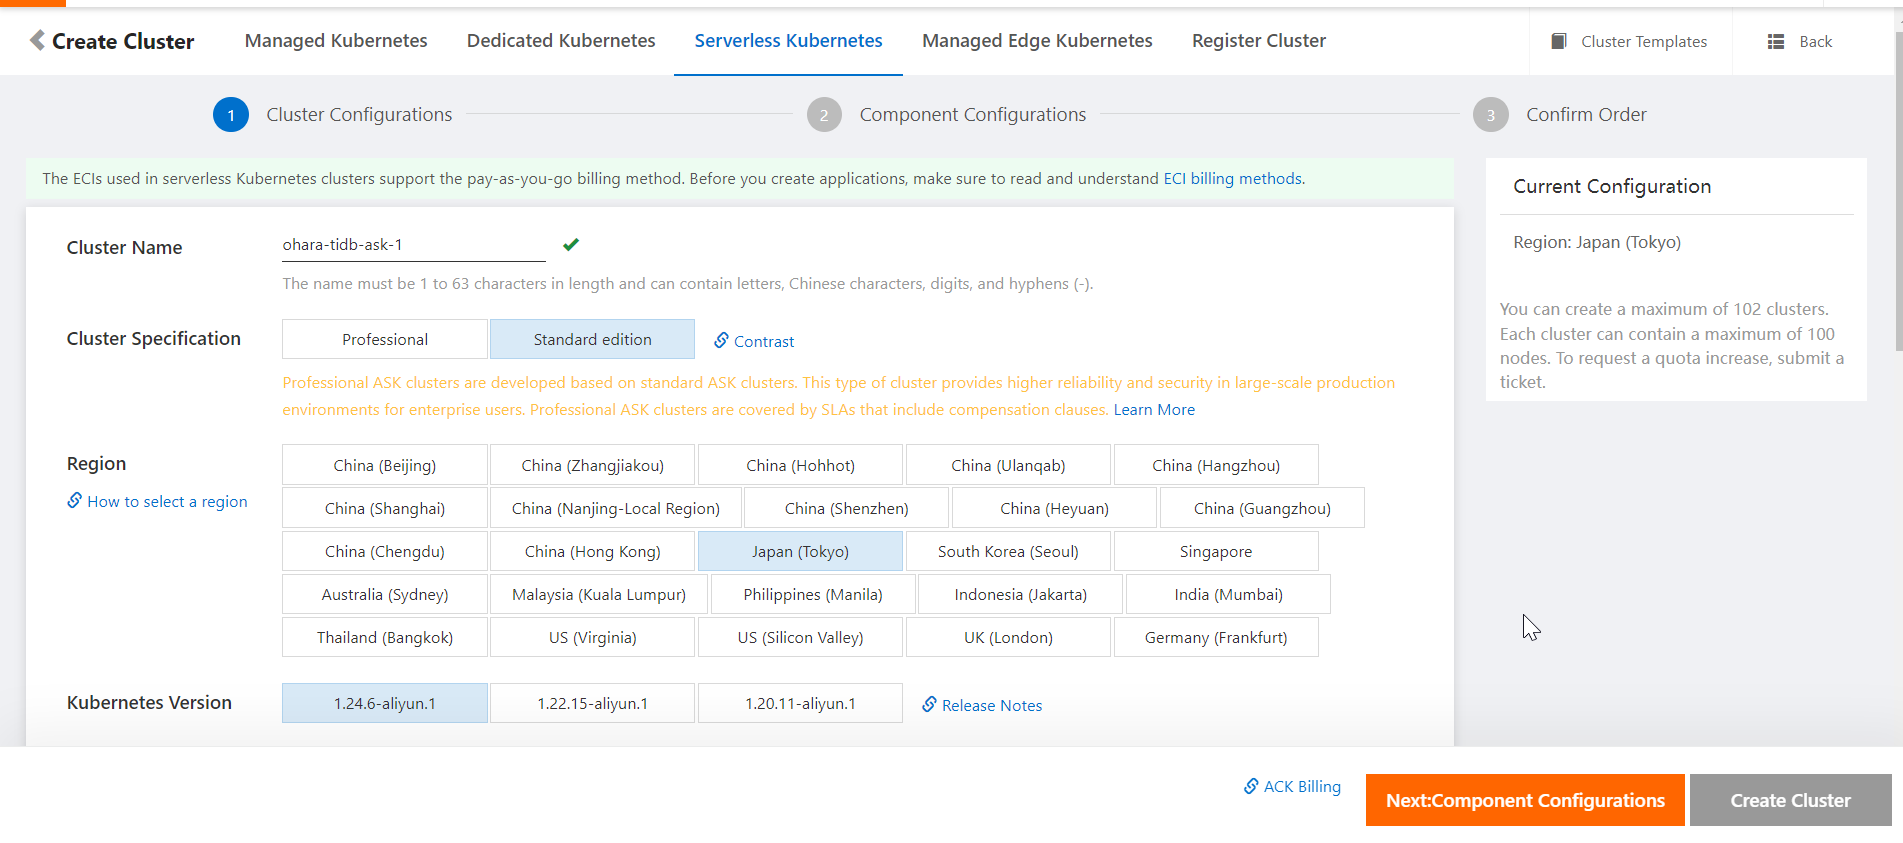
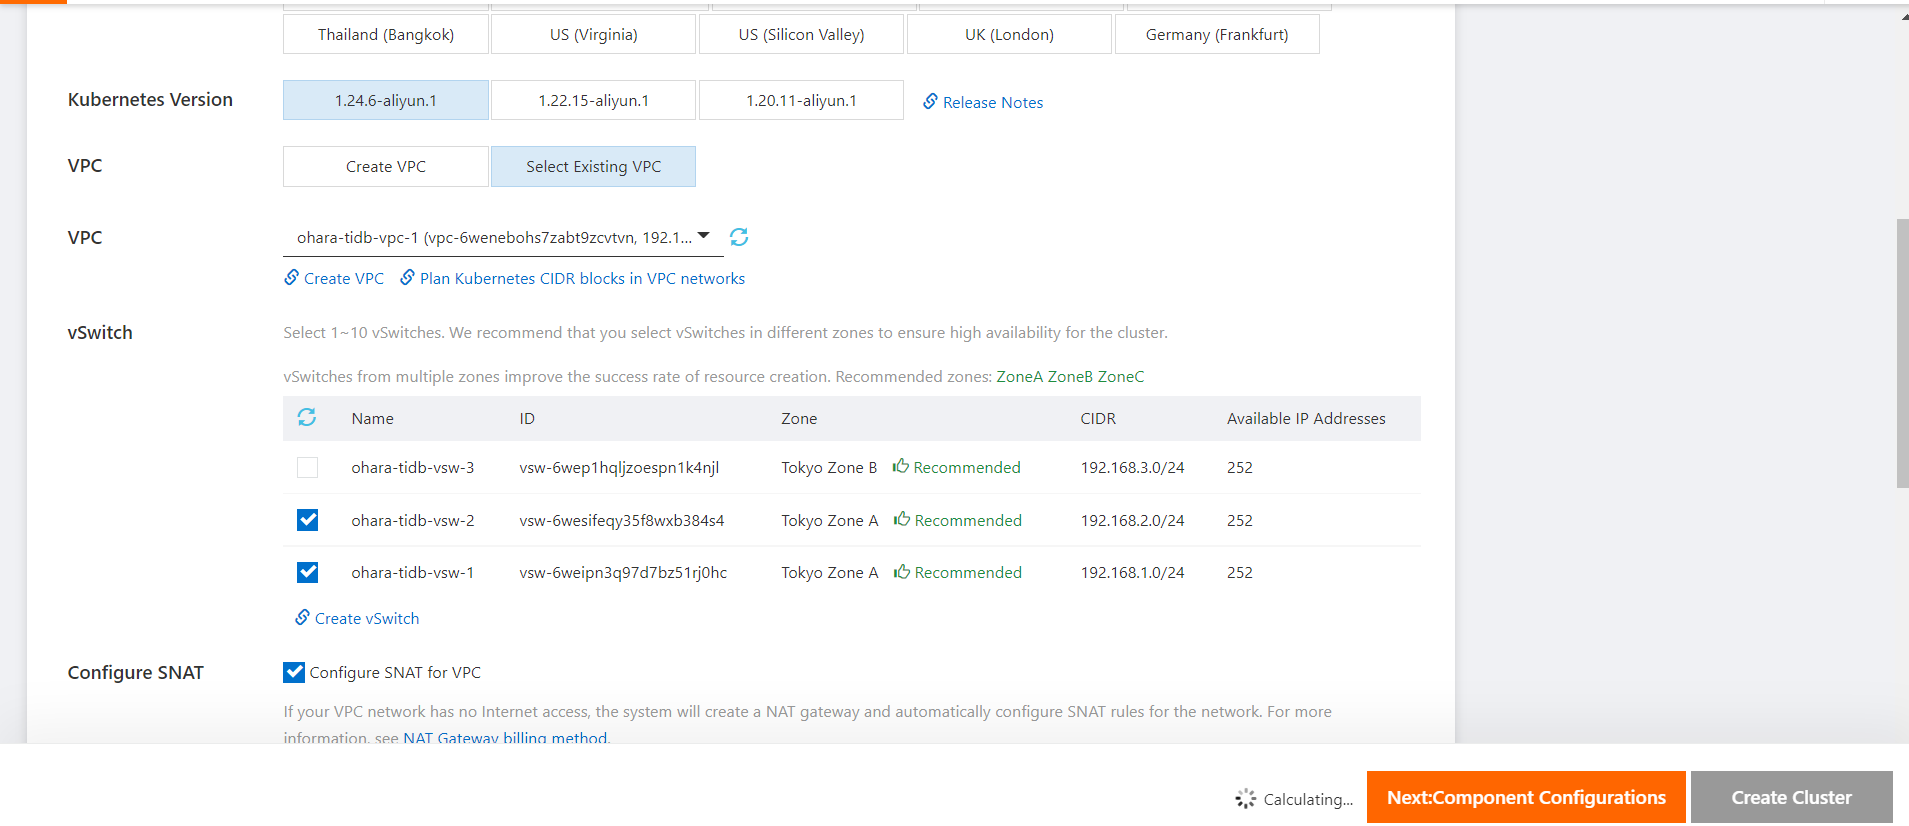
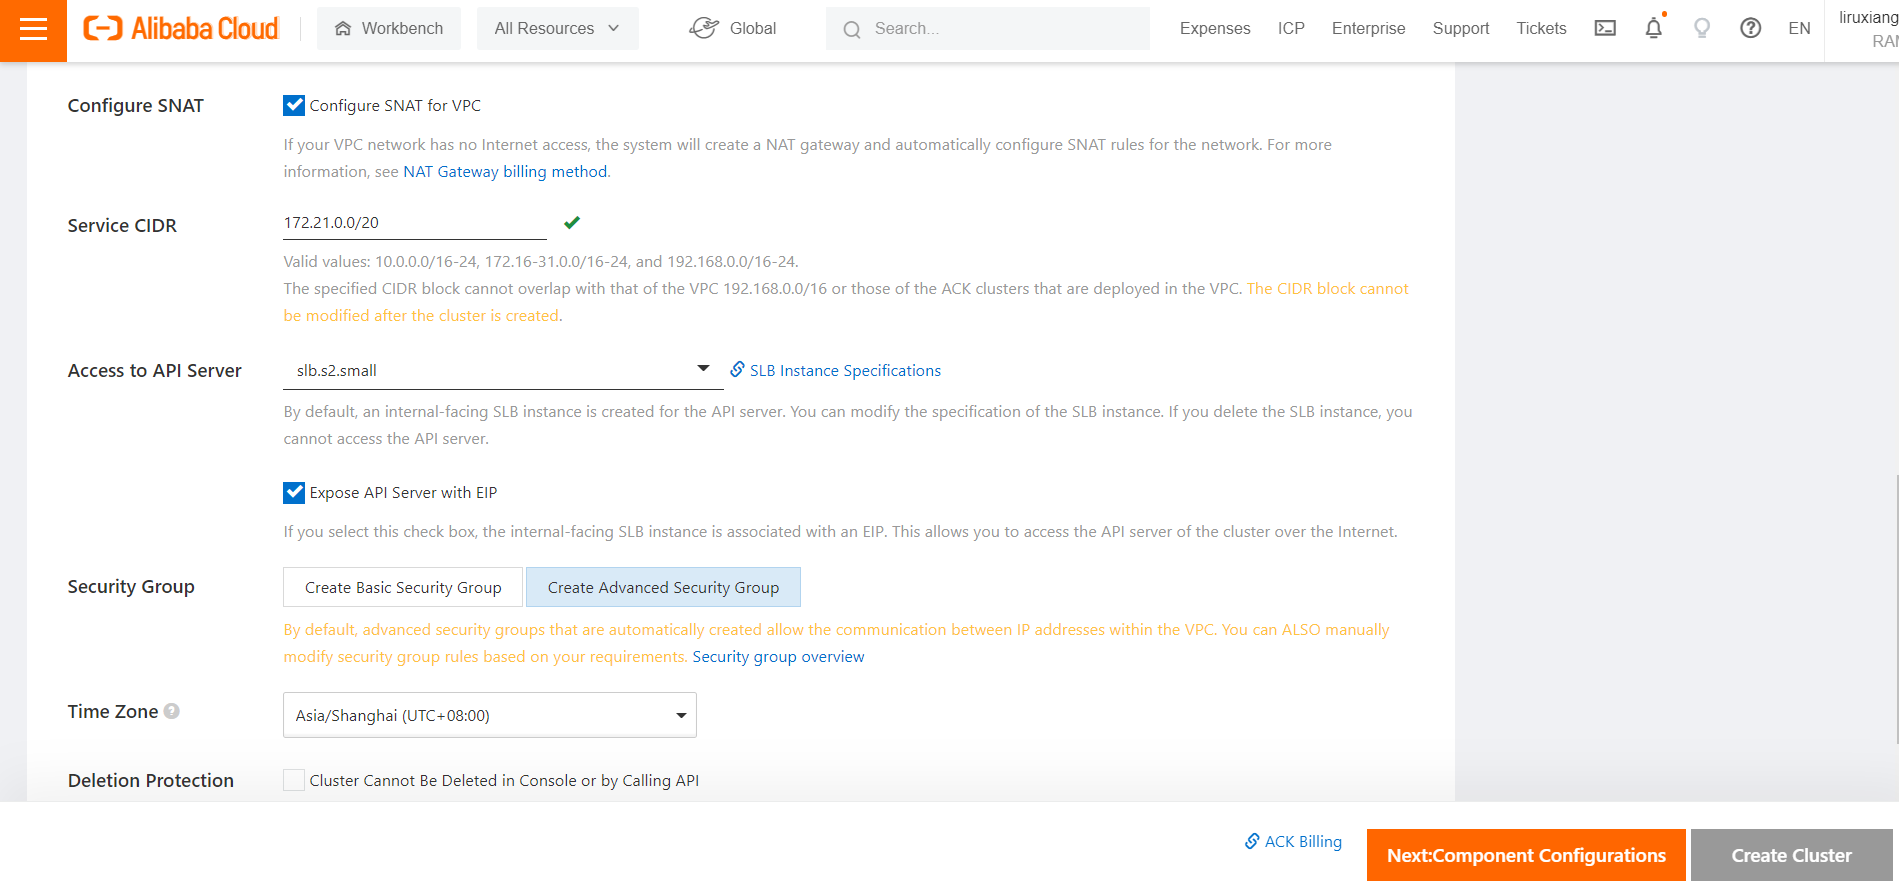
You must set the Service Discovery parameter to CoreDNS. For more information, see the Additional Information section in this article. The information about installing a TiDB database is not in the official PingCAP documentation. You can refer to this article as a recommended solution. You can also use this article as a reference when you deploy a TiDB database in a Kubernetes cluster.
The ASK cluster is created.

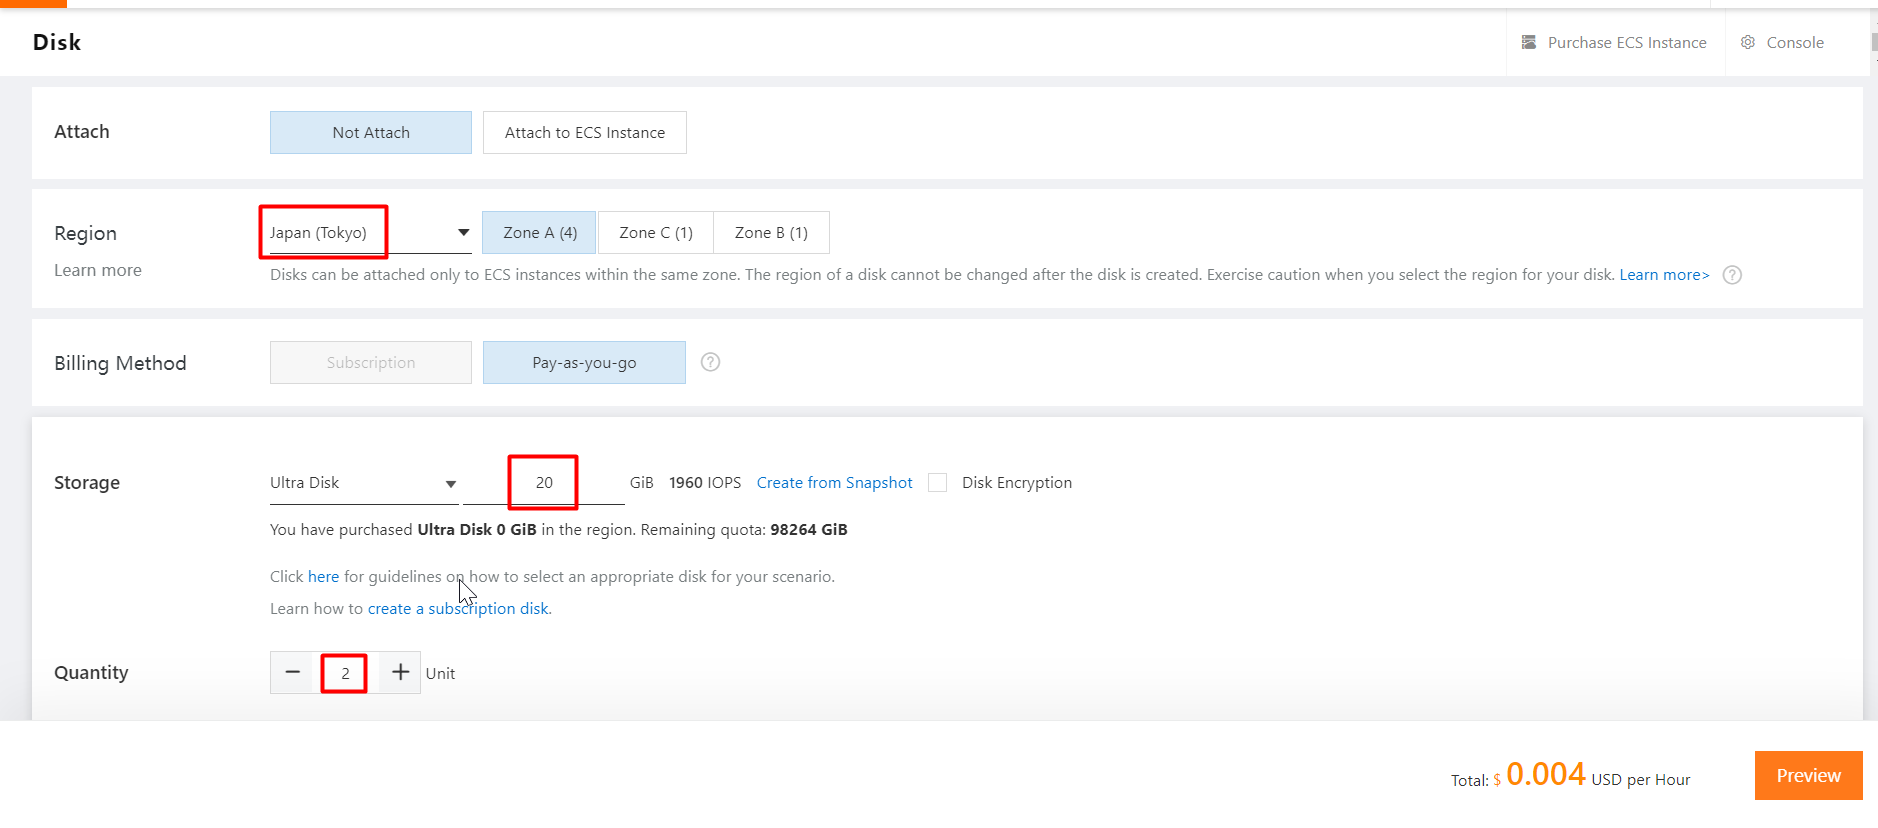
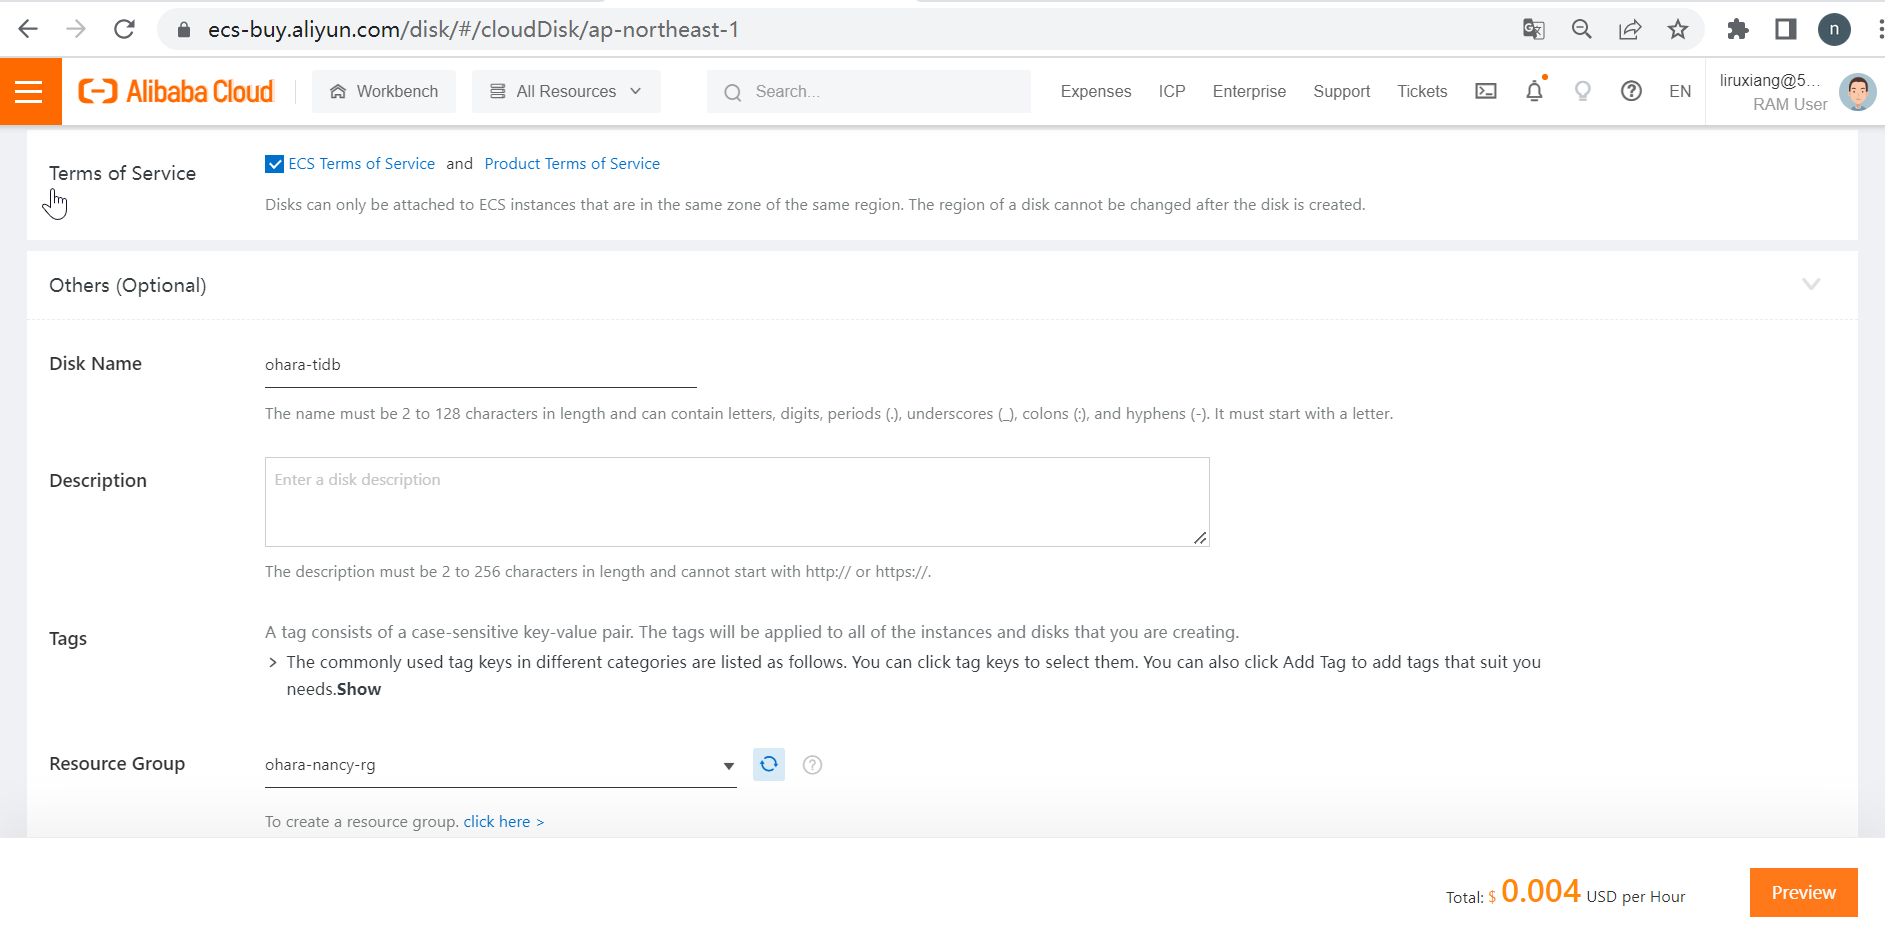
Create two disks for the ASK cluster in the Elastic Compute Service (ECS) console. Both TiDB-PD and TiKV need a PVC.
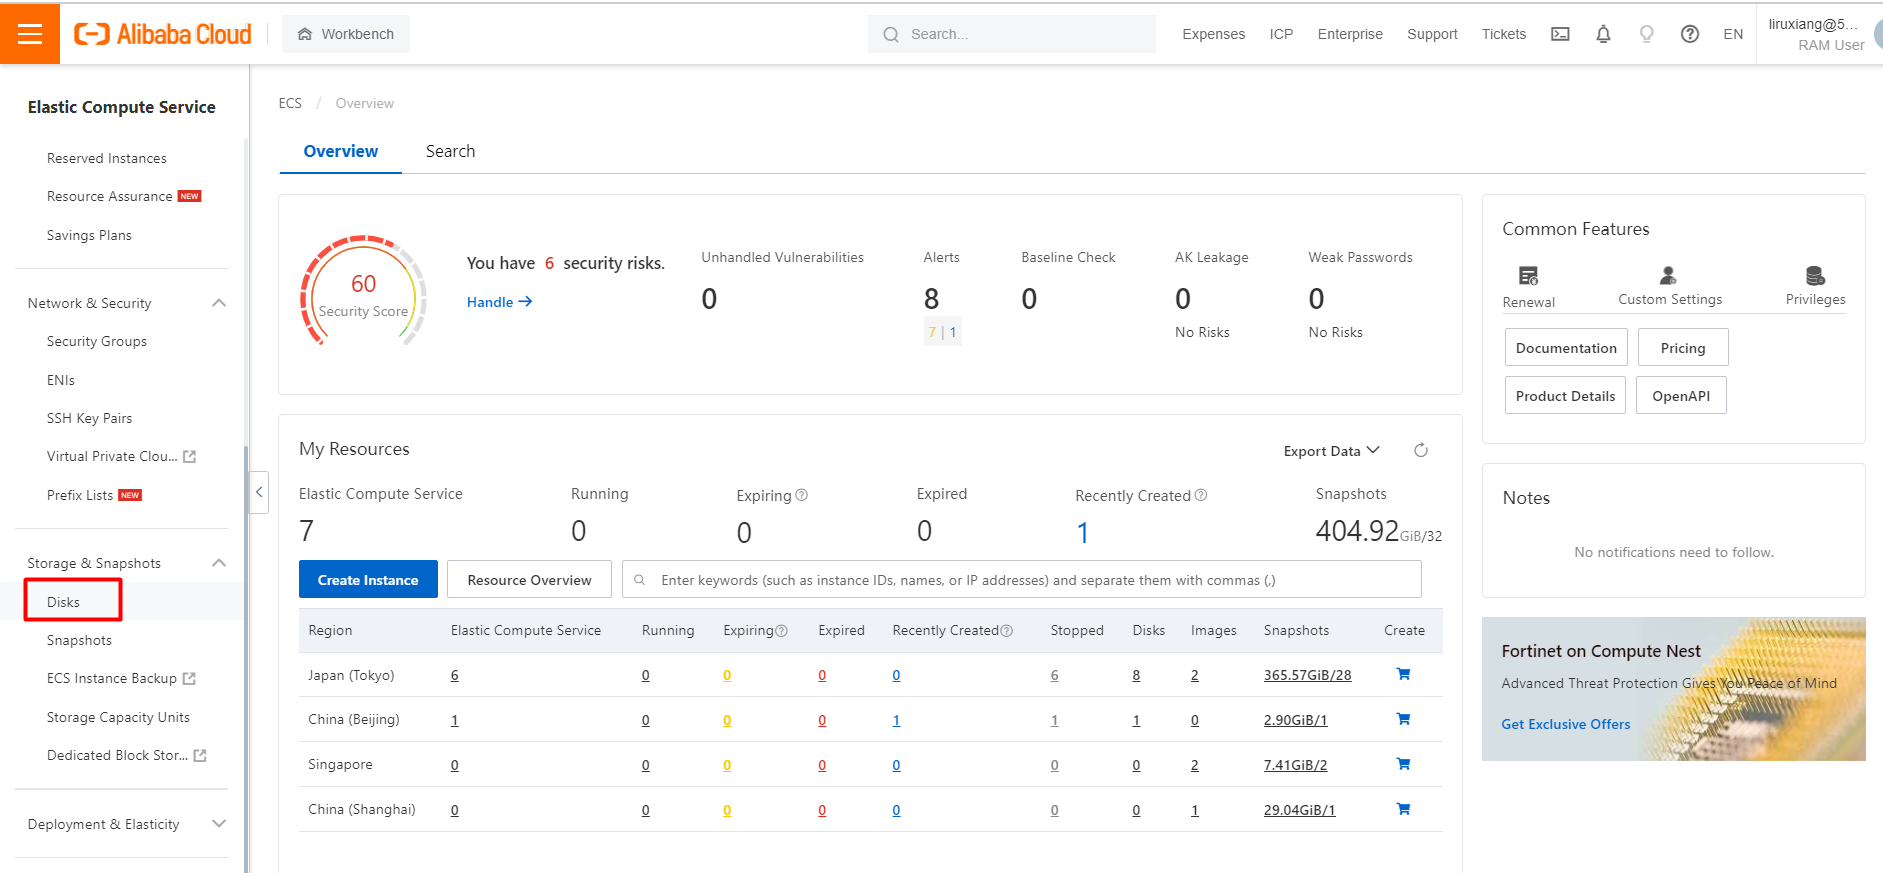
In the left-side navigation pane of the ECS console, choose Storage & Snapshots > Disks. On the Disks page, click Create Disk.
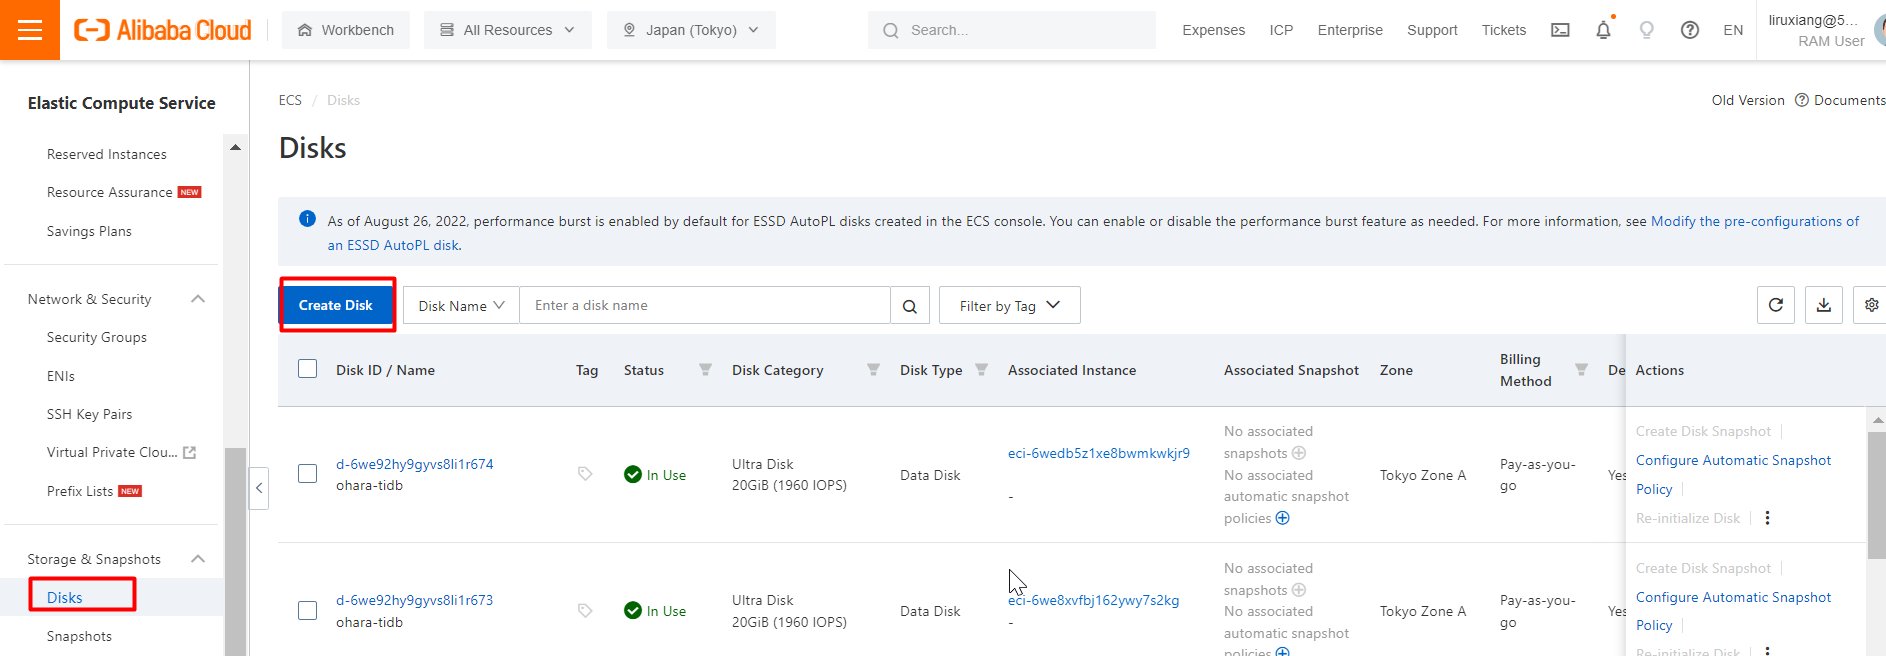
In this example, two disks of 20 GB are created.

After you perform the preceding steps, you can deploy a TiDB database. This step is easy.
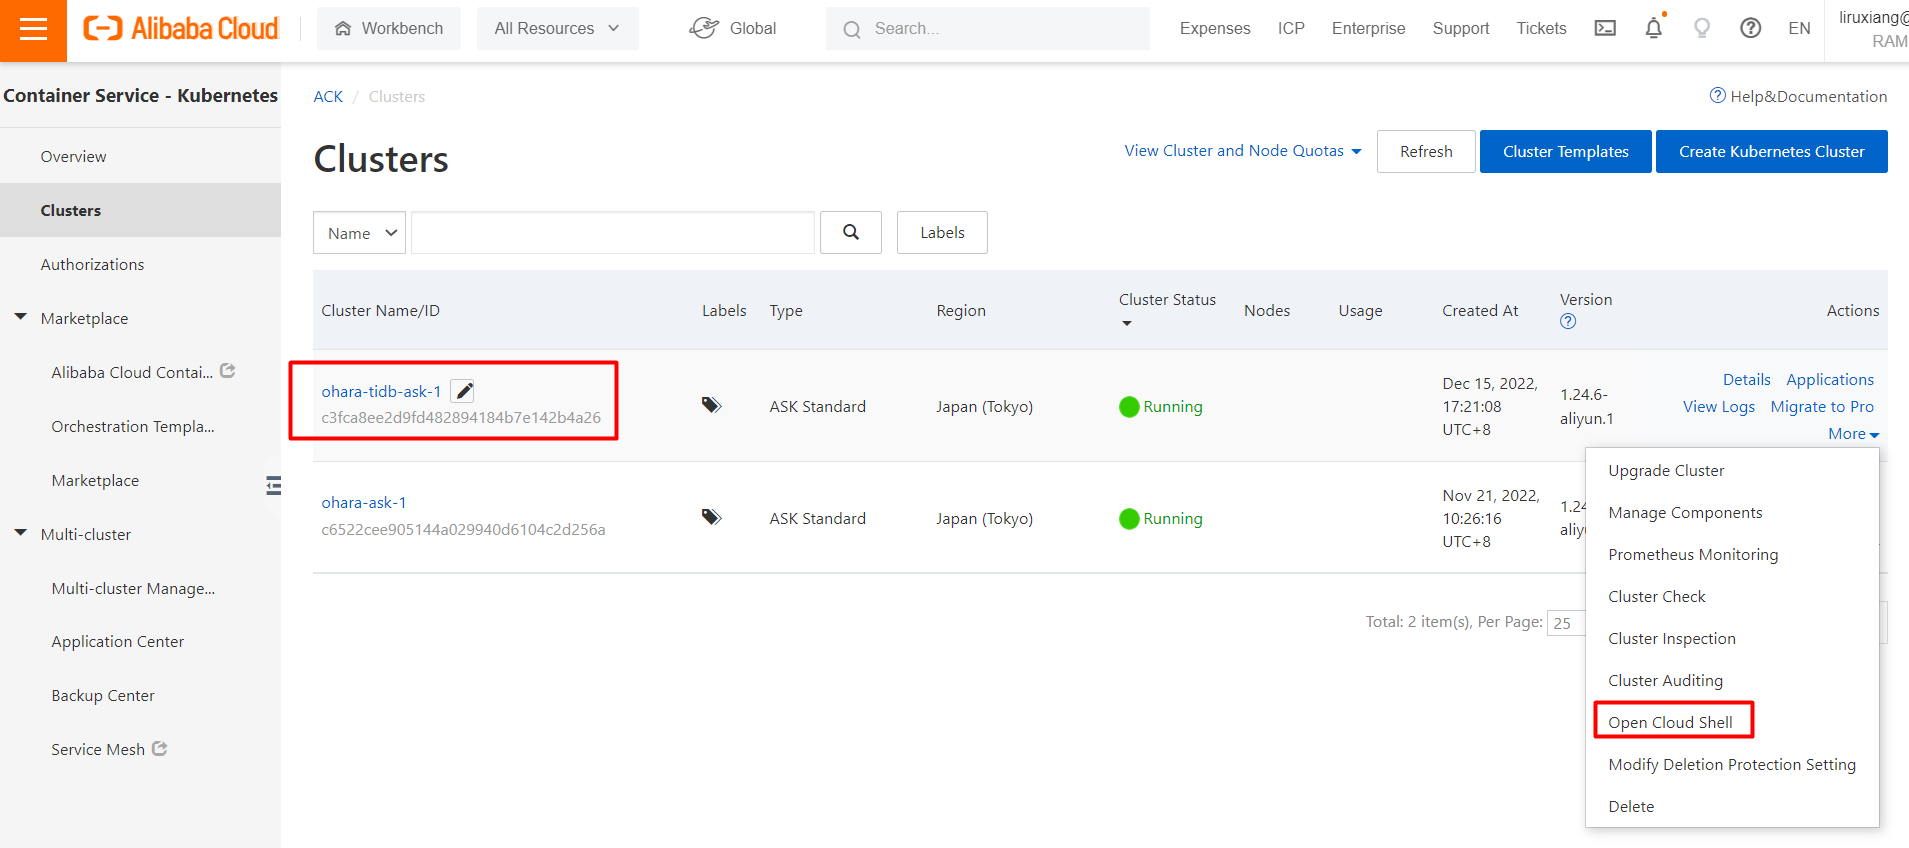
In the ACK console, click Clusters in the left-side navigation pane. On the Clusters page, find the ASK cluster in which you want to deploy a TiDB database, click More in the Actions column and select Open Cloud Shell.
When the CloudShell page is displayed, run the following command to check the cluster information:
kubectl cluster-info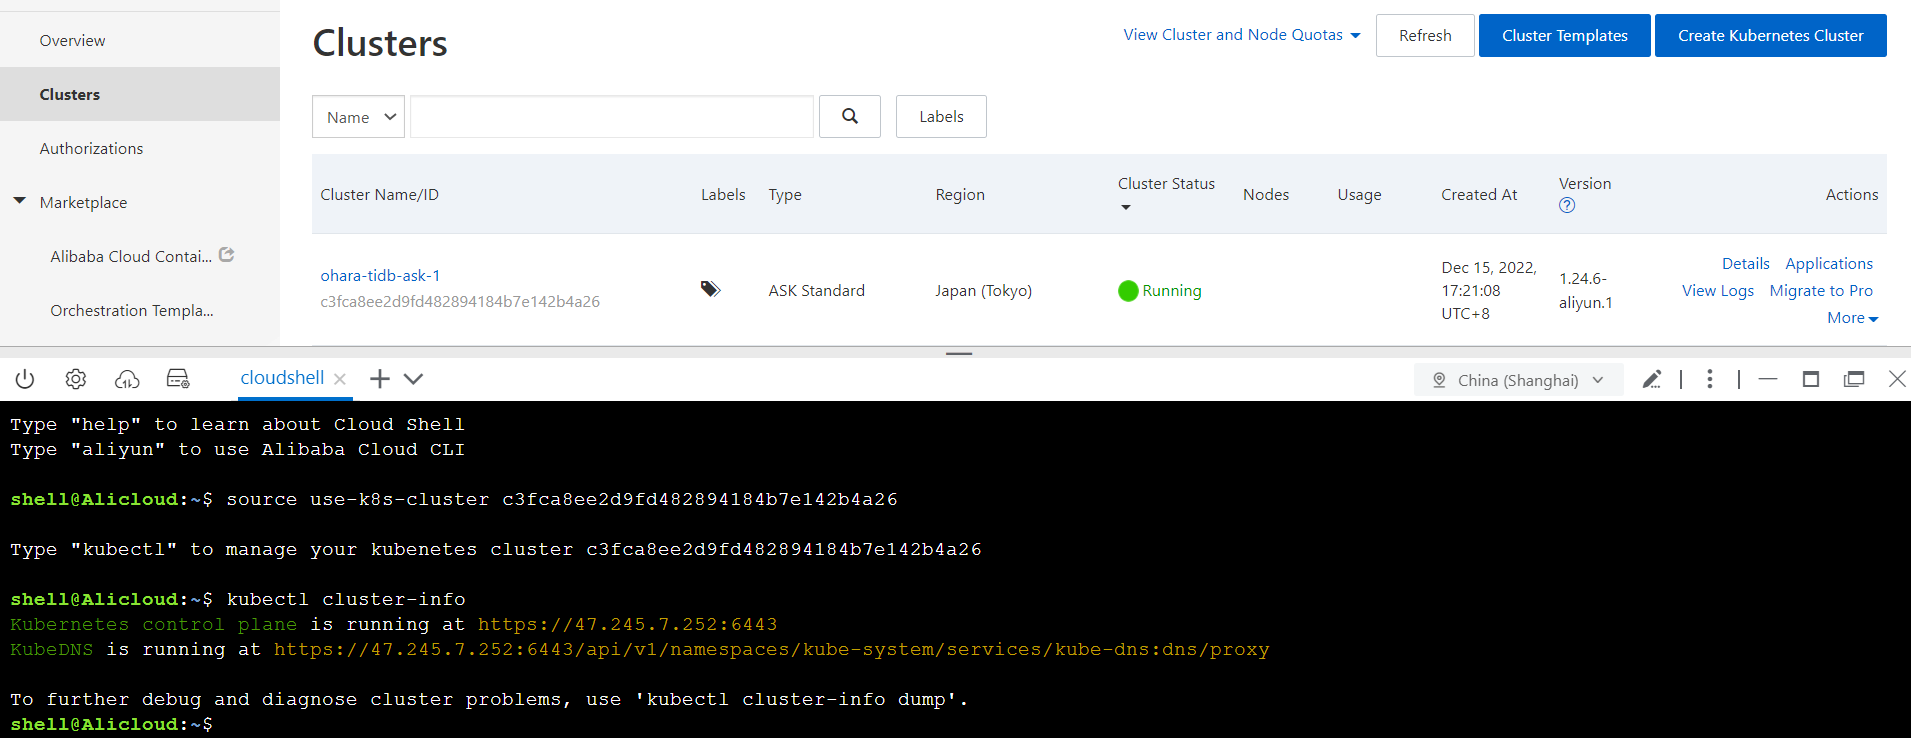
If no error occurs when you run the preceding command in CloudShell, you can perform the following steps. Most of these steps are based on the Get Started with TiDB on Kubernetes document of the official website.
Step 1: Run the following command to check the helm version:
helm version
Step 2: Run the following command to check the kubectl version:
kubectl version
Step 3: Run the following command to check the aliyun-cli version:
aliyun help
Step 4: Run the following command to download the crd.yaml file:
wget https://raw.githubusercontent.com/pingcap/tidb-operator/v1.3.9/manifests/crd.yaml
Step 5: Run the following command to install crd:
kubectl create -f crd.yaml
Step 6: Run the following command to add the PingCAP repository:
helm repo add pingcap https://charts.pingcap.org/
Step 7: Run the following command to create a tidb-admin namespace:
kubectl create namespace tidb-admin
Step 8: Run the following command to create tidb-operator:
helm install --namespace tidb-admin tidb-operator pingcap/tidb-operator --version v1.3.9
Step 9: Run the following command to check the pods of tidb-operator:
kubectl get pods --namespace tidb-admin -l app.kubernetes.io/instance=tidb-operator
Step 10: Run the following command to download the tidb-cluster.yaml file:
wget https://raw.githubusercontent.com/pingcap/tidb-operator/master/examples/basic/tidb-cluster.yaml
Step 11: Run the following command to create a tidb-cluster namespace:
kubectl create namespace tidb-cluster
Step 12: Run the following command to install tidb-cluster:
kubectl -n tidb-cluster apply -f tidb-cluster.yaml
Step 13: Run the following command to download the tidb-monitor.yaml file:
wget https://raw.githubusercontent.com/pingcap/tidb-operator/master/examples/basic/tidb-monitor.yaml
Step 14: Run the following command to install tidb-monitor:
kubectl -n tidb-cluster apply -f tidb-monitor.yaml
Step 15: Run the following command to check the pods:
watch kubectl get po -n tidb-cluster
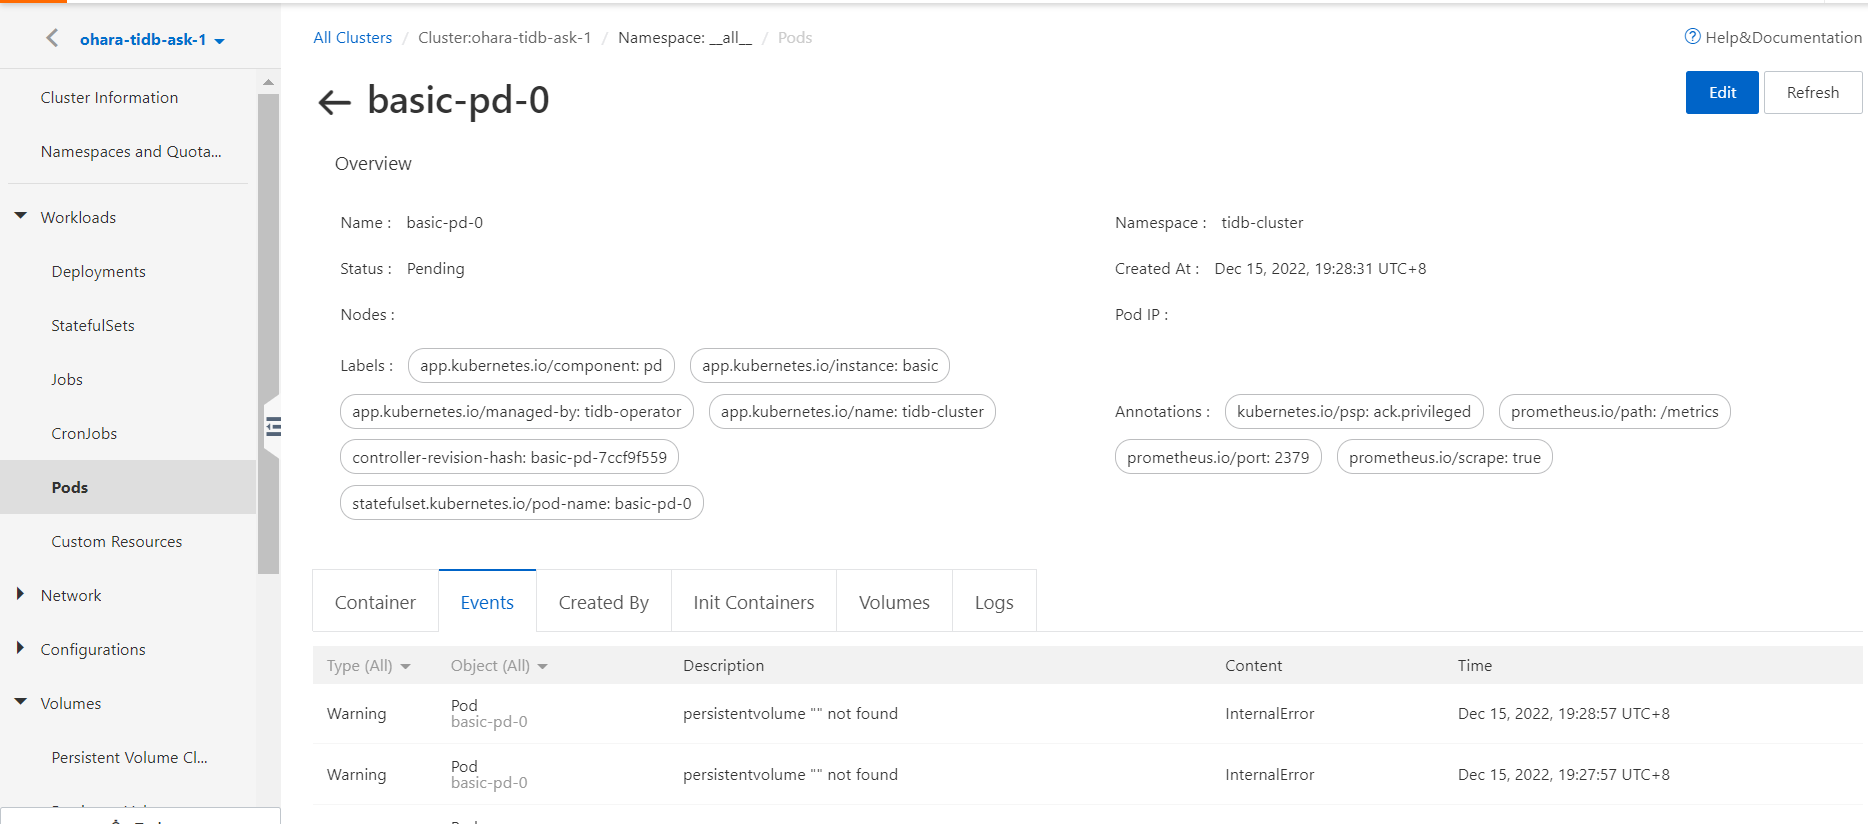
The preceding figure shows the status of pods. After you run the preceding commands, you can find that the basic-pd-0 pod is in the Pending state. This is because persistent volumes (PVs) cannot be identified on the TiDB side. The PVC is not properly attached from the TiDB side to the Alibaba Cloud Kubernetes side. To resolve the issue, you must recreate and redeploy the PV and PVC for the basic-pd-0 pod in the ASK cluster.
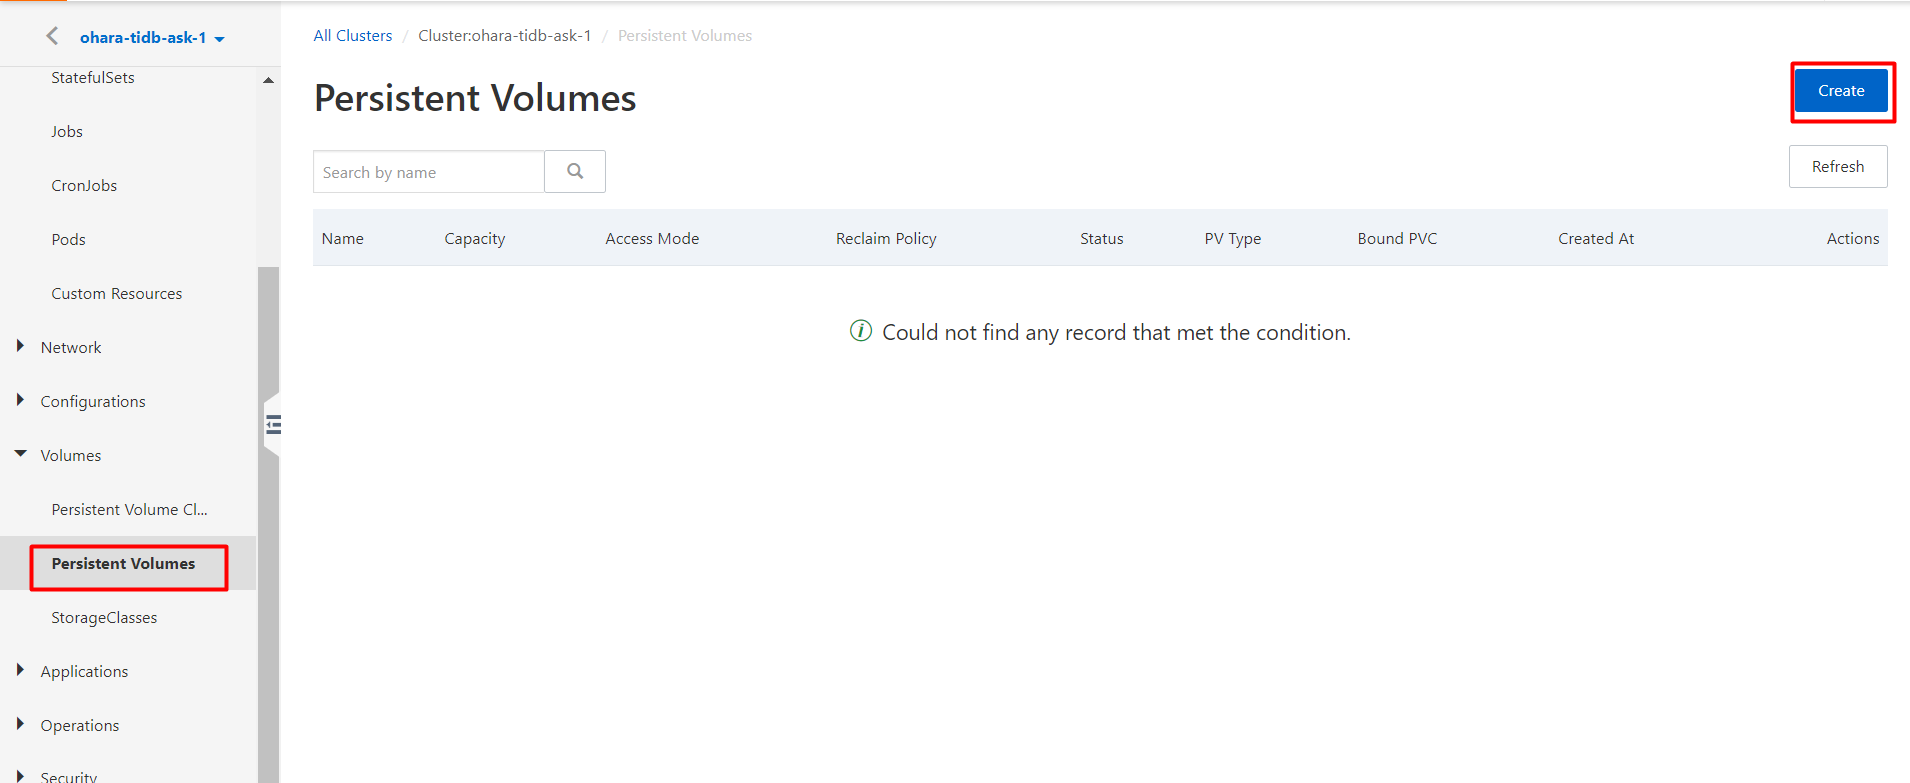
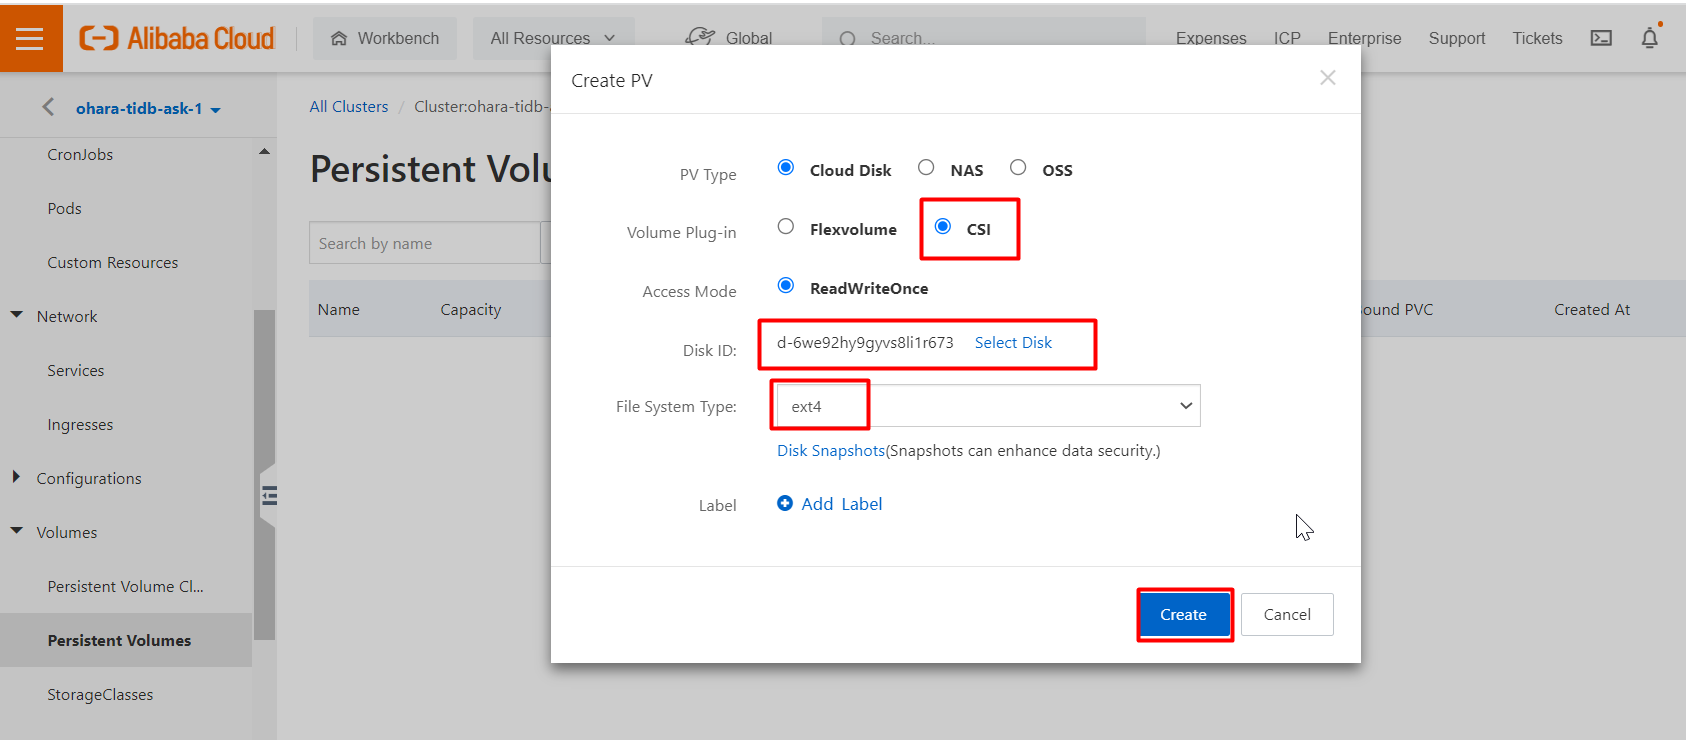
To create a PV for the basic-pd-0 pod, perform the following steps: Go to the cluster configuration page. In the left-side navigation pane, choose Volumes > Persistent Volumes. On the Persistent Volumes page, click Create.
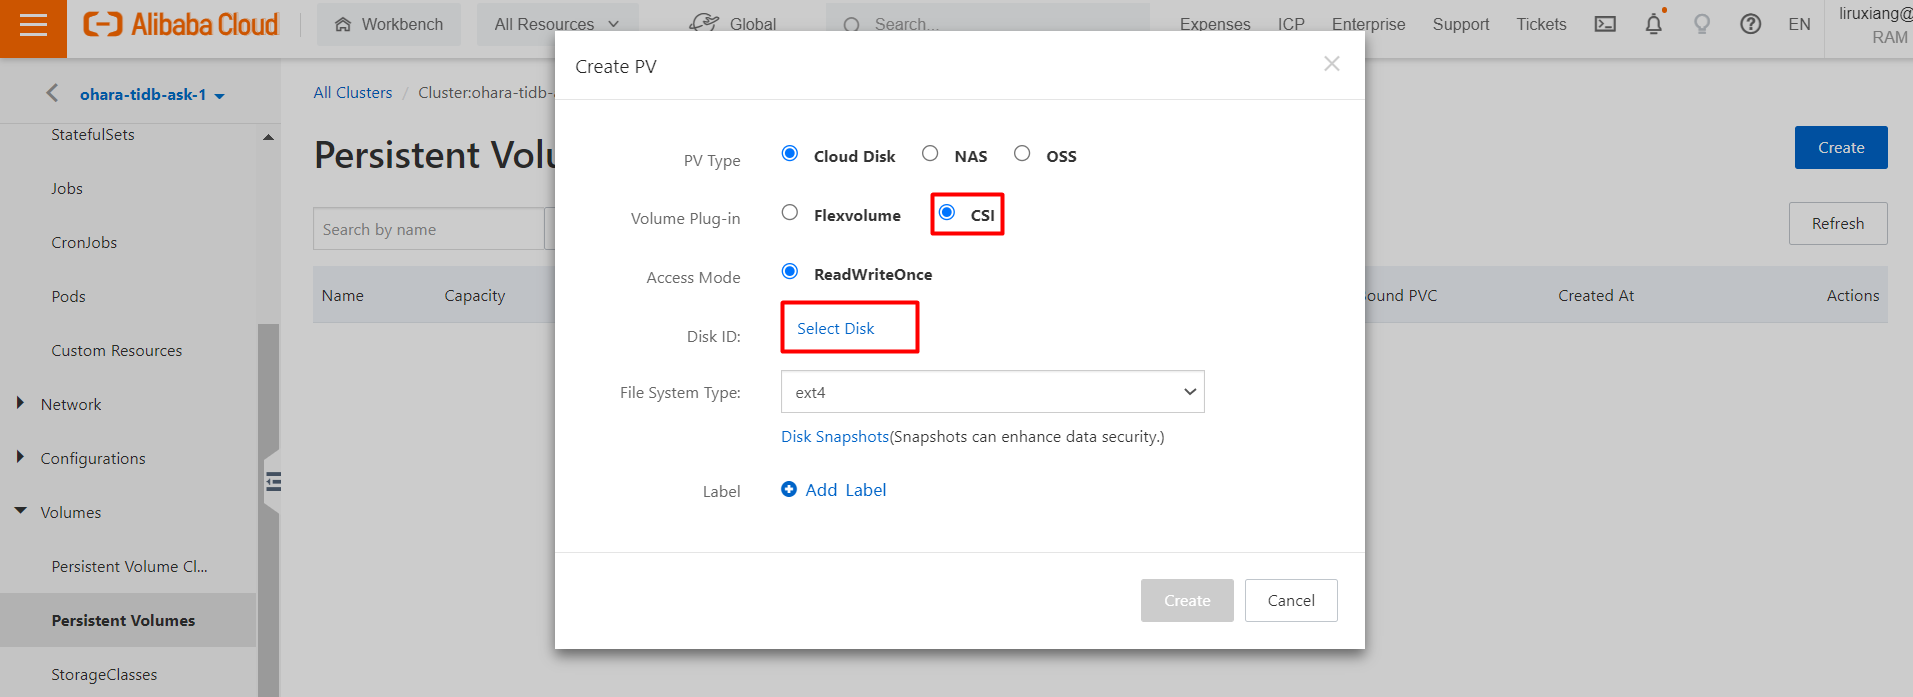
In the Create PV dialog box, set the Volume Plug-in parameter to CSI.
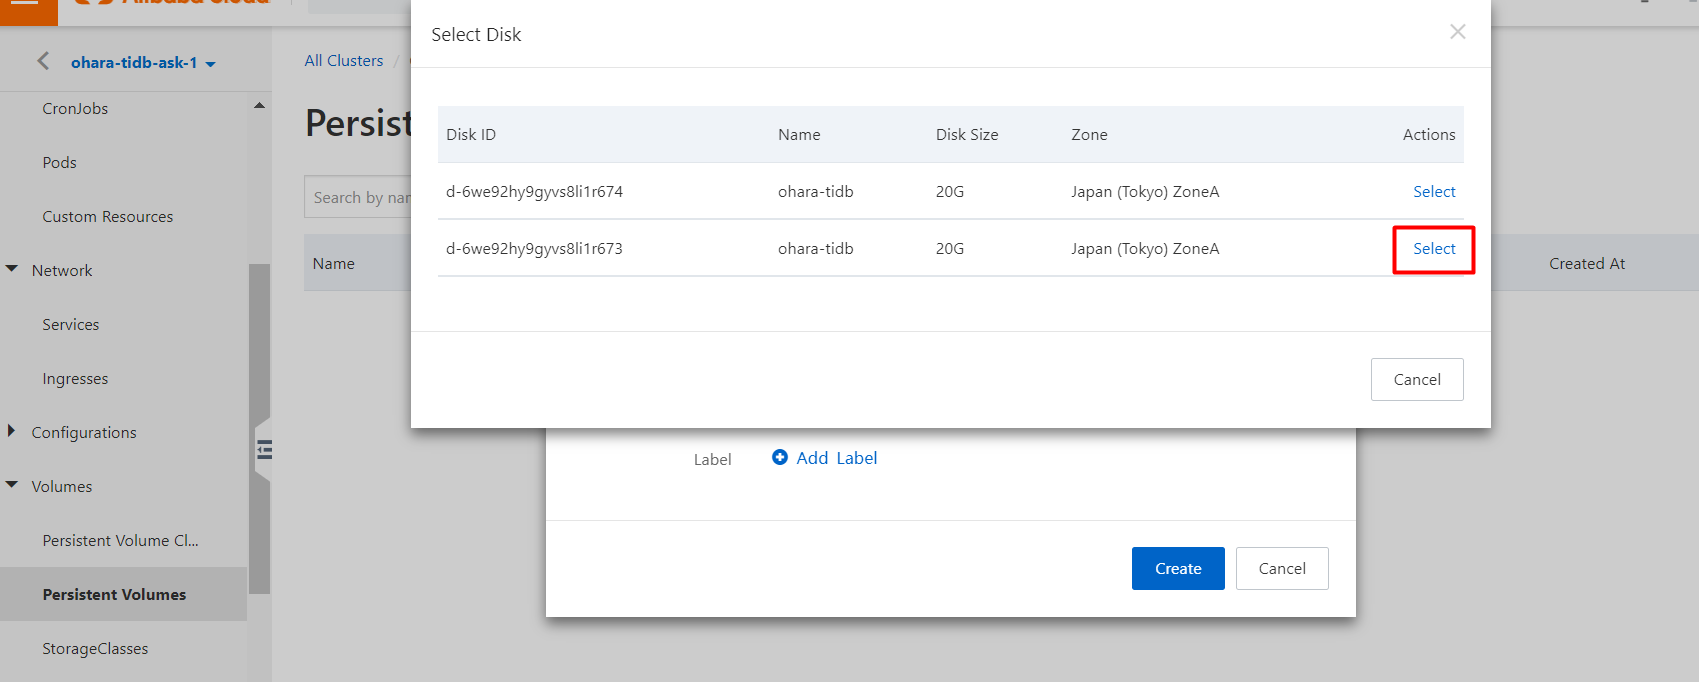
Select a disk.
The following figure shows how to configure the required parameters.
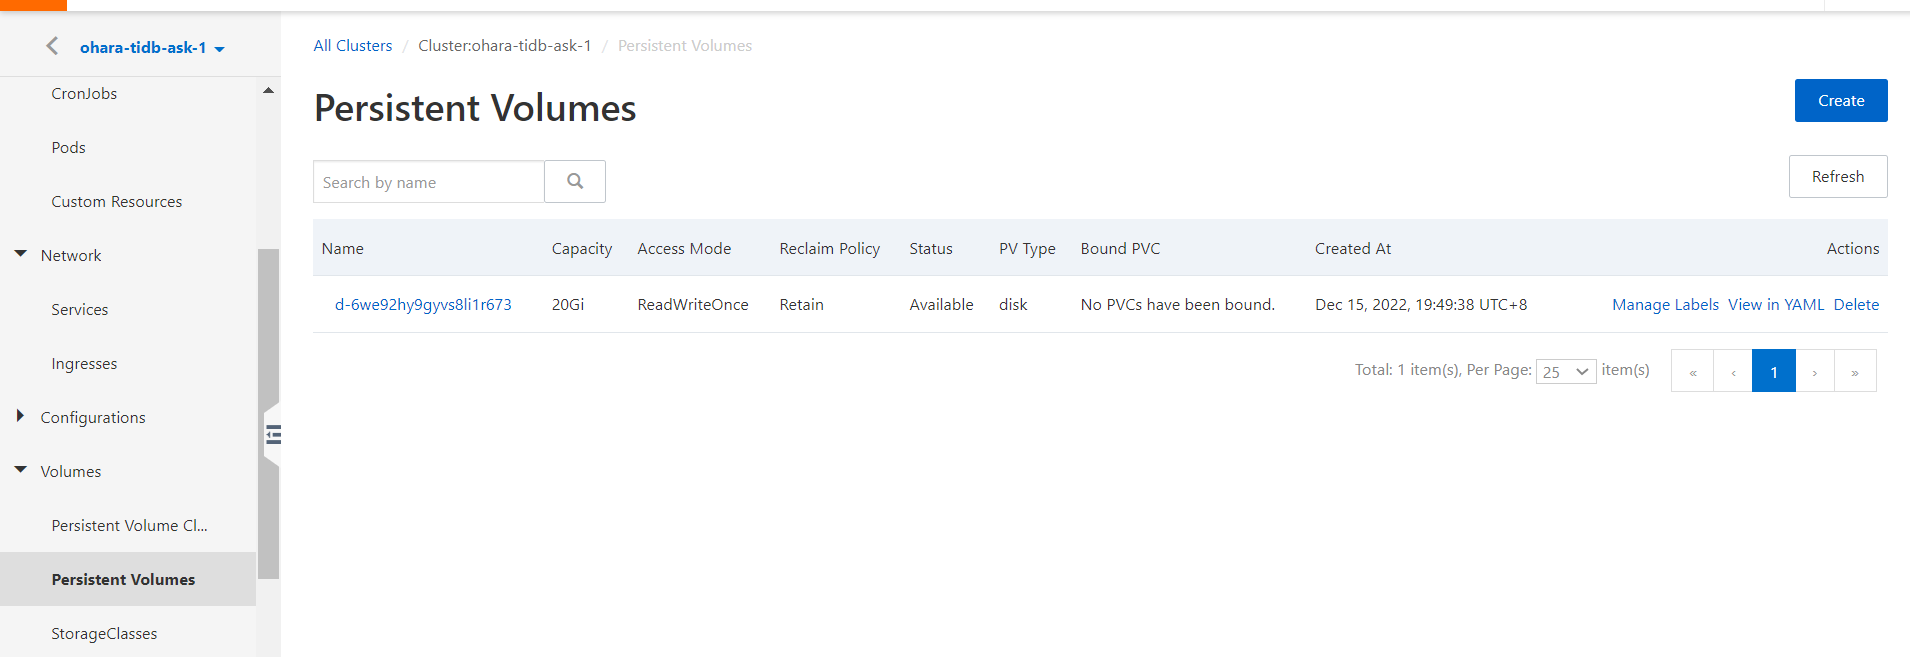
Check whether a new PV is created for the basic-pd-0 pod.
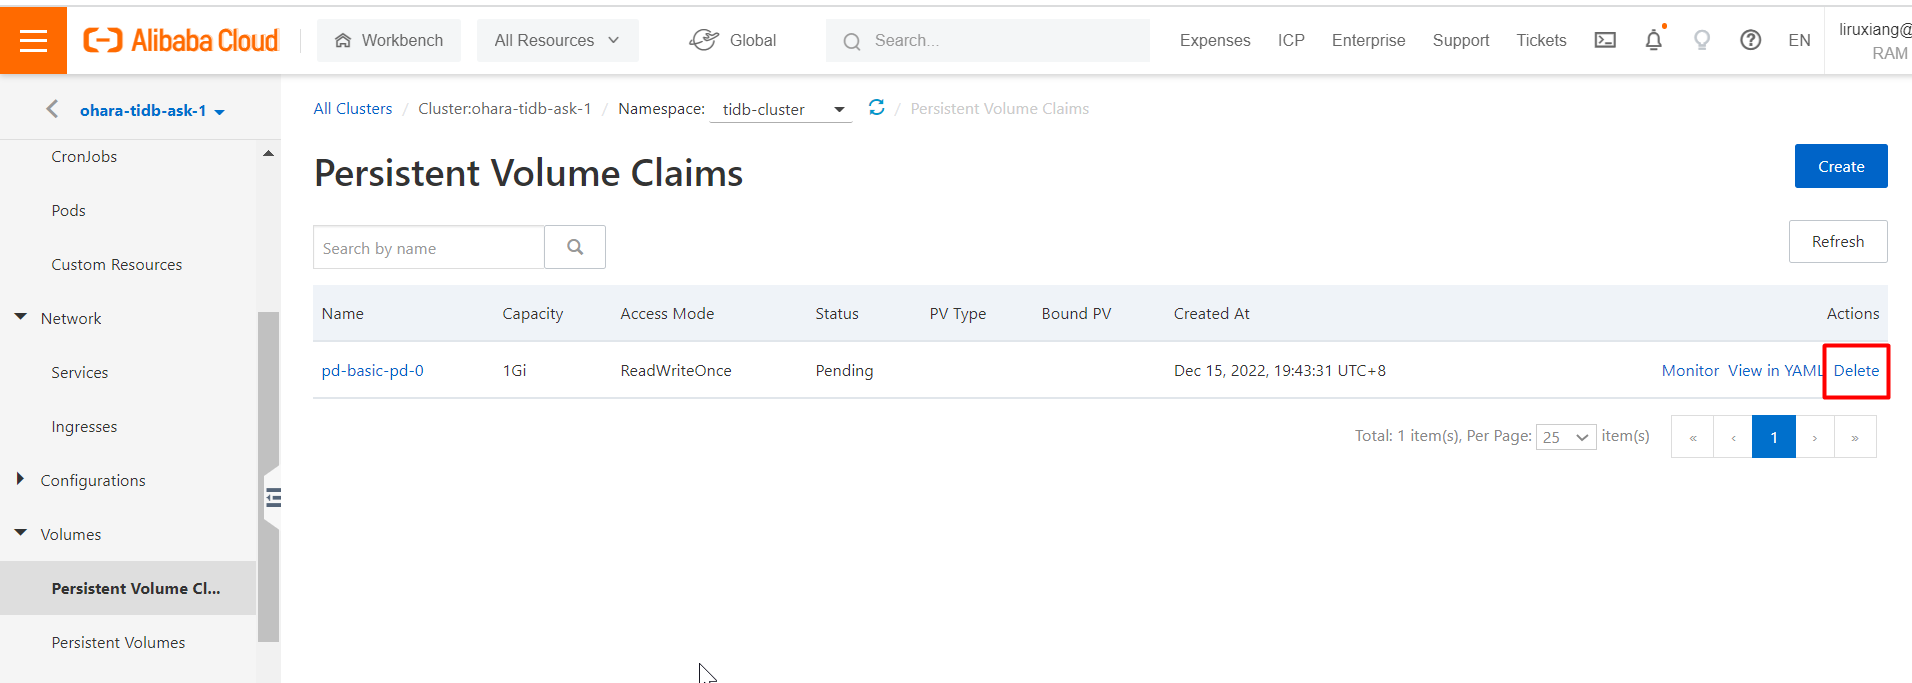
The next step is to recreate and redeploy the PVC named pd-basic-pd-0 that was deployed in the preceding steps. This is because that the TiDB side and ASK side are not connected. To do so, perform the following steps: Go to the cluster configuration page. In the left-side navigation pane, choose Volumes > Persistent Volume Claims. On the Persistent Volume Claims page, find the existing PVC and click Delete in the Actions column.
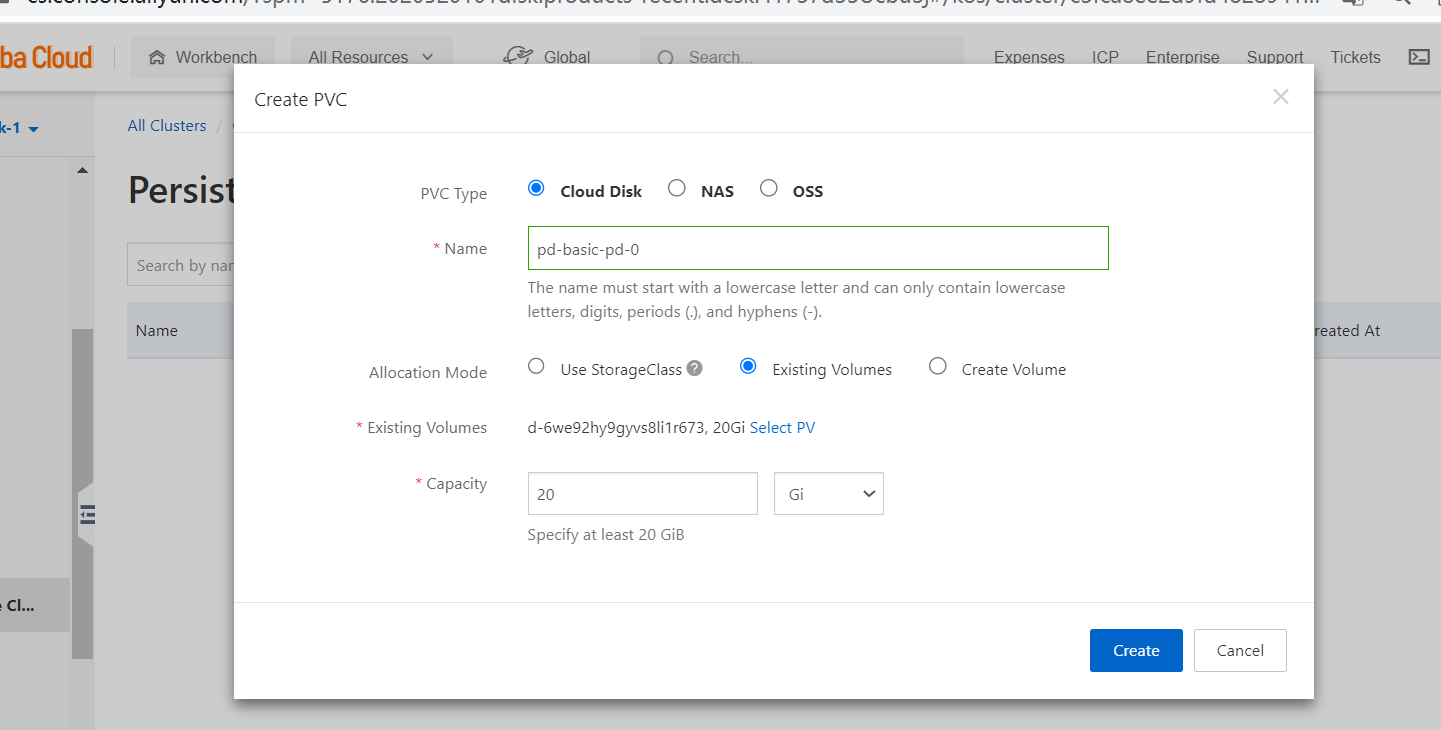
Then, create a PVC for the tidb_pd pod instead of the deleted one. To do so, perform the following steps: On the Persistent Volume Claims page, click Create. In the Create PVC dialog box, configure the required parameters.
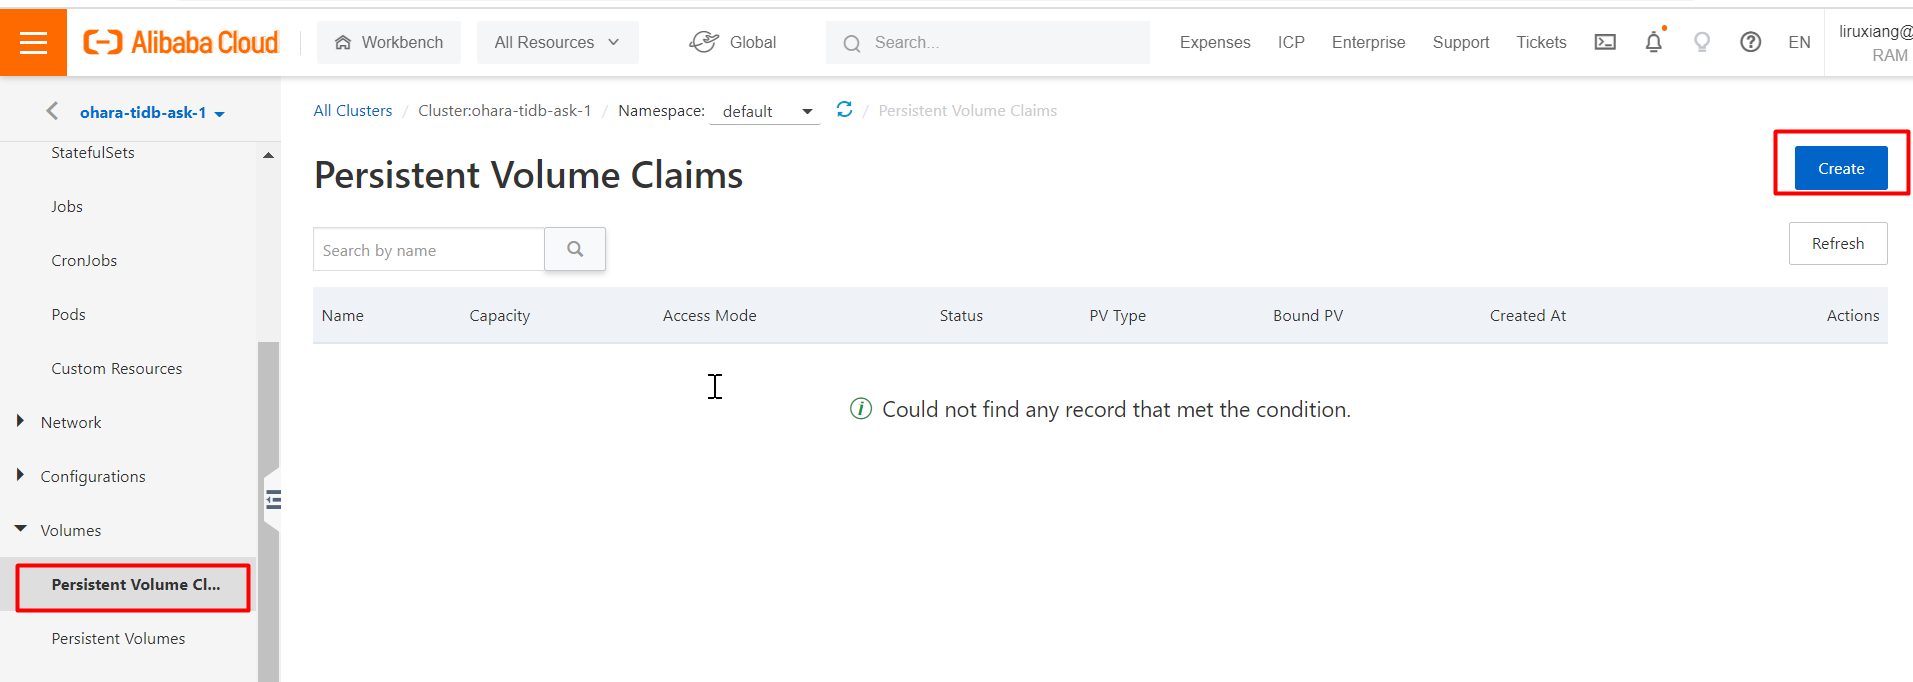
Set the name of the PVC to pd-basic-pd-0 to be consistent with the deleted one. When you recreate a PVC, the PVC name in the ASK cluster must be consistent with the PVC name in the TiDB side.
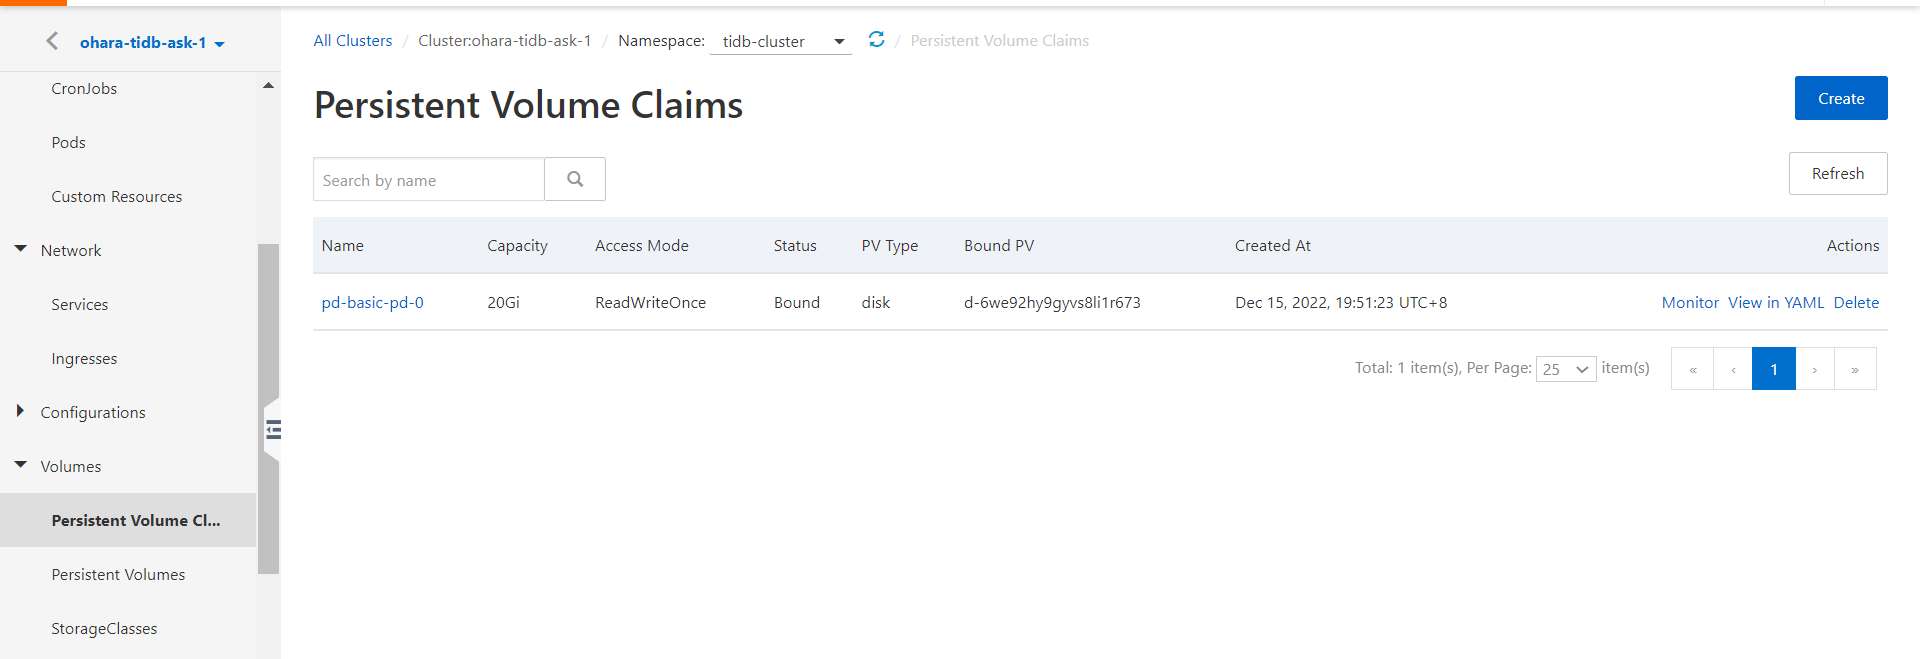
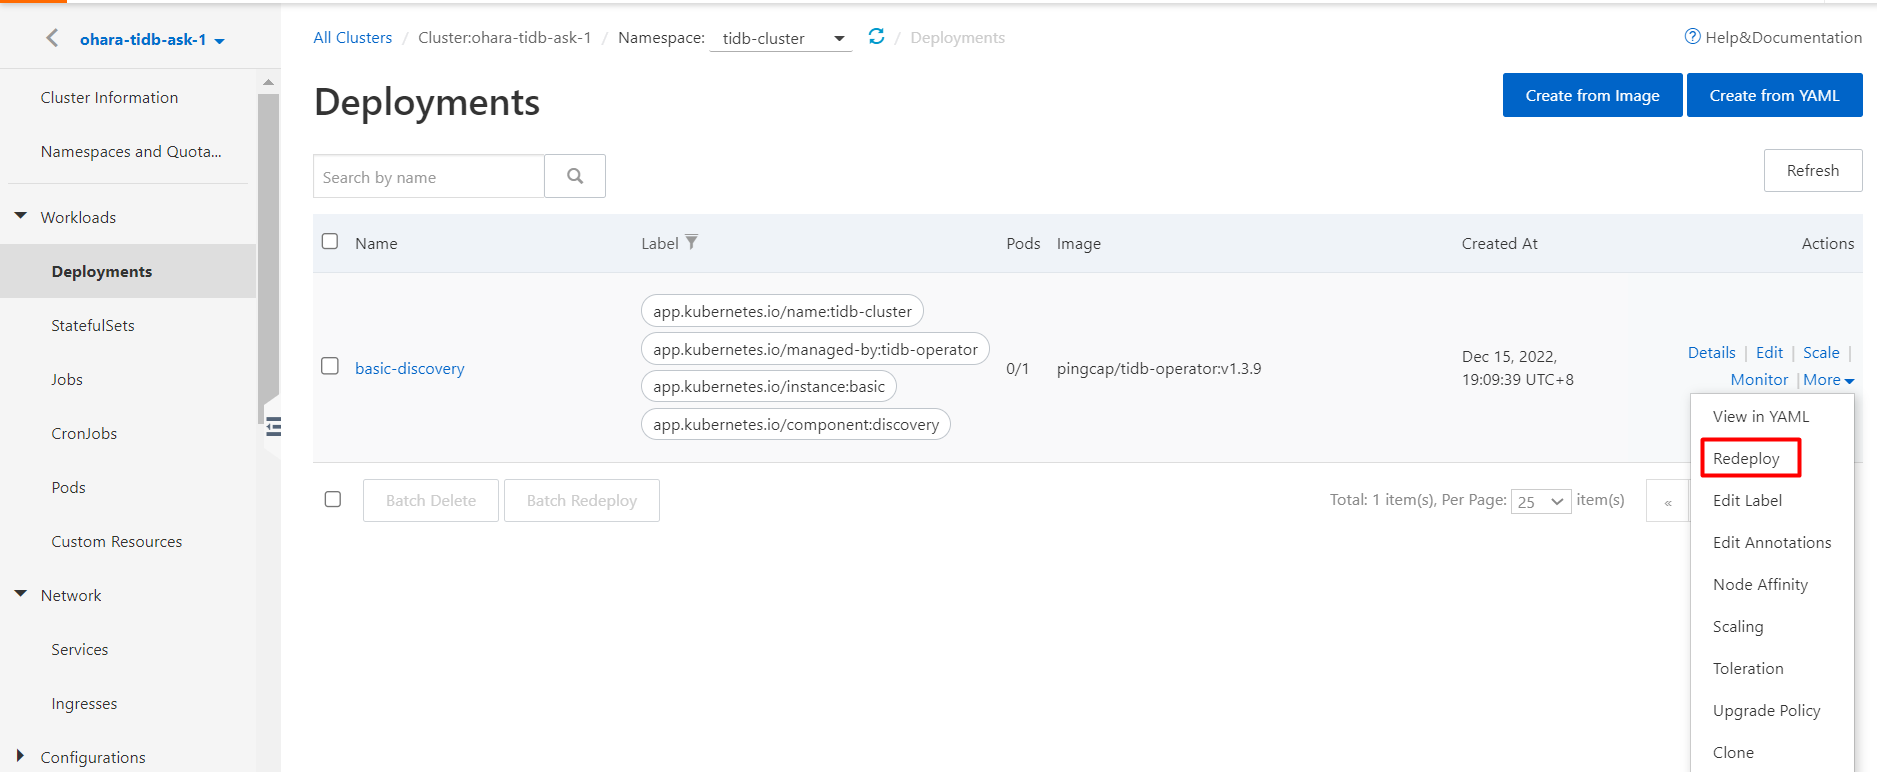
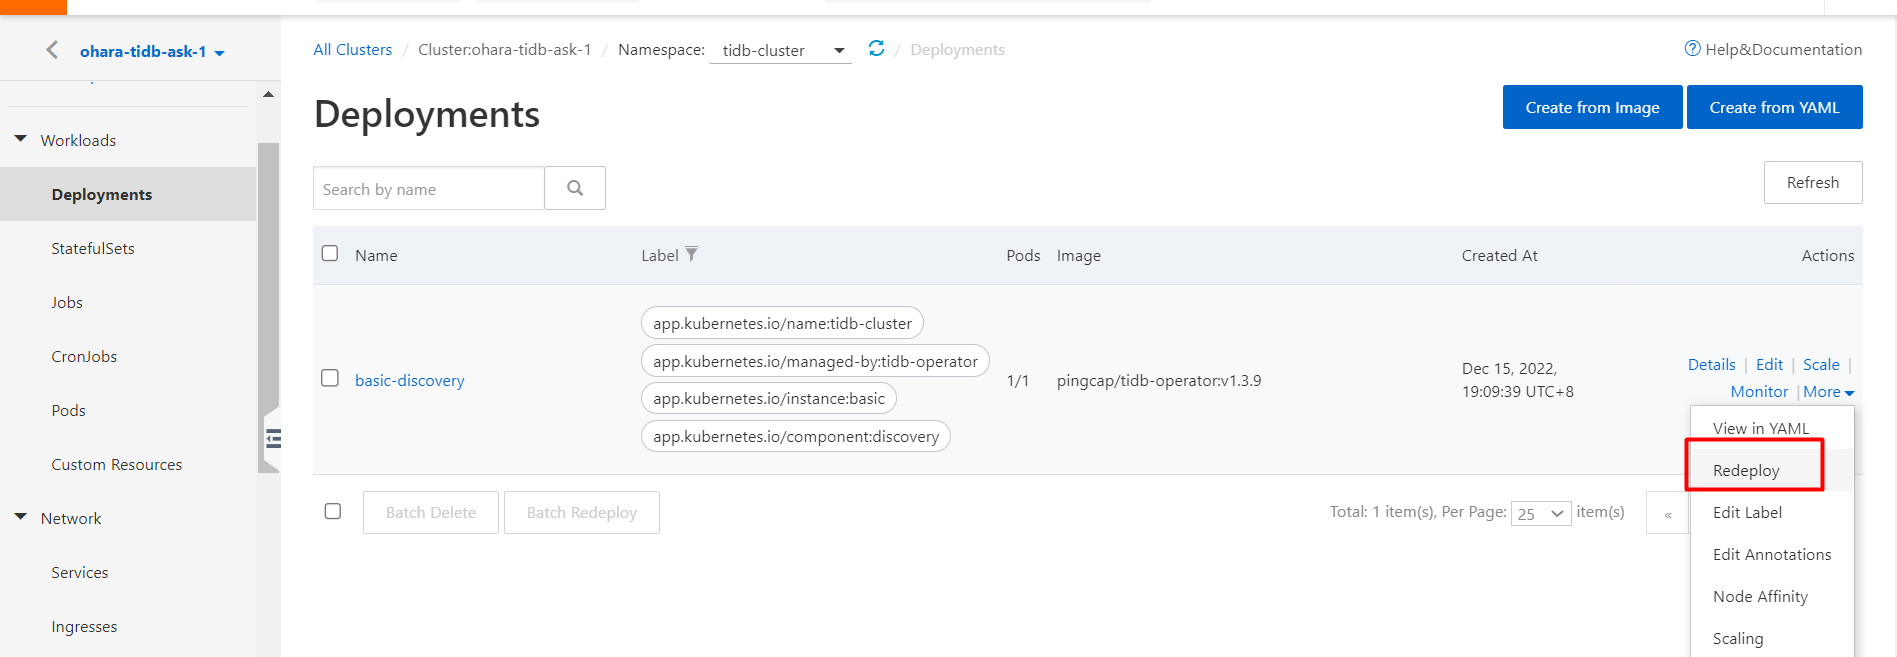
After you create the pd-basic-pd-0 PVC, perform the following steps: In the left-side navigation pane, choose Workloads > Deployments. On the Deployments page, find the deployment named basic-discovery, click More in the Actions column and click Redeploy.
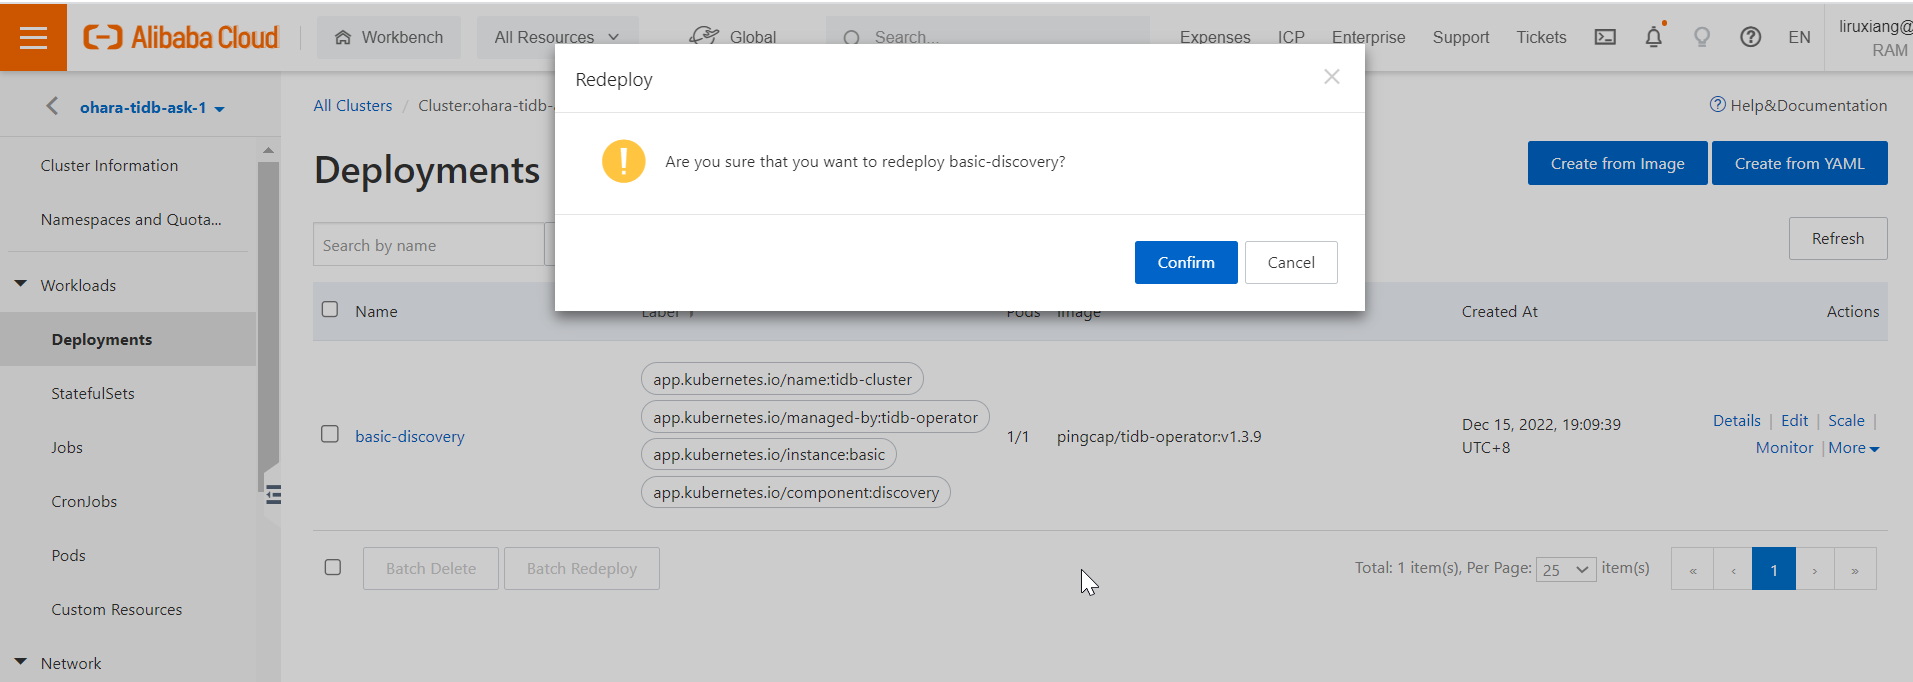
Make sure that the basic-pd-0 pod is in the Running state after redeployment.
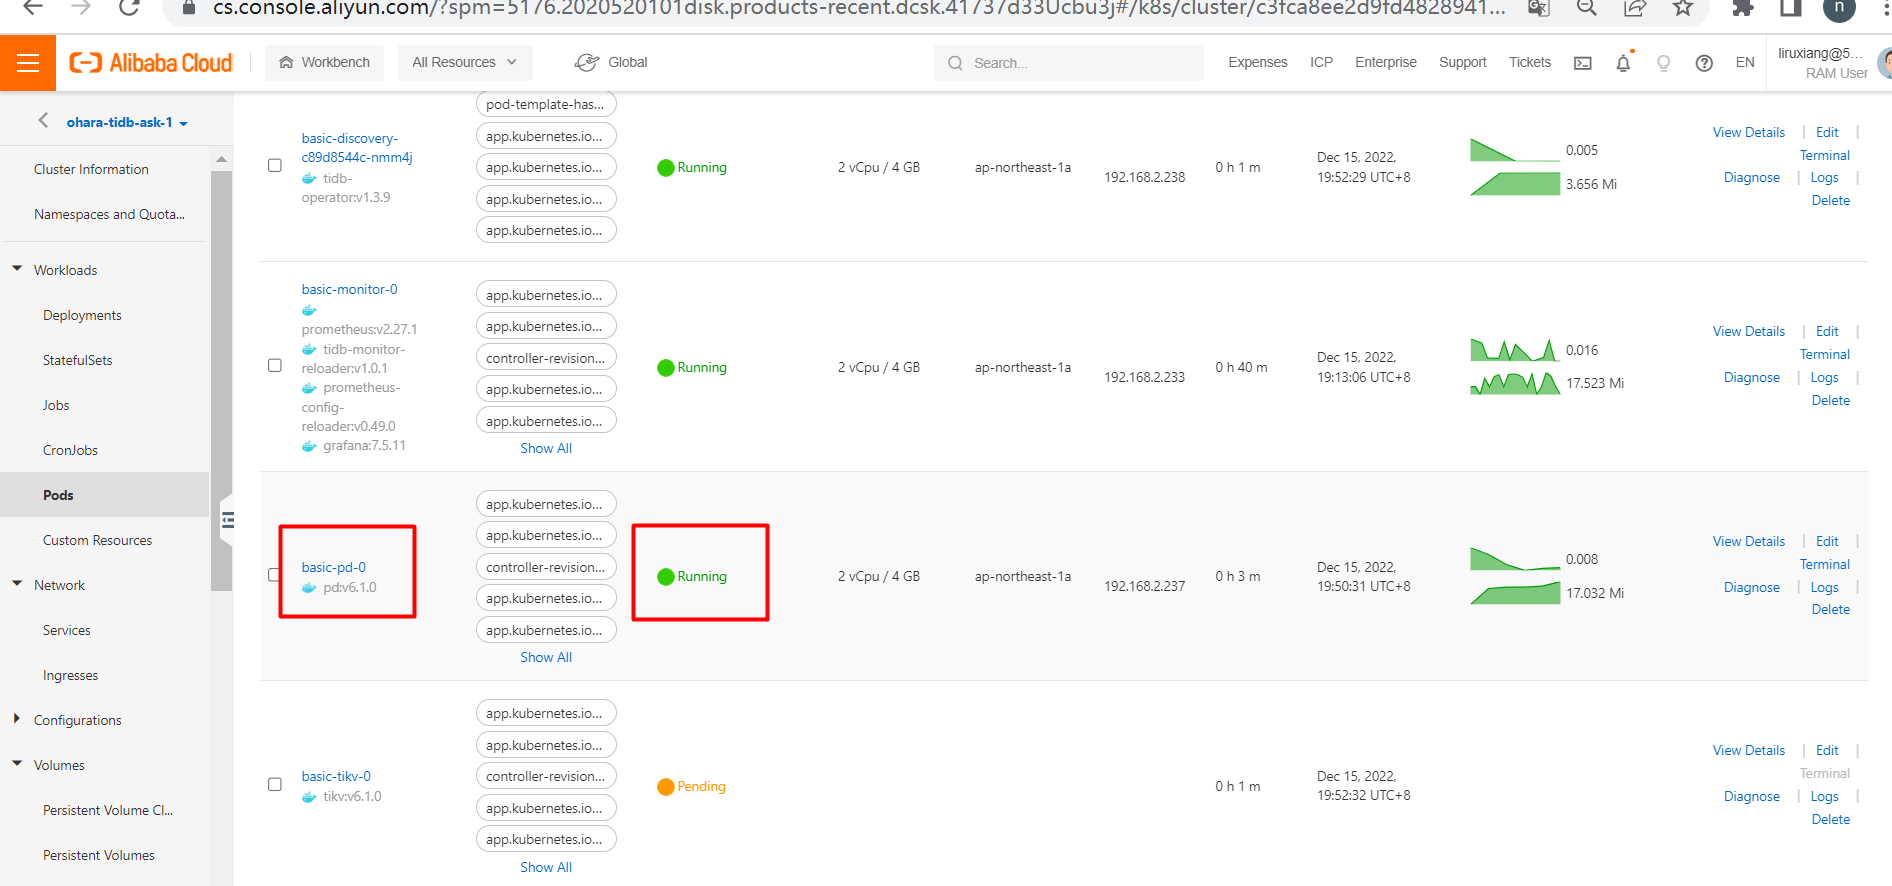
After the basic-pd-0 pod is successfully deployed, you must deploy the basic-tikv pod. The basic-tikv pod is generated if the basic-pd-0 pod starts.
If you check by running the following commands, the basic-tikv pod is also in the Pending state. The reason for this Pending state is that the PV cannot be identified on the TiDB side because the PVC is not correctly attached from the TiDB side to the Alibaba Cloud Kubernetes side. The reason is the same as that of the basic-pd-0 pod. The solution is also the same as that of the basic-pd-0 pod. Recreate and redeploy the PV and PVC for the basic-tikv-0 pod.
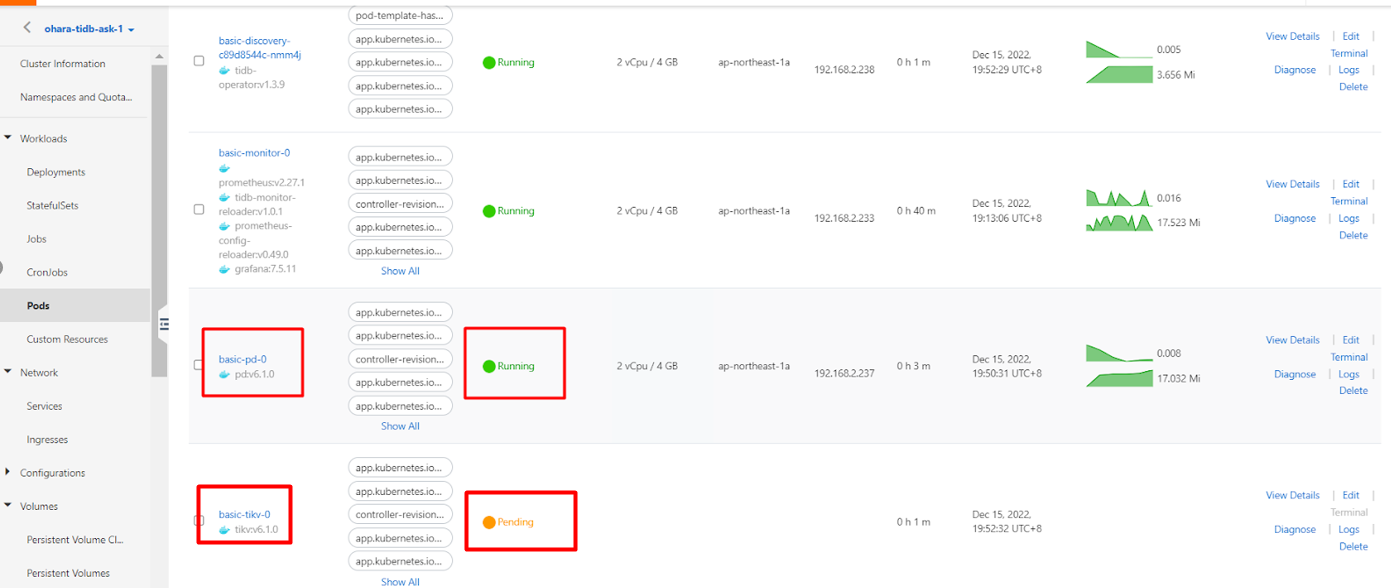
Check the pod status:
get po -n tidb-cluster
The basic-tikv-0 pod is generated under the basic-pd-0 pod, which is also in the Pending state.
Create a PV for the basic-tikv-0 pod. To do so, perform the following steps: In the left-side navigation pane, choose Volumes > Persistent Volumes. On the Persistent Volumes page, click Create. In the Create PV dialog box, set the Volume Plug-in parameter to CSI.
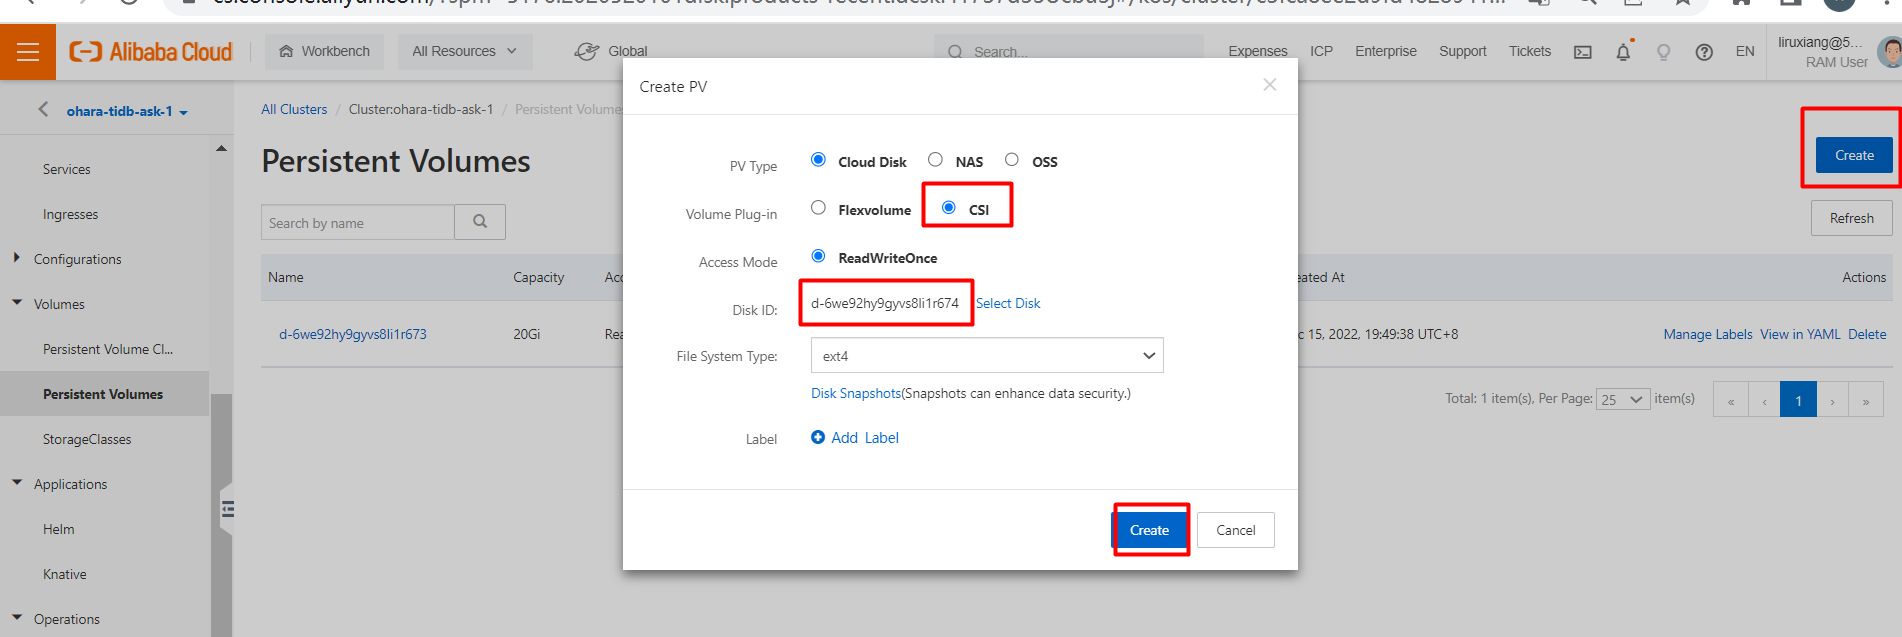
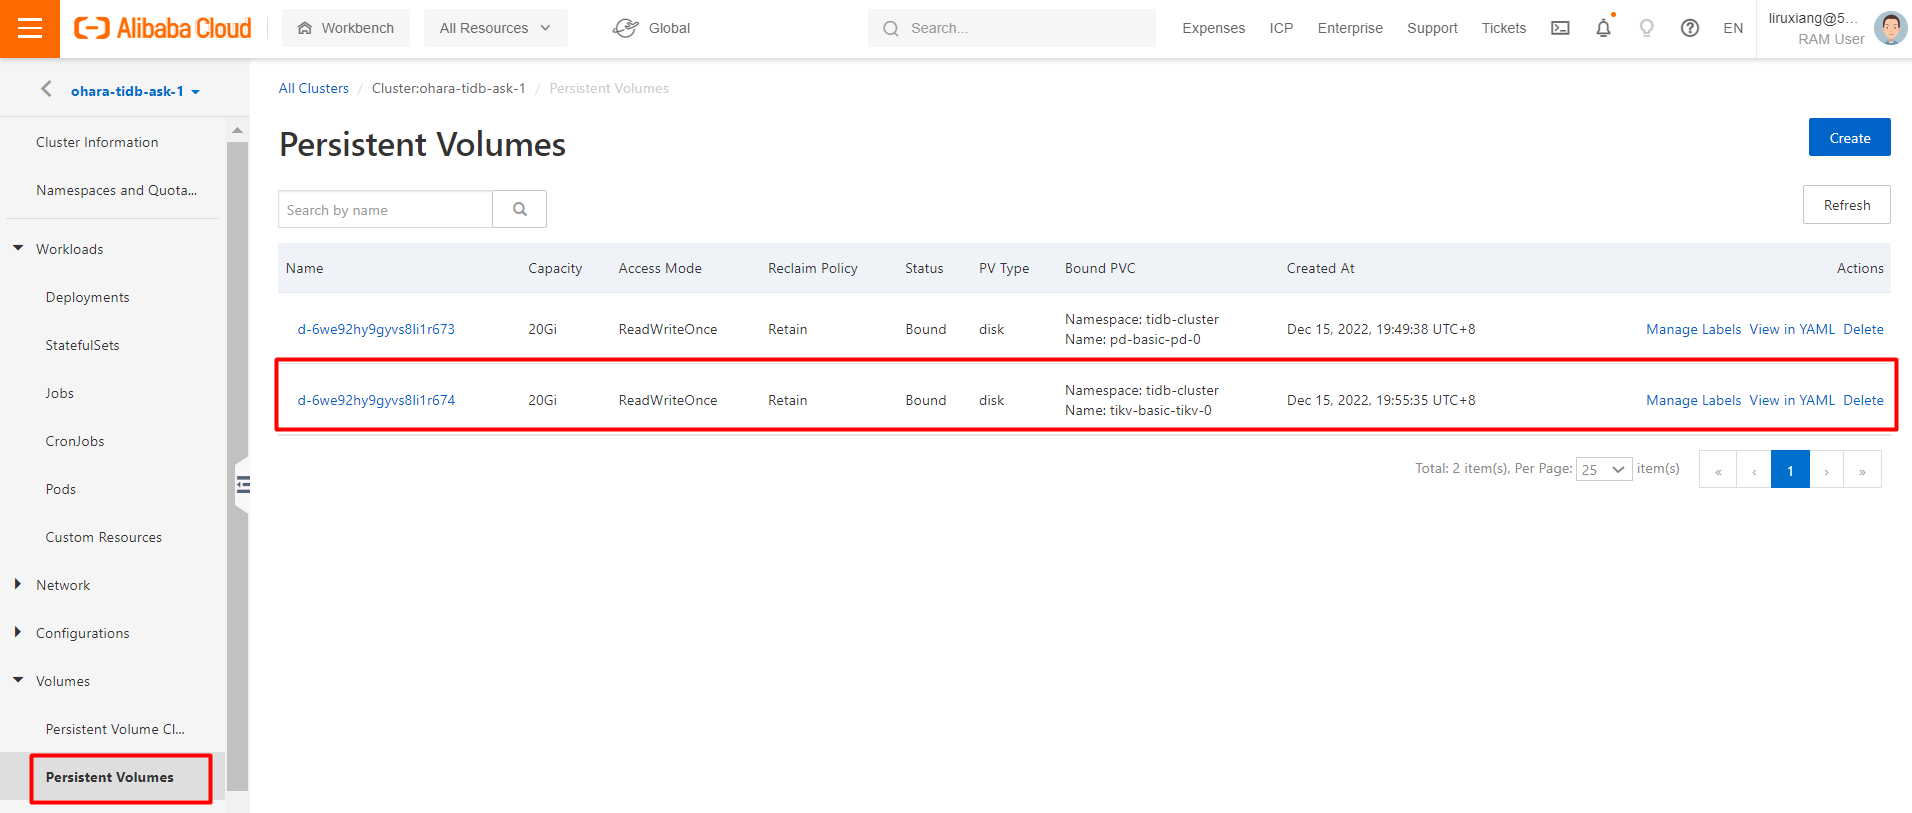
Next, you need to recreate and redeployed a PVC named tikv-basic-tikv-0 that was deployed in the preceding steps. To do so, perform the following steps: In the left-side navigation pane, choose Volumes > Persistent Volume Claims. On the Persistent Volume Claims page, delete the PVC named tikv-basic-tikv-0.

Then, recreate a PVC named tikv-basic-tikv-0. To do so, perform the following steps: Click Create. In the Create PVC dialog box, configure the required parameters.
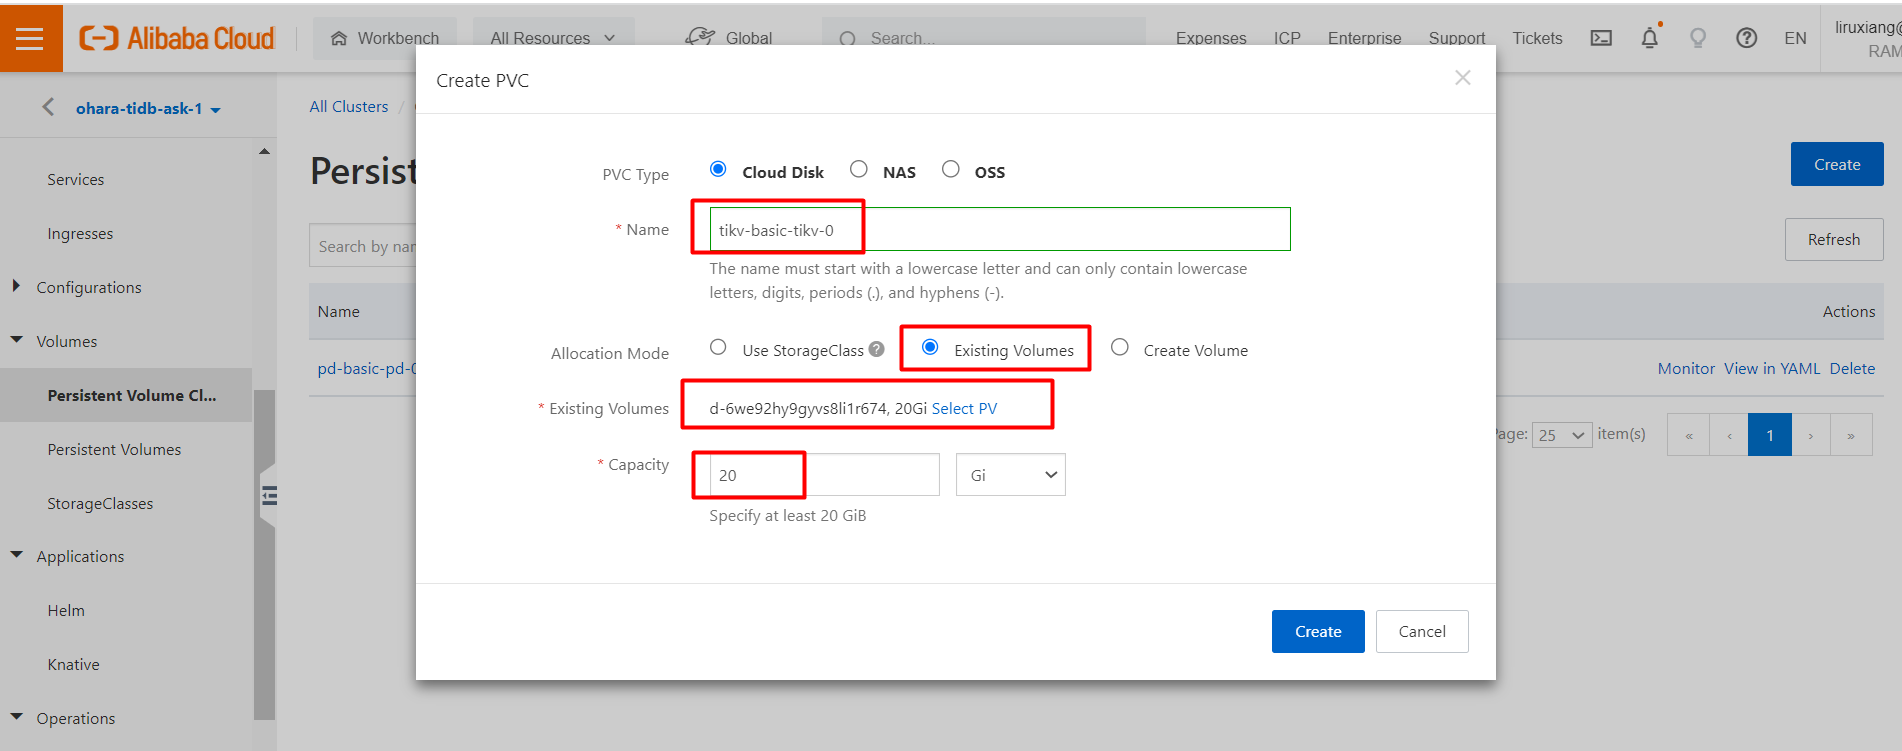
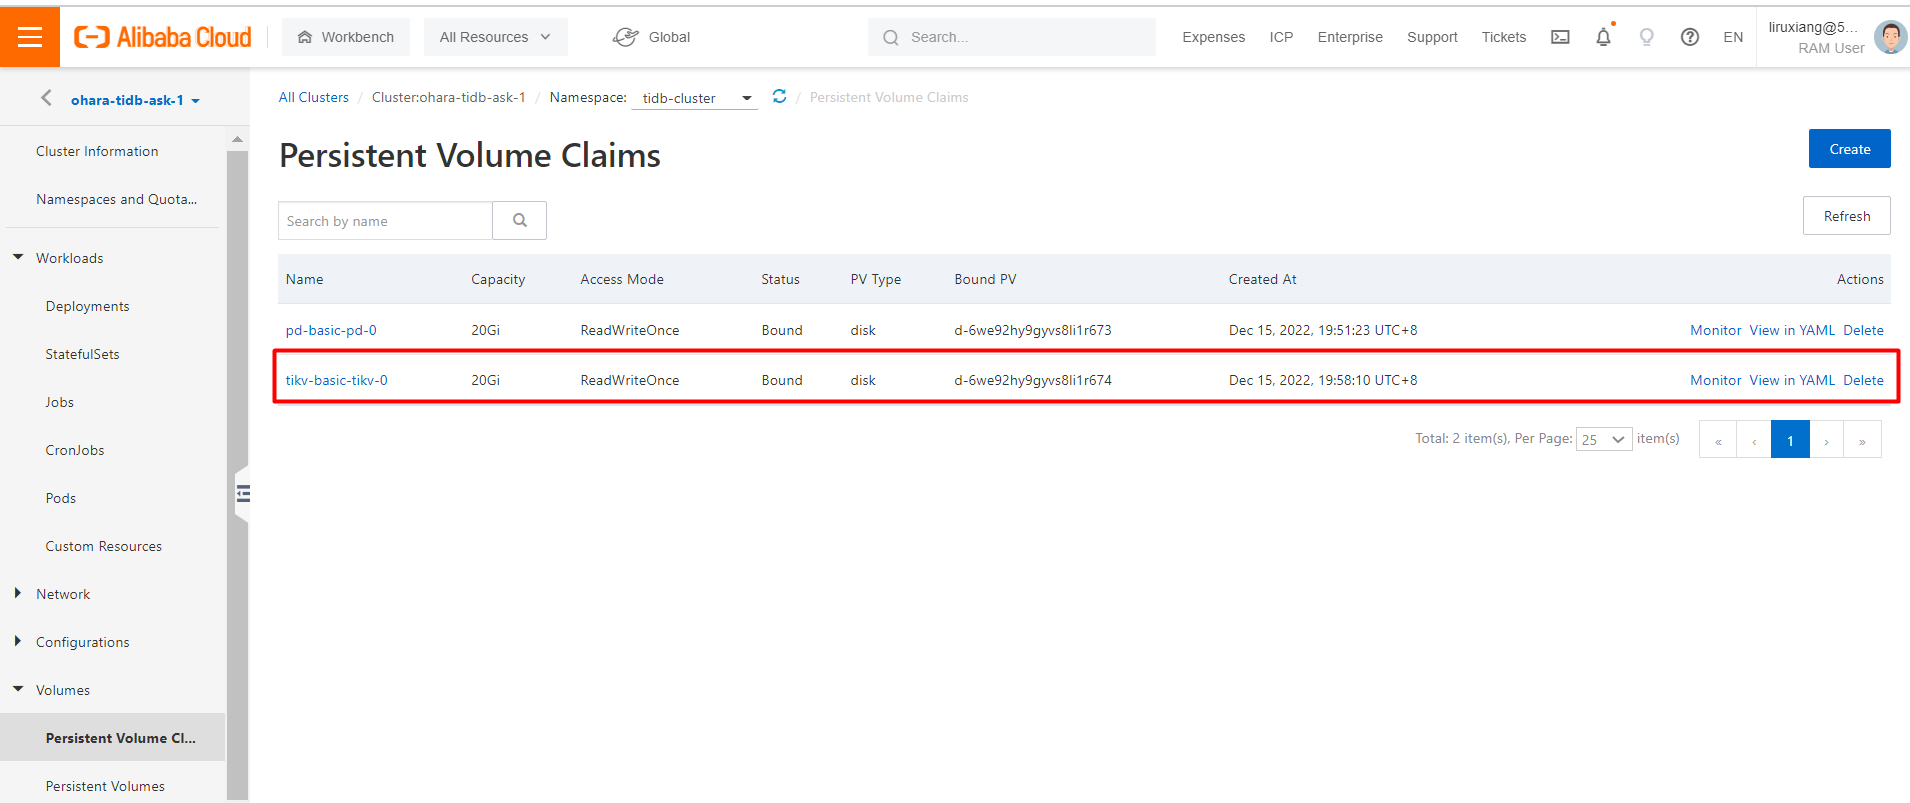
After you recreate a PVC named tikv-basic-tikv-0, choose Workloads > Deployments in the left-side navigation pane. On the Deployments page, find the deployment named basic-discovery, click More in the Actions column, and click Redeploy.
This way, you can confirm that the basic-tikv-0 pod is in the Running state on the Pods page.
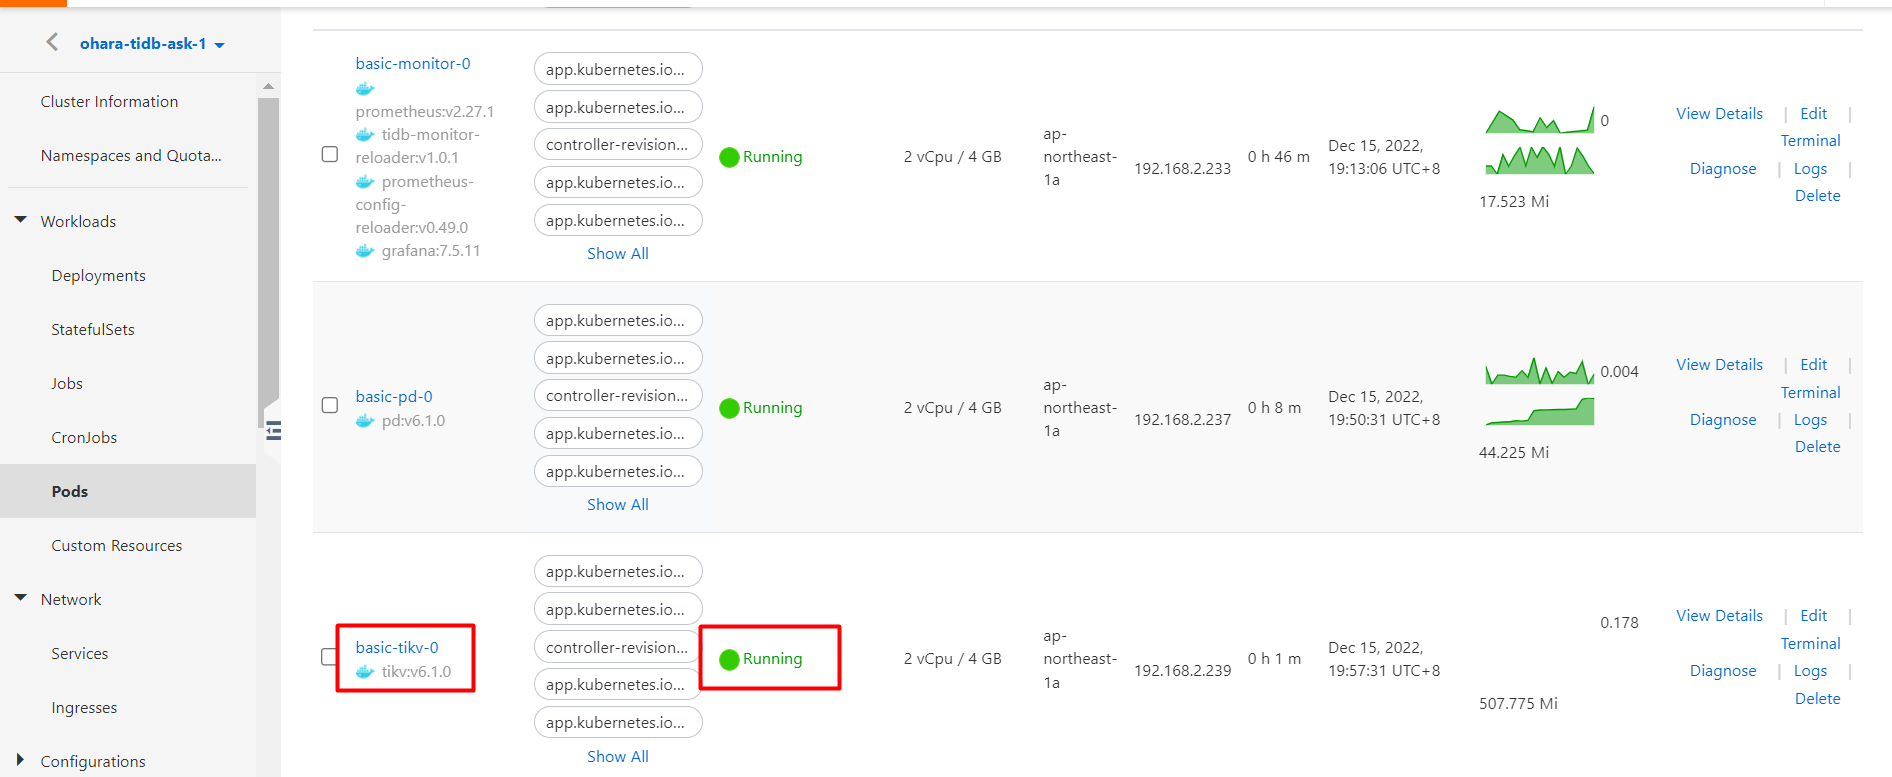
Check the pod status.
watch kubectl get po -n tidb-cluster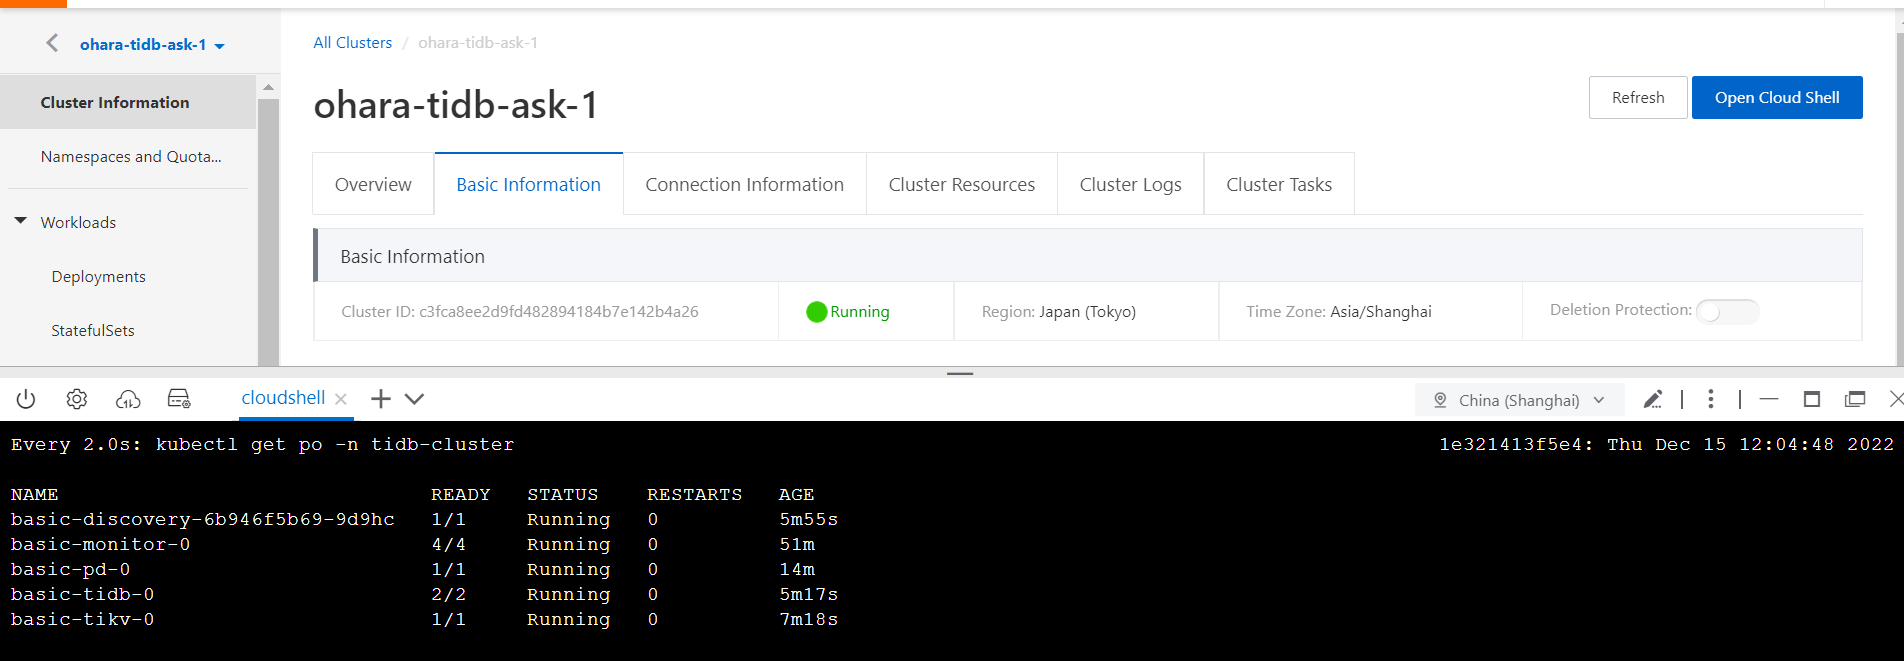
Check whether the basic-tidb-0 and basic-tikv-0 pods are in the Running state. You can check the pod status by running the kubectl command. Run the following command to obtain the service list information in the namespace of the tidb-cluster:
kubectl get svc -n tidb-cluster
The TiDB cluster and the pods are normal. After you perform the preceding steps, the TiDB database is installed in the ASK cluster. You can create resources based on containers in an easy and convenient manner.
After you deploy a TiDB database in an ASK cluster, you must connect to the TiDB service.
To connect to TiDB, the MySQL client must be installed in the host in which kubectl is installed.
The TiDB service is basic-tidb. When you connect to TiDB, you must work with this basic-tidb. For more information, see the "Step 4: Connect to TiDB" section of Get Started.
First, obtain the service list information in the namespace of tidb-cluster. By default, the TiDB service basic-tidb is accessed by using the port 4000. Make sure that the port 4000 is available.
kubectl get svc -n tidb-cluster
basic-tidb is accessed by using in the port 4000/TCP and 10080/TCP.
To access basic-tidb, monitor the port 14000 while you use the port forwarding feature to access the port 4000 for basic-tidb. The port 4000 is defined in the YAML file and the image file for pingcap/tidb:v6.1.0. The default public port is 4000.
kubectl port-forward -n tidb-cluster svc/basic-tidb 14000:4000 > pf14000.out &
Check the monitoring result by using netstat -tpln.
After you perform the preceding steps, you can use the MySQL client to connect to basic-tidb of TiDB.
Set the port 14000 as the local port by using the IP address 127.0.0.1.
mysql --comments -h 127.0.0.1 -P 14000 -u root
After you connect to TiDB, check whether the TiDB service built on ASK works as expected.
Note: The goal of this article is to deploy TiDB in ASK, no DDL, data control language (DCL), or DML operations are performed. DDL operations are commands used to define databases and table. DCL operations are commands used to control data by authority. DML operations are commands used to operate data. You need to only perform a quick check.
Run the following command to check the TiDB version:
select tidb_version()\G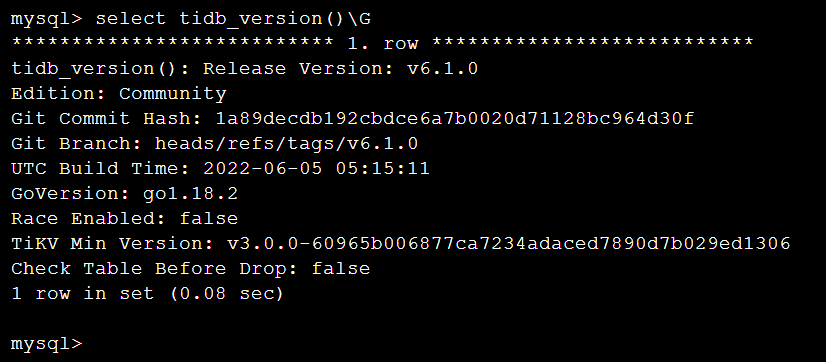
Run the following command to check the TiKV store status:
select * from information_schema.tikv_store_status\G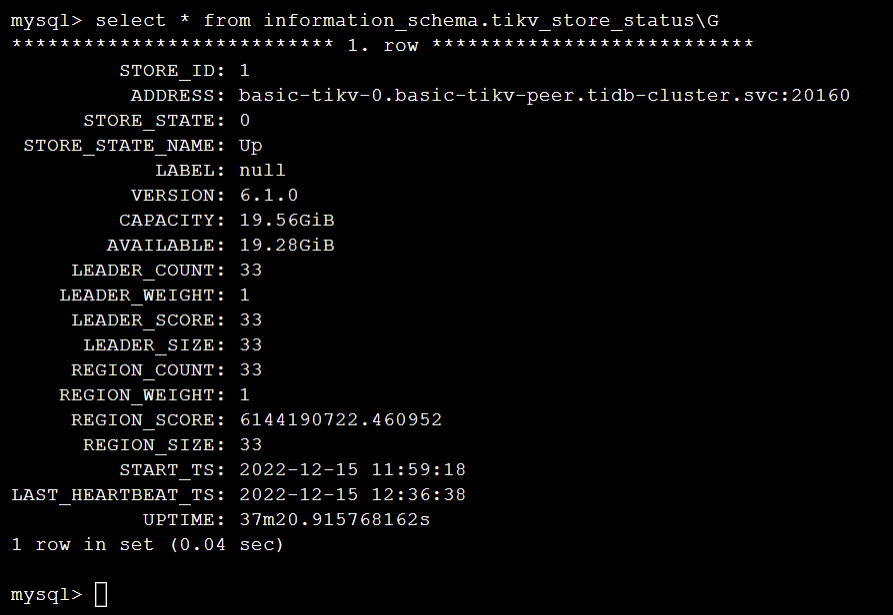
Run the following command to check the TiDB cluster information:
select * from information_schema.cluster_info\G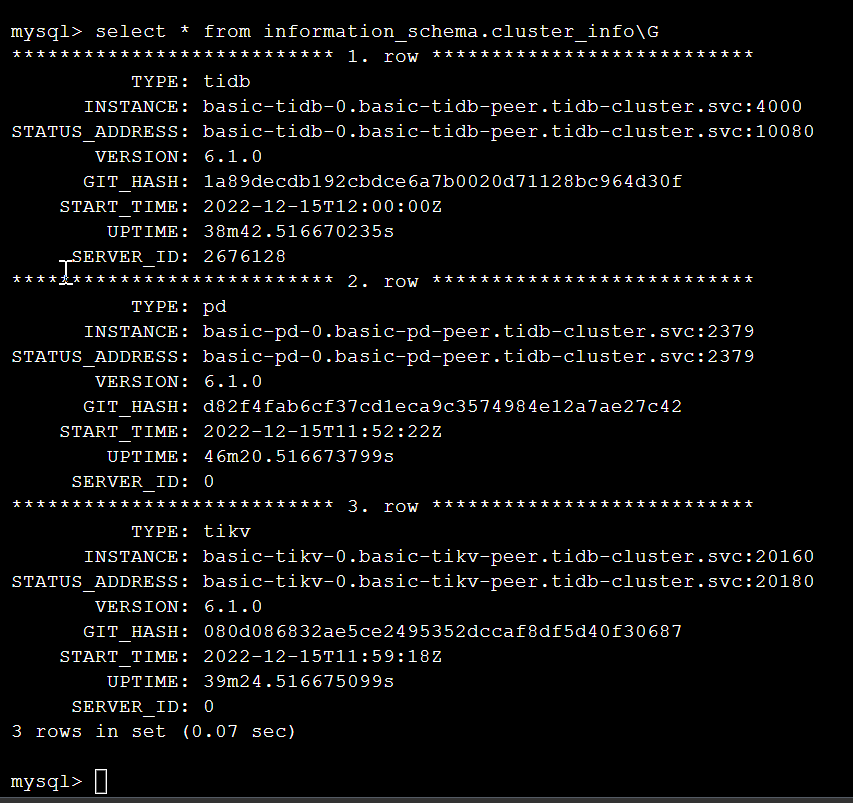
Run the following command to check status:
status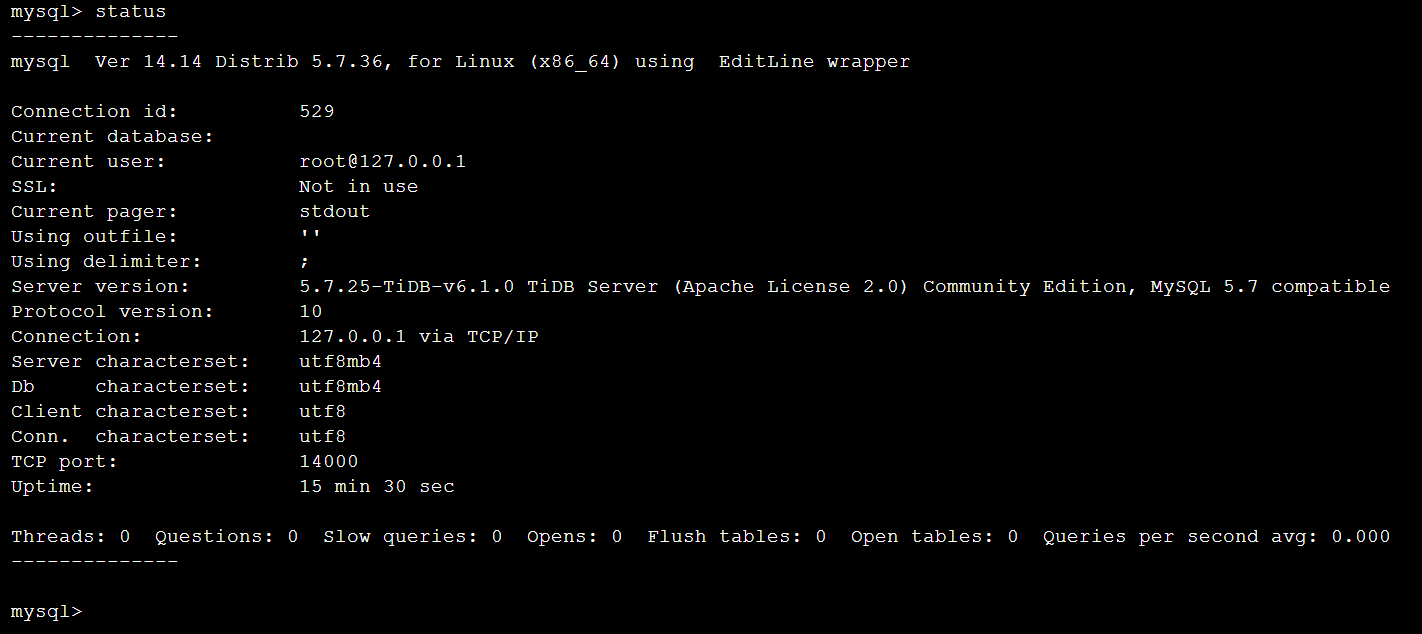
Run the following command to create a database:
create database sbdb;
Run the following command to check the database:
show Databases;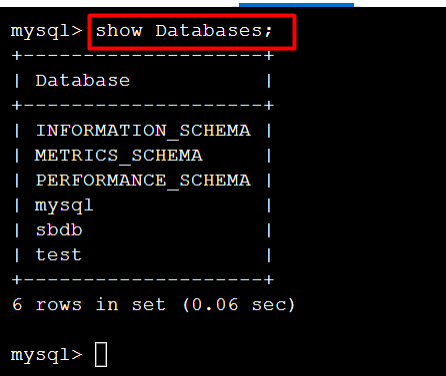
Run the following command to select a database:
use sbdb;
Run the following command to create a table:
create table sbtest(id int unsigned not null auto_increment primary key, v varchar(32));
Run the following command to check the table:
show tables;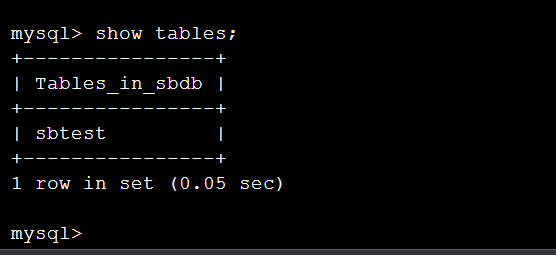
Run the following command to add data to the table:
INSERT INTO sbtest VALUES(1,'test1');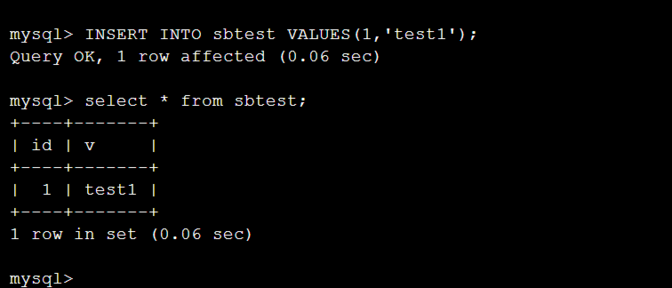
Run the following select command to query data in the table:
select * from sbtest;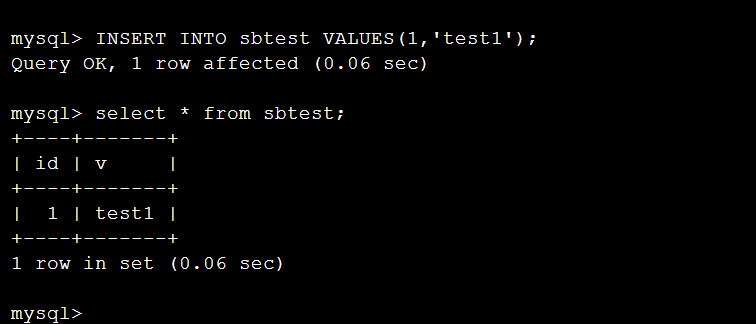
Make sure that the operations based on MySQL work as normal.
Make sure that you can operate TiDB on MySQL.
To monitor the load on TiDB, create Grafana and connect with the TiDB cluster. To do so, perform the following steps:
Go to the cluster configuration page. In the left-side navigation pane, choose Network > Services. On the Services page, view the basic-grafana service.
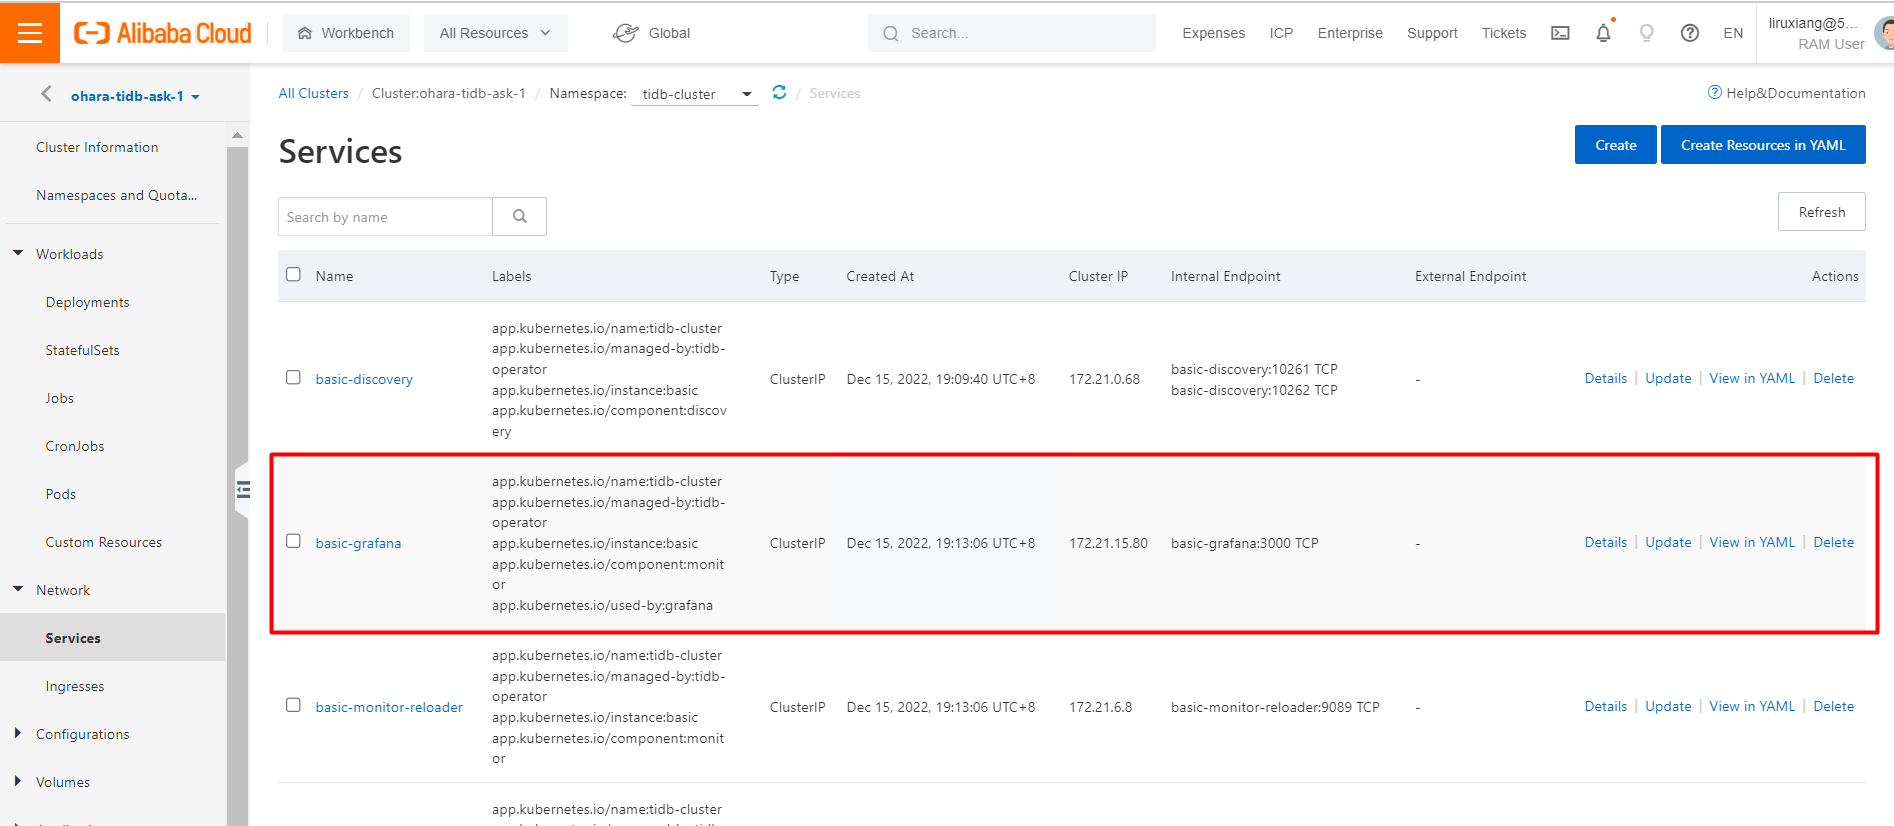
The preceding figure shows that the basic-grafana service is of the ClusterIP type and cannot be connected from an external network. In this case, end users cannot access Grafana or monitor the TiDB load. You can use SLB to allow accesses to Grafana from external networks.
In the SLB console, create an SLB instance.
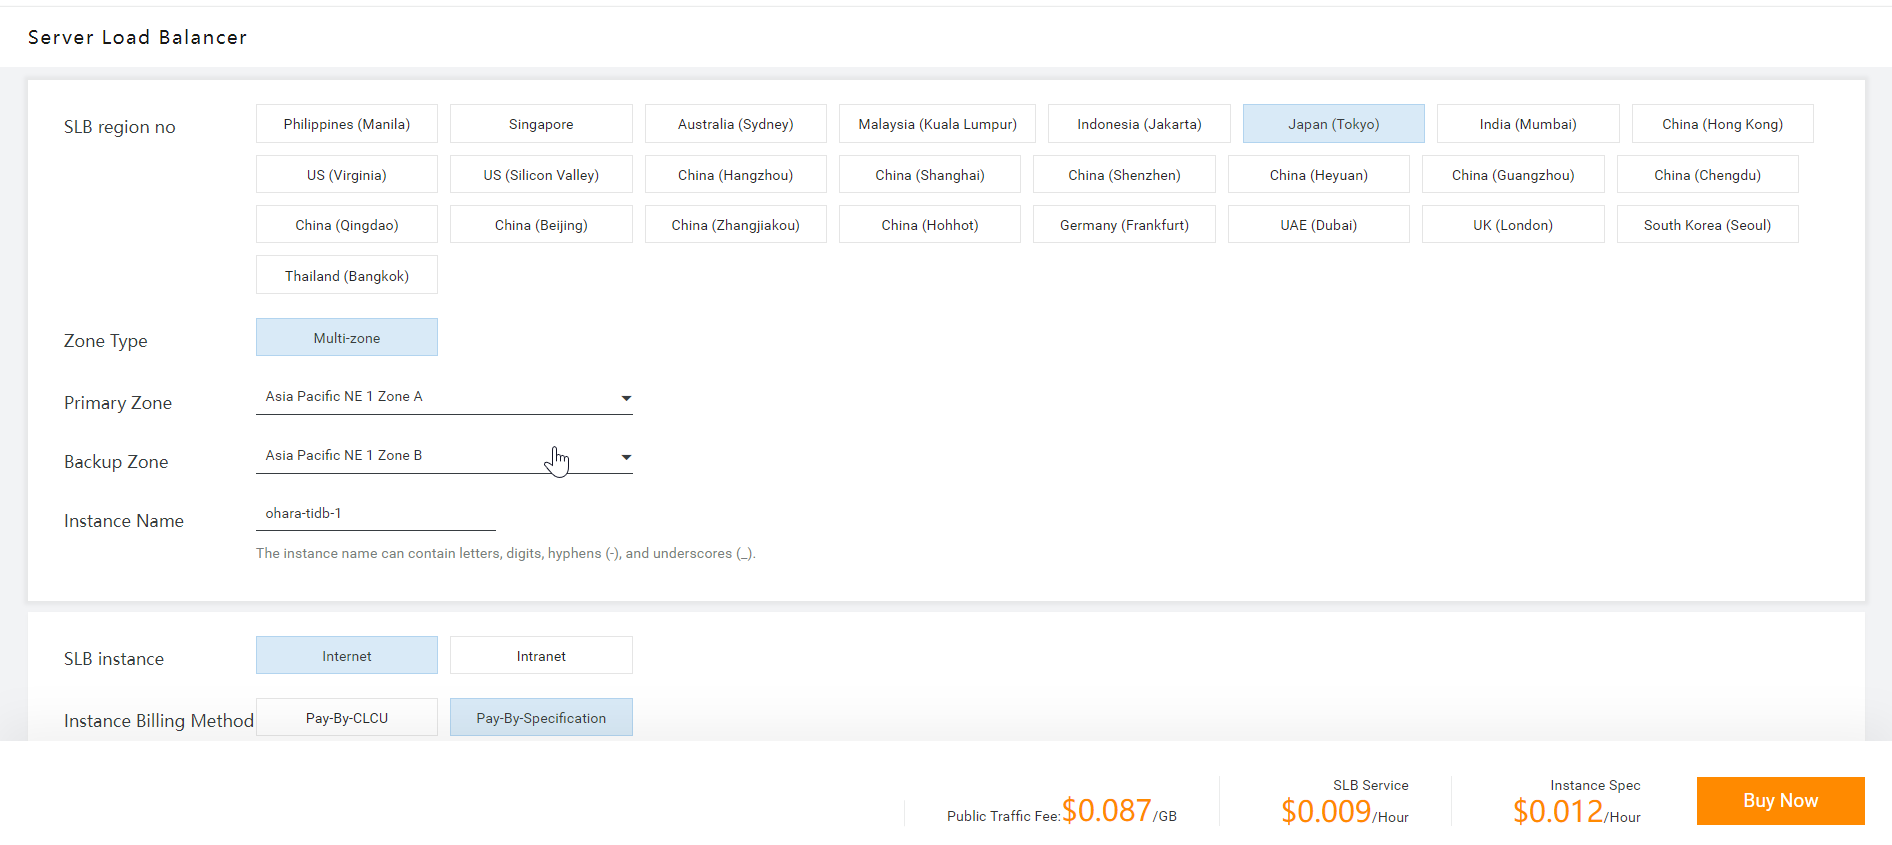
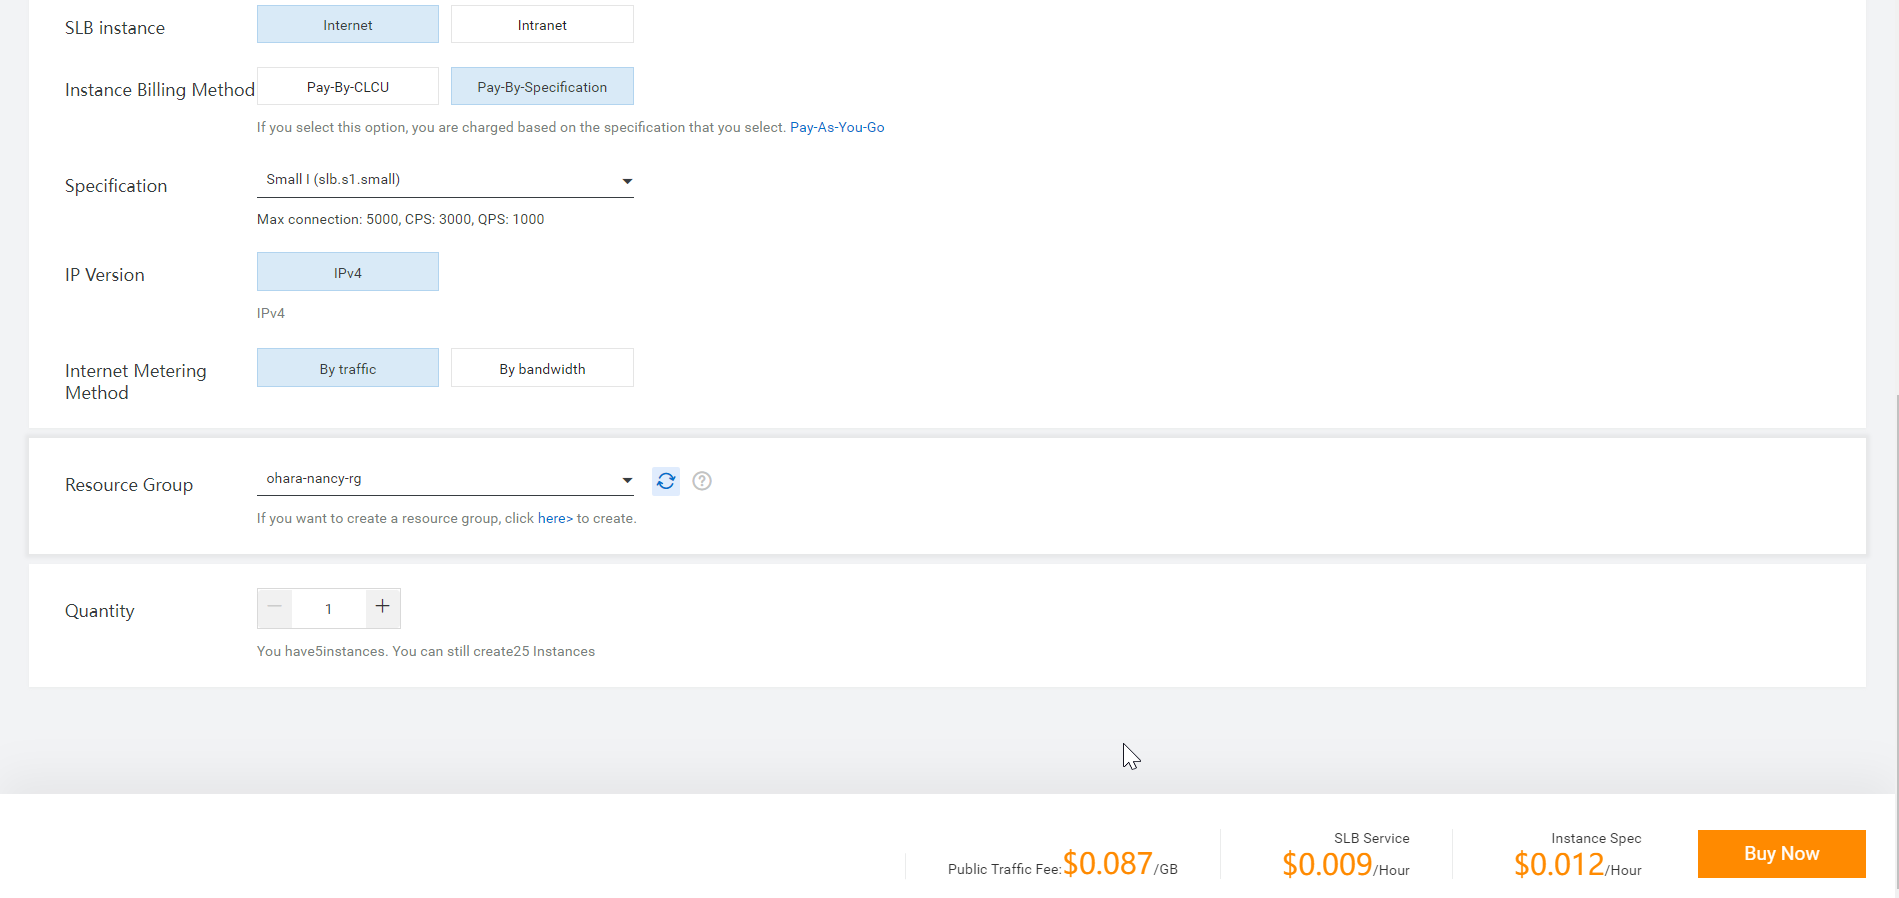

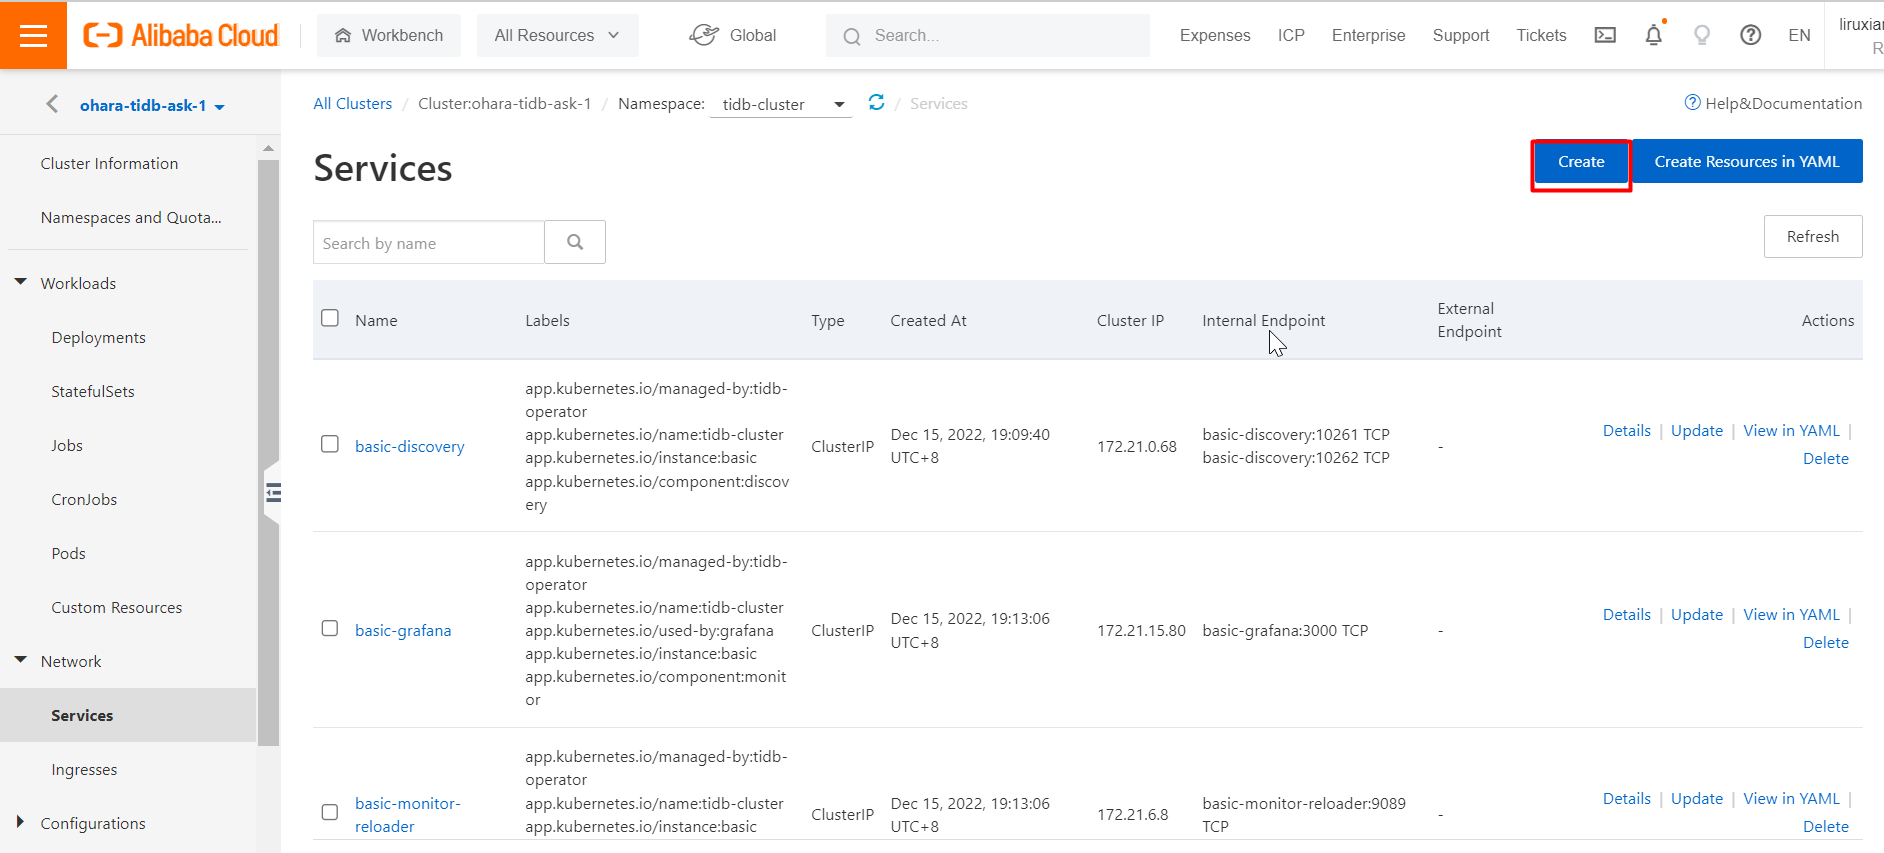
After an SLB instance is created, go back to the Services page of the ASK cluster in the ACK console. On the Services page, you can click Create to create an external service for Grafana.
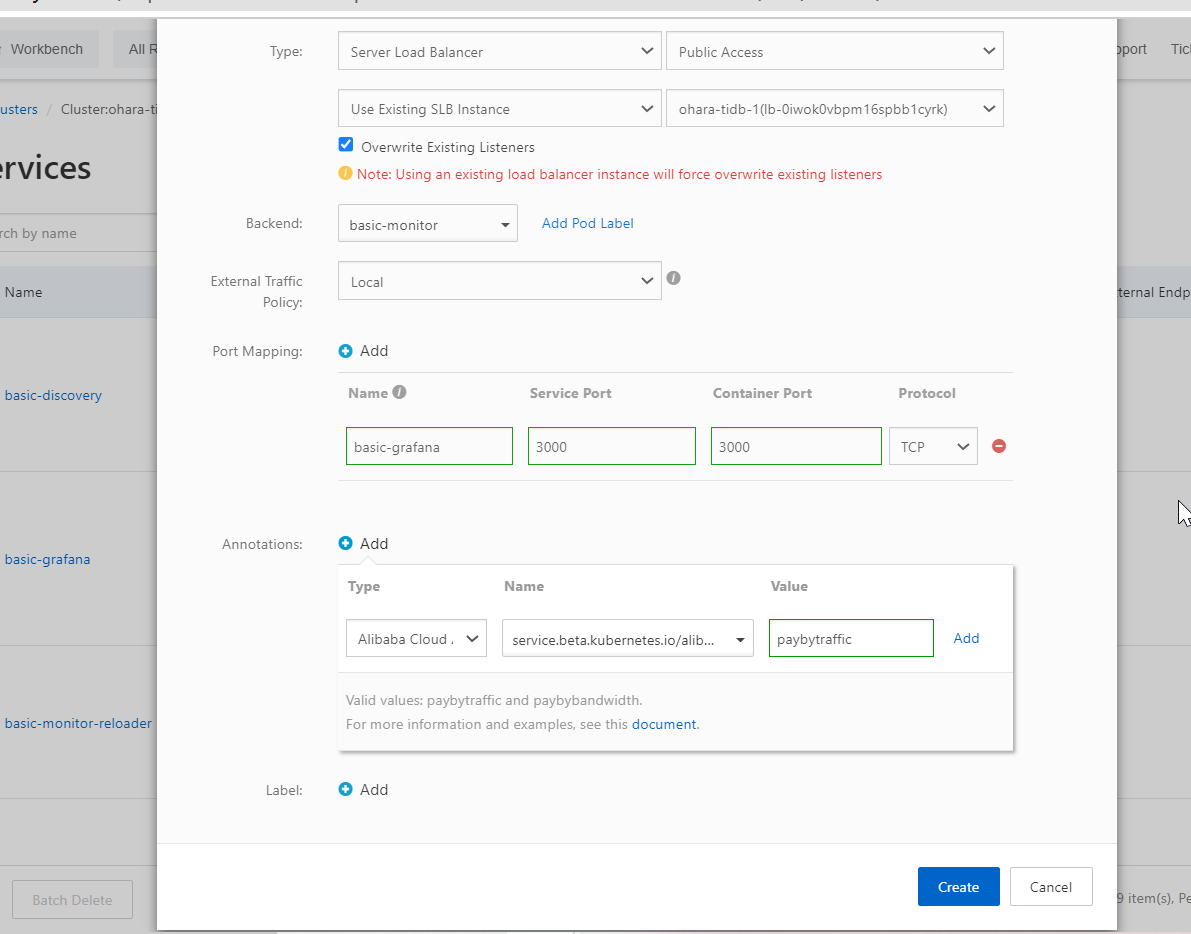
Configure the external service for Grafana to be associated with the created SLB instance. To do so, perform the following steps: In the Create Service dialog box, configure a port for Grafana in the Port Mapping section. After you configure the required parameters, click Create.
After you create an external service for Grafana, check the service on the Services page in the ACK console.
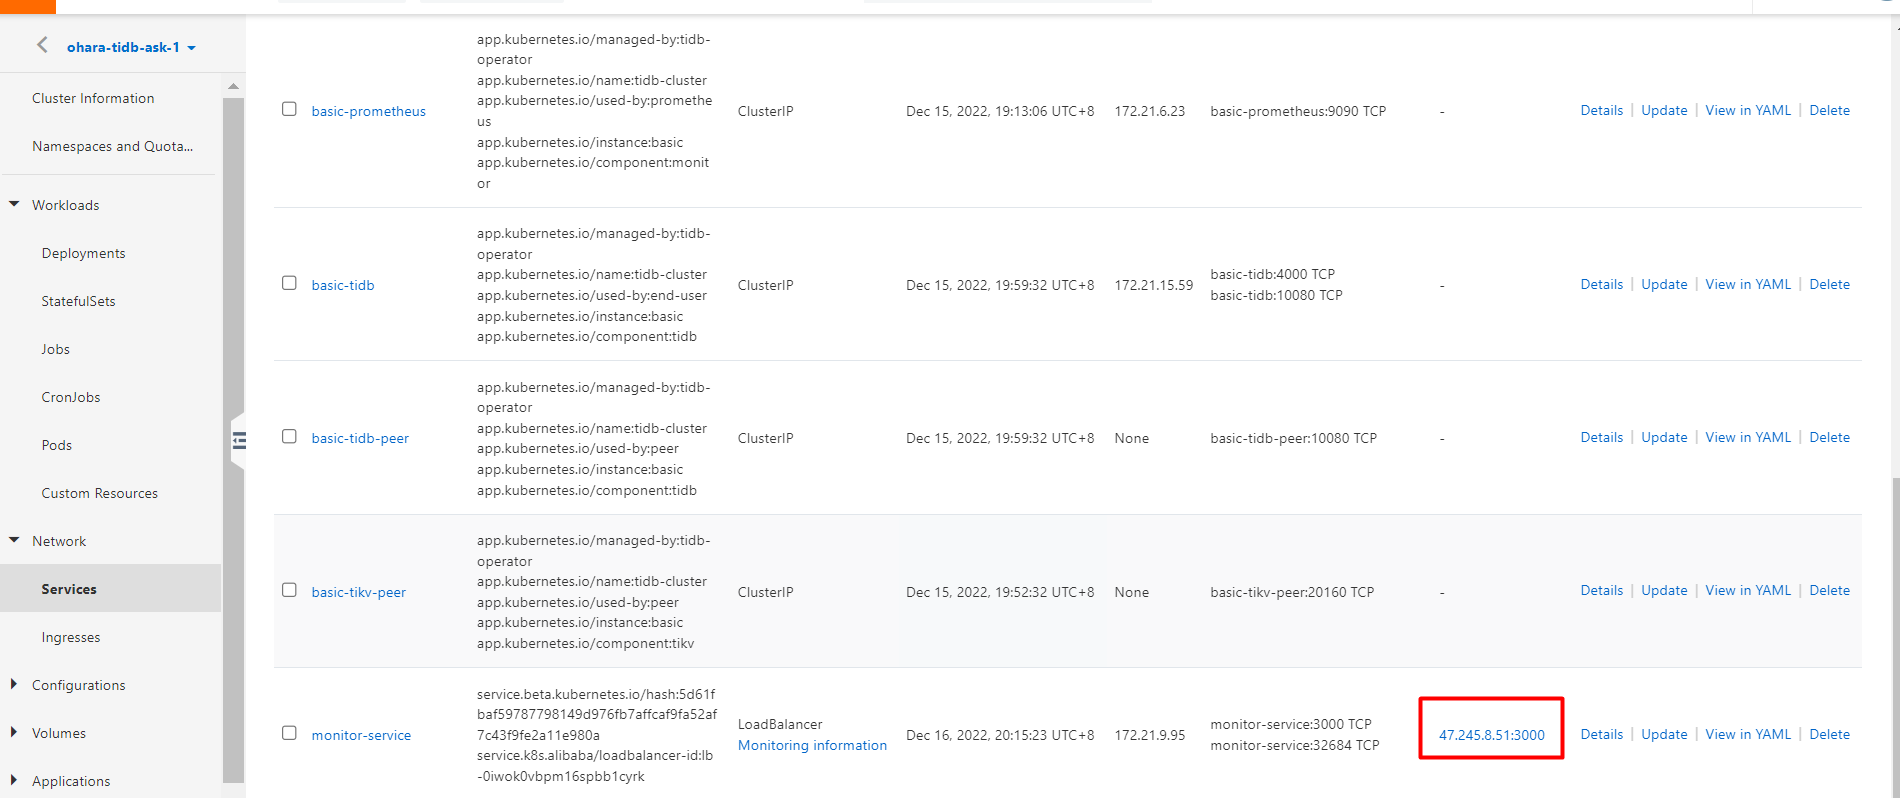
You can view the IP address and port that can be used to access Grafana from an external network. You can enter the IP address and port in a browser to access Grafana.
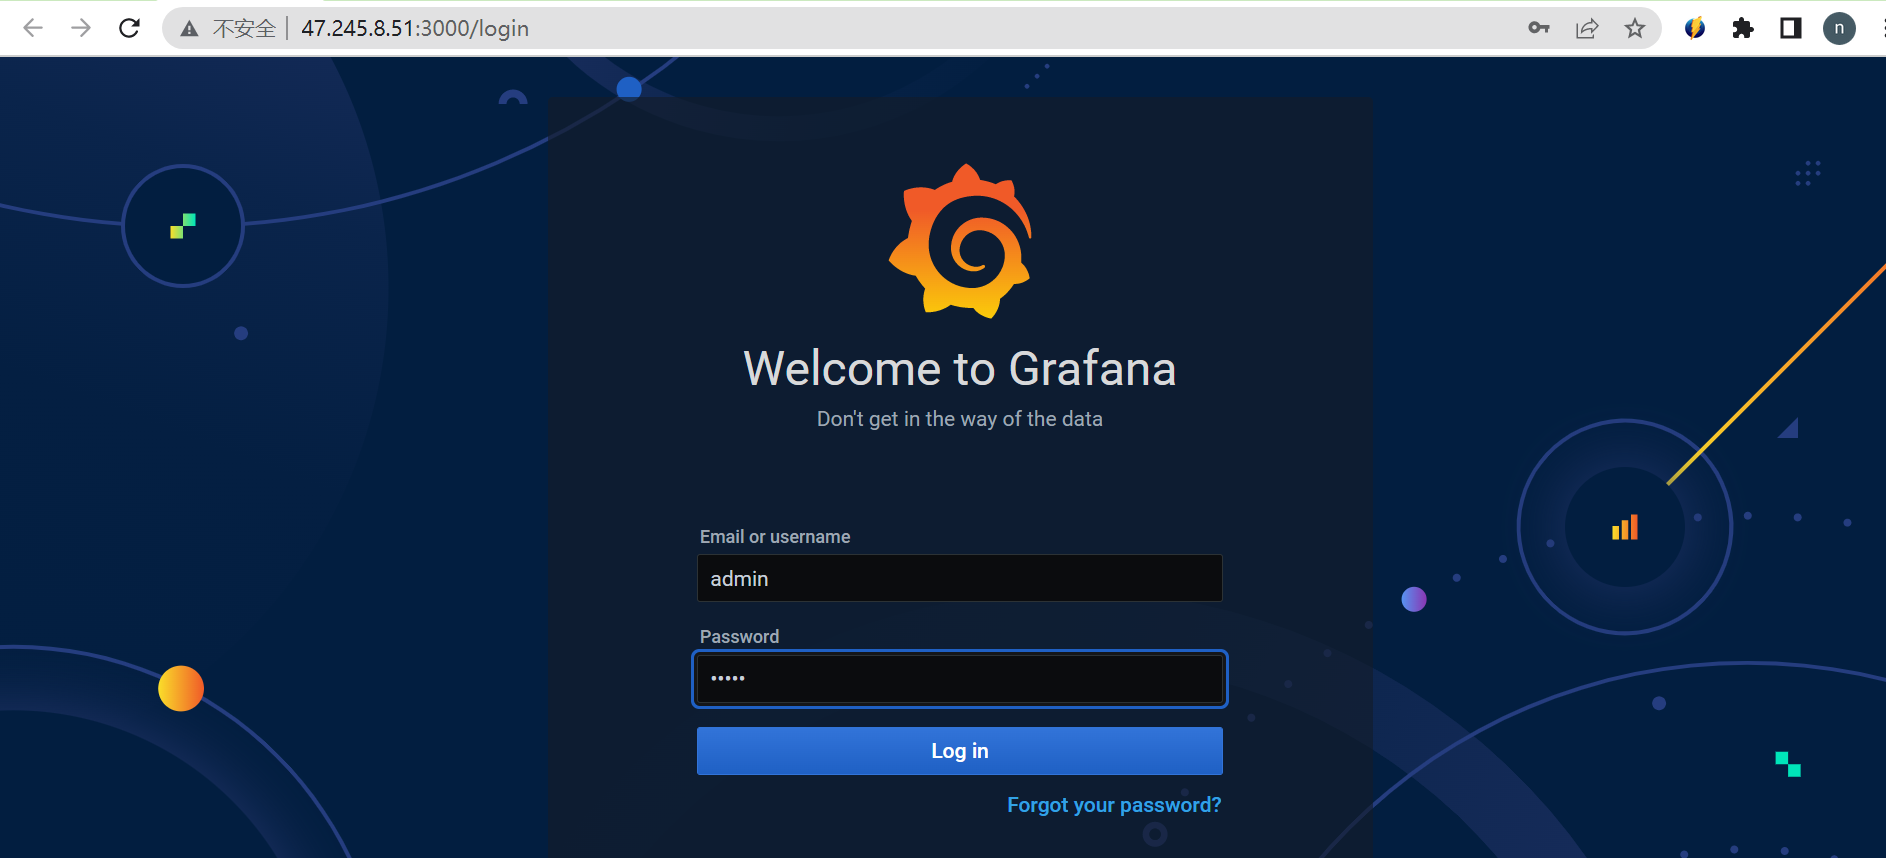
Log on to Grafana. The default account name and password are as follows.
account: admin
password: admin (for first-time login)
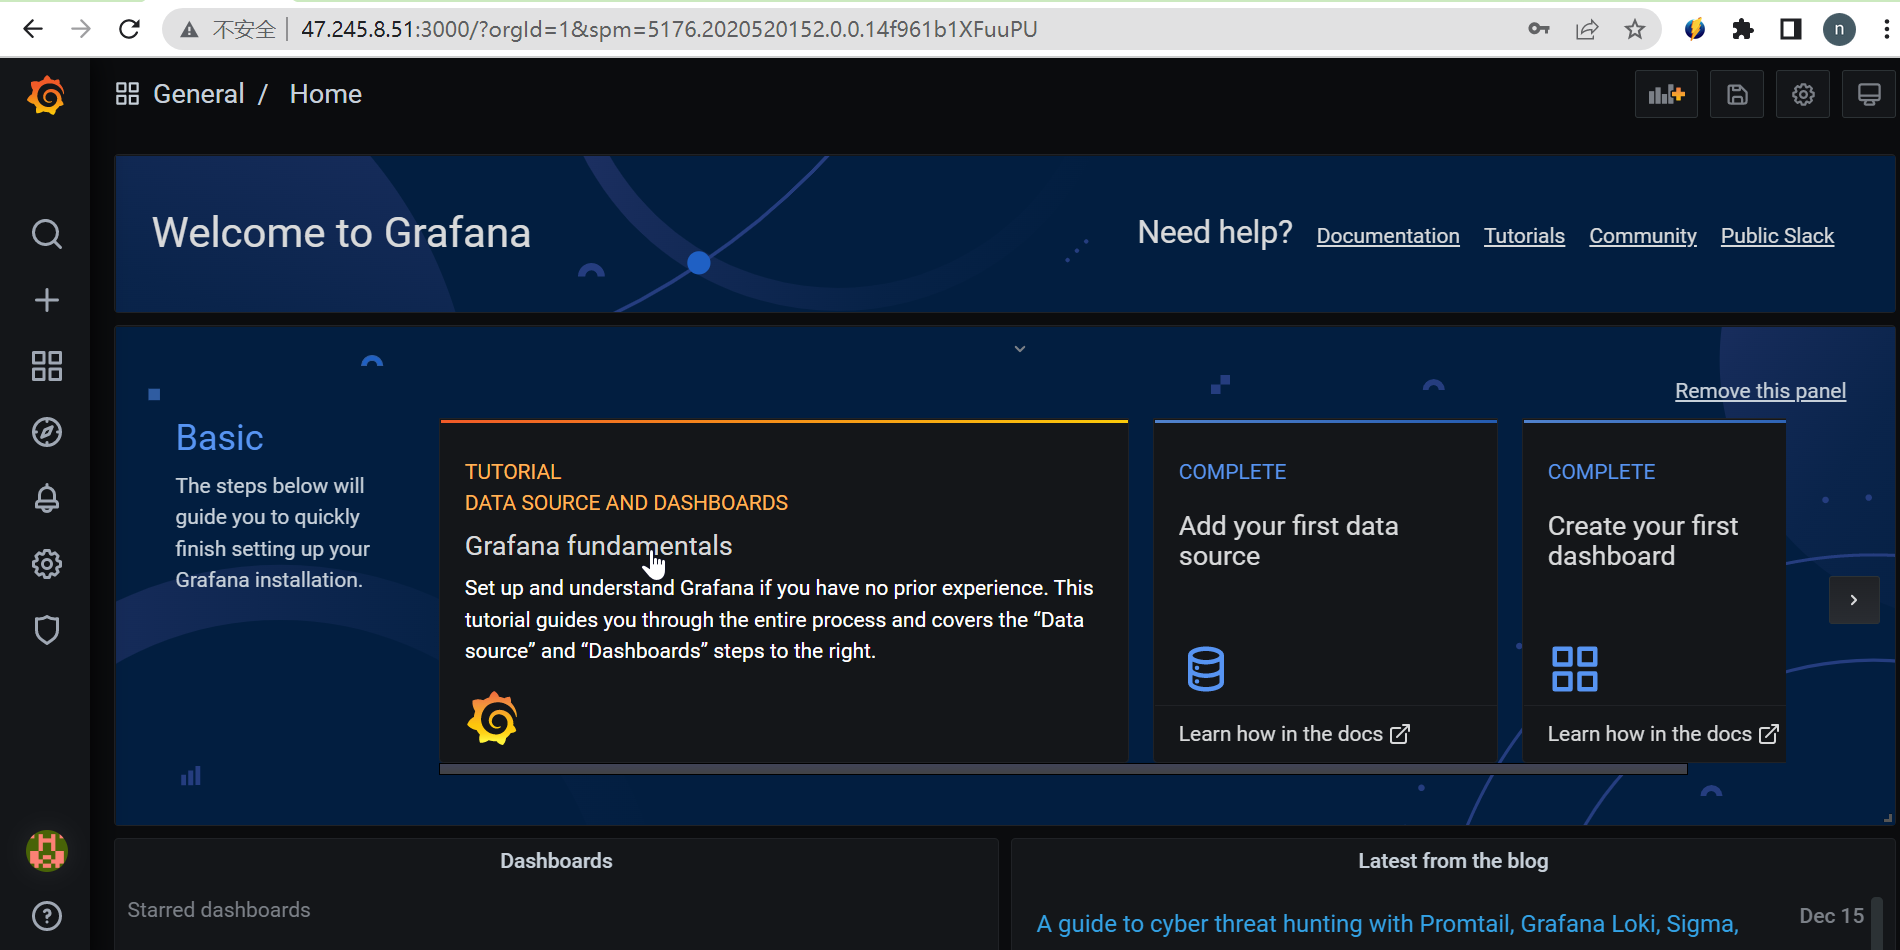
The remaining configurations are similar to those in Grafana.
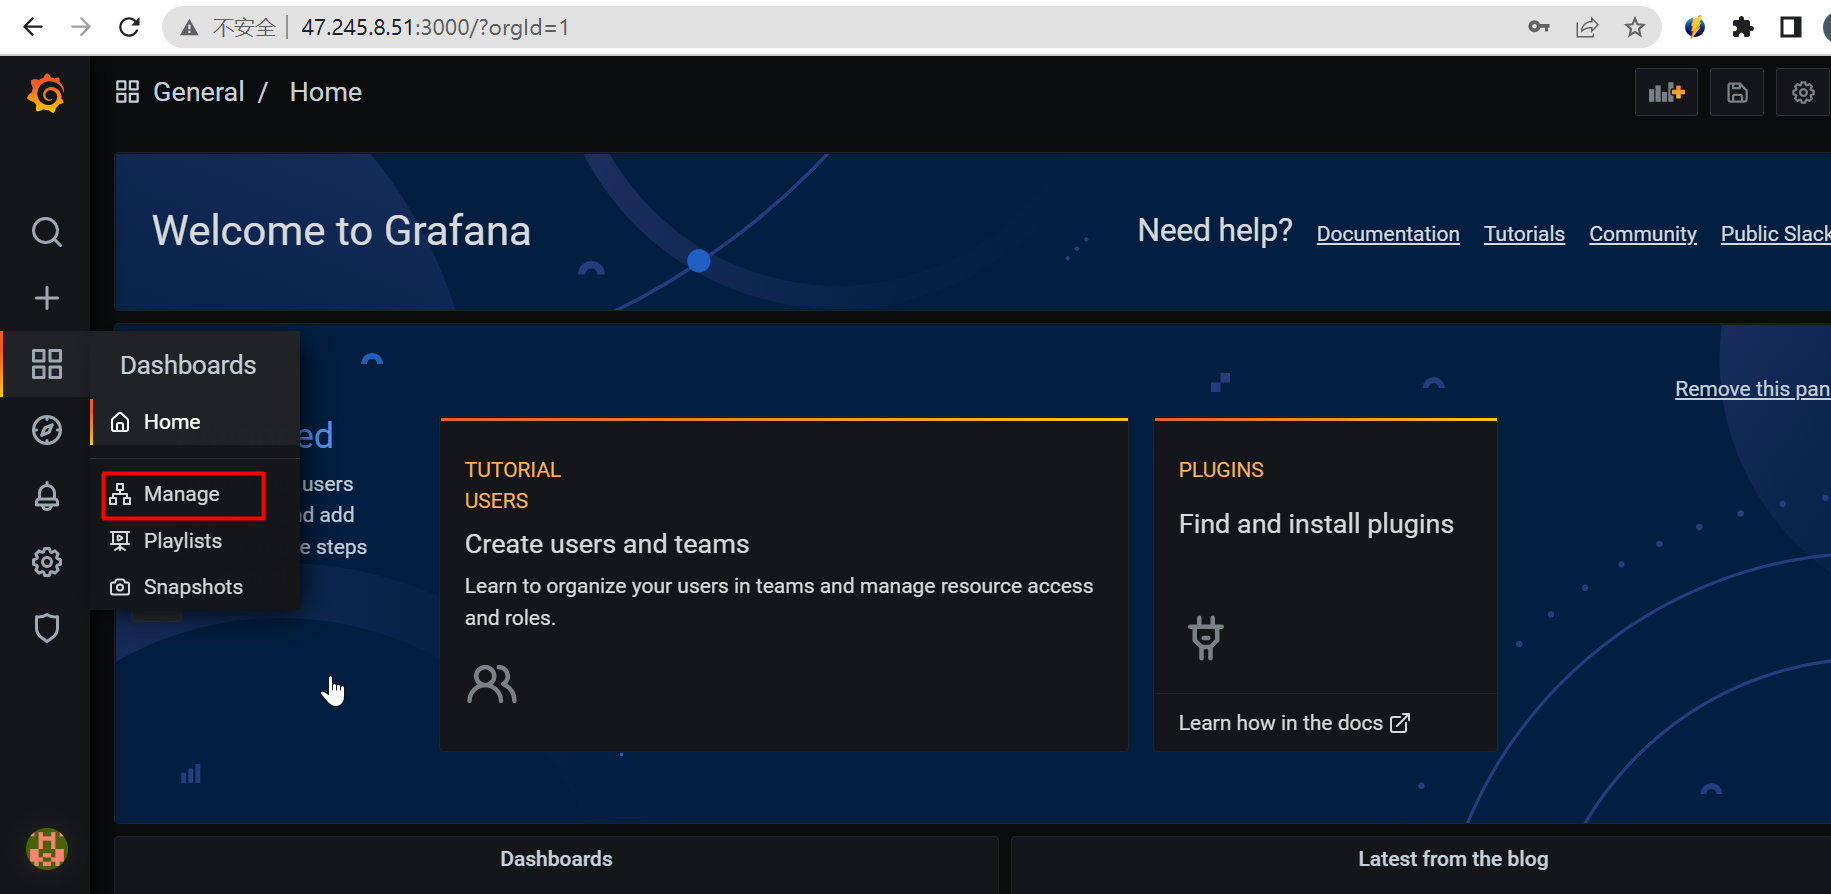
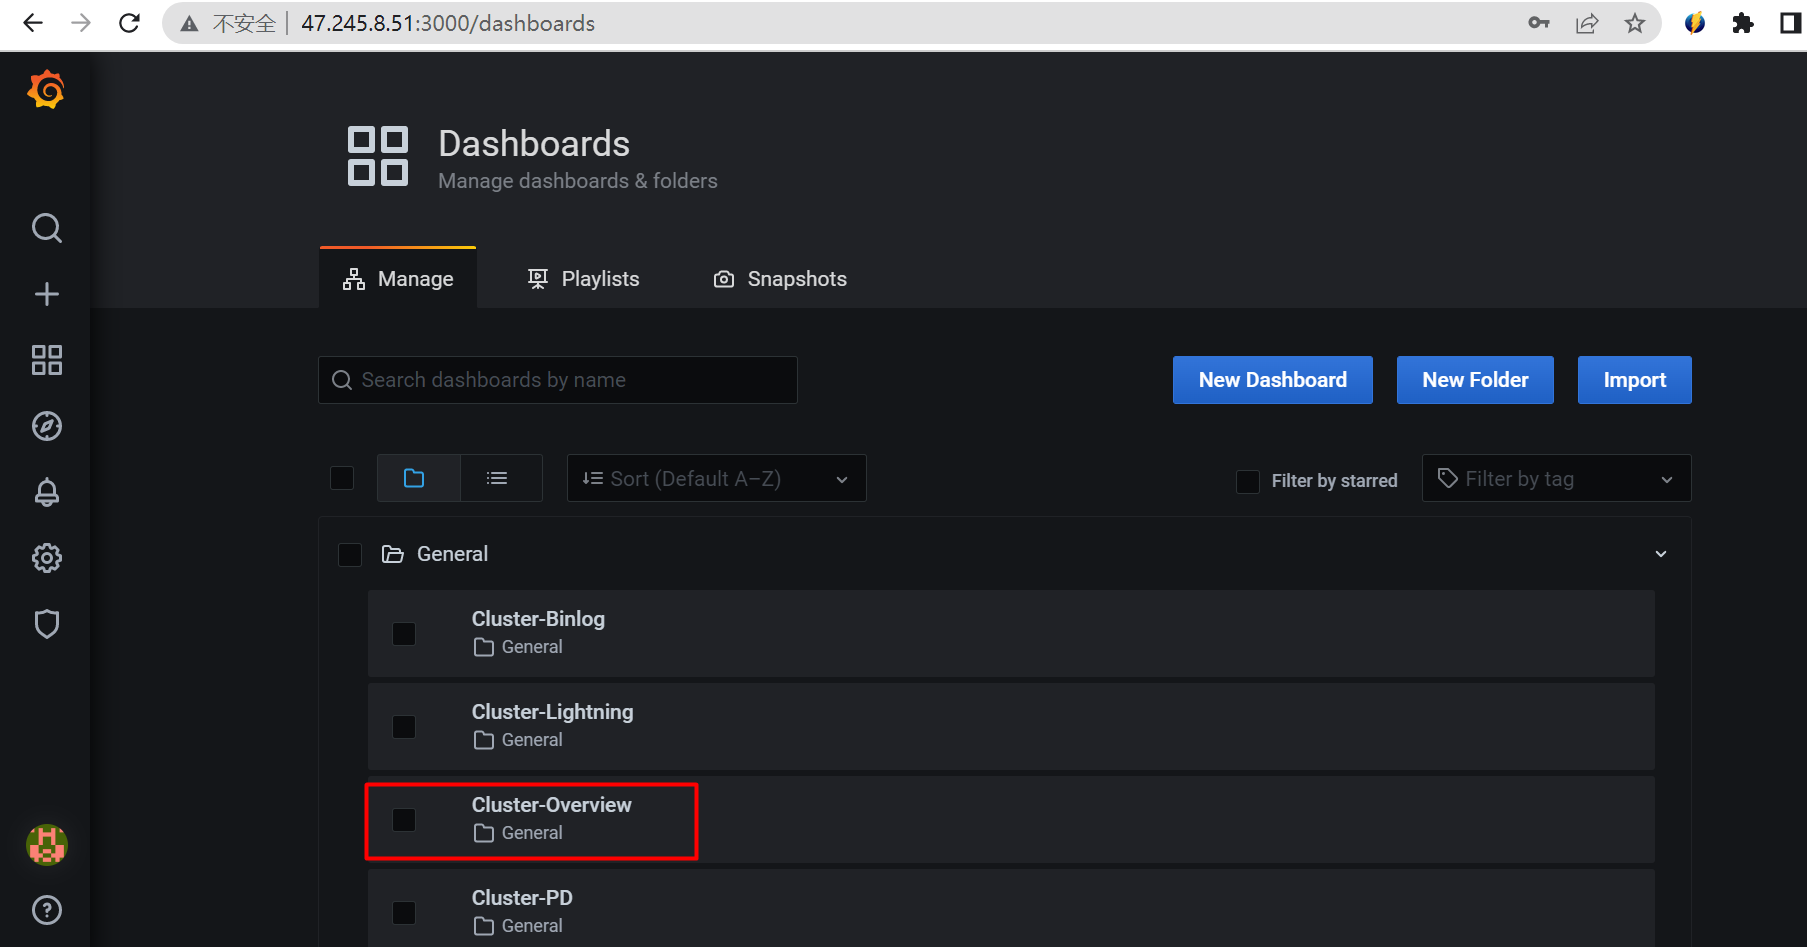
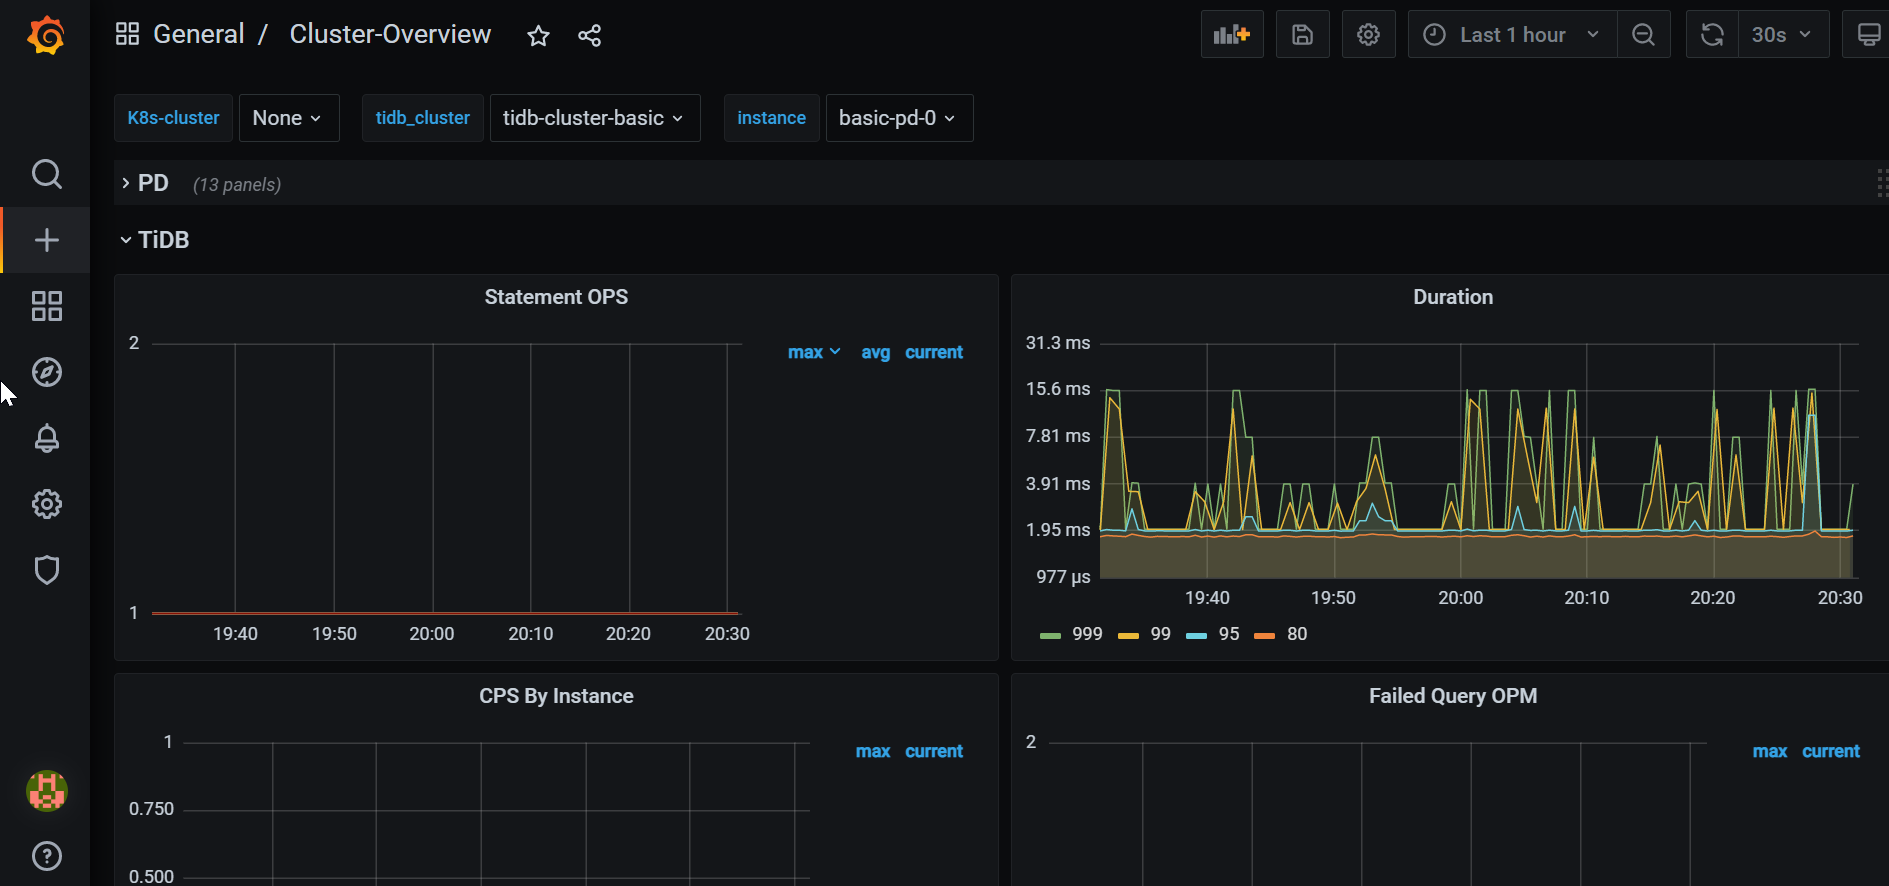
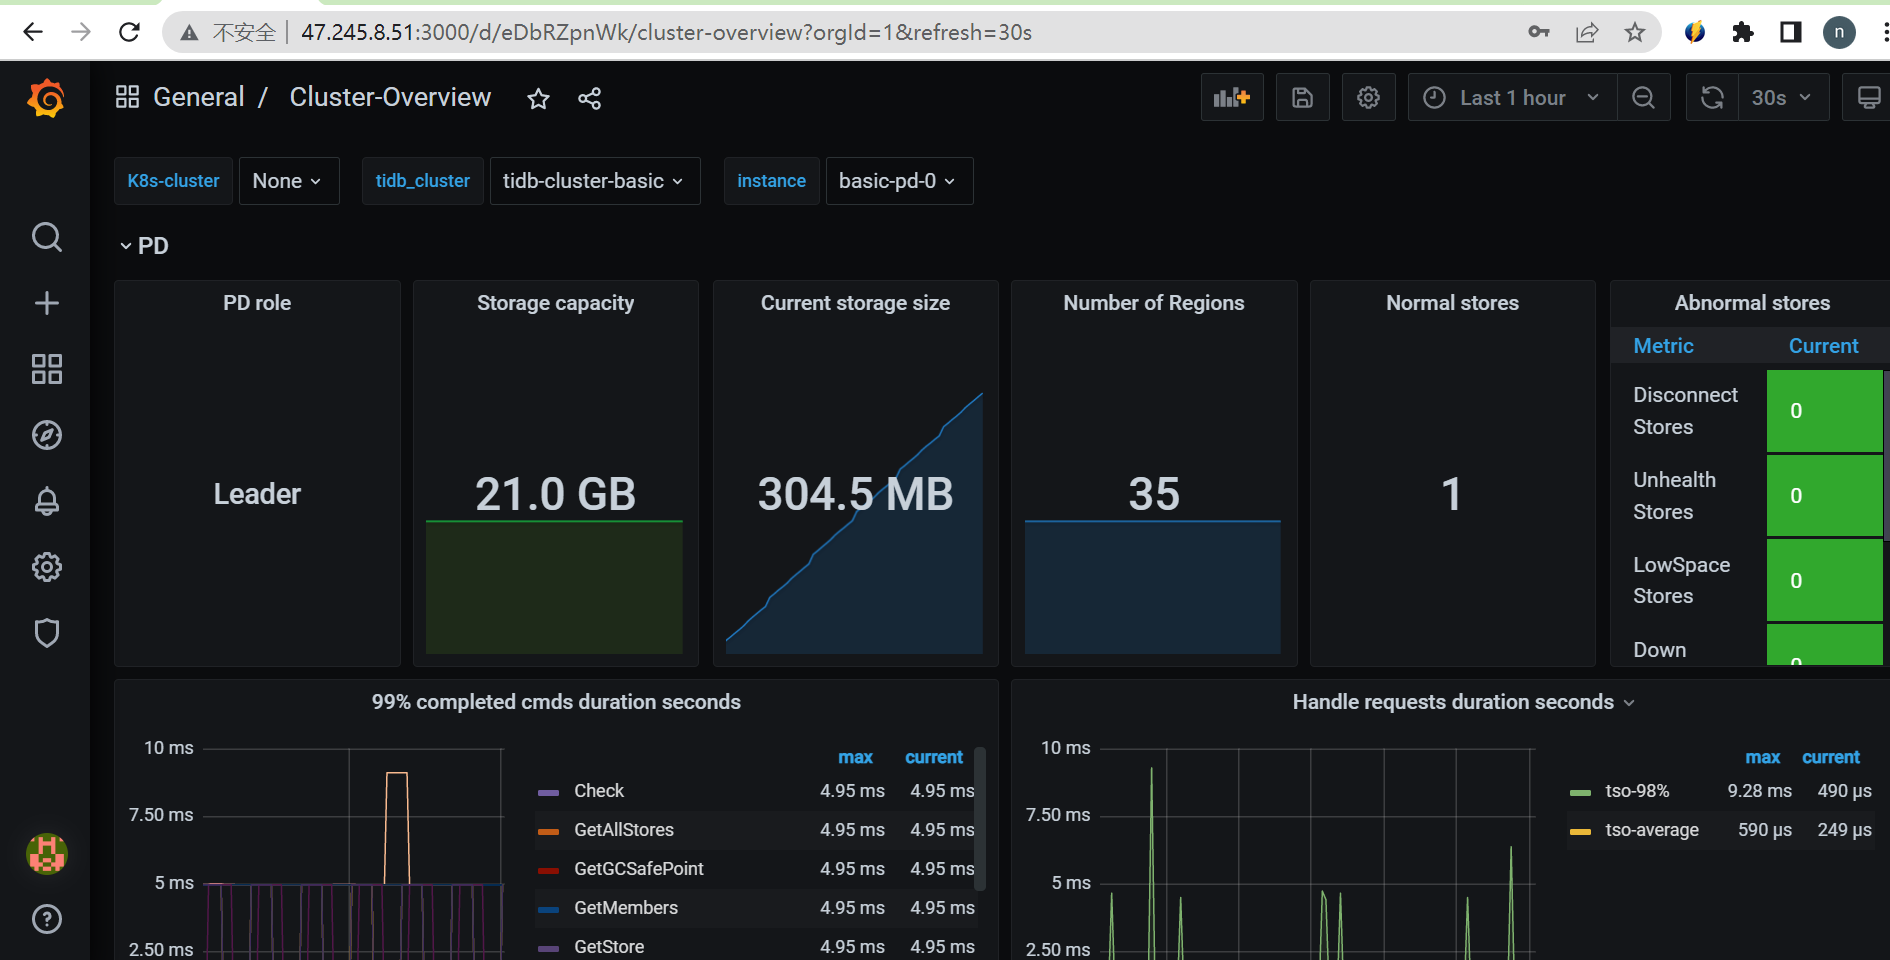
To visualize TiDB load monitoring in a chart format in Grafana, create a monitoring graph. The process is quick and simple. In the left-side navigation pane, click Dashboards > Manage in Grafana, then choose Cluster-Overview.
On the Cluster-Overview page, click TiDB.
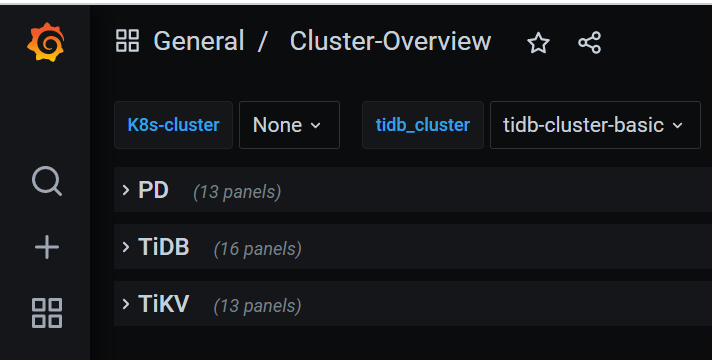
The following figure shows the monitoring graph of the TiDB basic-pd-0 instance.
If you select PD(PVC) for TiDB, the following figure shows the monitoring graph.
There are a few installation details that are not included in the official PingCAP documentation. You can refer to this section for troubleshooting guidance when deploying TiDB in Kubernetes.
This occurs because the required storage class is not set by default for TiDB. To resolve this issue, manually recreate the required PV and PVC and redeploy the pod. Note that when recreating, the PVC must have the same name as the required PVC for the TiDB side.
If the basic-pd-0 pod is in the CrashLoopBackOff status, it is likely due to the inaccessibility of the health check URL. This occurs because the URL cannot be recognized without coreDNS. To resolve this issue, install the coreDNS component in the cluster. While there are alternative solutions available, I recommend using coreDNS as it provides a quick and effective internal DNS server.
Ensure that the basic-pd pod is in the Running state. The two pods are created by tidb-controller after the basic-pd is ready.
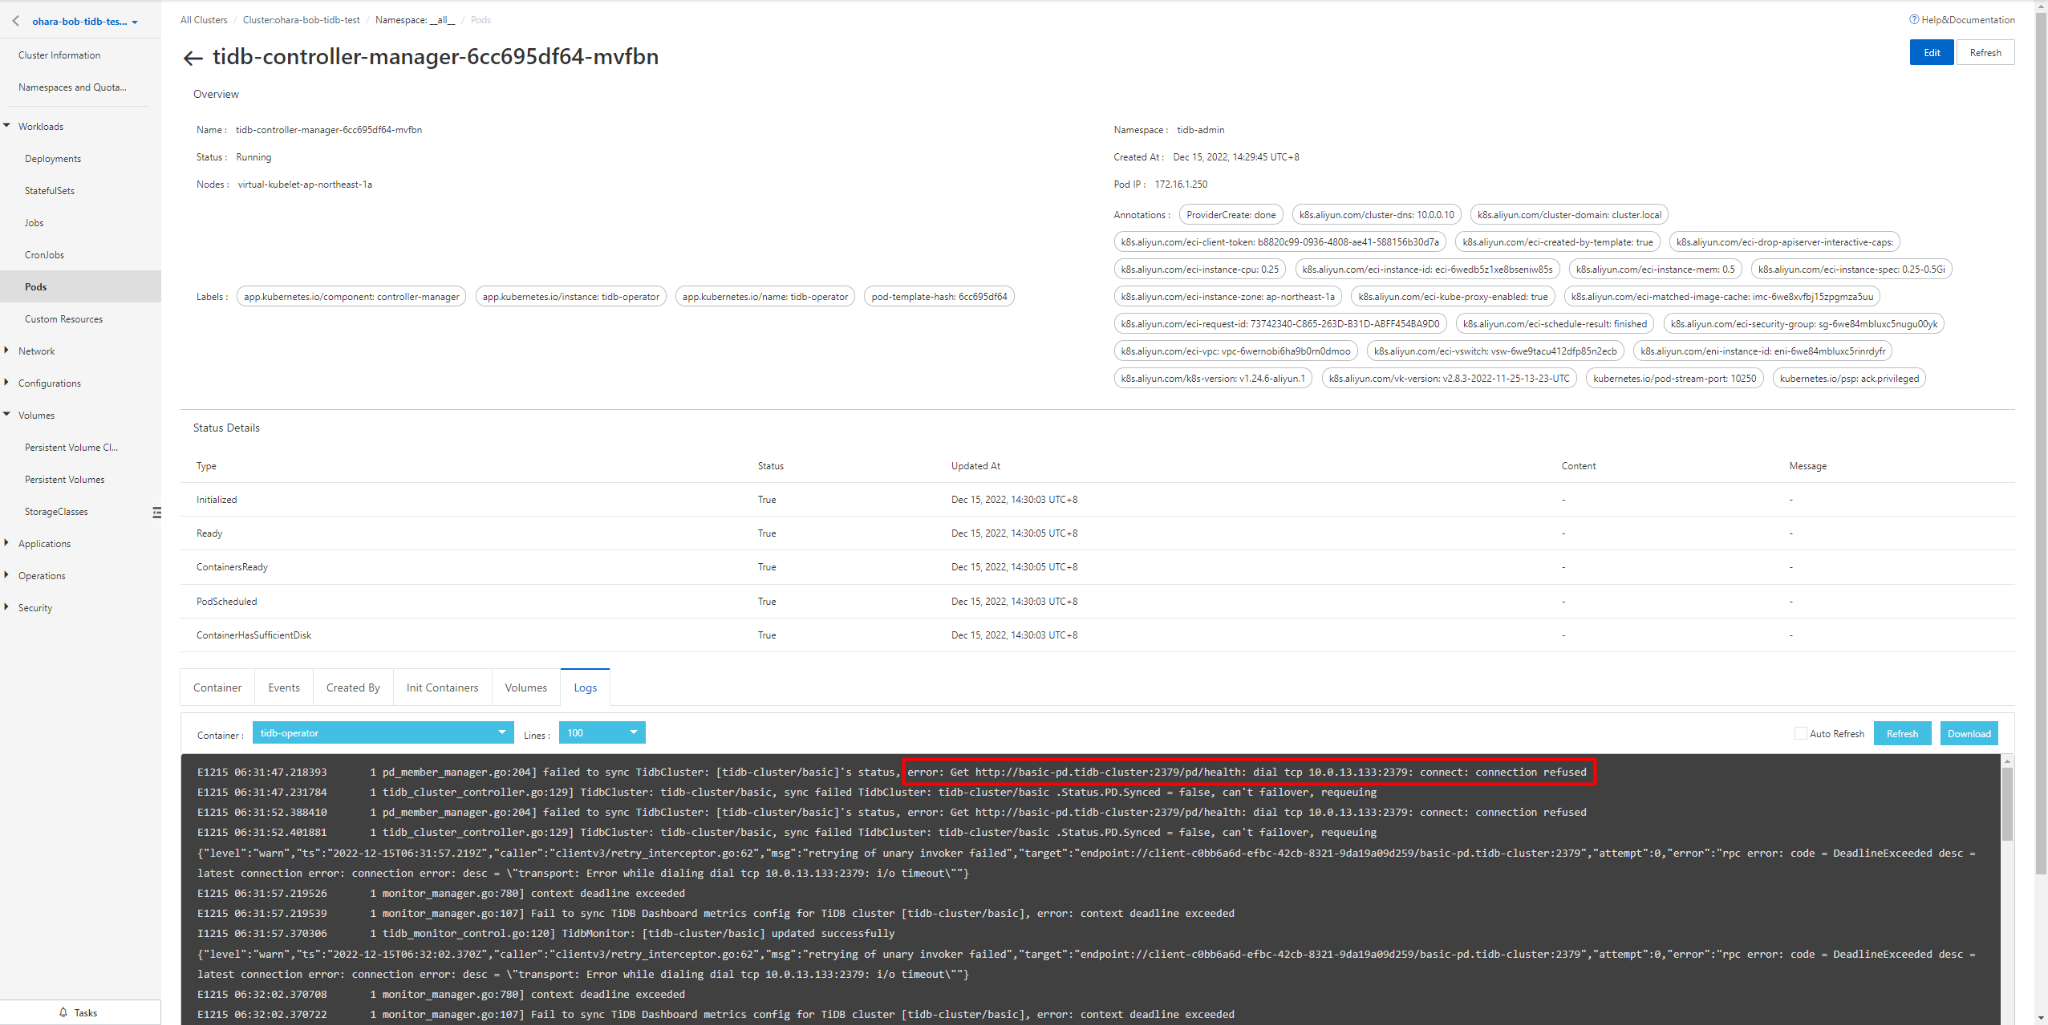
The figure above shows that the detailed reason can be found in the tidb-controller log.
PingCAP TiDB has a lot of useful best practices that can be used as a reference for troubleshooting.
TiDB is a next-generation database that can be built with Kubernetes. One of its major assets is its high compatibility with MySQL.
However, TiDB or Kubernetes beginners may encounter issues during the building process due to the lack of certain information on the official TiDB website. To mitigate this, Alibaba Cloud's ASK can be used to build a serverless container, which allows for seamless building and troubleshooting of potential problems that may not be documented on the TiDB website.
Additionally, logs and error information can be viewed in the Container Service ACK console if errors occur, enabling quick resolution of issues before using the Kubectl command. With the use of coreDNS, a low-cost serverless Kubernetes, TiDB can be deployed in Knative.
Furthermore, you can use Alibaba Cloud ACK One to deploy TiDB as a multi-cloud database, connecting all Kubernetes clusters for maximum strength.
This article is a translated piece of work from SoftBank: https://www.softbank.jp/biz/blog/cloud-technology/articles/202212/deploy-tidb-with-serverless-k8s/
Disclaimer: The views expressed herein are for reference only and don't necessarily represent the official views of Alibaba Cloud.
Test the Validity of Web Application Firewall on Alibaba Cloud
Alibaba Cloud Community - September 1, 2023
Hironobu Ohara - February 3, 2023
Alibaba Cloud Native Community - September 19, 2023
Alibaba Container Service - June 16, 2020
Alibaba Container Service - January 27, 2022
Alibaba Cloud Community - July 11, 2024
 Serverless Workflow
Visualization, O&M-free orchestration, and Coordination of Stateful Application Scenarios
Learn More Managed Service for Prometheus
Multi-source metrics are aggregated to monitor the status of your business and services in real time.
Learn More Serverless Application Engine
Serverless Application Engine (SAE) is the world's first application-oriented serverless PaaS, providing a cost-effective and highly efficient one-stop application hosting solution.
Learn More Application Real-Time Monitoring Service
Build business monitoring capabilities with real time response based on frontend monitoring, application monitoring, and custom business monitoring capabilities
Learn MoreMore Posts by H Ohara