By Ankit Mehta, Alibaba Cloud Tech Share Author. Tech Share is Alibaba Cloud's incentive program to encourage the sharing of technical knowledge and best practices within the cloud community.
The biggest challenge for any IT administrator or DevOps engineer is to prepare environments the agile way by making sure that all the environments carry same components all the time.
In some cases, environments are geographically distributed and changes should be rolled out in such a way that it does not impact existing infrastructure and delivered in time to meet the SLO (Service Level Objectives), SLI (Service Level Indicators), and SLA (Service Level Agreements).
This blog post will help you to understand how to configure and manage the infrastructure with identical software/components on each system. The blog post is intended for the readers with some or intermediate IT administration experience.
The blog post will answer the following questions
As defined in Wikipedia, "Configuration Management is establishing and maintaining consistency of a product's performance, functional, and physical attributes with its requirements, design, and operational information throughout its life".
From a DevOps perspective, we need to make sure that the development environment is exactly similar to the production and UAT - User Acceptance Test servers. This will help to reduce to see the different results from the environment to the environment.
The first step to getting started with is to create an inventory of all the requirements. The following is a sample inventory baseline file.

Some of the most important components of the inventory files are
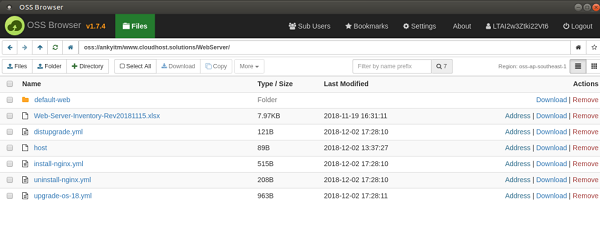
As a best a best practice one must keep all the revision of the files. You can use GitHub, Bitbucket, Google Drive or Alibaba Cloud Object Storage Service (OSS). For this blog post, we will use the Alibaba cloud OSS. As the configuration files are going to be less than 5GB, and data transmission is also less, so virtually your files are stored free and still under your control. Following is an example of a configuration file structure stored on OSS.
Now as we have the requirement, the next step is to automate it and we will use Ansible. Ansible is an open source IT automation tool that can improve the stability, reliability, and consistency of the IT infrastructure.
Let's get started with Ansible. Following are the base requirement.

For the demonstration purpose, we will use an Ubuntu based Alibaba Cloud Elastic Compute Service (ECS) server.
At the time of writing, Ubuntu 18.04 may not be available on the default images of certain regions yet. To prepare two servers with Ubuntu 18.04, the custom image option can be used. To achieve this,
1. Install one server with 16.04
2. Upgrade the server with 18.04
3. Once the server is Upgraded, Navigate to create image
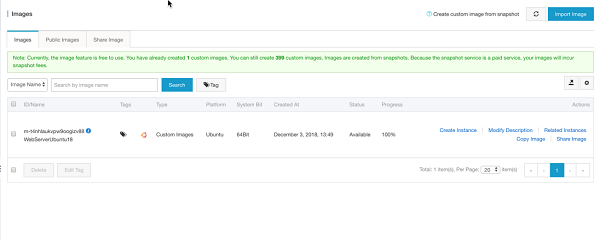
4. Once the image is created, use this image as custom image for the installation

Ansible is not a directly available package, so you may need to install an Ansible ppa. Run the following commands:
sudo apt-get update
sudo apt-get install software-properties-common
sudo apt-add-repository ppa:ansible/ansible
sudo apt-get update
sudo apt-get install ansibleansible --version

There are mainly two important configuration files from the Ansible perspective:
Ansible uses the root user to connect to the remote computer. As a best practice, it is not good to use the root as a login user.
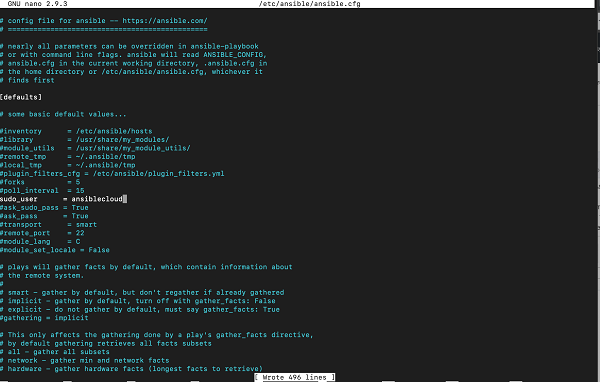
If any other user instead of the root user is used for the server configuration then, it is required to update the configuration file to use the alternate user.
To update the remote login user, update the ansible.cfg file remote_user section. In my case, the username is alibabacloud so the configuration updated configuration will be as follows:
remote_user = alibabacloud
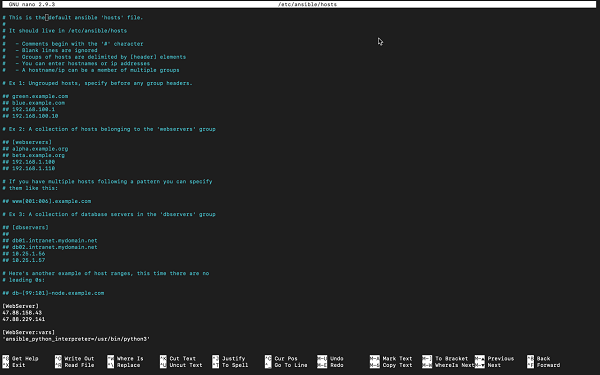
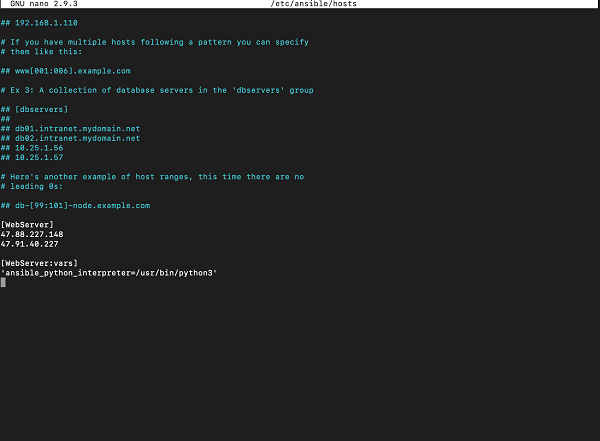
The next step is to update the host file, it is advised to group the servers under a logical group. This will not only help your system management smoother but also give you high-level network segmentation. You can implement the host file entries with either domain name or the IP address. Following is our sample host file with required entries.
Execute the ping command to validate if the connection is working fine:
ansible WebServer -m ping -e 'ansible_python_interpreter=/usr/bin/python3'Ping before host addition:

Ping after host and user addition:

Latest version of the Ansible requires Python3 as interpreter, it is required to pass the -e 'ansible_python_interpreter=/usr/bin/python3'. The default python version can be overridden by adding the python interpreter variable to the host inventory file.
[WebServer:vars]
'ansible_python_interpreter=/usr/bin/python3'
After the successful connection test, we can apply a first basic command to update the remote server.
ansible WebServer -m apt -a "upgrade=yes update_cache=yes" -bHere, -m defines the module. For the demonstration purpose, all servers are the Ubuntu-based servers we are using "apt" if the system is Debian based, then replace the "apt" with "deb". If the system is based on CentOS then, replace it with "yum", in the case of Fedora replace it with "dnf"
-a denotes the module arguments and -b denotes run commands as a superuser.
upgrade=yes, denotes upgrade the system. If distribution upgrade is required then, the command with upgrade=dist is needed.
update_cache=yes is an equivalent command to the apt-get update.
You can refer to the list of all modules by Ansible from Ansible Modules.
Running commands one by one does not make any difference in running a predefined shell script or the Ansible scripts. Ansible playbooks can help to resolve this issue by listing all the required steps (tasks) in one file and run them on the remote server.
The scripts are written in YAML file and uses the same command as we run in the previous step.
Installing a web server involves multiple steps. To make it more convenient and easy to understand, Let's go step by step.
Create a YAML file to install a server and make sure that the service is up and running.
---
- hosts: WebServer
  tasks:
    - name: Install NginX
      apt: name=nginx state=latest
    - name: Start NginX Service
      service:
          name: nginx
          state: started
In the above script out all the hosts defined under WebServer will receive the following tasks.
Task 1: Install latest NginX server
Taks 2: Start Nginx
As we installed the web server now, it is time to deploy a default website. For the scope of this blog post, we will deploy a static webpage on the server by modifying the existing playbook.
      - name: "HTML Test Deploy"
        become: true
         syncronize:
           dest: /var/www/html
           src: ../default-site/
In the above case the Ansible playbook will synchronize the /default-site folder to destination /var/www/html
The full script can be accessed from: https://github.com/ankyit/ansible-demo/blob/master/install-nginx.yml
Let's say there is more than one server and it is required to configure both servers at the same time. To achieve this, add the new server entry to the inventory file and run the ansible-playbook, in no time both servers will be ready.


It is always recommended to check the changes going to be applied by the playbook. To achieve this, run the playbook with --check parameter. This will do a dry run of the script execution on the server,
If during the playbooks are not running as intended or not giving the expected results then script debug may be required. By running the script with -vvv will provide a verbose output of the execution. This can help in finding the issues.
Note: All the scripts discussed here can be accessed from https://github.com/ankyit/ansible-demo
How Fast Is Alibaba Cloud CDN: An In-Depth Performance Analysis
Automating Your PHP Application Deployment with PHP Deployer

2,593 posts | 775 followers
FollowAlibaba Clouder - August 31, 2020
Alibaba Clouder - May 29, 2019
JDP - July 31, 2020
Alibaba Clouder - December 17, 2018
Alibaba Clouder - July 12, 2018
Alibaba Clouder - October 30, 2018

2,593 posts | 775 followers
Follow OSS(Object Storage Service)
An encrypted and secure cloud storage service which stores, processes and accesses massive amounts of data from anywhere in the world
Learn MoreLearn More
 ECS(Elastic Compute Service)
Elastic and secure virtual cloud servers to cater all your cloud hosting needs.
Learn MoreMore Posts by Alibaba Clouder
Start building with 50+ products and up to 12 months usage for Elastic Compute Service
Get Started for Free Get Started for Free