With the efficiency and agile iteration brought by containerization, as well as the cost-effective resource utilization and scalable nature of cloud computing, cloud-native orchestration frameworks like Kubernetes are increasingly attracting AI and big data applications for deployment and execution. However, the mismatch between the design principles of data-intensive computing frameworks and the flexible application orchestration in cloud-native environments has resulted in data access and computing bottlenecks.
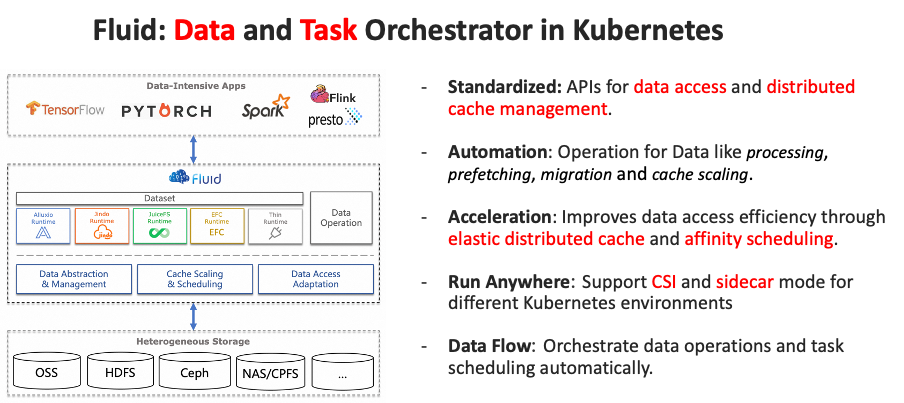
As a cloud-native AI and big data application, the CNCF open-source project Fluid offers an efficient and convenient data abstraction layer that separates data from storage, accelerating data processing and access for specific scenarios, such as large models.

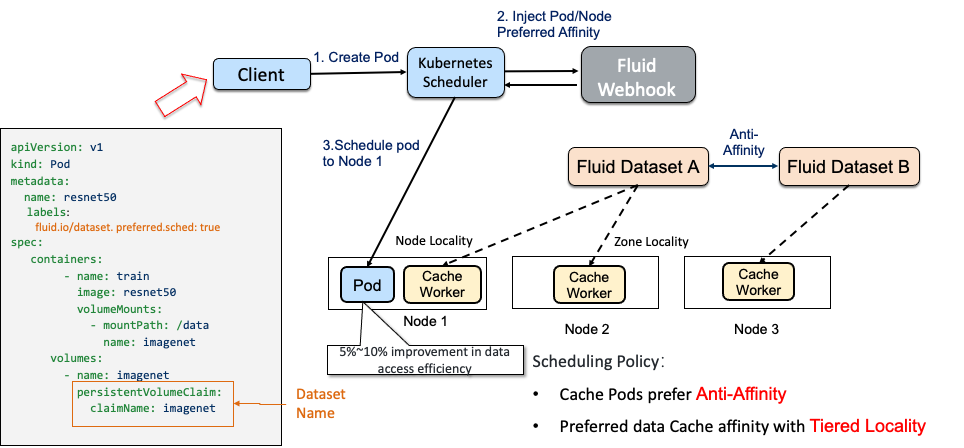
Fluid also provides a configurable tiered locality scheduling capability. In cloud platforms and data center environments, Fluid supports scheduling tasks based on the location of the dataset cache used by each task. This allows users to prioritize task scheduling to nodes with shorter transmission distances, without requiring knowledge of the underlying data cache arrangement.
1. Why does Fluid support tiered locality scheduling? The architecture of computing-storage separation, which is widely adopted in cloud-native systems, brings flexibility and cost advantages. However, it also impacts the performance of data computing and access. To address this, one solution is to introduce a cache layer in the cloud or data center, deploying cache or distributed storage on the computing side. However, this approach doesn't guarantee better performance in practice. One major reason is the lack of awareness among users regarding network delays and throughput limitations caused by physical location differences during deployment. Fluid addresses this issue by drawing inspiration from locality scheduling in the big data domain. In big data, there is a well-known concept that "moving computation is better than moving data." This is because data transmission over the network adds significant I/O overhead. To improve efficiency, it is crucial to minimize this overhead by avoiding data transmission over the network whenever possible. Even when data transmission is necessary, the distance should be minimized, and data locality measures this distance.
When distributed caches are deployed in the Kubernetes cluster, Fluid divides them into different tiers based on their locality or transmission distance. The best locality is achieved when data can be computed on a local compute node without network transmission. If the best locality cannot be achieved, data is divided into tiers based on transmission distance, such as the same node, rack, availability zone, and region. Longer transmission distances result in lower locality tiers and increased latency.
2. Why does Fluid support configurability in tiered locality scheduling? Different public clouds have their own definitions for various affinities. For example, AWS supports Placement Groups, while Alibaba Cloud supports Deployment Set, which differ from the built-in labels of Kubernetes like topology.kubernetes.io/zone and topology.kubernetes.io/region. Additionally, labels may vary in self-managed data centers, such as for unique concepts like the same rack. In some lower versions of Kubernetes, there are also different labels for zones and regions. If you have specific requirements, you can configure them during the deployment or upgrade of Fluid.
Based on this, Fluid provides the capability of tiered locality scheduling. Fluid is responsible for orchestrating dataset cache and scheduling data affinity. When deploying a cache pod, Fluid adheres to the anti-affinity rule to ensure that each cache worker fully utilizes the bandwidth. When scheduling an application pod that utilizes the dataset, Fluid schedules it to the node where the cache is located based on tiered affinity. If the node affinity cannot be achieved, the pod is scheduled to a node in the same zone to prevent cross-zone data access.

This demo describes how to use ACK Fluid's tiered affinity scheduling to ensure that the cached data and the computing task run in the same zone.
This experiment is divided into three parts:
• A Container Service for Kubernetes (ACK) Pro cluster is created and the Kubernetes version of the cluster is 1.18 or later. For more information, see Create an ACK Pro cluster.
• The cloud-native AI suite is installed, and the ack-fluid component is deployed.
Note: If you have already installed open source Fluid, uninstall it before deploying the ack-fluid component.
• If you have not installed the cloud-native AI suite, enable Fluid acceleration when you install the suite. For more information, see Deploy the cloud-native AI set.
• If you have already installed the cloud-native AI suite, go to the Cloud-native AI Suite page of the Container Service for Kubernetes (ACK) console and deploy the ack-fluid component.
• A kubectl client is connected to the ACK Pro cluster. For more information, see Connect to a cluster by using kubectl.
Prepare the Kubernetes and OSS environments. It only takes about 10 minutes to deploy the JindoRuntime environment.
In the environments of this experiment, there are three nodes, of which the node cn-beijing.192.168.125.127 runs in Alibaba Cloud Beijing Zone b, the nodes cn-beijing.192.168.58.146 and cn-beijing.192.168.58.147 run in Alibaba Cloud Beijing Zone l.
$ kubectl get no -o custom-columns="NAME:.metadata.name,ZONE:.metadata.labels.topology\.kubernetes\.io/zone"
NAME                         ZONE
cn-beijing.192.168.125.127   cn-beijing-b
cn-beijing.192.168.58.146    cn-beijing-l
cn-beijing.192.168.58.147 cn-beijing-lkubectl get cm -n fluid-system tiered-locality-config -oyaml
apiVersion: v1
data:
tieredLocality: |
preferred:
- name: fluid.io/node
weight: 100
- name: topology.kubernetes.io/zone
weight: 50
- name: topology.kubernetes.io/region
weight: 20
required:
- fluid.io/node
kind: ConfigMap
metadata:
annotations:
meta.helm.sh/release-name: fluid
meta.helm.sh/release-namespace: default
labels:
app.kubernetes.io/managed-by: Helm
name: tiered-locality-config
namespace: fluid-system1. Run the following command to download a copy of the test data:
$ wget https://archive.apache.org/dist/hbase/2.5.2/RELEASENOTES.md2. Upload the downloaded test data to the corresponding bucket of Alibaba Cloud OSS. For the upload, you can use ossutil, a client tool provided by OSS. For more information, see Install ossutil.
$ ossutil cp RELEASENOTES.md oss://<bucket>/<path>/RELEASENOTES.md1. Before creating a Dataset, you can create a mySecret.yaml file to store the accessKeyId and accessKeySecret of OSS. See the following YAML sample:
apiVersion: v1
kind: Secret
metadata:
  name: mysecret
stringData:
  fs.oss.accessKeyId: ****** # Enter the accessKeyId.
  fs.oss.accessKeySecret: ****** # # Enter the accessKeySecret.
2. Run the following command to generate a Secret:
kubectl create -f mySecret.yamlExpected output:
secret/demo created3. Create a dataset.yaml file to create a Dataset. You can use the following YAML sample.
apiVersion: data.fluid.io/v1alpha1
kind: Dataset
metadata:
  name: demo
spec:
  mounts:
    - mountPoint: oss://<bucket-name>/<path>
      options:
        fs.oss.endpoint: <oss-endpoint>
      name: demo
      path: "/"
      encryptOptions:
        - name: fs.oss.accessKeyId
          valueFrom:
            secretKeyRef:
              name: mysecret
              key: fs.oss.accessKeyId
        - name: fs.oss.accessKeySecret
          valueFrom:
            secretKeyRef:
              name: mysecret
              key: fs.oss.accessKeySecret
---
apiVersion: data.fluid.io/v1alpha1
kind: JindoRuntime
metadata:
  name: demo
spec:
  replicas: 1
  master:
    nodeSelector:
      topology.kubernetes.io/zone: cn-beijing-l
  worker:
    nodeSelector:
      topology.kubernetes.io/zone: cn-beijing-l
  tieredstore:
    levels:
      - mediumtype: MEM
        path: /dev/shm
        quota: 20Gi
        high: "0.99"
        low: "0.8"
Note: If you want to use tiered affinity scheduling, you must configure nodeSelector or nodeAffinity for the worker role when you specify the cache deployment.
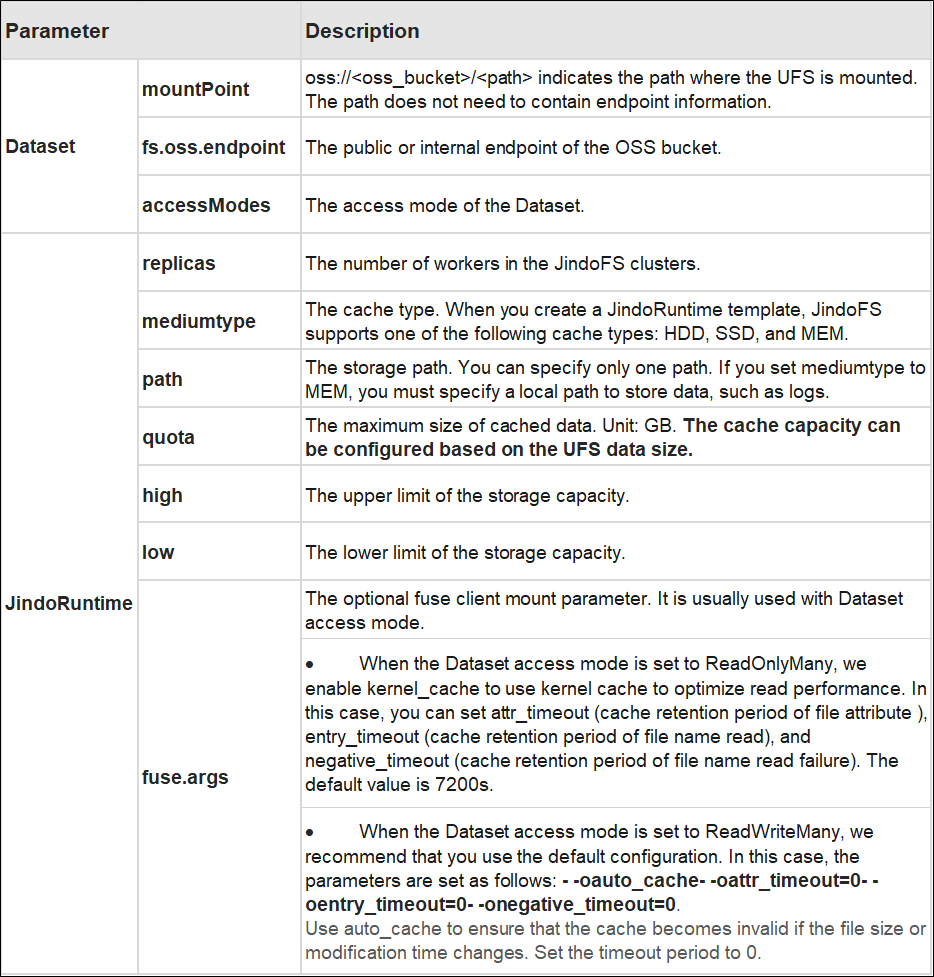
The following table shows the parameters and their descriptions in the YAML sample.

4. Run the following commands to deploy dateset.yamlz to create a JindoRuntime and a Dataset:
kubectl create -f dataset.yamlExpected output:
dataset.data.fluid.io/demo created
jindoruntime.data.fluid.io/demo created
5. Run the following command to check the deployment of the Dataset:
kubectl get datasetExpected output:
NAME    UFS TOTAL SIZE   CACHED      CACHE CAPACITY   CACHED PERCENTAGE   PHASE   AGE
demo 588.90KiB 0.00B 10.00GiB 0.0% Bound 2m7s1. Create an application pod.
$ cat<<EOF >app-1.yaml
apiVersion: v1
kind: Pod
metadata:
  name: app-1
  labels:
    # enable Fluid's scheduling optimization for the pod
    fuse.serverful.fluid.io/inject: "true"
spec:
  containers:
    - name: app-1
      image: nginx
      volumeMounts:
        - mountPath: /data
          name: demo
  volumes:
    - name: demo
      persistentVolumeClaim:
        claimName: demo
EOF
$ kubectl create -f app-1.yaml
Note: If you want Fluid to intervene in scheduling, you must enable fuse.serverful.fluid.io/inject: "true" in labels.
The node that hosts the pod is cn-beijing.192.168.58.147, which is located in Alibaba Cloud Beijing Zone l. It proves that this pod can be preferentially scheduled to a node in the same zone as the distributed cache.
$ kubectl get po app-1 -owide
kubectl get po app-1 -owide
NAME    READY   STATUS    RESTARTS   AGE     IP               NODE
app-1   1/1     Running   0          4m59s   192.168.58.169   cn-beijing.192.168.58.147
2. Set the two nodes in Beijing Zone l to unschedulable.
$ kubectl cordon cn-beijing.192.168.58.146
$ kubectl cordon cn-beijing.192.168.58.147
3. In this case, both nodes in Alibaba Cloud Beijing Zone l are in unschedulable state to prevent new pods from being rescheduled to this zone.
$ kubectl get no
NAME                         STATUS                     ROLES    AGE   VERSION
cn-beijing.192.168.125.127   Ready                      <none>   32h   v1.26.3-aliyun.1
cn-beijing.192.168.58.146    Ready,SchedulingDisabled   <none>   81d   v1.26.3-aliyun.1
cn-beijing.192.168.58.147    Ready,SchedulingDisabled   worker   81d   v1.26.3-aliyun.1
4. Submit a second application pod with the same configuration as the first.
$ cat<<EOF >app-2.yaml
apiVersion: v1
kind: Pod
metadata:
  name: app-2
  labels:
    # enable Fluid's scheduling optimization for the pod
    fuse.serverful.fluid.io/inject: "true"
spec:
  containers:
    - name: app-2
      image: nginx
      volumeMounts:
        - mountPath: /data
          name: demo
  volumes:
    - name: demo
      persistentVolumeClaim:
        claimName: demo
EOF
$ kubectl create -f app-2.yaml
5. The pod is scheduled to the node cn-beijing.192.168.58.147, which is located in Alibaba Cloud Beijing Zone b. This proves that the pod can be scheduled to a node in a different zone from the distributed cache when it does not match the node affinity.
$ kubectl get po -owide app-2
NAME    READY   STATUS    RESTARTS   AGE   IP                NODE                         NOMINATED NODE   READINESS GATES
app-2   1/1     Running   0          98s   192.168.125.131   cn-beijing.192.168.125.127   <none>           <none>
Conclusion: In preferred scheduling, the node is preferentially scheduled to the zone where the distributed cache is located. If it does not match the node affinity, the pod is scheduled to a node in a different zone.
1. Create an application pod and specify the labels in metadata in the following format: fluid.io/dataset.{dataset_name}.sched: required. For example, fluid.io/dataset.demo.sched: required. This indicates that the pod must obey the required scheduling rule, and will be scheduled to the cache node of the dataset demo according to default configurations.
$ cat<<EOF >app-3.yaml
apiVersion: v1
kind: Pod
metadata:
  name: app-3
  labels:
    # enable Fluid's scheduling optimization for the pod
    fuse.serverful.fluid.io/inject: "true"
    fluid.io/dataset.demo.sched: required
spec:
  containers:
    - name: app-3
      image: nginx
      volumeMounts:
        - mountPath: /data
          name: demo
  volumes:
    - name: demo
      persistentVolumeClaim:
        claimName: demo
EOF
$ kubectl create -f app-3.yaml
2. In this case, the pod app-3 is in the pending state and cannot be scheduled. The events show that two nodes are unschedulable and another node didn't match Pod's node affinity/selector, which indicates that the required scheduling has taken effect.
Events:
  Type     Reason            Age   From               Message
  ----     ------            ----  ----               -------
  Warning  FailedScheduling  16s   default-scheduler  0/3 nodes are available: 1 node(s) didn't match Pod's node affinity/selector, 2 node(s) were unschedulable. preemption: 0/3 nodes are available: 3 Preemption is not helpful for scheduling., .
3. The pod scheduling rule in this case requires that the pod must be scheduled to a node where the cache is located.
$kubectl get po app-3 -o jsonpath='{.spec.affinity}'
{"nodeAffinity":{"requiredDuringSchedulingIgnoredDuringExecution":{"nodeSelectorTerms":[{"matchExpressions":[{"key":"fluid.io/s-default-demo","operator":"In","values":["true"]}]}]}}}%
4. Delete the pod.
$ kubectl delete po app-31. Change the required rule from Node Affinity to Zone Affinity to ensure that caches and computing resources run in the same zone (data center) in performance-sensitive scenarios.
$ kubectl edit cm -n fluid-system tiered-locality-config
apiVersion: v1
data:
  tieredLocality: |
    preferred:
    - name: fluid.io/node
      weight: 100
    - name: topology.kubernetes.io/zone
      weight: 50
    - name: topology.kubernetes.io/region
      weight: 20
    required:
    - topology.kubernetes.io/zone
kind: ConfigMap
metadata:
  annotations:
    meta.helm.sh/release-name: fluid
    meta.helm.sh/release-namespace: default
  labels:
    app.kubernetes.io/managed-by: Helm
  name: tiered-locality-config
  namespace: fluid-system
The specific changes are as follows.
Before the modification:
required:
    - fluid.io/node
After the modification:
required:
    - topology.kubernetes.io/zone
2. Implement the configuration without restarting the fluid-webhook.
3. Add nodes by using ACK and check their zones.
$ kubectl get no -o custom-columns="NAME:.metadata.name,ZONE:.metadata.labels.topology\.kubernetes\.io/zone"
NAME                         ZONE           STATUS
cn-beijing.192.168.125.127   cn-beijing-b   True
cn-beijing.192.168.58.146    cn-beijing-l   True
cn-beijing.192.168.58.147    cn-beijing-l   True
cn-beijing.192.168.58.180    cn-beijing-l   True
Among them, cn-beijing.192.168.58.180 is a node added to Zone l.
4. Create another application pod and specify the labels in metadata in the following format: fluid.io/dataset.{dataset_name}.sched: required. For example, fluid.io/dataset.demo.sched: required. This indicates that the pod must obey the required scheduling rule, and will be scheduled to the cache node of the dataset demo according to default configurations.
$ cat<<EOF >app-3.yaml
apiVersion: v1
kind: Pod
metadata:
  name: app-3
  labels:
    # enable Fluid's scheduling optimization for the pod
    fuse.serverful.fluid.io/inject: "true"
    fluid.io/dataset.demo.sched: required
spec:
  containers:
    - name: app-3
      image: nginx
      volumeMounts:
        - mountPath: /data
          name: demo
  volumes:
    - name: demo
      persistentVolumeClaim:
        claimName: demo
EOF
$ kubectl create -f app-3.yaml
You can find that the pod is already running on the scaled-out node cn-beijing.192.168.58.180. Check the affinity configuration of the application pod.
$ kubectl get po app-3 -o jsonpath='{.spec.affinity}'
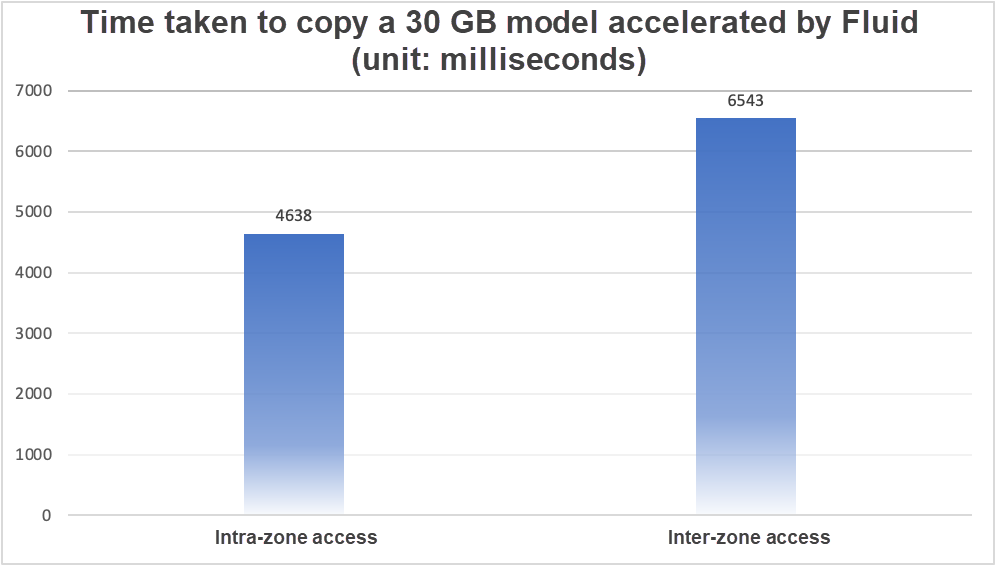
{"nodeAffinity":{"requiredDuringSchedulingIgnoredDuringExecution":{"nodeSelectorTerms":[{"matchExpressions":[{"key":"topology.kubernetes.io/zone","operator":"In","values":["cn-beijing-l"]}]}]}}}%To compare the performance difference of data access for large models across availability zones, we placed a 30 GiB model on OSS and used Fluid to evaluate access performance in a similar manner.
We selected the ECS instance type: ecs.g8i.24xlarge, which has 64 vCPUs, 256 GiB of memory, and 30 Gbit/s of network bandwidth. Using Fluid's accelerated access mode (data prefetch and multi-stream data acceleration), we accessed data within the same zone and across zones to assess performance differences.
Our observation showed that the performance of intra-zone access improved by 1.41 times, and the bandwidth reached the hardware limit of 30 Gbit/s. This improvement is significant.

This article explains how to use Fluid to implement tiered affinity scheduling and configure custom affinity based on real scenarios. This scheduling approach improves data access performance.
Author: Biran

180 posts | 32 followers
FollowAlibaba Container Service - August 16, 2024
Alibaba Container Service - February 17, 2021
Alibaba Developer - March 1, 2022
ApsaraDB - October 22, 2020
Alibaba Container Service - August 16, 2024
Alibaba Cloud Native Community - March 29, 2024

180 posts | 32 followers
Follow Container Service for Kubernetes
Alibaba Cloud Container Service for Kubernetes is a fully managed cloud container management service that supports native Kubernetes and integrates with other Alibaba Cloud products.
Learn More ACK One
Provides a control plane to allow users to manage Kubernetes clusters that run based on different infrastructure resources
Learn More Cloud-Native Applications Management Solution
Accelerate and secure the development, deployment, and management of containerized applications cost-effectively.
Learn More Container Registry
A secure image hosting platform providing containerized image lifecycle management
Learn MoreMore Posts by Alibaba Container Service