In this tutorial, we will create a failover cluster using Windows Server on Alibaba Cloud with ECS.
WSFC is a feature of the Windows Server platform, which is generally used to improve the high availability of applications and services on your network. WSFC is a successor to the Microsoft Cluster Service (MCS).
An Alibaba Cloud Elastic Compute Service (ECS) Instance provides fast memory and the latest Intel CPUs to help you to power your cloud applications and achieve faster results with low latency. All ECS instances come with Anti-DDoS protection to safeguard your data and applications from DDoS and Trojan attacks.
Alibaba Cloud ECS allows you to load applications with multiple operating systems and manage network access rights and permissions. Within the user console, you can also access the latest storage features, including auto snapshots, which is perfect for testing new tasks or operating systems as it allows you to make a quick copy and restore later. It offers a variety of configurable CPU, memory, data disk and bandwidth variations allowing you to tailor each Instance to your specific needs.
When using WSFC in conjunction with Alibaba Cloud ECS, if one cluster node fails, another node can take over. We can configure this failover to happen automatically, which is the usual configuration, or we can manually trigger a failover.
This tutorial assumes a basic understanding of Alibaba Cloud's suite of products and services, the Alibaba Cloud Console, failover clustering, the Active Directory (AD), and the administration of Windows Server.
We recommend the following configuration, which contains three servers and runs across an Alibaba Cloud Virtual Private Cloud (VPC) to provide an isolated cloud network to operate your resource in a secure environment:
Note: The quorum is sometimes referred to as the Disk or File Witness. In all actuality, it is simply a small clustered disk, which is in the available cluster storage group.
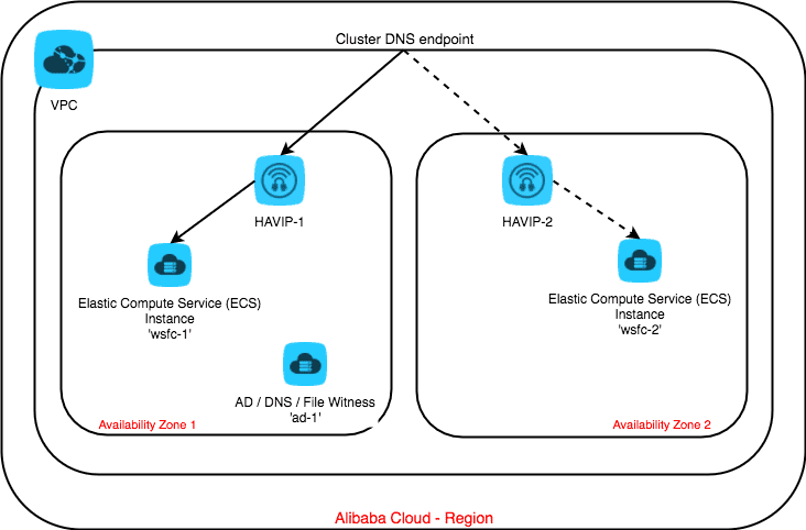
Figure 1: The Architecture
When the cluster fails, requests must go to the newly active node. This routing is usually handled by the address resolution protocol (ARP), which associates IP addresses with MAC addresses.
However, in Alibaba Cloud, the VPC system uses software-defined networking, which does not provide MAC addresses. This means the changes broadcast by ARP don't affect routing. To make routing work, we need to make use of an Alibaba Cloud product called HAVIP (Highly Available Virtual IP).
In this tutorial we need to form a cluster across two different subnets in two availability zones. So, we will need to employ two HAVIPs.
When a failover happens in the cluster, the following changes take place:
First, log on to your Alibaba Cloud Console. We are now going to set up your Alibaba Cloud account to work with the WSFC environment.
1. In the Alibaba Cloud Console, find and click Elastic Compute Service on the left-side navigation pane.
2. Create the three ECS instances we'll need for this tutorial, which include:
wsfc-a and wsfc-b.ad-1.3. Remember to select VPC for Network Type and Windows Server for the OS when creating these ECS instances.
4. More details on creating an ECS instance are available here.
5. When you have created the three instances, your console dashboard should look like this:


Next, we need to create two HAVIPs, one in each of the two zones, and then bind the corresponding instance to that subnet behind the HAVIP. In Alibaba Cloud, all IP addresses on any VPC and underlying switches are assigned dynamically. So, you must use your HAVIP to configure a static IP address that can be used as Virtual IP address for your Windows Server Failover Cluster and other application clusters on ECS.
By default, HAVIP button is not available for use. So, you will need to log a support ticket To whitelist HAVIP. Once HAVIP is available under VPC, complete the following steps:
1. Click on Create a HAVIP Address.

2. Select VSwitch and Specify the Private IP address that you want to use as a static virtual IP
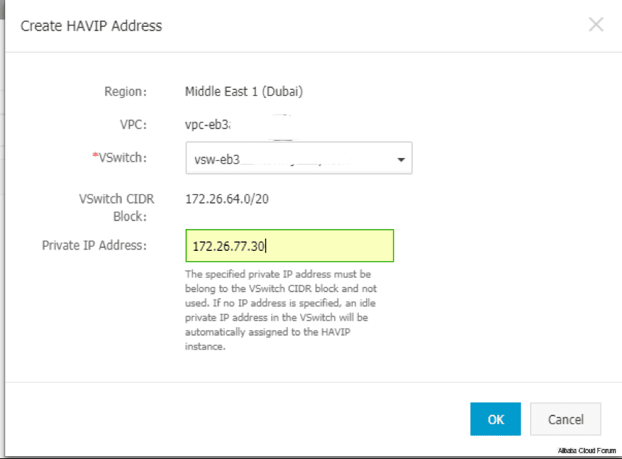
3. Add both Nodes that will be part of the High Availability Cluster.

4. The Primary should be called the Master, while secondary will be called the Slave.
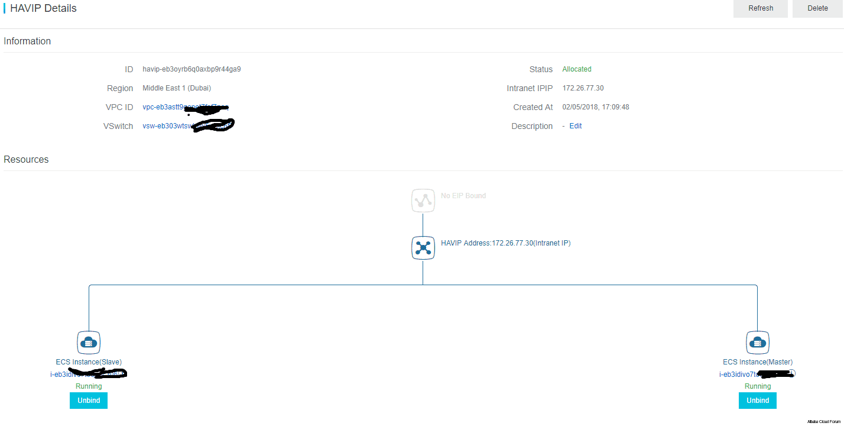
5. Check this new HAVIP is accessible from the ECS instance. If you can successfully ping it, this IP address can now be used for your Windows Cluster.
For the remainder of this tutorial, we will assume the following environment has been set up:
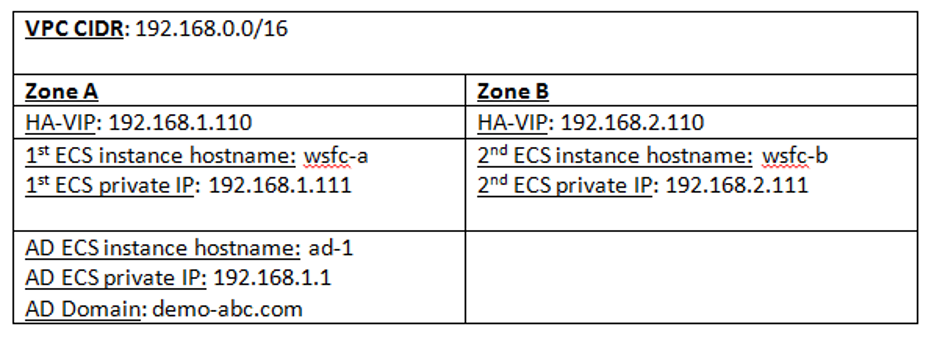
1. Use RDP to connect to the wsfc-a instance.
2. Before we can join this instance to the domain, we need to perform one fix on the duplicated SID because of the nature of the public image that we used to create the instance.
3. Download the file from the following address: sysprep.ps1.
4. Open a PowerShell terminal window as Administrator.
5. Execute the script, and enter the administrative password when prompted:
[wsfc-a]> .\Sysprep.ps1 -ReserveHostname -ReserveNetwork -skiprearm -post_action "reboot"6. Restart and then connect back to each instance and open a PowerShell terminal window as Administrator.
7. Set the following variables:
[wsfc-a]> $DNS = "192.168.1.1"                 # Private IP of ad-1 instance
[wsfc-a]> $LocalStaticIp = "192.168.1.111"     # Private IP of this instance
[wsfc-a]> $DefaultGateway = "192.168.1.253"
8. Obtain the address interface of the private static IP, in this case it is showing Ethernet:
[wsfc-a]> netsh interface ip show address

Configuration for interface "Ethernet"
    DHCP enabled:                         No
    IP Address:                           192.168.1.111
    Subnet Prefix:                        192.168.1.0/24 (mask 255.255.255.0)
    Default Gateway:                      192.168.1.253
    Gateway Metric:                       1
    InterfaceMetric:                      15
9. Set the static IP address and default gateway to:
[wsfc-a]> netsh interface ip set address name="Ethernet" static `
     $LocalStaticIp 255.255.255.0 $DefaultGateway 1
Note: RDP might lose connectivity for a few seconds or require you to reconnect.
10. Configure the primary DNS server to:
[wsfc-a]> netsh interface ip set dns name="Ethernet" static $DNS11. Open Server Manager > Local Server, click onto the default WORKGROUP, and change to the domain to the domain we set in this tutorial:
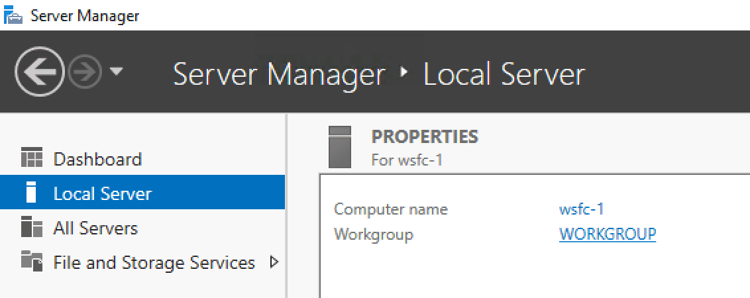
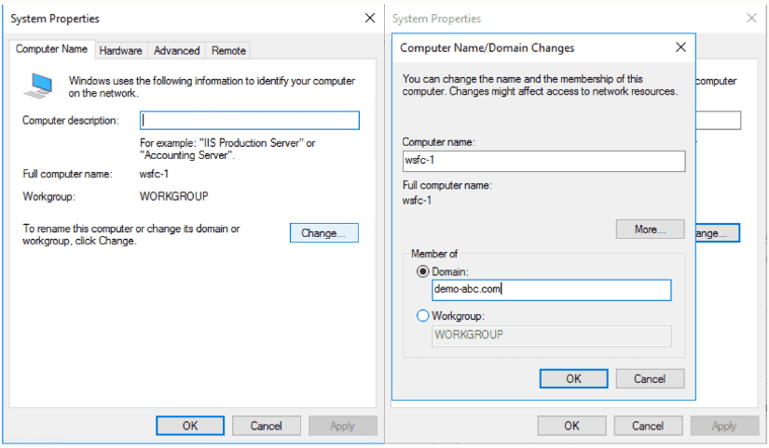
Enter the credentials of an account with the permission to join the domain when prompted.
12. Finally, restart the instance to complete the operation.
13. Repeat the above steps for the wsfc-b instance, adapting to its own static IP address.
1. Use RDP to connect to the wsfc-a instance with the credentials we created in previous step.
2. Open a PowerShell terminal as Administrator.
3. Add the clustering tools to the instance by running the following command:
[wsfc-a]> Install-WindowsFeature Failover-Clustering -IncludeManagementTools4. Restart to complete the configuration.
5. Repeat steps 1-3 for the wsfc-b instance.
6. Now we are ready to create the cluster. The subsequent steps can be performed on either one of the instances.
7. Open Failover Cluster Manager.
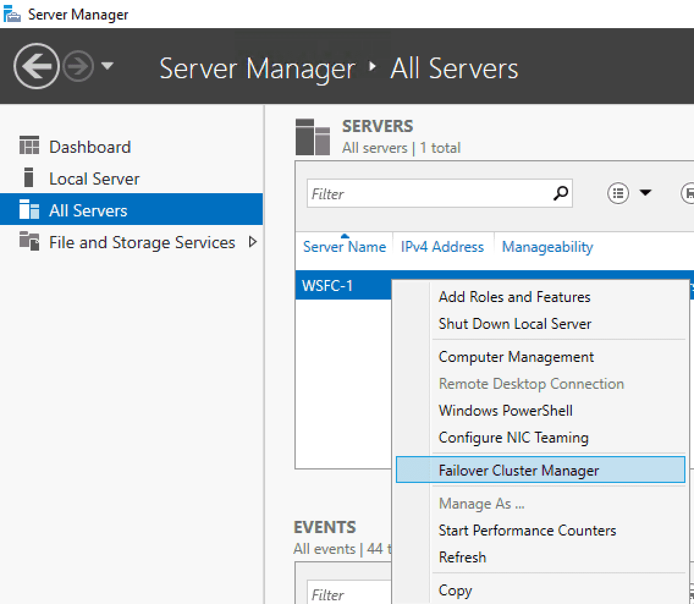
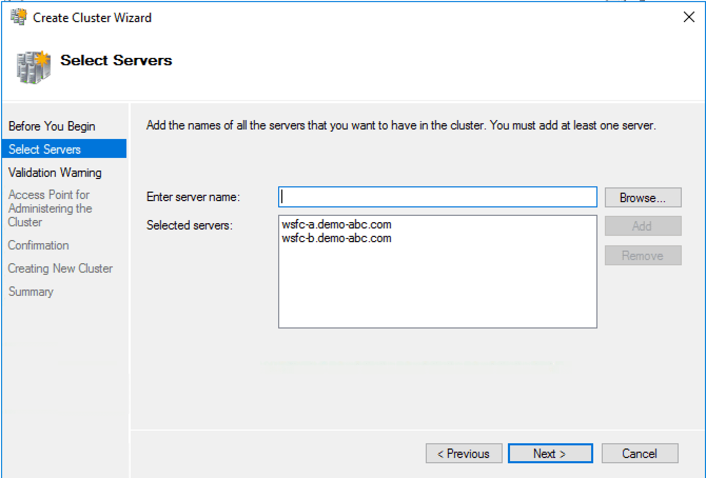
8. Right-click on Failover Cluster Manager > Create Cluster.
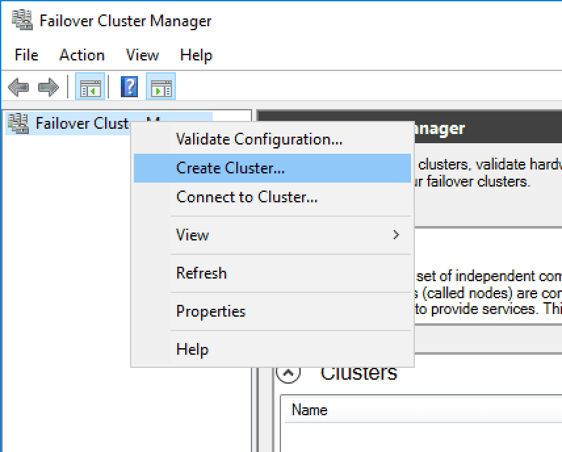
9. Set the static IP address and default gateway to:
[wsfc-a]> netsh interface ip set address name="Ethernet" static `
$LocalStaticIp 255.255.255.0 $DefaultGateway 1
10. Click Next and keep the option to run configuration validation tests.
11. Click Next to get to the Validate a Configuration Wizard screen.
12. On the Testing Options page, select Run only tests I select, and then click Next.
13. Unselect Storage on the Test Selection page as the Storage option will fail in our setup, as it would for separate standalone physical servers. Shared storage is needed for traditional failover-cluster instances (FCIs) where every node needs to see the shared storage locations where data and log files reside, but in the cloud, we would favor a solution like SQL AlwaysOn that doesn't require shared storage.
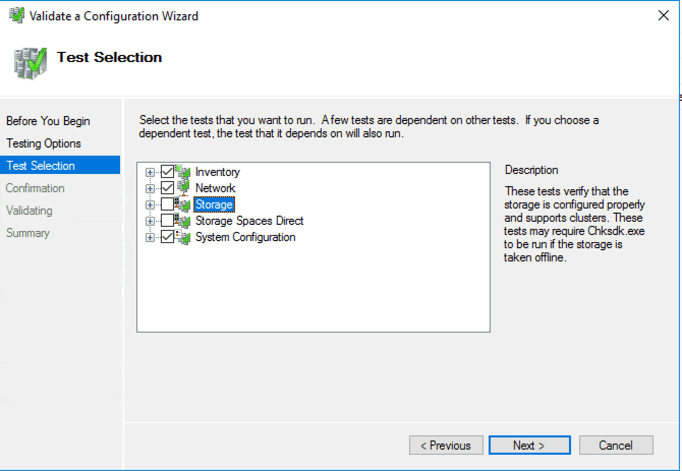
14. Click Next twice to run the tests. Make sure none of the tests have failed.
15. Common issues found during cluster validation include:
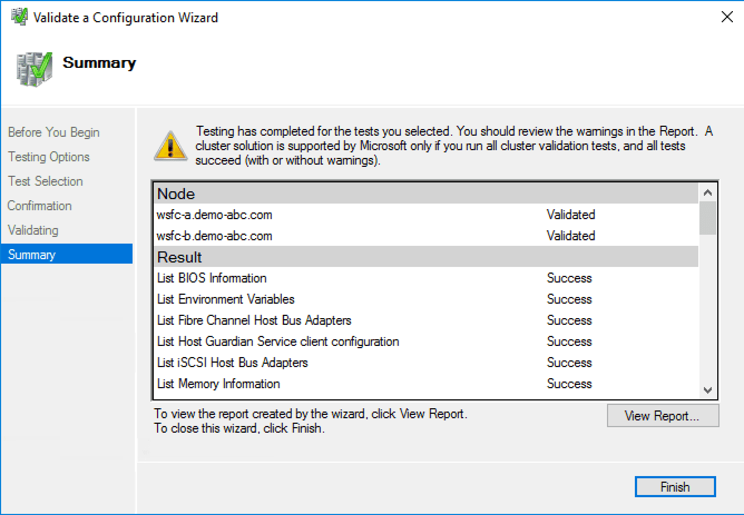
16. Click Finish to return to Create Cluster Wizard.
17. Name the cluster wsfc-cluster-1 on the Access Point for Administering the Cluster page and specify the two HAVIP addresses as the cluster IP for each subnet.
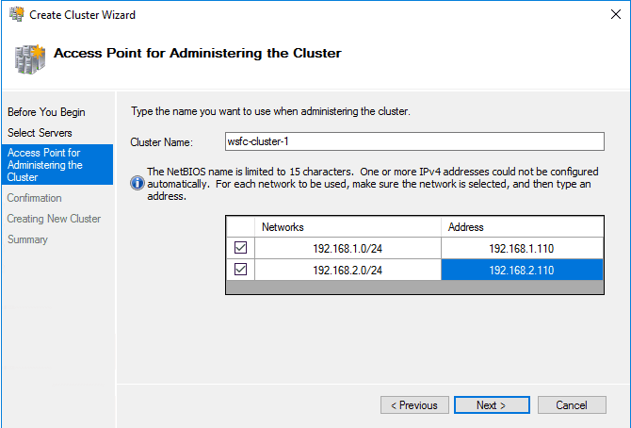
18. Click Next twice to create the cluster and then Finish to complete the wizard.
19. We can also uncheck the Add all eligible storage to the cluster option for now.
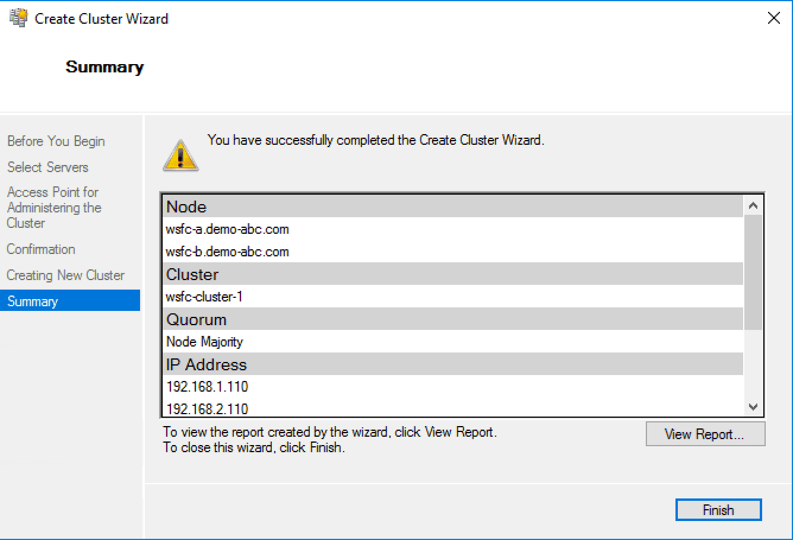
20. We can now move on to create the file-share witness to help the cluster to achieve quorum.
21. Right-click on the cluster, select More Actions and then Configure Cluster Quorum Settings.
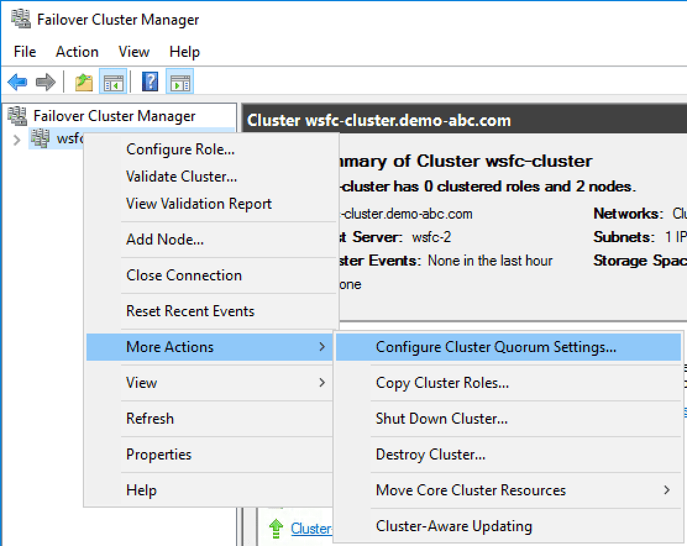
22. Click Next.
23. Select the option for Select the quorum witness and then click Next.
24. Select the option for Configure a file share witness.
25. Select Browse option, and then create a new file share on the AD instance ad-1, and click Next.
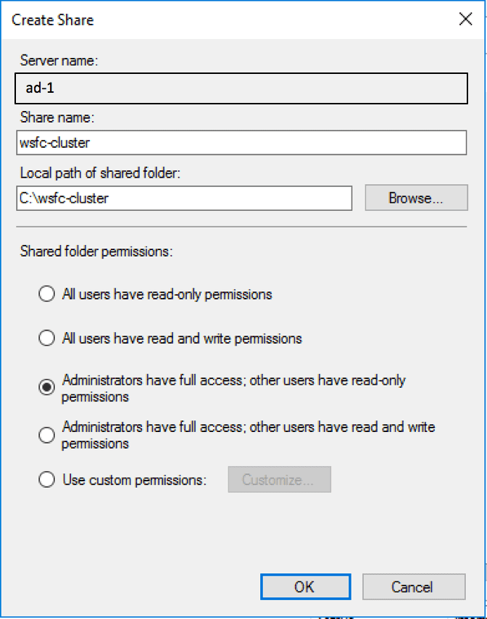
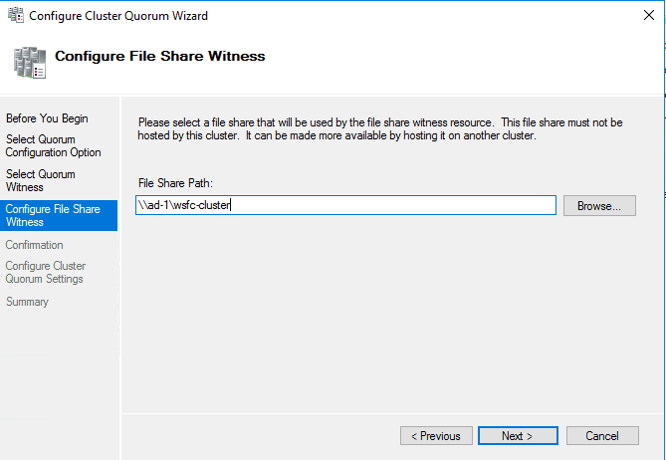
26. Click Next after confirming the settings.
27. Click Finish to end the wizard.
28. Verify that all resources are online for the cluster:


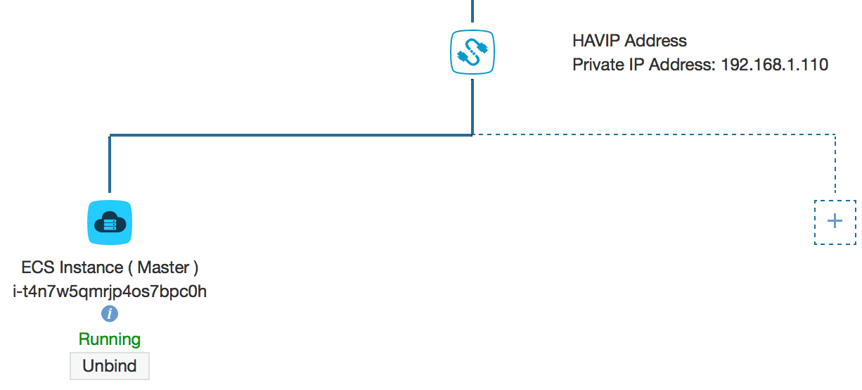
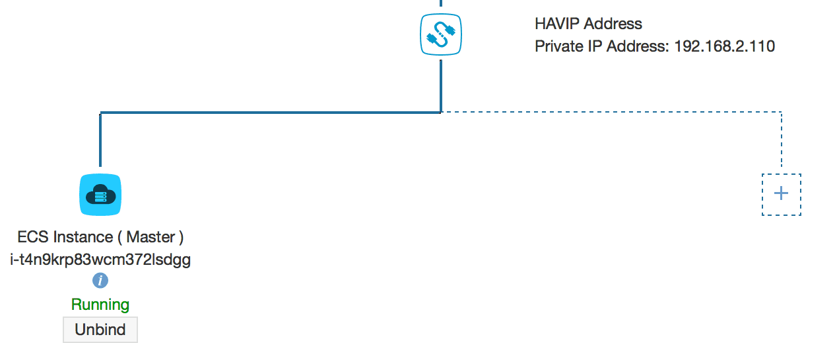
1. In the HAVIP web console, both servers in their respective HAVIP have been promoted to Master. But, from WSFC perspective, the cluster resource is online for 192.168.2.110, in this case, it is wsfc-b that is the active node in the cluster setup.
2. Next, we will try to simulate a failover and make sure the connection is working as expected.
3. First, RDP to the ad-1 server, open a PowerShell terminal window, and we will start pinging the cluster. The current active IP address is wsfc-b (192.168.2.110) in this example.

4. RDP to either one of the instances as part of the cluster. Within the Failover Cluster Manager page, right-click onto on the cluster we created, select More Actions > Move Core Cluster Resources > Select Node.
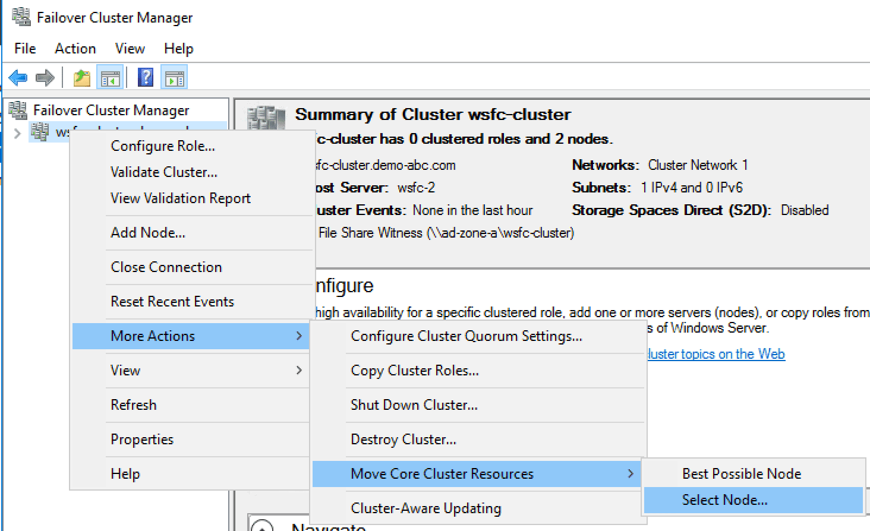
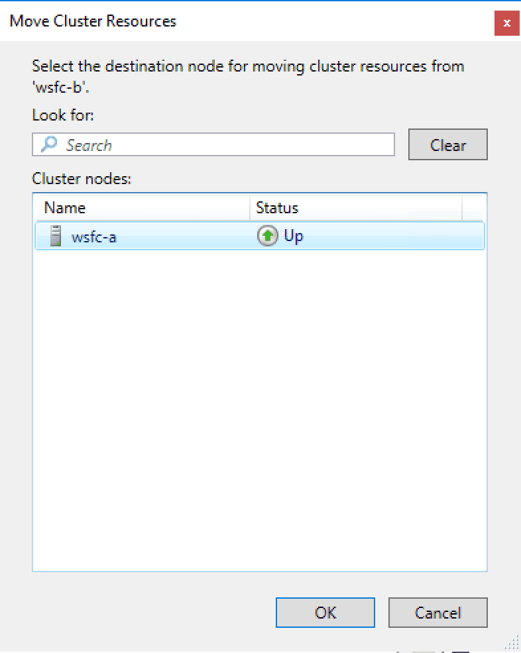
5. Since the current resource is up on wsfc-2, we only see wsfc-1 here as candidate to failover the resource. Select the node and click OK to complete this action.
6. The failover should complete very quickly, but if we go back to the ad-1 server, after refreshing the DNS, we can perform the ping again and notice that the failover is assigned to 192.168.1.110.

7. In the HAVIP web console, we also confirm that the wsfc-1 is the new Master:
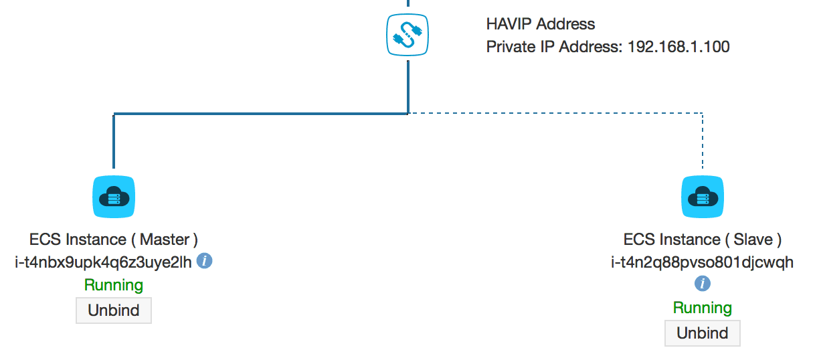
8. To failback to the previous server, we can repeat step 5 above and we will see wsfc-b in the selection list.
And, that's it! We have successfully created a failover cluster using Windows Server on Alibaba Cloud.

2,593 posts | 792 followers
FollowAlibaba Clouder - September 30, 2018
Alibaba Clouder - August 20, 2020
Alibaba Clouder - September 29, 2018
Alibaba Clouder - September 27, 2018
Alibaba Clouder - August 9, 2019
Alibaba Clouder - September 28, 2018

2,593 posts | 792 followers
Follow ECS(Elastic Compute Service)
Elastic and secure virtual cloud servers to cater all your cloud hosting needs.
Learn More VPC
VPC
A virtual private cloud service that provides an isolated cloud network to operate resources in a secure environment.
Learn More OSS(Object Storage Service)
An encrypted and secure cloud storage service which stores, processes and accesses massive amounts of data from anywhere in the world
Learn MoreMore Posts by Alibaba Clouder