In this tutorial, we will deploy a SQL Server high availability (HA) solution with WSFC and the SQL Server Failover Cluster on an Alibaba Cloud Elastic Compute Service (ECS) Instance.
WSFC is a feature of the Windows Server platform, which is generally used to improve the high availability of applications and services on your network. WSFC is a successor to the Microsoft Cluster Service (MCS). SQL Server takes advantage of WSFC services and capabilities to support Always On availability groups and SQL Server failover cluster instances. We recommend you use Windows Server Failover Clustering (WSFC) and SQL Server AlwaysOn Availability Groups as your SQL Server high availability (HA) solution on Alibaba Cloud's Elastic Compute Service (ECS) instances.
An Alibaba Cloud ECS instance provides fast memory and the latest Intel CPUs to help you to power your cloud applications and achieve faster results with low latency. All ECS instances come with Anti-DDoS protection to safeguard your data and applications from DDoS and Trojan attacks.
The Alibaba Cloud ECS allows you to load applications with multiple operating systems and manage network access rights and permissions. Within the user console, you can also access the latest storage features, including auto snapshots, which is perfect for testing new tasks or operating systems as it allows you to make a quick copy and restore later. It offers a variety of configurable CPU, memory, data disk and bandwidth variations allowing you to tailor each Instance to your specific needs.
When using WSFC in conjunction with Alibaba Cloud ECS, if one cluster node fails, another node can take over. We can configure this failover to happen automatically, which is the usual configuration, or we can manually trigger a failover.
In this tutorial, we will deploy a SQL Server high availability (HA) solution with WSFC and the SQL Server Failover Cluster on an Alibaba Cloud ECS instance. This tutorial assumes a basic understanding of Alibaba Cloud's suite of products and services, the Alibaba Cloud Console, failover clustering, the Active Directory (AD), and the administration of Windows Server.
1.Introduction
1.1 The Architecture
We recommend the following configuration, which contains three servers and runs across the Alibaba Cloud Virtual Private Cloud (VPC) to provide an isolated cloud network to operate your resource in a secure environment:
| Item |
Specification and version number |
| ECS |
CPU-4 Cores, Memory-16GB, |
| OS |
Windows Server 2016 DataCenter X64 |
| SQL Server |
SQL Server 2016 Enterprise X64 |
| Demo DB |
failover, created by HammerDB(SQL Server TPC-C) |
| Management |
SSMS (SQL Server Management Studio) |

1.2 Prerequisites
For the purposes of this tutorial, we will assume the following tasks are complete:
- Install and configure the WSFC on an ECS instance
- This includes the installation and configuration of the Active Directory (AD) domain service and the CA (Certificate) service.
- Create an SQL Server instance.
- Configure your Windows settings to better optimize your SQL Server instance.
- Install and configure the SQL Server Always On feature.
2.Add SQL Server into the Domain
2.1 Configure Your NIC (Network Interface Card)
First, we need to configure the DNS of the management network card as the IP address of the AD server (which is 192.168.0.119 in this example).
- In Server Manager, click IPAM. The IPAM client console appears.
- In the navigation pane, in MONITOR AND MANAGE, click DNS and DHCP Servers. In the display pane, click Server Type, and then click DNS. All DNS servers that are managed by IPAM are listed in the search results.
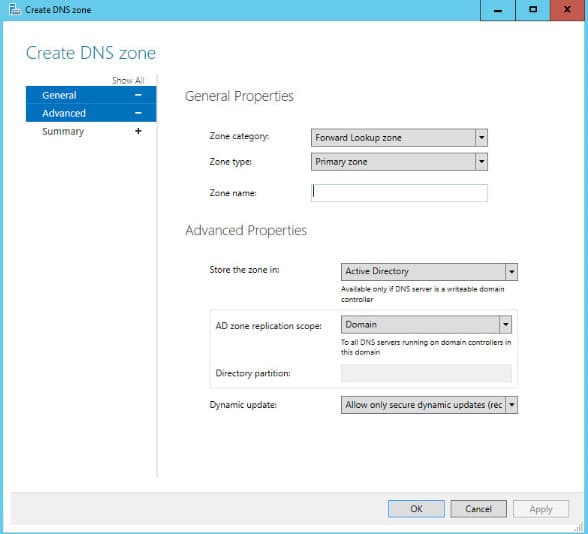
- Locate the server where you want to add a zone, and right-click the server. Click Create DNS zone.
- The Create DNS Zone dialog box opens. In General Properties, select a zone category, a zone type, and enter a name in Zone name. Also select values appropriate for your deployment in Advanced Properties, and then click OK.
- Type in the ipconfig cmd into Powershell, and the following information should appear:
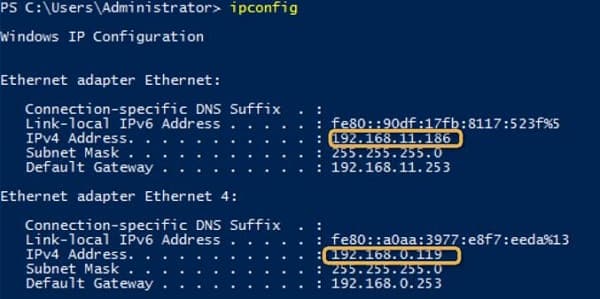
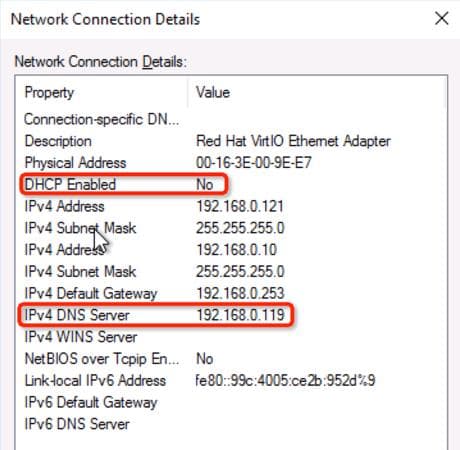
The IP address of the network card has been changed to a static IP address instead of the default DHCP assignment when creating the ECS. If we do not complete this step, there will be a problem when creating a failover cluster (you will not be able to find the input box for entering the cluster IP address.)
You can also check your Network Connection Details on the SQL Server UI:
2.2 Two Servers Join the Domain
Now, we need to change the system settings for the domain.
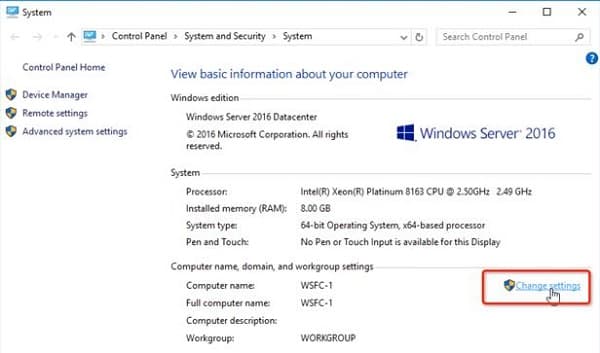
- Go to Control Panel > System and Security > System and click Change settings.
- Add the domain name:
- When prompted, fill in your admin login details:
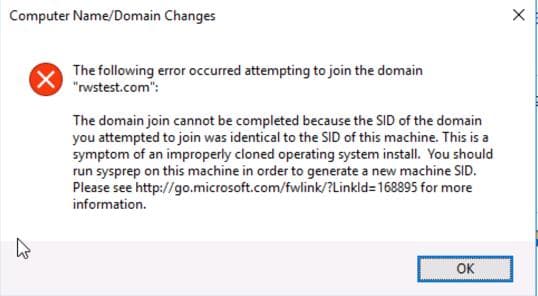
- If the following error appears, this is because the ECS Windows image and Alibaba Cloud image have the same SID.
- You can check if this is the case by using the ipconfig cmd and checking your user SID:
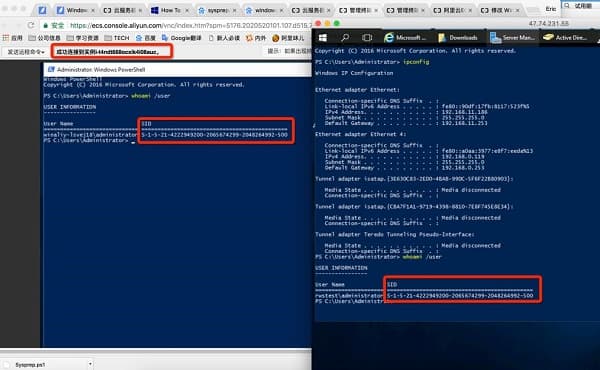
If this is the case, you can modify the SID of both nodes using the following tutorial:
https://www.alibabacloud.com/help/doc-detail/40846.htm
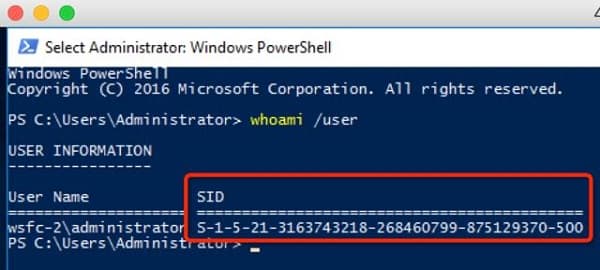
The SID of Node-2 should now have changed after modification:
- After the re-execute join domain operation succeeds, you will see a confirmation message on the AD controller.
3.Configure the iSCSI Target Server
The iSCSI server and AD domain server need to be combined. Here are the steps to configure the iSCSI target server and achieve this:
3.1 Creating a Cloud Disk and Mounting to iSCSI Server
- On Alibaba Cloud Console, select Block Storage > Cloud Disks.
- In the upper-right corner of the Disk List page, click Create Cloud Disk to go to the Create page.
- Select the same region and zone as your ECS instance.
- Select a cloud disk category and specify the disk size and the quantity. You can also choose Create a cloud disk from a snapshot.
- Confirm the configuration and the cost.
- Click Buy Now, confirm your order, and make the payment.
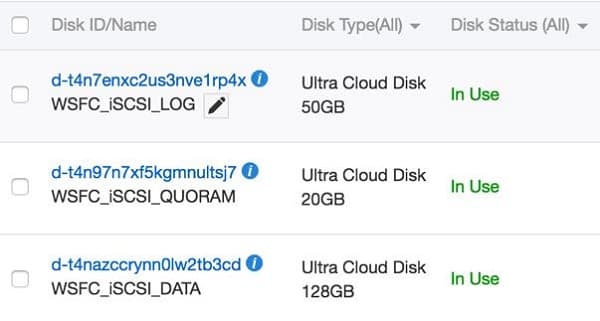
Go back to the Cloud Disks page and refresh it. You should see the following:
3.2 Add iSCSI Target Server Role
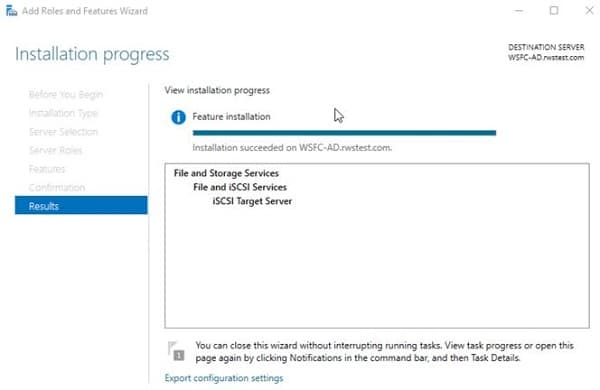
- In the Add Roles and Features Wizard, select Server Roles and check the iSCSI Target Server box.
- Click OK to start the installation. Once complete, the following should appear:
3.3 Add iSCSI Virtual Disks
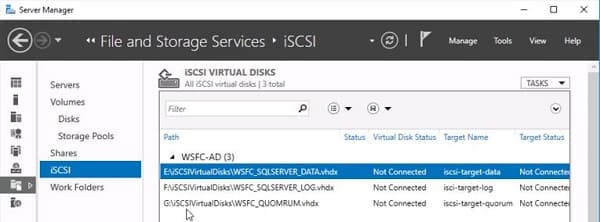
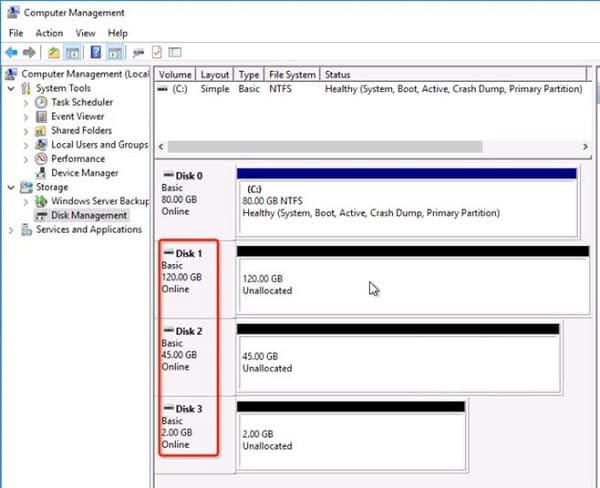
Next, create three virtual disks attached to the AD/iSCSI server as iSCSI virtual disks:
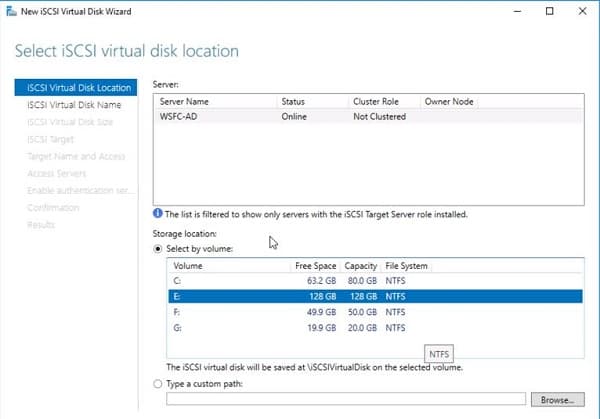
Add the desired name and size of the server.
Choose New iSCSI target
Target Name: iscsi-target-data
Then, create the iSCSI virtual disk.
After all three have been created, you will see the initial list of status, although these are not yet connected:
3.4 Mount the iSCSI Virtual Disk on the Servers
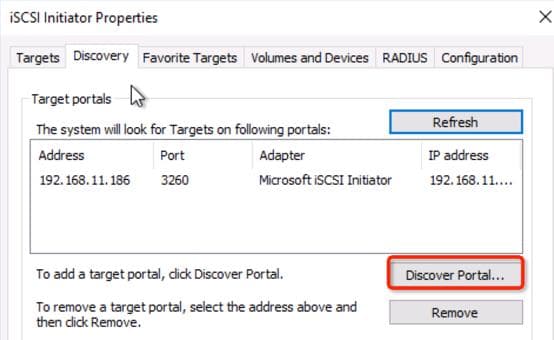
Next, initiate and configure your iSCSI initiators on two servers in the Cluster and make virtual disks on AD / ISCSI server as targets by:
- Click on Tools in the Server Manager Dashboard, then iSCSI Initiator:
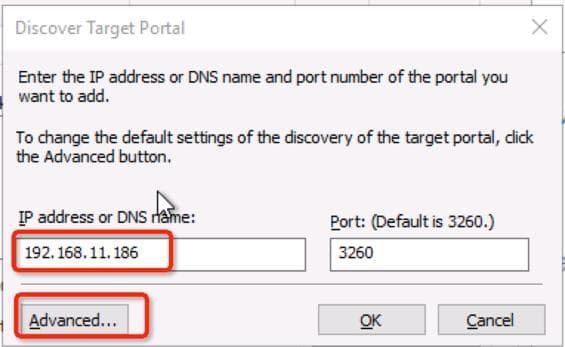
- On the Discovery tab, click Discover Portal…
- Add the DNS details and then click Advanced…
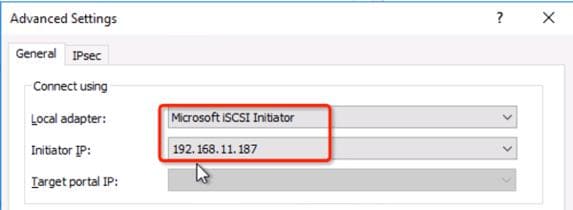
- Make sure your local adapter is listed as Microsoft iSCSI Initiator and the correct IP address is shown:
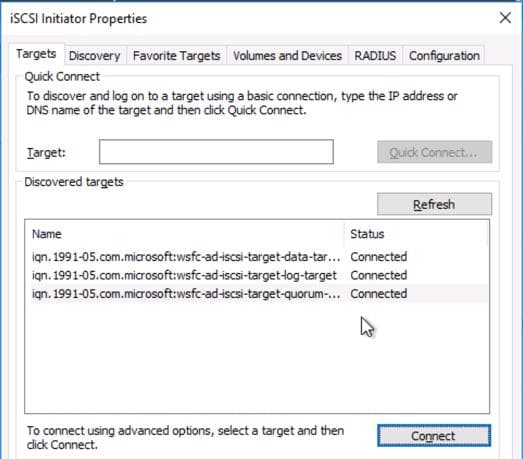
- Click Connect and the status of the three iSCSI targets becomes Connected:
- Click the Volumes and Devices tab and click Auto Configure.
- When you return to the Files and Storage Services UI for the iSCSI, the status of all three targets should now appear as Connected.
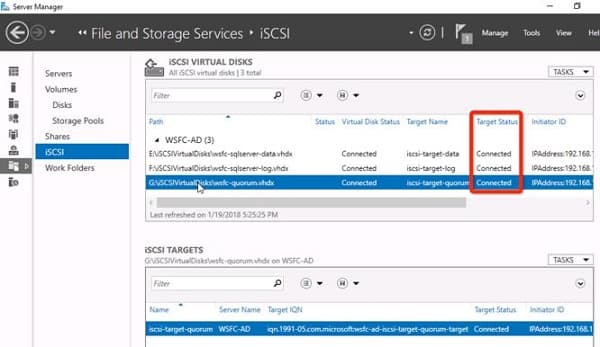
- If you check the online operations on all three iSCSI virtual disks, the following information should appear:
4.Create WSFC
4.1 Validate Configuration
- Start the Failover Cluster Manager on the node WSFC-1:

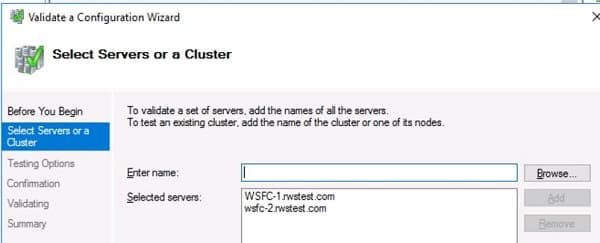
- Select the servers for WSFC-1 and WSFC-2 (which are 192.168.0.120 and 192.168.0.121 for this example):
- Click OK and wait for the validation process to complete:
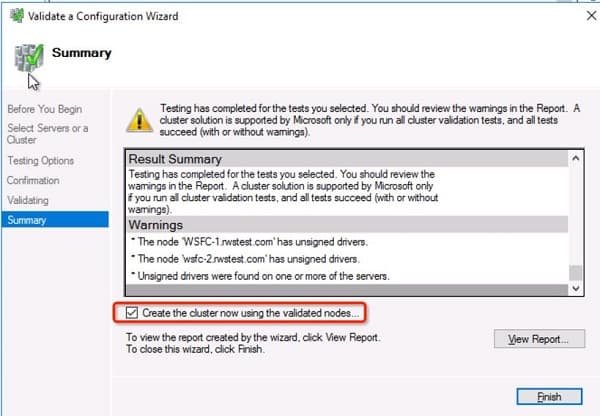
- When the Summary appears, make sure the Create the cluster now using the validated nodes… box is checked. Click Finish.
4.2 Create the Cluster
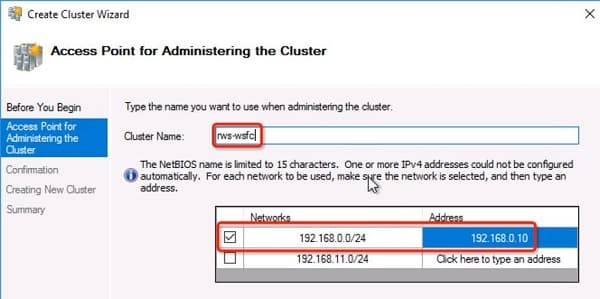
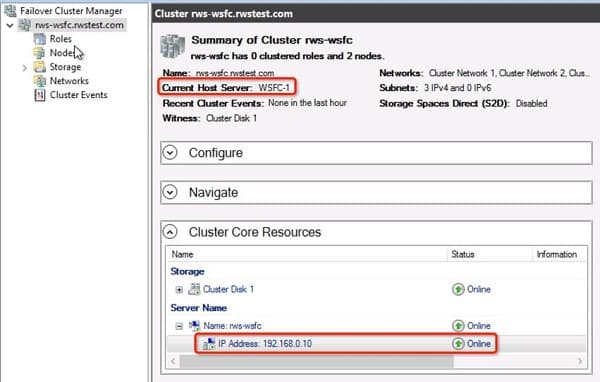
- Next, assign the IP address in the segment 192.168.0.xxx as the IP address of the access point for the cluster, using the Create Cluster Wizard.
- After the creation is complete, check the status is online:
4.3 Add HAVIP to Alibaba Cloud Console
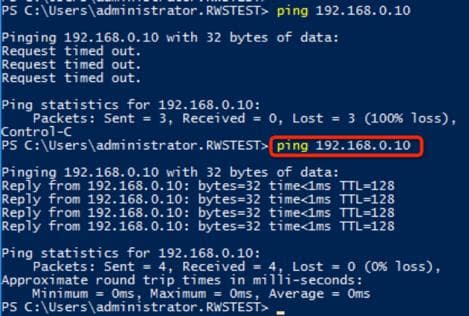
Alibaba Cloud no longer supports multi-IP on a single NIC. Even if you can attach multiple IP addresses on the same NIC, it cannot ping successfully.

By adding HAVIP (High Availability IP), this problem is circumvented:
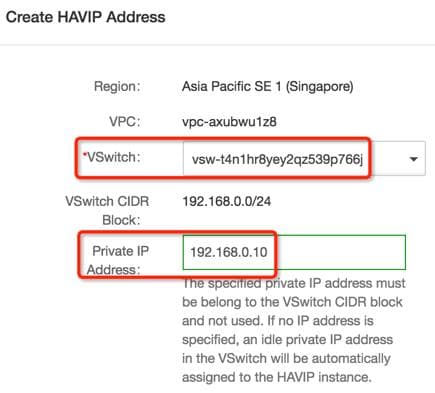
- In the Alibaba Cloud VPC, locate the VPC where the network segment 192.168.0.xxx is located, click and enter the HAVIP on the left.
- After entering the user interface, click Create HAVIP Address in the upper right corner, select the correct VSwitch and use the cluster IP as the Private IP address:
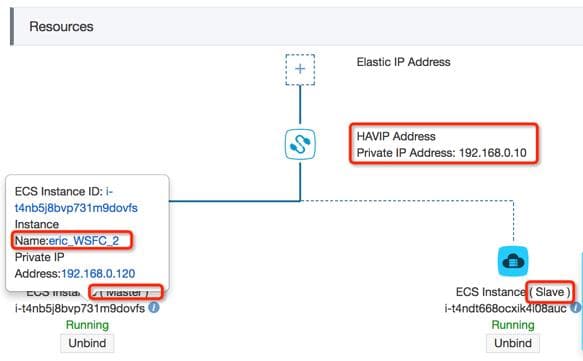
- Bind your ECS instances to HAVIP and look at the status. You can see that the current WSFC-2 node is in the Master state, consistent with the one seen above with the Failover Cluster Manager:
- Ping the WSFC-1 node again to verify the cluster IP connectivity. The ping test should now work:
4.4 Verification on Failover
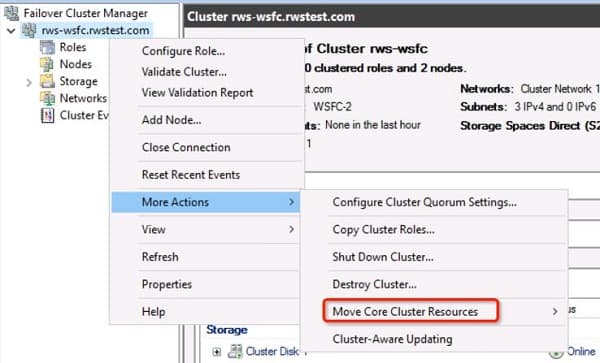
- Click More Actions, click Move Core Cluster Resources and select the WSFC-1 node:
- Check the status after the move operation:

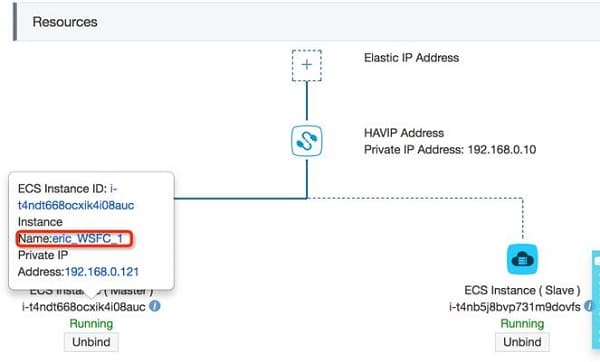
- At this point, view the corresponding HAVIP state in the Alibaba Cloud Console and you can see the WSFC-1 node is now the Master:
- You can also check the status of node WSFC-1 from PowerShell:

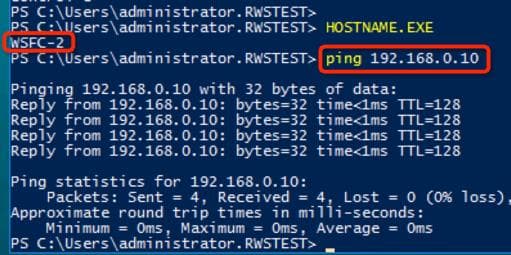
- At node WSFC-2, ping the cluster IP bound to WSFC-1 to verify the connection:
4.5 Add a Disk in Cluster Manager
Now we need to add a disk by performing the following steps in the Cluster Manager:
- In Actions, click Add Disk and select all three cluster disks:

- Click OK and check the status of each one is "Online".
4.6 Configure the Quorum Disk
The quorum is sometimes referred to as the Disk or File Witness. It is simply a small clustered disk which is in the available cluster storage group. To configure the quorum, you should:
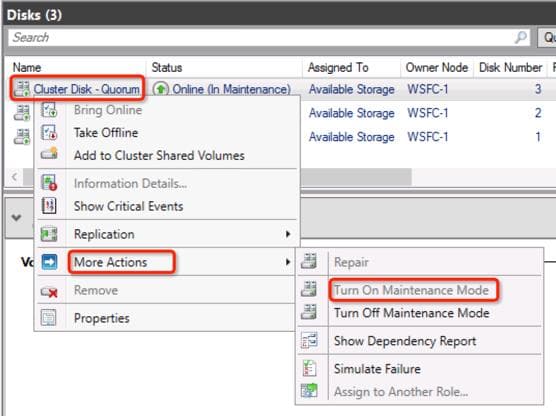
- First, turn on maintenance mode on the quorum disk in the More Actions menu.
- Then format it in Computer Management -> Disk Management and turn off the disk maintenance mode.
NOTE: Disk formatting can be performed only on the node 1 server. You do not need to do it again on node 2. After cluster failover manager can move the disk resource to node 2, at the computer management -> disk management to see just format the disk is still NTFS format.
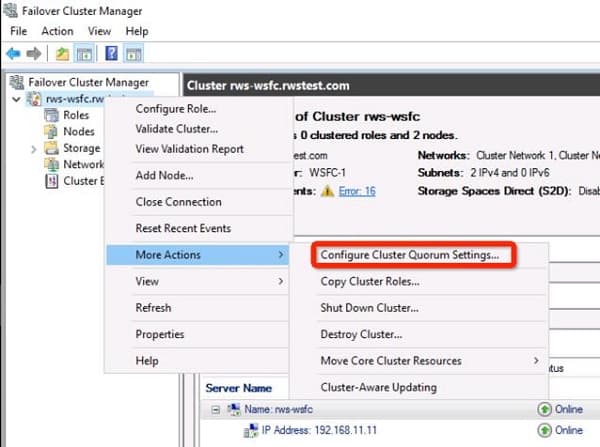
- Next, go to the quorum disk configuration settings:
- Click the Select the quorem witness option.
- And select Configure a disk witness.
- Select the disk.
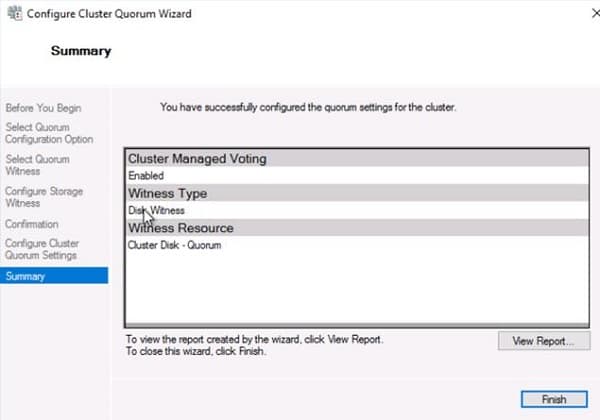
- And complete the quorum disk settings, clicking Finish when you are done:
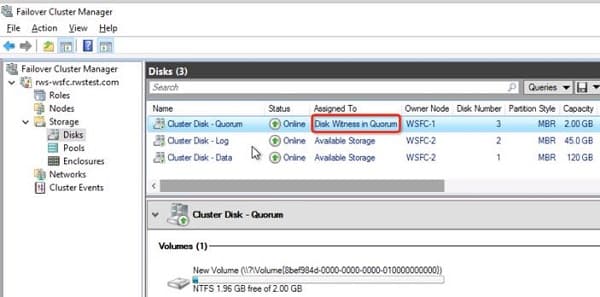
- Finally, check the status:
4.7 Format Other Disks
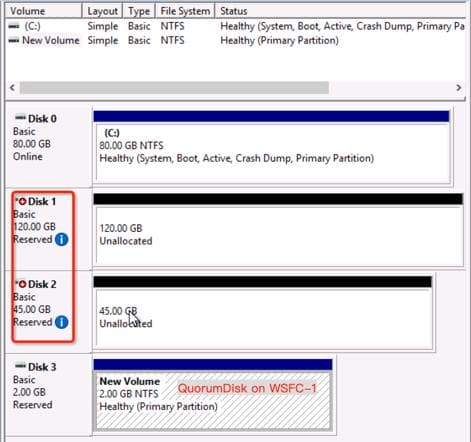
The other two DATA and LOG disks are also formatted as NTFS. You can see that these two disks are now on the cluster's WSFC-2 node, so the states seen in disk management for WSFC-1 and WSFC-2 are as follows:
WSFC-1:
WSFC-2:
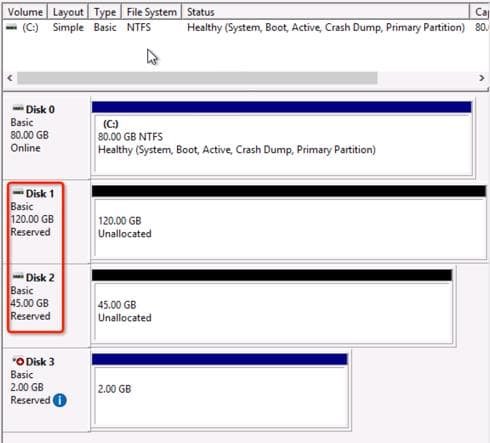
Turn off maintenance mode after formatting on the WSFC-2 node and check the status via Failover Cluster Manager:
For easy identification and operation, move all three disk resources to the WSFC-1 node.
4.8 Add Cluster Shared Volumes
Finally, click to add Cluster Shared Volumes to your configuration by following these screenshots:
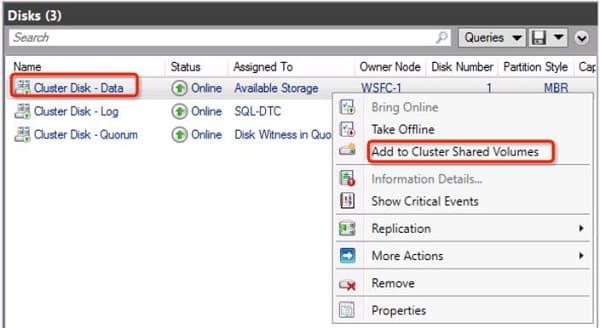
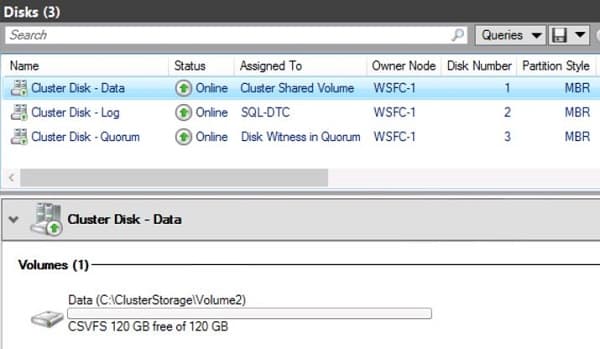
You can view the shared volume on My Computer. This volume will be used for SQL Server.

5.Deploy SQL Server Failover Cluster
The SQL Server failover cluster is equivalent to the primary and secondary machines, while only one SQL Server service is running, the database is stored in shared storage and has only one copy.
We now need to deploy the SQL Server failover cluster using the following steps:
5.1 Run System Configuration Checker
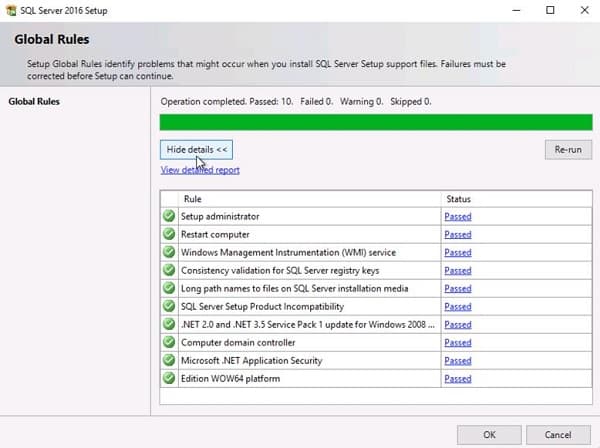
First, check your system configuration by clicking the following tool on the SQL Server menu:
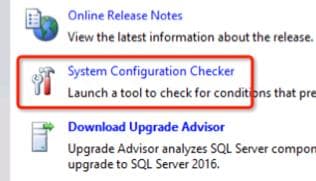
The following results should appear:
5.2 Install SQL Server Failover Cluster on WSFC-1
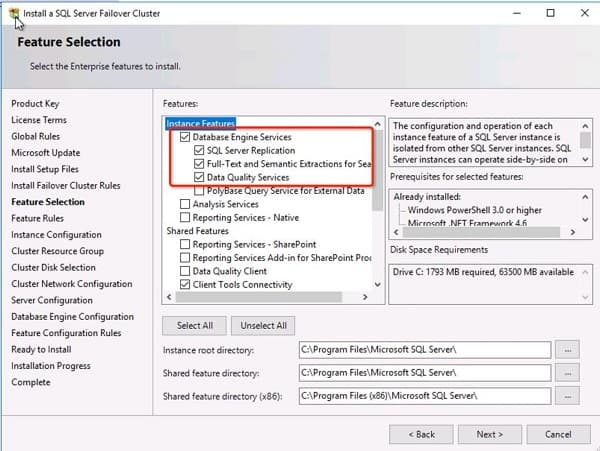
- Run the installer for SQL Server on the WSFC-1 node and select the New SQL Server failover cluster installation option:

- Choose Database Engine Services and the following client related options in Shared Features:
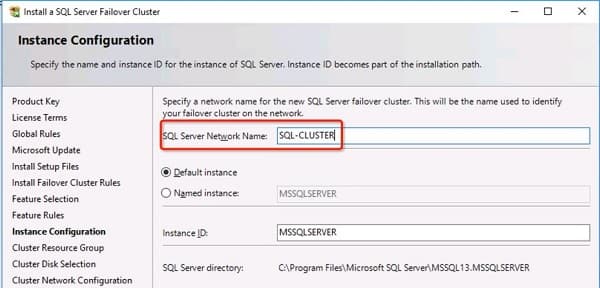
- Add the name of your SQL Server network:
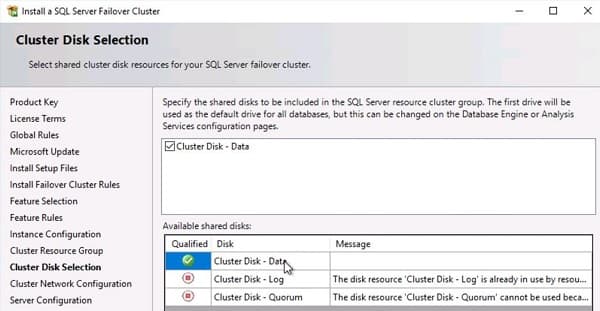
- Check Cluster Disk – Data:
- Click OK.
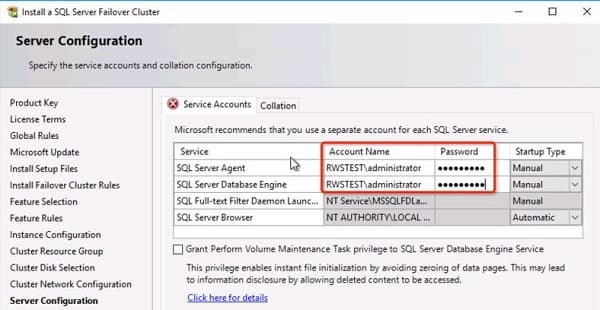
- Add your login details for the server:
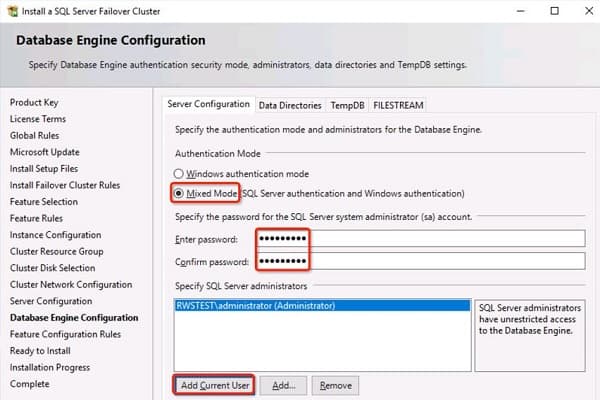
- On the Server Configuration tab, make sure Mixed Mode is selected and enter the server login details:
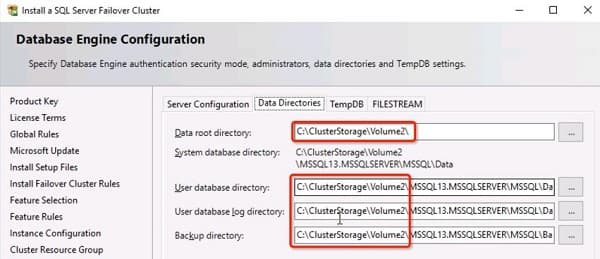
- Now, go to the Data Directories tab and enter the directory details:
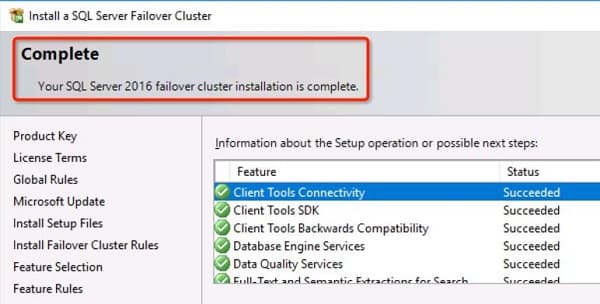
- Click OK to complete the installation:
- Finally, check the status with the Failover Cluster Manager:
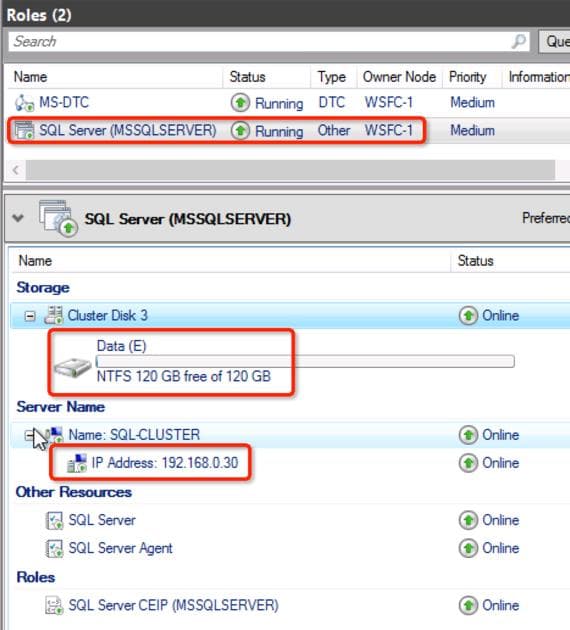
- Add HAVIP for SQL-CLUSTER cluster IP. In this tutorial we have added a total of three HAVIPs:

5.3 Add WSFC-2 as a SQL Server Failover Cluster Node
- Run the installer for SQL Server on the WSFC-2 node and select following option:

- Enter the name of the node
- Add the login credentials
- Complete the installation
5.5 SQL Server Network Configuration
- Next, you need to configure the network in SQL Server Configuration Manager and set the IP addresses of all 127.0.0.1 and 192.168.0.xxx segments to Enabled = Yes

- Restart SQL Server related services after this modification.
5.6 Check the SQL Server Status of Both Nodes
- View the current SQL Server running on node WSFC-1 with Failover Cluster Manager:

- View on the WSFC-1 node:

- You can see the cluster IP on SQL-CLUSTER listens on the port 1433:
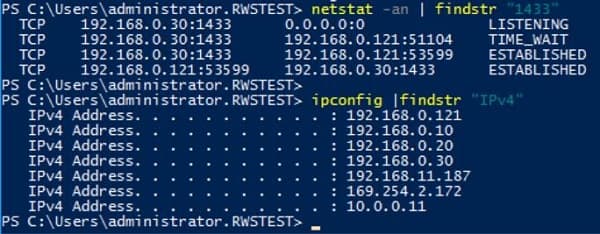
- If you view the WSFC-2 node, the SQL Server related services are Stopped.

- View its status via the SSMS management tools. The SSMS is installed in the AD server (192.168.0.119), so enter the SQL-CLUSTER cluster IP address.
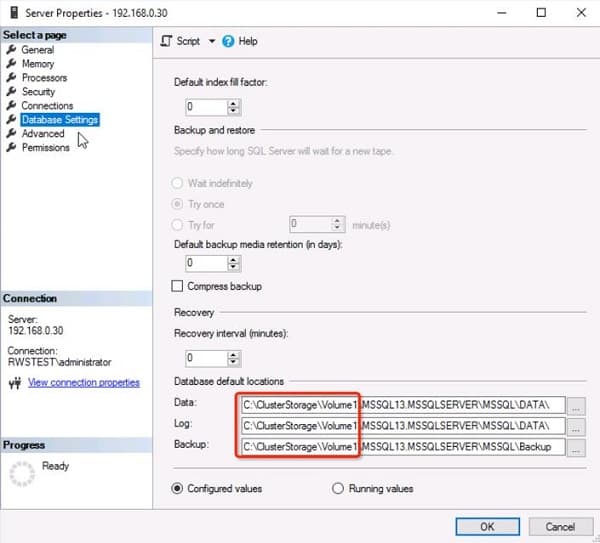
- You can also view the cluster shared storage details by clicking Databases and System Databases.
- Go to the Database Settings and check the default locations:
6.Check Your Configuration
You have now to deployed WSFC and the SQL Server Failover Cluster on an Alibaba Cloud ECS instance. You can check your configuration with the following steps:
6.1 Generate test data with tool HammerDB
- Go to the download URL: http://www.hammerdb.com/download.html to download the HammerDB tool.
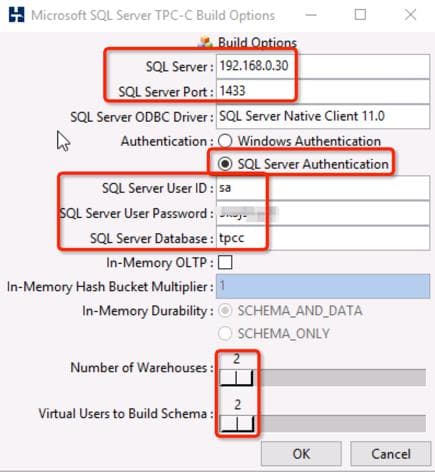
- When you open HammerDB, configure the Build Options and click Build to start generating data:
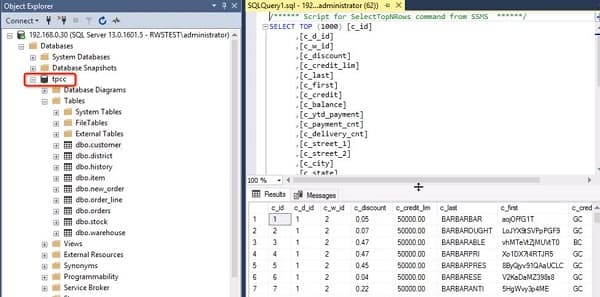
- In SSMS, execute SQL statements to query part of the tpcc database data:
6.2 Move SQL Server Failover Cluster to the WSFC-2 Node and Verify
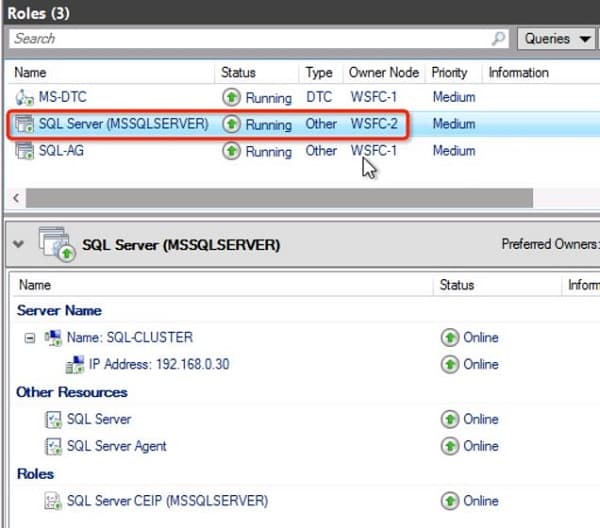
- Click More Actions, click Move Core Cluster Resources and select the WSFC-2 node:
- Check the cluster is running on the node WSFC-2:
Conclusion
That's it! You have now checked and verified your WSFC and the SQL Server Failover Cluster on an Alibaba Cloud ECS instance.
If you need any further help with your installation, please go to https://www.alibabacloud.com/help or contact one of the Alibaba Cloud Support team.
To read the other tutorials covering Windows Server Failover Clusters, SQL Servers and Windows Server Failover Clustering, visit:
https://www.alibabacloud.com/getting-started/projects


 ECS(Elastic Compute Service)
5209830766159913 October 18, 2018 at 8:59 am
good