During a migration from an Microsoft SQL Server database to Alibaba Cloud, you have the choice of either migrating to an Alibaba Cloud Elastic Compute Service (ECS) hosted database or migrating directly to an Alibaba Cloud ApsaraDB for RDS database instance. In this tutorial, we will take advantage of the database mirroring feature of Microsoft SQL Server and tell you how to backup and restore your content.
As a bit of a heads up, in this tutorial, we will carry out the following steps:
In this tutorial, we will also be showing you how you can verify your configuration in a final appendix.
Database mirroring works by keeping two copies of a single database. These two copies reside on different server instances of the SQL Server Database Engine. Typically, these server instances are physically located at different sites.
When you implement database mirroring on a database, it initiates a relationship, known as a database mirroring session, between these server instances. One server instance serves the database to the client, or the principal server. The other instance acts as a hot or warm standby server, or more specifically the mirror server, depending on the configuration and state of the mirroring session.
When a database mirroring session is synchronized, database mirroring provides a hot standby server that supports rapid failover without a loss of data from committed transactions. When the session is not synchronized, the mirror server is typically available as a warm standby server, but there is a risk of minor data loss.
The principal and mirror servers communicate and cooperate as partners in a database mirroring session. The two partners perform complementary roles in the session: the principal role and the mirror role. At any given time, one partner performs the principal role, and the other partner performs the mirror role. Each partner is described as owning its current role.
The partner that owns the principal role is known as the principal server, and its copy of the database is the current principal database. The partner that owns the mirror role is known as the mirror server, and its copy of the database is the current mirror database. When database mirroring is deployed in a production environment, the principal database is the production database.
When you conduct database mirroring, every INSERT, UPDATE, and DELETE operation on the principal database must be duplicated onto the mirror database as quickly as possible. This is accomplished by sending a stream of active transaction log records to the mirror server, which applies log records to the mirror database in sequence. Unlike replication, which works at the logical level, database mirroring works at the level of the physical log record.
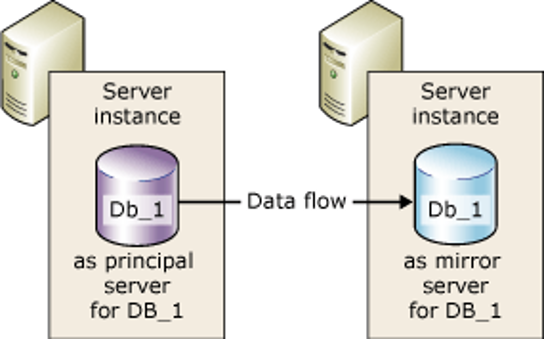
The above diagram is a simple logic network diagram. It demonstrates the main components needed to implement database mirroring. These components, and related terms are defined below:
FULL and OFF.In this guide, we will use the following test environment:
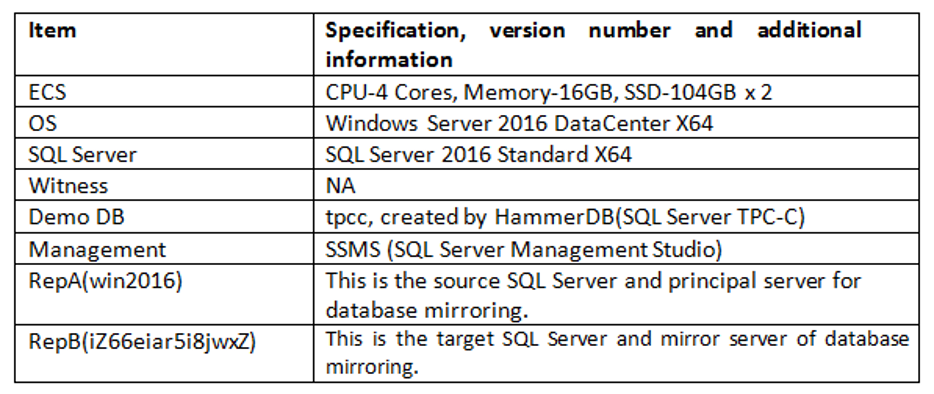
For this tutorial, we recommend you create the same Windows accounts on both SQL Servers, with the same password. In this section, we will demonstrate how to do this as an Administrator user.
First, ping both servers to check there are no firewall-related issues:
ping <IP of RepB>
ping <IP of RepA>
Next, check whether the default port 1433 is reachable:
telnet <IP of RepB> 1433
telnet <IP of RepA> 1433
Query the driver letter and directory where the data files and log files for the demo database (tpcc) reside on principal server (RepA) using the following command:
USE master
go
SELECT physical_name
FROM    sys.master_filesWHERE   database_id = DB_ID('tpcc')
When you run this command, the following directory should be set up:

Now, create same directories on RepB server.
Run the following SQL command:
USE master
GO
SELECT NAME [Database Name],
       recovery_model_desc [Recovery Model],
       CASE
         WHEN [compatibility_level] = 90 THEN '2005'
         WHEN [compatibility_level] = 100 THEN '2008'
         WHEN [compatibility_level] > 100 THEN '2008+'
         ELSE '2000 or lower version'
       END Compatibility Level]
FROM   sys.databases
WHERE  NAME = 'tpcc'
When you run this command, the following recovery model should be set up:

If Recovery Model of the demo database is not FULL, use the SQL Server Management Studio to modify this.
To achieve this, open the Database Properties – tpcc, click Options, and change the Recovery model to FULL:
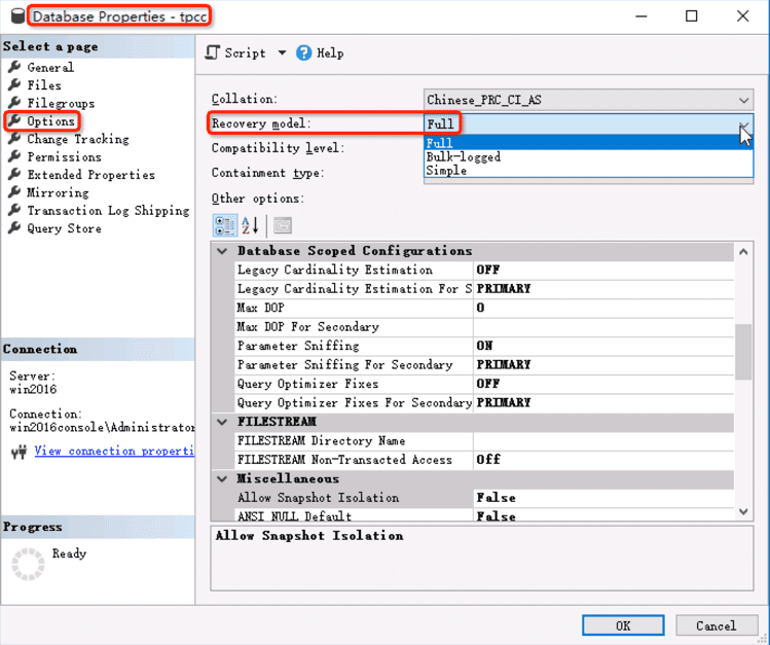
Click OK.
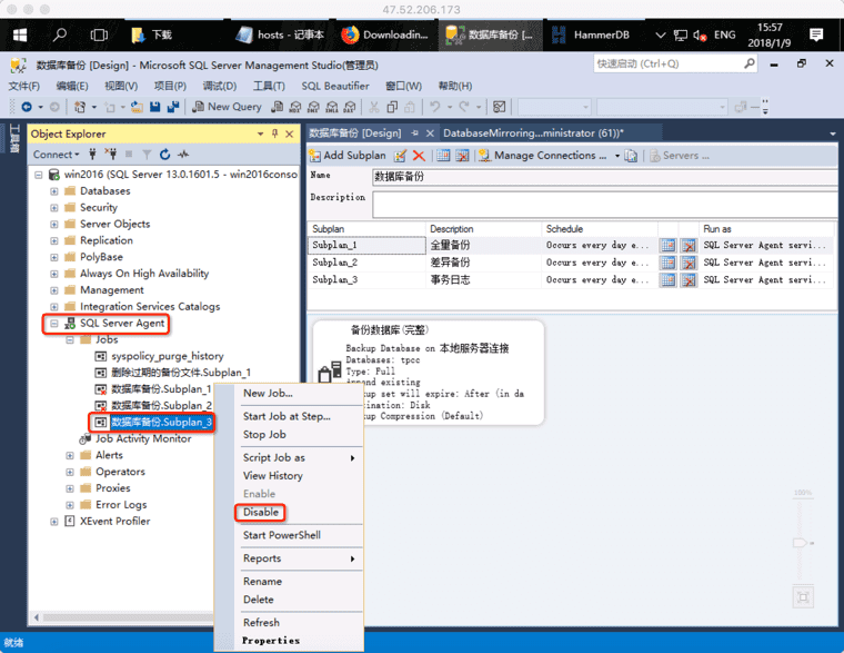
In the Object Explorer, open the SQL Server Agent and disable routine backup jobs on the principal server (RepA):
The master key is used to encrypt the certificate, but you must ensure you have put the appropriate safeguards in place to fully protect your database. You must implement the appropriate password and storage protection for the database master key, which is an instance-level object that has a very wide range of impact. You can use the following statement to achieve this:
USE master
GO
CREATE MASTER KEY ENCRYPTION BY PASSWORD = 'Password@123';
Now, use the same method to create the database master key on the mirror server.
Now, you need to create the HOST_A_cert certificate on the principal server using the following command:
USE master
GO
CREATE CERTIFICATE Host_A_Cert WITH Subject = 'Host_A Certificate', Expiry_Date = '2019-1-1';
You can find it here:
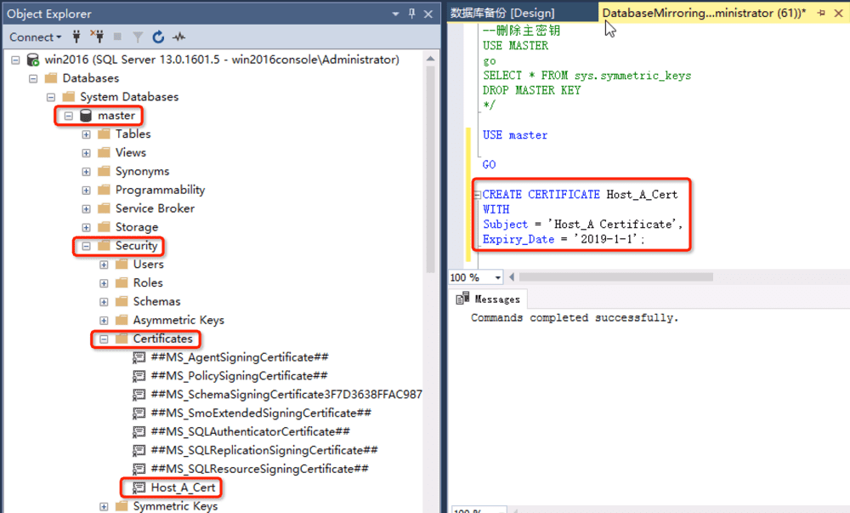
Use the same method to create a HOST_B_cert certificate on the mirror server.
When all the operations are performed on the mirror server, notice that the related parameters are changed to the values corresponding to the master server. For example, Host_A should be changed to Host_B, you get the picture.
Use the following SQL statement to create an endpoint in the principal server and specify that port 5022 be used:
--Create endpoint with Certificate Host_A_Cert
IF NOT EXISTS (SELECT 1 FROM sys.database_mirroring_endpoints)
  BEGIN
     CREATE ENDPOINT [DatabaseMirroring]
      STATE = STARTED AS TCP (LISTENER_PORT = 5022, LISTENER_IP = ALL)
      FOR DATABASE_MIRRORING (
AUTHENTICATION = CERTIFICATE Host_A_Cert,
ENCRYPTION = REQUIRED Algorithm AES,
ROLE = ALL);
  END
You can find the endpoint here:
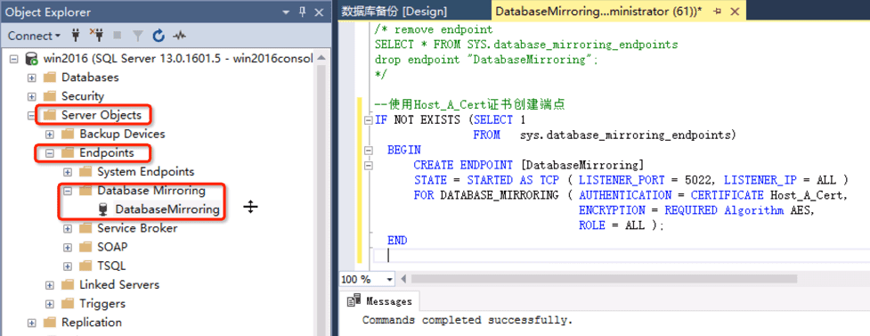
Now, repeat this step, making a slight modification to the name of the certificate on the mirror server, to create the mirror server endpoint.
The purpose of backing up a certificate is to send it to another server and import the certificate. As a result, another server can access this server, the principal server, with a certificate.
To achieve this, run the following command:
BACKUP CERTIFICATE Host_A_Cert TO FILE = 'E:\ShareFolders\Host_A_Cert.cer';Repeat this step on the mirror server, paying attention to the certificate name and path.
Copy Host_A_Cert.cer and Host_B_Cert.cer should reside in the same folder on both servers.
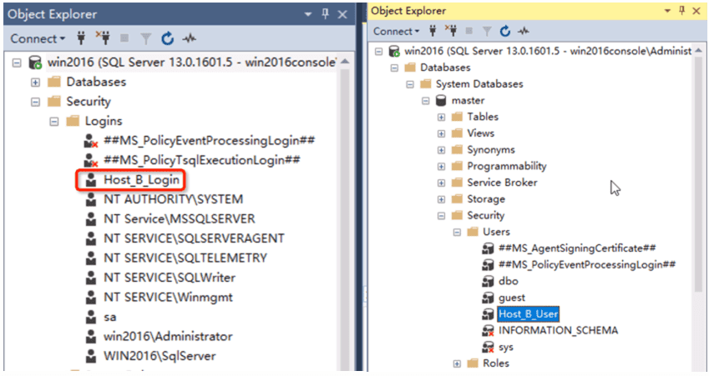
For each server to create a separate server login account, we need to create a login for the mirror server. You can achieve this by running the following command:
CREATE LOGIN Host_B_Login WITH PASSWORD = 'Password@123';
CREATE USER Host_B_User For Login Host_B_Login;
CREATE CERTIFICATE Host_B_Cert AUTHORIZATION Host_B_User
FROM FILE = 'E:\Certification\Host_B_Cert.cer';
GRANT CONNECT ON ENDPOINT::[DatabaseMirroring] TO [Host_B_Login];
Repeat this step on the mirror server, paying attention to the login name, username, certificate name and path.
You can now find the accounts here on the Object Explorer:
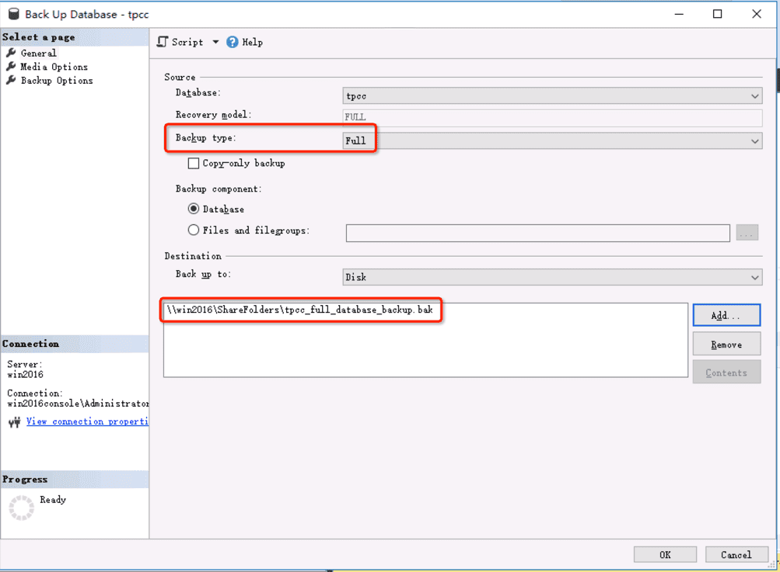
First, open the Back Up Database – tpcc window. The Backup Type should be set to FULL:
Next, change the Backup type to Transaction Log:
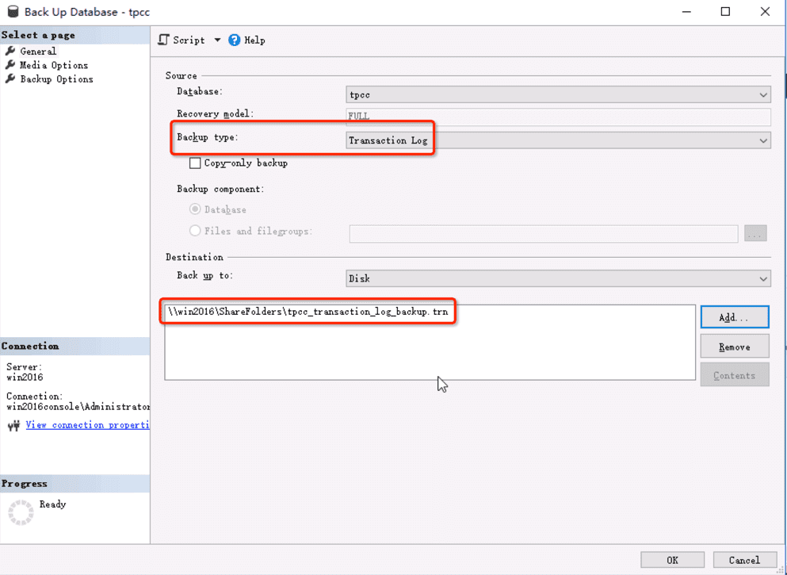
Change the destination to match this new setting. Check the backup files are in the correct repository:

Now, we need to restore the backup to the target SQL Server.
First, go to Device and click on the hamburger icon (…). A popup window should appear. Check the backup devices match the devices we set up in the previous step.
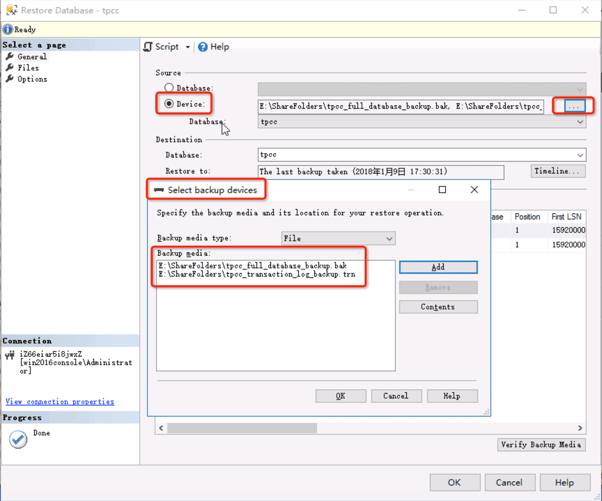
Next, go to the Options page and check the Recovery state is set to RESTORE WITH NORECOVERY:

Click Restore and the restore process will begin. A progress bar should appear:


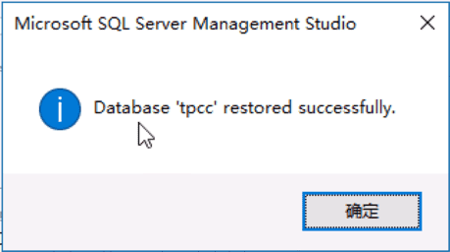
Once the restore process has completed, click OK on the popup window:
Finally, we need to check the restore result.
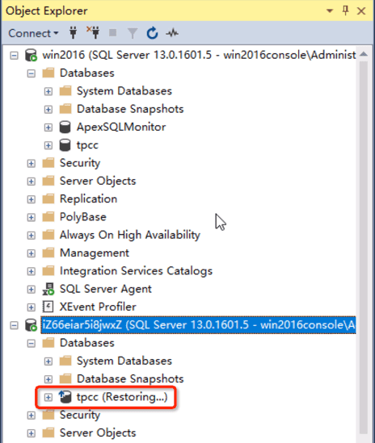
In Object Explorer, check the tpcc (Restoring…) tab is shown.
First, we need to add the partner on the principal and mirror databases. To achieve this, perform the following SQL statement on RepB, which is the Mirroring Database:
ALTER DATABASE tpcc
    SET PARTNER = 'TCP://RepA:5022';
GO
Next, perform following SQL statement on RepA(Principal Database):
ALTER DATABASE tpcc
    SET PARTNER = 'TCP://RepB:5022';
GO
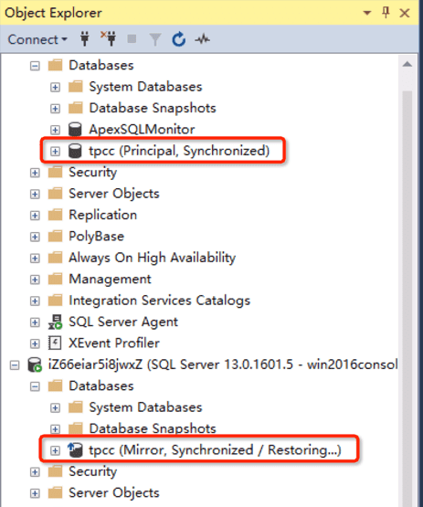
Next, check the Database Mirroring Status in the Object Explorer:
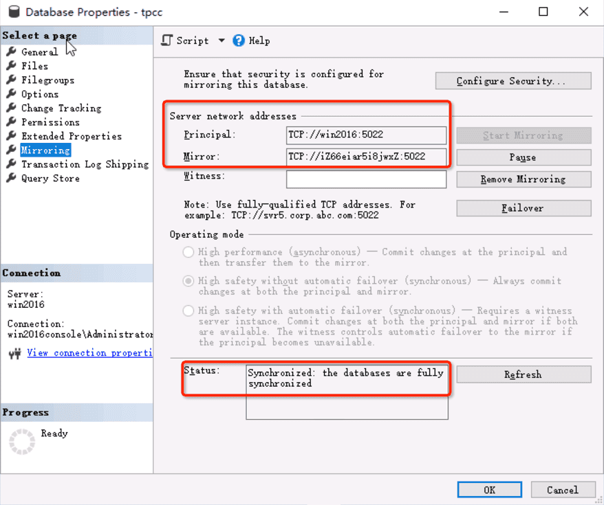
Click on the Mirroring page of the Database Properties – tpcc. Enter the principal and mirror server network addresses. When you hit Refresh, the Status should read Synchronized: the databases are fully synchronized:
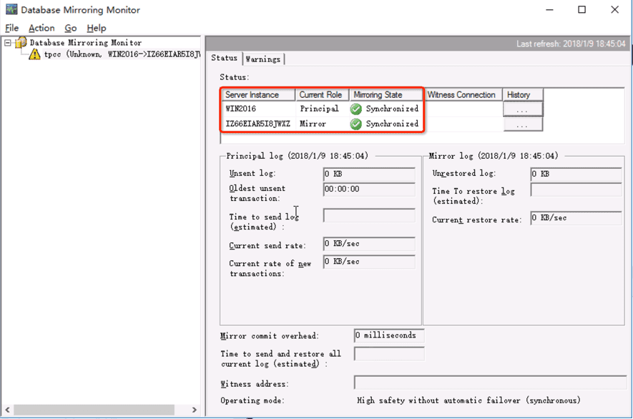
Now, open the Database Mirroring Monitor tool and double check the server instances are synchronized:
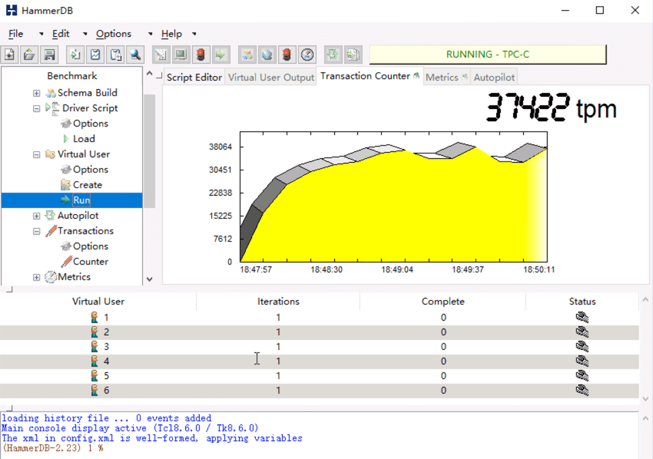
In this guide, we are using the HammerDB Load Testing took to simulate service traffic. If you are also using HammerDB Load Testing, check the Virtual User is running. You can omit this step if you are setting up with a live service.
The Current send rate, Current rate of new transactions and Current restore rate should now be populated with figures > 0:
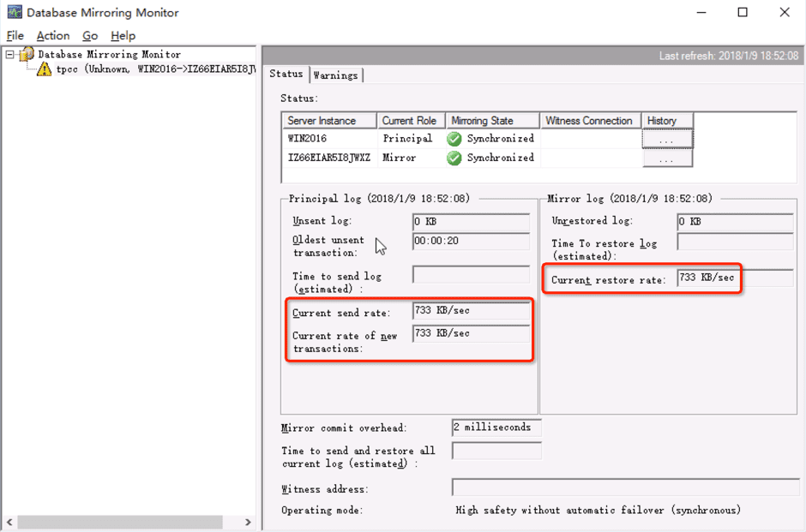
If you click through to the principal server, the following information should appear:
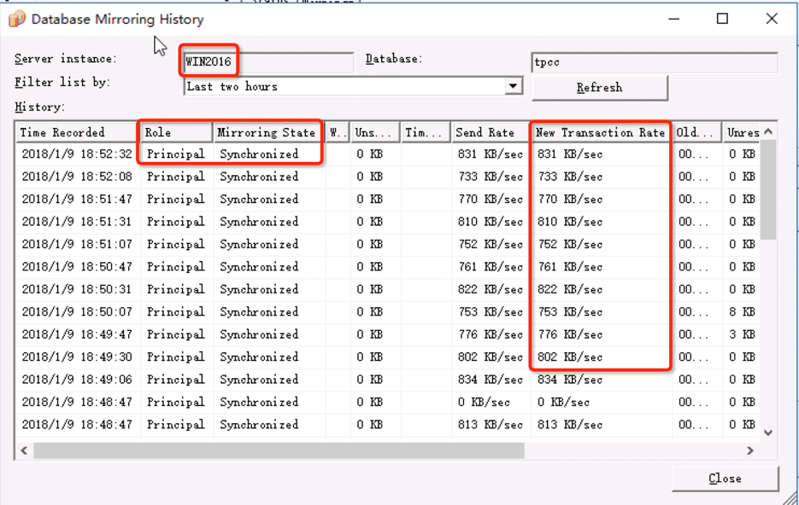
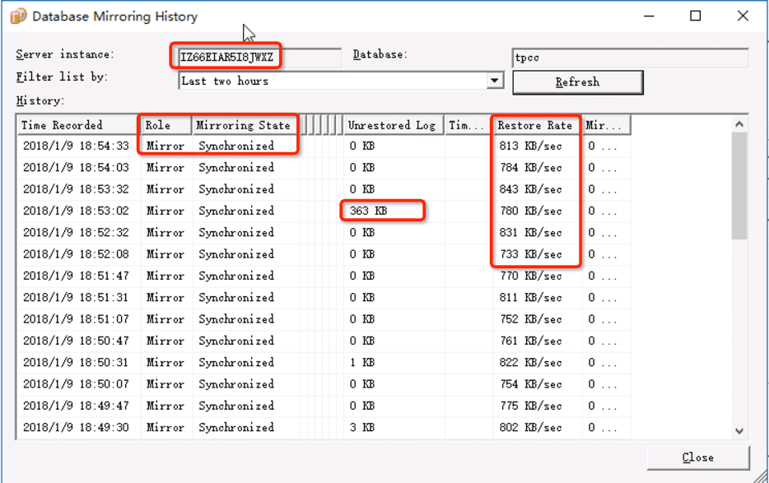
The following information should appear for the mirror server:
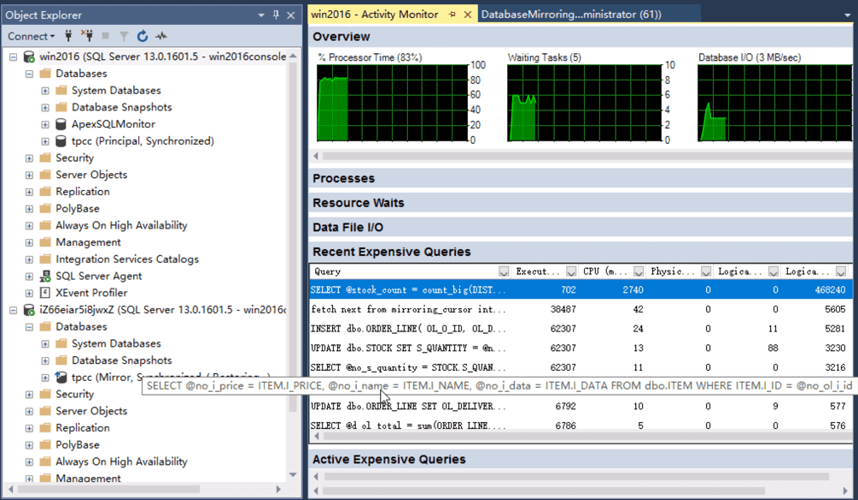
Finally, check the Activity Monitor Status in HammerDB (if relevant) to make sure the database is connected:
And that's it! We have now migrated data from your Microsoft SQL Server database to an Alibaba Cloud ECS-hosted database using the database mirroring feature. We have also demonstrated how to backup and restore your content.
You may want to verify your configuration to check the database mirroring service is running as expected. We recommend you carry out these steps immediately after the initial setup and at regular intervals to check your configuration is running. However, you should be aware that to verify your configuration we need to stop service traffic, which maybe disruptive to your business.
First, stop the service traffic.
If you are using the HammerDB load test case in a testing environment, then switch database roles by manual failover on the SQL Server Management Studio (SSMS). In a customer production environment, the service should be stopped for a short time during the role switch.
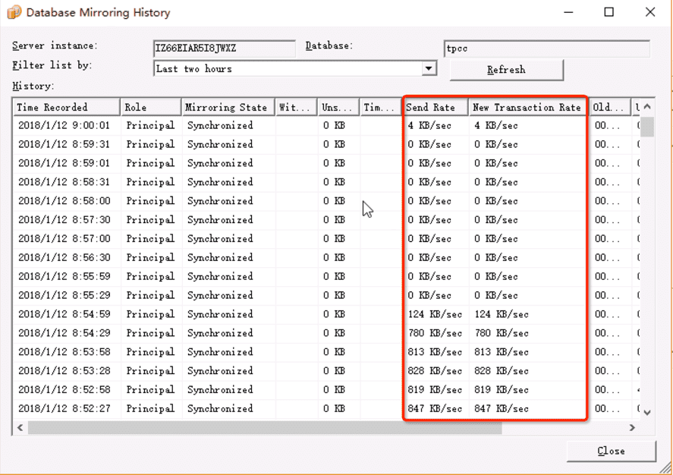
You can check you have successfully stopped your service traffic by opening the Database Mirroring History window. The transaction log generation speed should be greatly reduced:
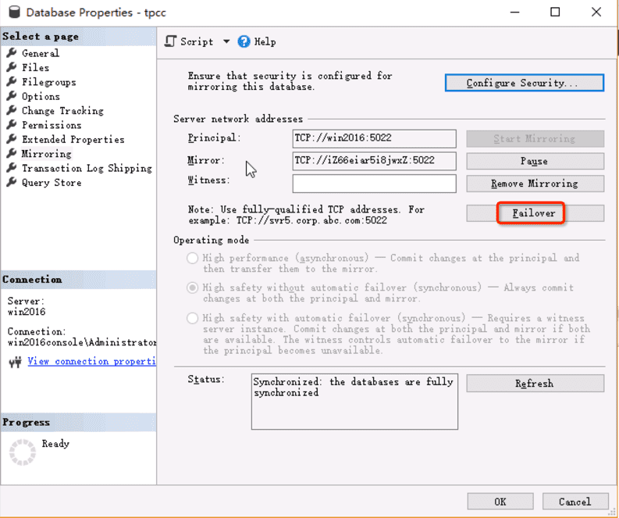
Next, open the Database Properties – tpcc window and click Failover for a manual failover:
Click Yes when the following alert appears:

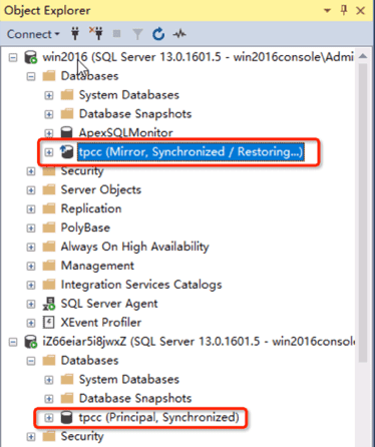
When the failover is complete, check the results in Object Explorer:
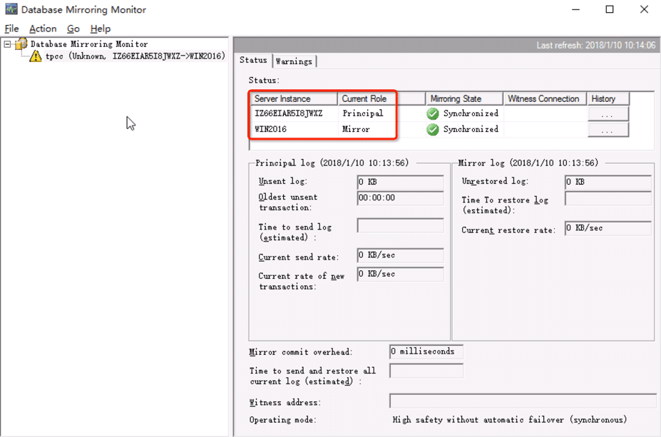
Also, check the database roles in Database Mirroring Monitor:
Next, we click Remove Mirroring in the Database properties – tpcc tool:
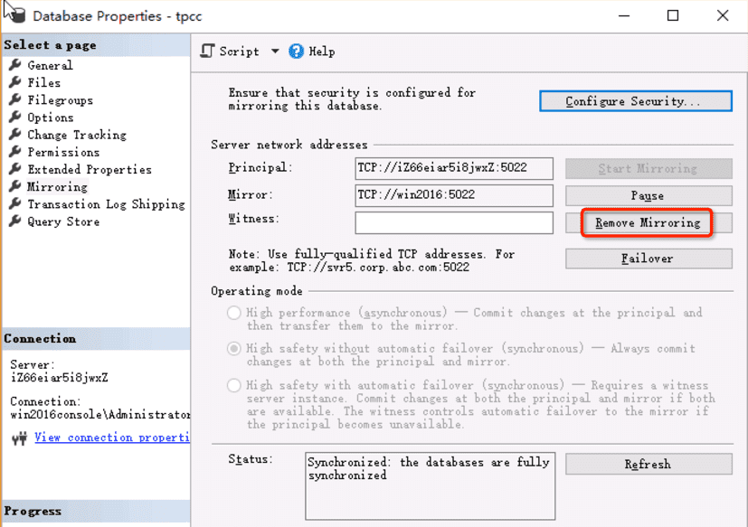
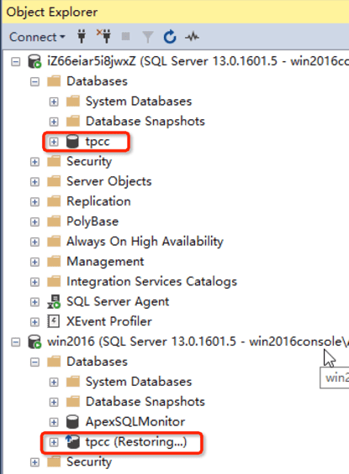
After that, check the status of principal (RepB) and mirror (RepA) database. In this example, RepA is restoring:
Finally, modify the RepA status by running the following SQL statement on RepA:
RESTORE DATABASE tpcc WITH RECOVERY 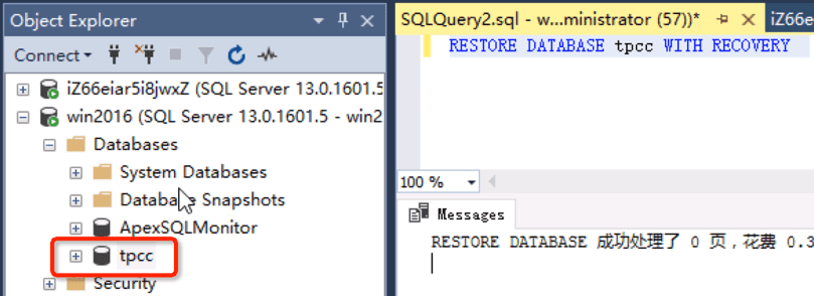
There are two ways to restart the service traffic, either directly or through Alibaba Cloud Server Load Balancer (SLB).
1. We do not need to change the IP address of database in the application configuration, because the SLB service IP address is unique to the database visit address.
2. However, we do need to modify the weight of backend servers on the Alibaba Cloud Console. Go to Backend Servers and click to swap the weights of the two servers.

3. The following windows will appear. Simply swap the weights of the two servers and click Confirm:
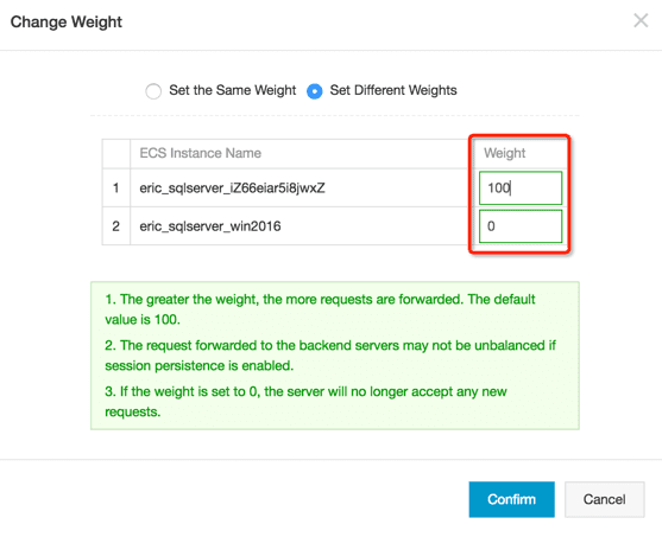
4. After modification, the weights should now appear as:

5. Next, restart the service.
Note: Using this method, we are using Alibaba Cloud's SLB and SQL Server on ECS service. So, we need not change any IP addresses in the HammerDB or when dealing with a customer production site.
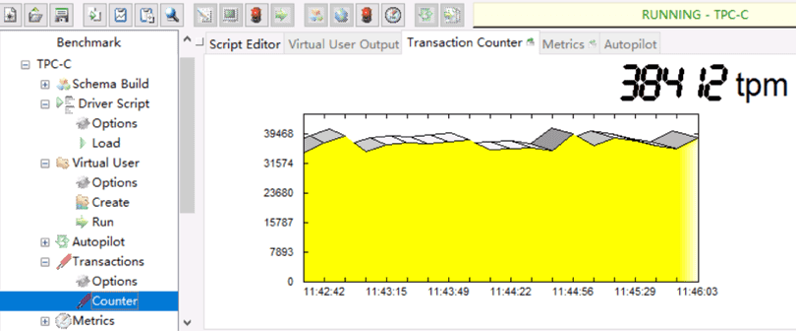
Finally, check the service status either in HammerDB:
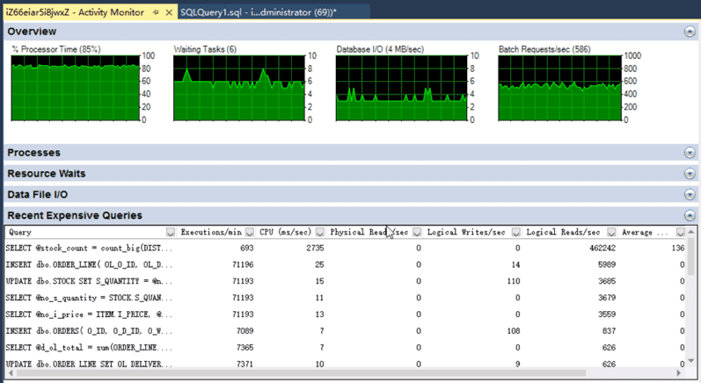
And/or on the SSMS Activity Monitor:
Database Mirroring (SQL Server): https://docs.microsoft.com/en-us/sql/database-engine/database-mirroring/database-mirroring-sql-server?spm=a2o8d.corp_prod_task_detail.0.0.8c30a40EmuKvB
Overview of Always On Availability Groups (SQL Server): https://docs.microsoft.com/en-us/sql/database-engine/availability-groups/windows/overview-of-always-on-availability-groups-sql-server
Deploying Windows Server Failover Clustering (WSFC) on Alibaba Cloud
Why All Businesses Should Adopt a Cloud Data Loss Prevent System

2,598 posts | 769 followers
FollowAlibaba Clouder - December 13, 2017
Alibaba Cloud Community - November 8, 2024
ApsaraDB - March 4, 2021
digoal - August 2, 2023
ApsaraDB - April 28, 2020
ApsaraDB - March 4, 2021

2,598 posts | 769 followers
FollowLearn More
 ECS(Elastic Compute Service)
Elastic and secure virtual cloud servers to cater all your cloud hosting needs.
Learn MoreLearn More
More Posts by Alibaba Clouder