By Yi Li

source: osxdaily.com
Docker and Kubernetes have become very commonplace infrastructure in the IT architectures of many enterprises nowadays. This is especially the case as container runtime security has also come to gain greater attention in the IT community generally.
Not too long ago, Docker 19.03 added support for an all-new, important feature - Rootless Container. I took my time during a recent week holiday in May to get my taste of this all-new feature from Docker. This blog article draws from my experiences Experimenting with Rootless Docker, and also considers additional details and related practices, including how this feature further improves the security and manageability of containers.
With Docker and Kubernetes becoming more common, container security is also becoming an increasingly large concern. Docker provides application virtualization functionality and implements resource isolation and quota constraints through namespaces and cgroups. Docker Engine has the following client-server structure:
Docker Client (TCP/Unix Socket) -> Docker Daemon (Parent/Child Processes) -> Container
Because privileged capabilities are required to create namespaces and mount file systems in Linux, Docker Daemon has always needed to be started by the root user. This allows users with access to Docker to obtain root privileges by connecting to Docker Engine and launch attacks by bypassing the audit feature in the system. This prevents containers from being applied in some scenarios. For example, in the high-performance computing field, because containers need to be run by the unprivileged user in traditional resource management and scheduling systems, the community has to implement another container runtime—Singularity.
With the great work done by Moby and BuildKit maintainer Akihiro Suda, rootless support was added to Docker Engine and BuildKit. This support allows Docker Engine to be run as an unprivileged user and enables better reuse of the Linux security system.
Note:*
- Currently, the rootless container is available in experimental mode. Some features are not supported yet, including cgroups resource control, apparmor security profiles, and checkpoint/restore.
- Only Ubuntu currently supports overlay filesystems in rootless mode. For security reasons, this solution has not obtained upstream support. For other operating systems, rootless mode uses vfs storage driver and may impact performance. Therefore, rootless mode is not suitable for I/O intensive applications.
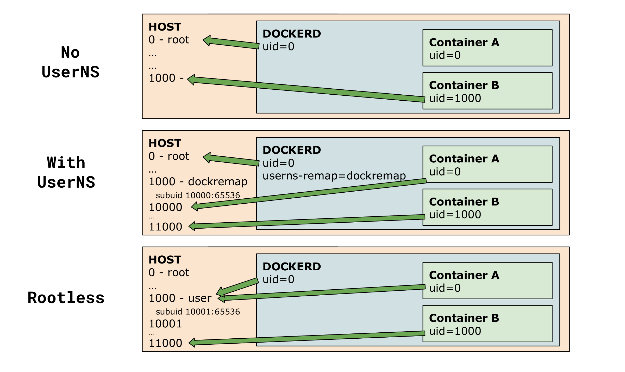
The first key is to take advantage of user namespaces. User namespaces map a range of user IDs so that the root user in the inner namespace maps to an unprivileged range in the parent namespace. Docker Engine has already provided the --userns-remap flag to support the corresponding capability, providing better container security. The rootless mode works in a similar way, except the Docker Daemon is also run in the remapped namespace.

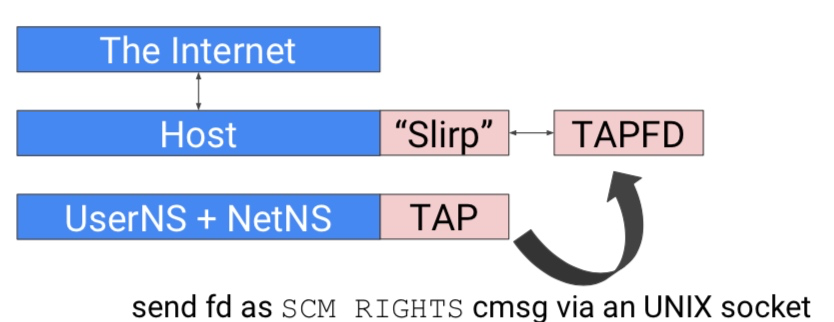
Although unprivileged users can create network namespaces in user namespaces and perform operations like iptables rule management and tcpdump, they cannot create veth pairs across the host and containers, which means containers do not have Internet connection. To solve this problem, Akihiro uses the usermode network (SLiRP) to provide containers with Internet connection by connecting a TAP device to an unprivileged user namespace. The following diagram shows the architecture.

For more information, check out the slirp4netns project.
You can follow these steps to set up your environment for rootless containers. Note that the verification practice is performed on a CentOS 7.6 VM.
Next, you want to create a user. You can do so by running these commands.
$ useradd moby
$ passwd moby
Then, add the new user to the sudoers group.
usermod -aG wheel mobyNext, switch to the unprivileged user.
$ su - moby
$ id
uid=1000(moby) gid=1000(moby) groups=1000(moby),10(wheel)
Configure uid/gid mapping.
$ echo "moby:100000:65536" | sudo tee /etc/subuid
$ echo "moby:100000:65536" | sudo tee /etc/subgid
Install Rootless Docker
$ curl -sSL https://get.docker.com/rootless | shNext, if you are installing this for the first time, you need to install the required package.
$ curl -sSL https://get.docker.com/rootless | sh
# Missing system requirements. Please run following commands to
# install the requirements and run this installer again.
# Alternatively iptables checks can be disabled with SKIP_IPTABLES=1

cat <<EOF | sudo sh -x
curl -o /etc/yum.repos.d/vbatts-shadow-utils-newxidmap-epel-7.repo https://copr.fedorainfracloud.org/coprs/vbatts/shadow-utils-newxidmap/repo/epel-7/vbatts-shadow-utils-newxidmap-epel-7.repo
yum install -y shadow-utils46-newxidmap
cat <<EOT > /etc/sysctl.d/51-rootless.conf
user.max_user_namespaces = 28633
EOT
sysctl --system
EOF
Next, if you want, you can install the usermode network protocol stack (slirp4netns). For this, you'll need to build slirp4netns from the source code because the slirp4netns version installed by yum is too old to be run.
$ sudo yum install glib2-devel
$ sudo yum group install "Development Tools"
$ git clone https://github.com/rootless-containers/slirp4netns
$ cd slirp4netns
$ ./autogen.sh
$ ./configure --prefix=/usr
$ make
$ sudo make install
You will see the following prompt after the Rootless Docker is installed.
$ curl -sSL https://get.docker.com/rootless | sh
# systemd not detected, dockerd daemon needs to be started manually

/home/moby/bin/dockerd-rootless.sh --experimental --storage-driver vfs

# Docker binaries are installed in /home/moby/bin
# Make sure the following environment variables are set (or add them to ~/.bashrc):\n
export XDG_RUNTIME_DIR=/tmp/docker-1000
export DOCKER_HOST=unix:///tmp/docker-1000/docker.sockTo verify you've got the rootless container, you can follow these steps.
First, run the following commands:
$ export XDG_RUNTIME_DIR=/tmp/docker-1000
$ export DOCKER_HOST=unix:///tmp/docker-1000/docker.sock
$ /home/moby/bin/dockerd-rootless.sh --experimental --storage-driver vfs
Next, run the following in a different window:
$ export XDG_RUNTIME_DIR=/tmp/docker-1000
$ export DOCKER_HOST=unix:///tmp/docker-1000/docker.sock
$ docker version
Client:
 Version:           master-dockerproject-2019-04-29
 API version:       1.40
 Go version:        go1.12.4
 Git commit:        3273c2e2
 Built:             Mon Apr 29 23:39:39 2019
 OS/Arch:           linux/amd64
 Experimental:      false

Server:
 Engine:
  Version:          master-dockerproject-2019-04-29
  API version:      1.40 (minimum version 1.12)
  Go version:       go1.12.4
  Git commit:       9a2c263
  Built:            Mon Apr 29 23:46:23 2019
  OS/Arch:          linux/amd64
  Experimental:     true
 containerd:
  Version:          v1.2.6
  GitCommit:        894b81a4b802e4eb2a91d1ce216b8817763c29fb
 runc:
  Version:          1.0.0-rc7+dev
  GitCommit:        029124da7af7360afa781a0234d1b083550f797c
 docker-init:
  Version:          0.18.0
  GitCommit:        fec3683
$ docker run -d -p 8080:80 nginx
$ curl localhost:8080
Perform network performance testing by using iperf3 and start the server.
$ docker run -it --rm --name=iperf3-server -p 5201:5201 networkstatic/iperf3 -sTest the network bandwidth across the containers.
$ SERVER_IP=$(docker inspect --format "{{ .NetworkSettings.IPAddress }}" iperf3-server)
$ echo $SERVER_IP
172.17.0.2
$ docker run -it --rm networkstatic/iperf3 -c $SERVER_IP
...
- - - - - - - - - - - - - - - - - - - - - - - - -
[ ID] Interval           Transfer     Bandwidth       Retr
[  4]   0.00-10.03  sec  29.8 GBytes  25.5 Gbits/sec    0             sender
[  4]   0.00-10.03  sec  29.8 GBytes  25.5 Gbits/sec                  receiver
Test the network bandwidth across the containers and the host (Internet connection).
$ HOST_IP=$(hostname --ip-address)
$ echo $HOST_IP
192.168.1.162
$ docker run -it --rm networkstatic/iperf3 -c $HOST_IP
...
- - - - - - - - - - - - - - - - - - - - - - - - -
[ ID] Interval           Transfer     Bandwidth       Retr
[  4]   0.00-10.00  sec  1011 MBytes   848 Mbits/sec    0             sender
[  4]   0.00-10.00  sec  1008 MBytes   845 Mbits/sec                  receiver
You can see that the communication bandwidth across the containers is relatively high. However, the communication bandwidth in different network namespaces across the containers and the host reduced dramatically.
The introduction of the rootless container by docker is a big step forward in improving the security and manageability of Docker/Runc containers. This all new feature allows the full reuse of the security system in Linux and can reduce the attack surface by combining security configurations like seccomp and SELinux. The community also provides an experimental version of Kubernetes that does not require the root privileges. You can obtain this experimental version from https://github.com/rootless-containers/usernetes
However, granted the rootless container cannot prevent the risk of the Linux kernel. In addition, the network and storage performance of the rootless container needs to be optimized, and the rootless container can only be used in specific scenarios. I hope that the community can continue to improve the container security and efficiency so that this kind of container can be used in a wider range of scenarios.

224 posts | 33 followers
FollowMarketplace - October 13, 2020
Alibaba Container Service - July 24, 2024
Alibaba Clouder - July 27, 2020
Alibaba Clouder - September 3, 2020
Alibaba Clouder - December 18, 2017
Alibaba Clouder - January 12, 2021

224 posts | 33 followers
Follow ACK One
Provides a control plane to allow users to manage Kubernetes clusters that run based on different infrastructure resources
Learn More Container Service for Kubernetes
Alibaba Cloud Container Service for Kubernetes is a fully managed cloud container management service that supports native Kubernetes and integrates with other Alibaba Cloud products.
Learn More Container Registry
A secure image hosting platform providing containerized image lifecycle management
Learn More Elastic Container Instance
An agile and secure serverless container instance service.
Learn MoreMore Posts by Alibaba Container Service