By Nhi Ha, Alibaba Cloud Community Blog author
This blog is part of a two-part tutorial series on how to build a sample serverless application on Alibaba Cloud. This blog is the second part; in it, we will walk you through how to build a serveless application using a set of Alibaba Cloud services. The first part summarises some of the major concepts and the architecture behind the serverless application you will create in this part of the tutorial series.
From the first part we have seen that the serverless architecture can be realised using the following components:
So, in the following sections, let's see how we can set up and configure those components.
Log in to the Alibaba Cloud console, you will find Object Storage Service on the left menu. If this is the first time you will be using OSS, it will ask you to activate the service. Click on the checkbox to agree with the agreement and enable the service.
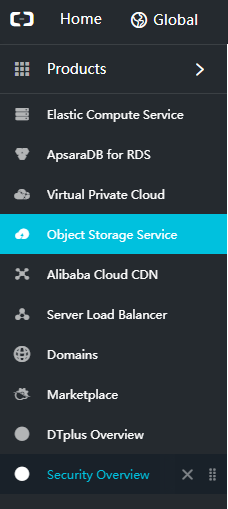
Now, you can follow these steps to publish your website to OSS:
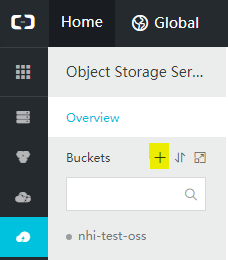
Click the + icon to create a new bucket.
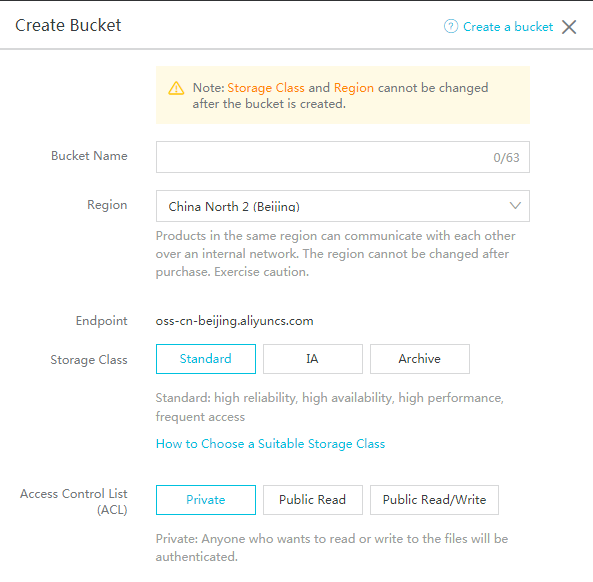
Name the bucket and select a region for your bucket. There are three storage classes for an OSS bucket:
Because in this tutorial this is a public website, I am going to set "Public Read" for the Access Control List.
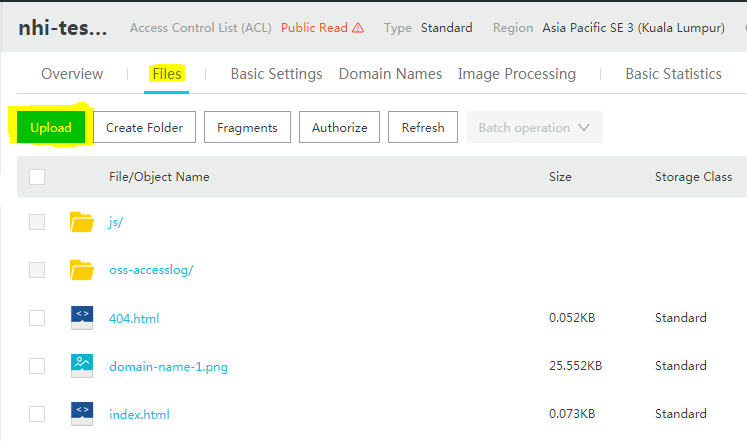
Creating folders and uploading files are pretty straight-forward. Just click on the buttons on the user interface.
After you have finished uploading all files of your website to your bucket, click the Overview tab to view the address.
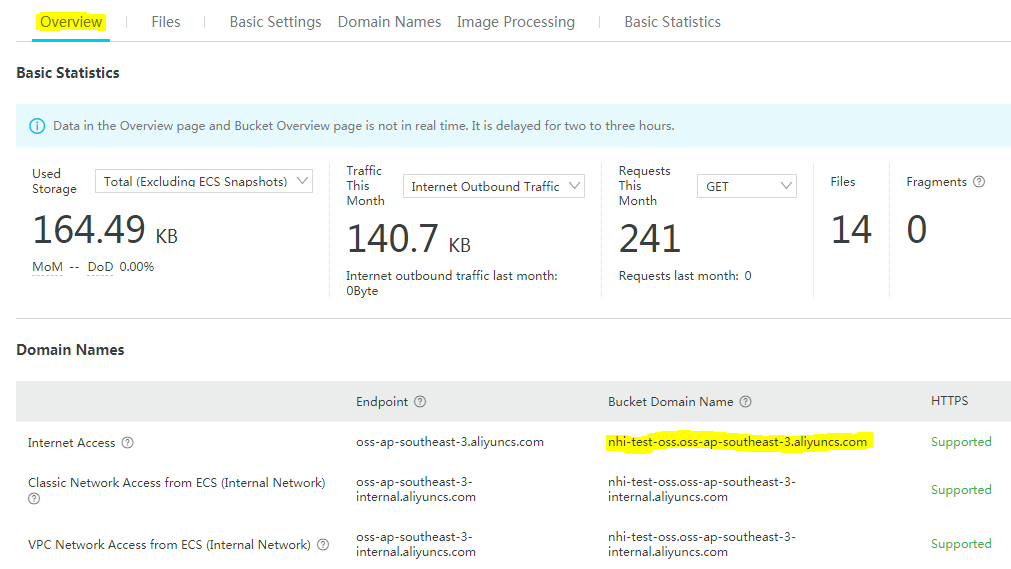
However, you may not see the website when you navigate to that URL. Instead you may see an Access denied message. This is because you haven't set the default homepage for the website. You can do it by clicking the Basic Settings tab and scroll down to the Static Pages section.
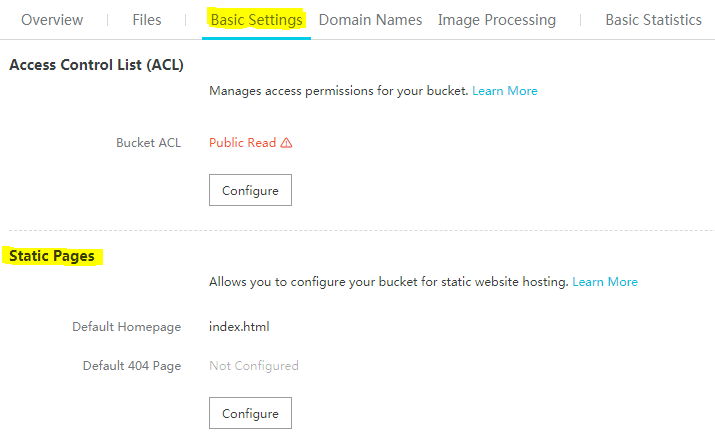
Now go back to your website URL you will see the homepage.
Automatically, OSS assigns a domain name to your bucket in the following format:
[bucket name].[endpoint]where the endpoint is oss-[region-id].aliyuncs.com
If you have your own domain name you can map it in the Domain Names tab.

After filling in the custom domain name, you can choose to switch on the CDN service.
That's everything you have to setup on the OSS side. On the Domain Name System (DNS) setting of the custom domain name, you have to add a CNAME record to map it to the bucket domain name (which is [bucket name].[endpoint]). If you do not know how to do it, please contact the service provider where you buy the domain name.
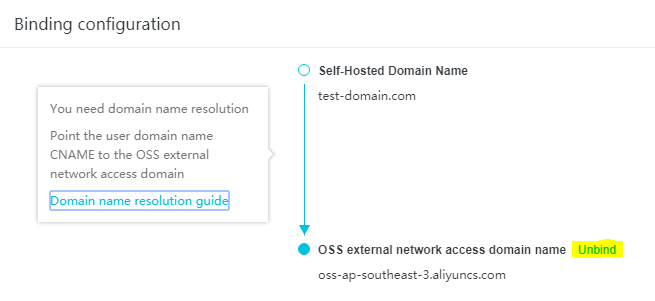
Later on, if you want to unlink that custom domain name from your bucket, click on Binding configuration and then click Unbind.
MongoDB is a popular name in the NoSQL family . MongoDB databases can be deployed on Alibaba Cloud via its ApsaraDB for MongoDB service. Users can select among 3 pricing schemes:
Replication and sharding refers to the data distribution models:
Follow the below steps to set up your database:
In the Alibaba Cloud console, click on Products and you will see ApsaraDB for MongoDB under the ApsaraDB group. Alternatively, you can use the search box to filter the desired service.
Select the pricing scheme, the region, the server specification, and set a password for your database. Alibaba Cloud will tell you how much the service cost you based on what you chose.
You can find more information about the instance parameters here.
Note: if you are using a free trial account, remember to select a subscription instance. PAYG instances do not include in the trial program.
To ensure database security Alibaba Cloud automatically block all access to the database. You have to specify IP addresses in the whitelist to gain access to the target instance.

ip.png1029x146 3.02 KBAfter you set your IP whitelist, click Database Connection to see the connection parameters.
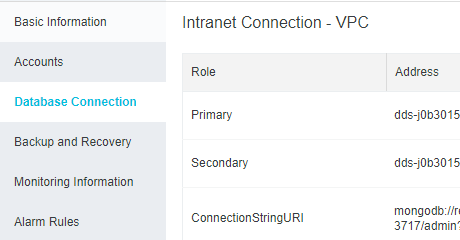
Use this connection string to connect to the database in your Nodejs code.
Function Compute lets you run code without provisioning or managing servers. This service prepares computing resources for you and runs your codes on your behalf elastically and reliably. You only pay for resources actually consumed when running the codes. If your code isn't executed, you won't pay anything.
Function Compute runs your code in response to events. When the event source service triggers an event, the associated function is automatically called to process the event.
From the Alibaba Cloud console, select Function Compute and click the + icon to create a new service.
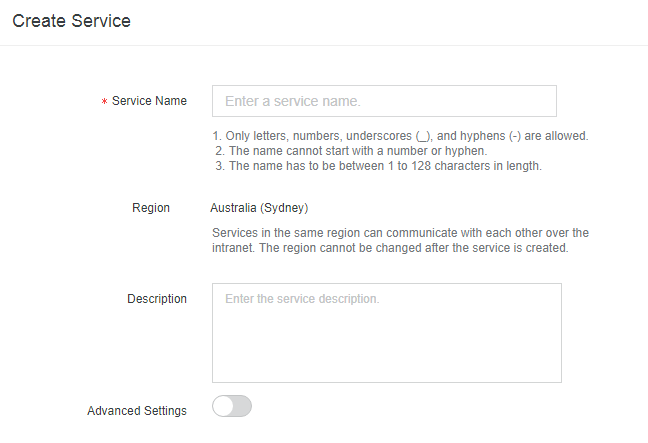
In the newly created service, click the + icon to create a new function. You will go through a multi-step wizard to select options for your function.
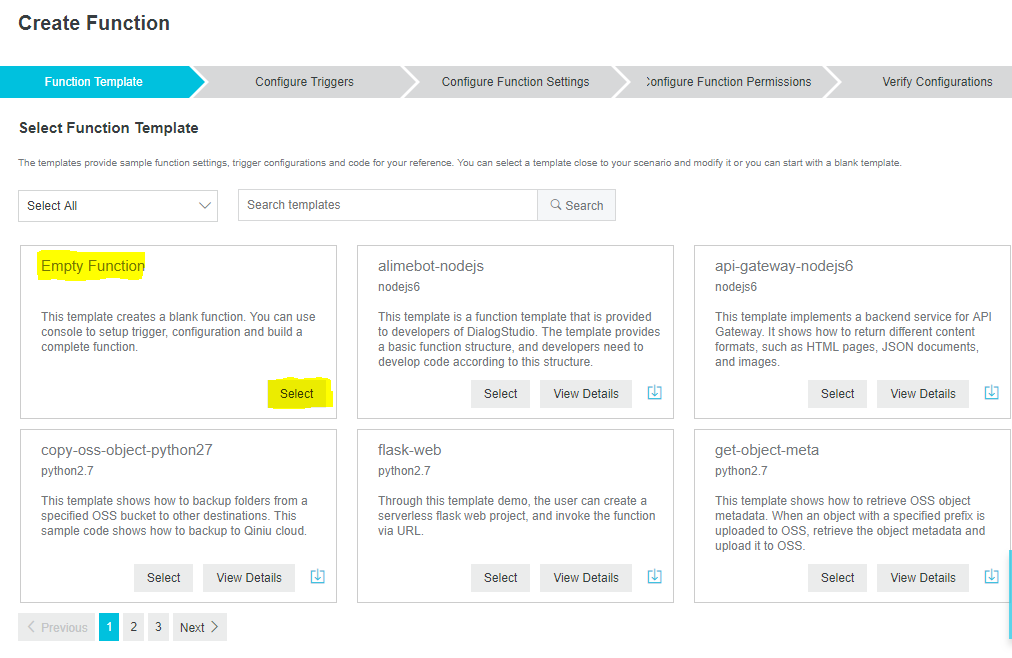
For a Function Template, select Empty Function.
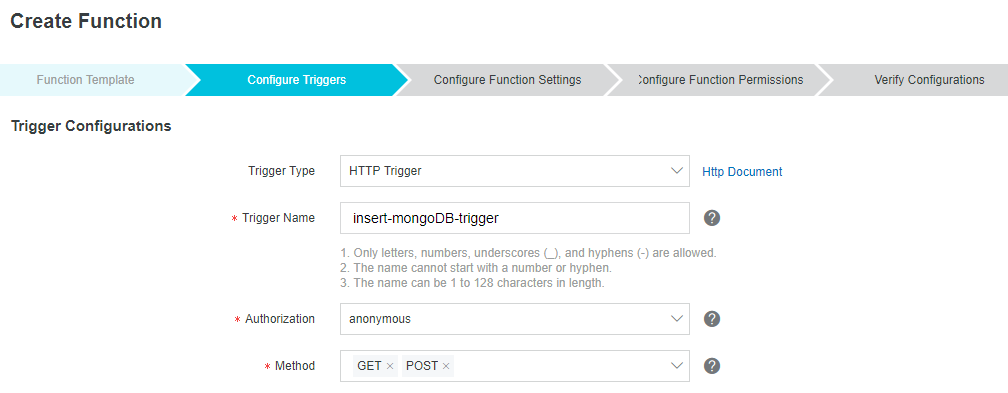
In the Configure Triggers step, select HTTP Trigger and provide it a name. Other settings and configured to set are shown the image below:
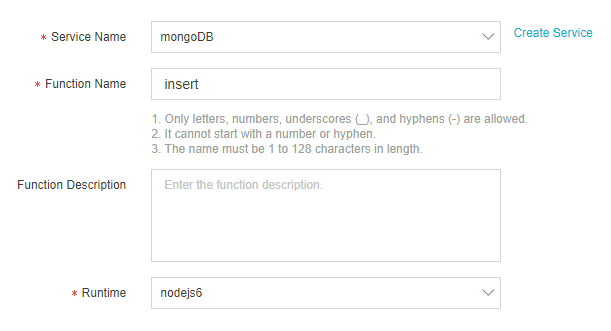
In the Configure Function Settings step, set a name for your function and select nodejs6 as runtime
Click Next in the last two steps to finish the wizard and create the function. Now click on the function you have just created and click the Code tab. This is where you provide your code for the function to run.
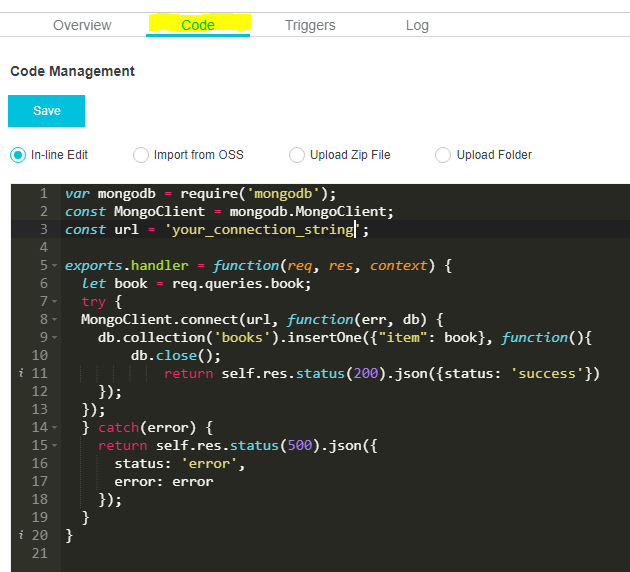
code.PNG630x572 23.4 KBUse the connection string from your MongoDB server. Also in this screen you can view the HTTP trigger that will invoke your function. You can also run the trigger to test you function here.
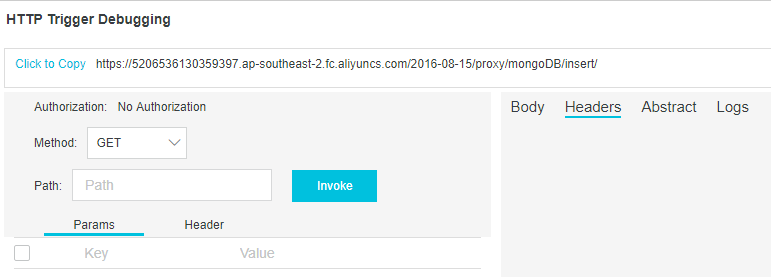
And you've completed a function to insert a new record into MongoDB database triggered by a HTTP request. Function Compute is particularly useful in situations where we need to run code in response to a certain action or a specific event that has just happened.
More use cases of Function Compute include the following:
Above we have gone over the basic steps you can use to create and set up a Function Compute to execute your application logic. Function Compute is a very powerful product, which can help provide the capabilities necessary to run and scale out your system. It automatically can handle your scalability, high availability, security, performance requirements and do so all by its own. In addition, this service also provides log query, performance monitoring, and alarms, among several other useful features.
Function Compute can be a hassle to use because it demands a different logical structure and required that you have a well-designed implementation. That is, you need to pay extra attention while designing and coding your logic and workflow due to its event-driven and stateless system. The entire system now technically depends on separate functions calls triggered by different events. You need to build a separate state machine to store your application state. Another best practice is that you should refactor the big functions into smaller ones to optimise the execution time.
In practice, you may need to experiment and find out the optimal balance point for your system in terms of cost and performance. Providing more memory and processing power will execute code faster. However, after a certain threshold, more RAM and CPU doesn't reduce the execution duration but on the other hand increase the running cost.
More about Alibaba Cloud Function Compute can be found at Function Compute's Frequently Asked Questions Page.
In this tutorial, we have gone through the steps to set up a serverless application on Alibaba Cloud ecosystem. By using Object Storage Service, ApsaraDB for MongoDB and Function Compute, we have created a fully-managed event-driven compute service that allows you to run code more flexibly and reliably. No maintenance is required for this application. This model also brings you the convenience of real-time auto scaling and dynamic load balancing within milliseconds. Welcome to the new world of application development and service provision.
Deploying Multiple Web Apps on Simple Application Server with SSL Certificates

2,593 posts | 792 followers
FollowAlibaba Clouder - September 6, 2019
Alibaba Clouder - June 23, 2020
Alibaba Clouder - November 23, 2020
afzaalvirgoboy - June 17, 2020
Alibaba Clouder - November 23, 2020
Alibaba Clouder - December 7, 2018

2,593 posts | 792 followers
Follow Function Compute
Alibaba Cloud Function Compute is a fully-managed event-driven compute service. It allows you to focus on writing and uploading code without the need to manage infrastructure such as servers.
Learn More ECS(Elastic Compute Service)
Elastic and secure virtual cloud servers to cater all your cloud hosting needs.
Learn More ApsaraDB for MongoDB
A secure, reliable, and elastically scalable cloud database service for automatic monitoring, backup, and recovery by time point
Learn MoreMore Posts by Alibaba Clouder