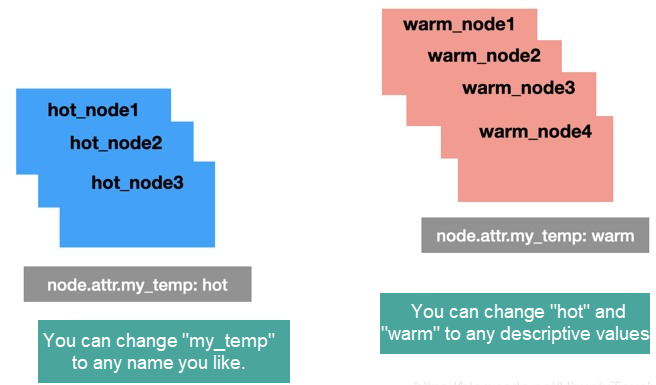
During the deployment of Elasticsearch, you can use nodes with different capabilities for different purposes. For example, some nodes have higher computing capabilities and are equipped with high-performance storage that runs quickly, while other nodes may have slightly lower computing power, storage speed, and other capabilities. To improve efficiency, you can use the two types of nodes for different purposes: You can use nodes with higher computing capabilities for indexing, which means creating an indexing table, and use nodes with lower capabilities for searching. We can name these two types of nodes differently:
This architecture is called a hot/warm architecture in Elasticsearch.
You can use a hot node for indexing. Hot nodes provide the following features:
Warm nodes are suitable for read-only indexes that are queried less frequently. Warm nodes provide the following features:
Shard filtering in Elasticsearch allows you to allocate your indexes to target nodes. You can specify the node.attr command in the elasticsearch.yml profile to set the attribute of your node to hot or warm as required.
Through the settings in index, you can use the index.routing.allocation command to allocate an index to a qualified node.
You must comply with the rules indicated in the following table when you allocate an index to a node:

As described in the preceding table, include indicates that at least one of the values is included, exclude indicates that none of the values are included, and require indicates that all the values of the index must be included. These values are actually tags that we use to identify the node. You can specify the tags based on your configurations.

As shown in the preceding figure, we identify the my_temp attribute as hot or warm. This means that nodes in our cluster are divided into two categories: hot nodes and warm nodes. In particular, my_temp, hot, and warm are attribute names that we arbitrarily chose to make their meanings easy to understand. You can specify other attribute names as long as they correspond to the values in the index.routing.allocation.include, index.routing.allocation.exclude, and index.routing.allocation.require commands.
You can configure settings in the index to allocate the index to a node with the corresponding attributes. The following code shows the sample settings in the index.
PUT logs-2019-03
{
  "settings": {
    "index.routing.allocation.require.my_temp": "hot"
  }
}
In the preceding code, we configured settings in the logs-2019-03 index to have the system allocate the index to a node with the hot attribute.
Assume that the logs-2019-03 index is no longer the index used for indexing. For example, you can call the rollover API operation to automatically scroll through the index names. You can run the following command to move the index to a warm node:
PUT logs-2019-03
{
  "settings": {
    "index.routing.allocation.require.my_temp": "warm"
  }
}
In this way, the Elasticsearch system automatically moves the logs-2019-03 index to a warm node to facilitate searching.
First, carry out an experiment in the following way, even though you cannot directly apply it in an actual production environment:
Alternatively, configure Alibaba Cloud Elasticsearch with one click. Then, you can directly open Kibana.
After the preceding installation or configuration is complete, open two terminals and run the following command on each terminal:
./bin/elasticsearch -E node.name=node1 -E node.attr.data=hot -Enode.max_local_storage_nodes=2The preceding command runs a node that is named node1 and whose data attribute is hot.
./bin/elasticsearch -E node.name=node2 -E node.attr.data=warm -Enode.max_local_storage_nodes=2The preceding command runs a node that is named node2 and whose data attribute is warm.
You can view the two nodes in Kibana.

As shown in the preceding figure, two nodes are running: node1 and node2. To view more attributes of the two nodes, you can run the following command:
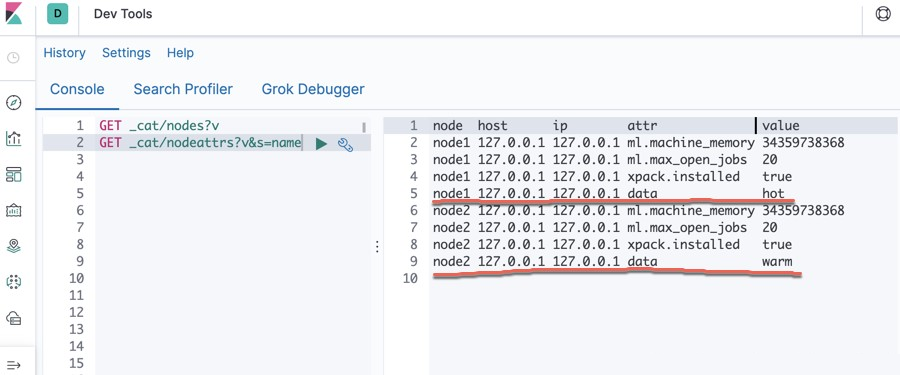
GET _cat/nodeattrs? v&s=nameThe following figure shows the output displayed on Kibana:

As you can see, node1 is identified as a hot node and node2 is identified as a warm node.
Next, you can allocate the logs-2019-03 index to the hot node by running the following command:
PUT logs-2019-03
{
  "settings": {
    "number_of_shards": 1,
    "number_of_replicas": 0,
    "index.routing.allocation.require.data": "hot"
  }
}
Then, you can view the command output by running the following command:
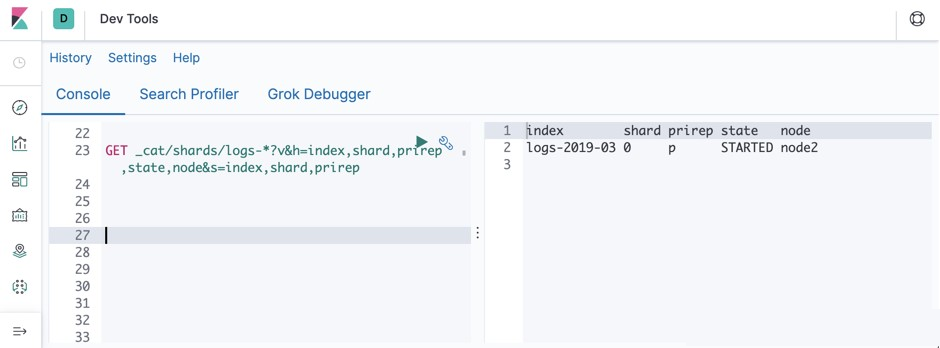
GET _cat/shards/logs-*? v&h=index,shard,prirep,state,node&s=index,shard,prirepThe following figure shows the output displayed on Kibana:

As shown in the preceding figure, the logs-2019-03 index has been allocated to node1.
Assume that you need to allocate the logs-2019-03 index to node2. You can do this by running the following command:
PUT logs-2019-03/_settings
{
  "index.routing.allocation.require.data": "warm"
}
The following figure shows the command output:

Obviously, the logs-2019-03 index has been moved to node2.
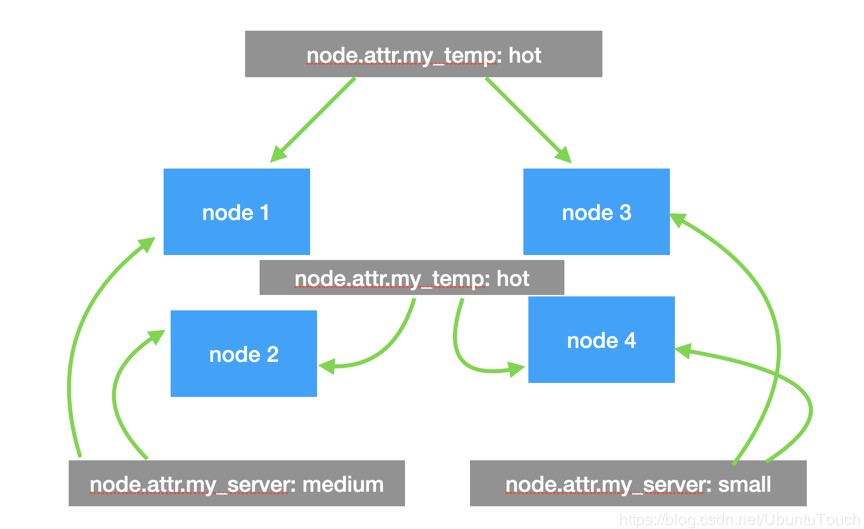
As mentioned above, you can add any attribute to the node.attr command as needed. In the preceding example, we have used hot and warm to identify the my_temp attribute. Actually, you can further define some attributes to identify hardware. For example, you can define the my_server attribute with the following values: small, medium, and large. The following figure shows the structure of a sample cluster with multiple attributes:

Each node in such a cluster may have different attributes. You can run the following command to allocate the index to a node that has two or more attributes:
 PUT my_index1
 {
   "settings": {
      "number_of_shards": 2,
       "number_of_replicas": 1,
       "index.routing.allocation.include.my_server": "medium",
       "index.routing.allocation.require.my_temp": "hot"
   }
 }
As shown in the preceding code, the my_index1 index is allocated to a node that has both the hot attribute and the medium attribute. According to the preceding figure, only node1 meets the requirements.
This article described how to control the allocation of an index through shard filtering. In actual operations, this is a tedious process when you have to do it yourself. We recommend that you use this technology with the rollover API described in my previous article "Elasticsearch: Rollover API." Elasticsearch has actually been very helpful. In subsequent articles, I will introduce how to use the index lifecycle policy to automatically manage your indexes.
Declaration: This article is adapted from "Elastic Helper in the China Community" with the authorization of the author Liu Xiaoguo. We reserve the right to investigate unauthorized use. Source: https://elasticstack.blog.csdn.net/
Alibaba Clouder - January 4, 2021
Alibaba Clouder - December 29, 2020
Alibaba Cloud Indonesia - May 11, 2023
Data Geek - September 26, 2024
Data Geek - August 7, 2024
Alibaba Clouder - December 30, 2020
 Big Data Consulting for Data Technology Solution
Alibaba Cloud provides big data consulting services to help enterprises leverage advanced data technology.
Learn More Big Data Consulting Services for Retail Solution
Alibaba Cloud experts provide retailers with a lightweight and customized big data consulting service to help you assess your big data maturity and plan your big data journey.
Learn More Alibaba Cloud Elasticsearch
Alibaba Cloud Elasticsearch helps users easy to build AI-powered search applications seamlessly integrated with large language models, and featuring for the enterprise: robust access control, security monitoring, and automatic updates.
Learn More Edge Node Service
An all-in-one service that provides elastic, stable, and widely distributed computing, network, and storage resources to help you deploy businesses on the edge nodes of Internet Service Providers (ISPs).
Learn MoreMore Posts by Data Geek
Dikky Ryan Pratama May 9, 2023 at 5:41 am
this is what I've been looking for all this time, thank you very much