ご利用のオペレーティングシステムがサポート終了 (EOL) フェーズに入った場合、またはビジネス要件を満たすために別のバージョンに移行する必要がある場合、Server Migration Center (SMC) を使用して、Elastic Compute Service (ECS) インスタンスのシステムディスク上のデータを保持したままオペレーティングシステムを移行できます。このトピックでは、SMC を使用して CentOS 7/8、Red Hat 7/8、および Alibaba Cloud Linux 2 を移行する方法について説明します。
SMC を使用して CentOS 7 または CentOS 8 オペレーティングシステムを Red Hat 7 または Red Hat 8 に移行できるのは、特定のユーザーのみです。この機能を使用するには、チケットを送信してアクセスをリクエストできます。
背景情報
ご利用の ECS インスタンスのオペレーティングシステムが「オペレーティングシステムのライフサイクルの概要」で説明されているようにサポート終了 (EOL) フェーズに入ると、セキュリティおよび運用上のリスクが増大する可能性があります。できるだけ早くオペレーティングシステムを交換することを推奨します。Server Migration Center (SMC) のオペレーティングシステム移行機能は、いくつかの移行ソリューションを提供します。移行後、オペレーティングシステムのカーネルと主要なシステムパッケージはアップグレードされますが、システムディスク上のデータは保持されます。
システムディスク上のデータを保持する必要がない場合、またはより多くのオペレーティングシステム変換オプションが必要な場合は、オペレーティングシステムを交換できます。詳細については、「システムディスクの交換」をご参照ください。
移行ソリューション
CentOS 7/8
オペレーティングシステムアーキテクチャ | 移行元オペレーティングシステム | 移行先オペレーティングシステム |
x86 | CentOS 7.x |
|
CentOS 8.x |
| |
ARM64 | CentOS 7.x |
|
CentOS 8.x |
|
Red Hat 7/8
オペレーティングシステムアーキテクチャ | 移行元オペレーティングシステム | 移行先オペレーティングシステム |
x86 | Red Hat 7.9 |
|
Red Hat 8.x |
|
Alibaba Cloud Linux 2
オペレーティングシステムアーキテクチャ | 移行元オペレーティングシステム | 移行先オペレーティングシステム |
x86 | Alibaba Cloud Linux 2 | Alibaba Cloud Linux 3 |
移行の制限事項
制限事項のカテゴリ | 説明 |
一般的な制限事項 |
|
CentOS 7 から Alibaba Cloud Linux 2 への移行 | Alibaba Cloud Linux 2 はカーネル 4.19 を使用しますが、CentOS 7 はカーネル 3.10 を使用します。2 つのカーネルバージョンには互換性がありません。カーネルアウトオブツリー (OOT) モジュールの開発やハードウェア有効化など、カーネルインターフェイスプログラミングに依存するサービスについては、移行後にサービスが実行できなくなるのを防ぐため、直接移行が適切かどうかを事前に評価する必要があります。 |
CentOS 7 から Alibaba Cloud Linux 3 への移行 | CentOS 7 はカーネル 3.10 を使用します。Alibaba Cloud Linux 3 は、カーネルとして Linux カーネル 5.10 LTS を使用し、基本ツールチェーンとして GCC 10.2、binutils 2.35、glibc 2.32 を使用します。2 つのカーネルバージョンには互換性がありません。カーネル OOT モジュールの開発やハードウェア有効化など、カーネルインターフェイスプログラミングに依存するサービスについては、移行後にサービスが実行できなくなるのを防ぐため、直接移行が適切かどうかを事前に評価する必要があります。 |
CentOS 8 から Alibaba Cloud Linux 3 への移行 | Alibaba Cloud Linux 3 は、カーネルとして Linux カーネル 5.10 LTS を使用し、基本ツールチェーンとして GCC 10.2、binutils 2.35、glibc 2.32 を使用します。そのパッケージエコシステムは CentOS 8 と互換性があります。このトピックで説明するオペレーティングシステム移行ツールを使用して CentOS 8 を Alibaba Cloud Linux 3 に移行する場合、ツールは移行対象のオペレーティングシステムに対して基本的なチェックを実行します。 |
さらに、オペレーティングシステム関連の機能やソフトウェアに関する以下の移行制限に注意する必要があります:
機能またはソフトウェア | サポート状況 | オペレーティングシステムの移行プロセスに影響しますか? | 説明 |
i386 アーキテクチャのパッケージ | サポート対象外 | はい | Alibaba Cloud Linux は i386 アーキテクチャのパッケージを提供していません。現在の CentOS 7/8 システムに i386 アーキテクチャのパッケージがある場合、移行ツールを使用してオペレーティングシステムを移行することはできません。移行中のシステム例外を避けるために、移行を実行する前にこれらのパッケージを削除する必要があります。 |
epel-modular | サポート対象外 | いいえ | CentOS 7/8 の EPEL リポジトリが依存するプラットフォームは、Alibaba Cloud Linux 3 のものとは異なります。そのため、オペレーティングシステムを移行することはできますが、移行後に epel-modular ベースのパッケージをインストールすることはできないことに注意してください。 |
C/C++ プログラムの互換性 | 保証されません | いいえ | Alibaba Cloud Linux 3 は、基本ツールチェーンとして GCC 10.2、binutils 2.35、glibc 2.32 を使用しており、システム独自のパッケージは互換性が確保されています。オペレーティングシステムの移行後、互換性の問題を避けるために、新しい基本ツールチェーンに基づいて C/C++ プログラムを再コンパイルして検証することを推奨します。 |
カーネルモジュールの互換性 | サポート対象外 | いいえ | Alibaba Cloud Linux 3 は、カーネルとして Linux カーネル 5.10 LTS を使用しており、そのパッケージエコシステムは CentOS 8 と互換性があります。ただし、Alibaba Cloud Linux 3 は CentOS 7 の 3.10 カーネルおよび CentOS 8 の 4.18 カーネルと完全な互換性があるわけではないことに注意する必要があります。そのため、カーネルインターフェイスプログラミングに依存するサービス (カーネル OOT モジュールの開発やハードウェア有効化など) については、移行後にサービスが実行できなくなるのを防ぐため、移行前に独自の移行評価を行う必要があります。 |
MySQL データベース | MySQL の同じバージョンまたはそれ以降のバージョンへの移行のみがサポートされています |
| Alibaba Cloud Linux 3 は MySQL データベースをサポートしていますが、MySQL はダウングレードをサポートしていないため、Alibaba Cloud Linux 3 が提供する MySQL バージョンが移行対象の CentOS 7/8 の MySQL バージョンよりも古い場合、移行ツールを使用してオペレーティングシステムの移行を完了することはできないことに注意する必要があります。 |
オペレーティングシステムのホット移行 | サポート対象外 | いいえ | オペレーティングシステム移行ツールを使用してオペレーティングシステムを移行する場合、ソフトウェアパッケージの再インストールが含まれるため、システム内のサービスが再起動し、ビジネスの中断を引き起こします。そのため、移行前に、スナップショットを作成してデータをバックアップし、通常のビジネスに影響を与えないように移行対象のオペレーティングシステム環境を隔離する必要があります。 |
移行に関する注意事項
オペレーティングシステムを移行する前に、以下の注意事項を必ず理解してください。
移行フェーズ | 注意事項 |
移行前 |
|
移行中 |
|
移行後 |
|
課金
移行中、システムは ECS インスタンスのすべてのディスクのスナップショットを作成してデータをバックアップします。これらのスナップショットは従量課金で課金されます。詳細については、「製品の課金」をご参照ください。
手順
移行中、システムは ECS インスタンスのすべてのディスクのスナップショットを作成してデータをバックアップします。作成されたスナップショットは従量課金で課金されます。詳細については、「製品の課金」をご参照ください。
オペレーティングシステムを移行します。
高速移行 (推奨)
説明この方法を使用するには、2017年12月1日より前に購入した ECS インスタンス、アップロードしたカスタムイメージから作成されたインスタンス、またはサードパーティのクラウドサーバーである場合、ECS インスタンスに Cloud Assistant エージェントをインストールする必要があります。2017年12月1日以降にパブリックイメージから作成された ECS インスタンスには、必要な Cloud Assistant エージェントがプリインストールされているため、操作は不要です。
SMC コンソール - クラウド移行 - OS 移行に移動します。
OS 移行ページで、[移行の開始] をクリックします。
[オペレーティングシステムの移行] ダイアログボックスで、インスタンス ID とリージョンによって移行する ECS インスタンスを選択し、[事前チェック] をクリックします。
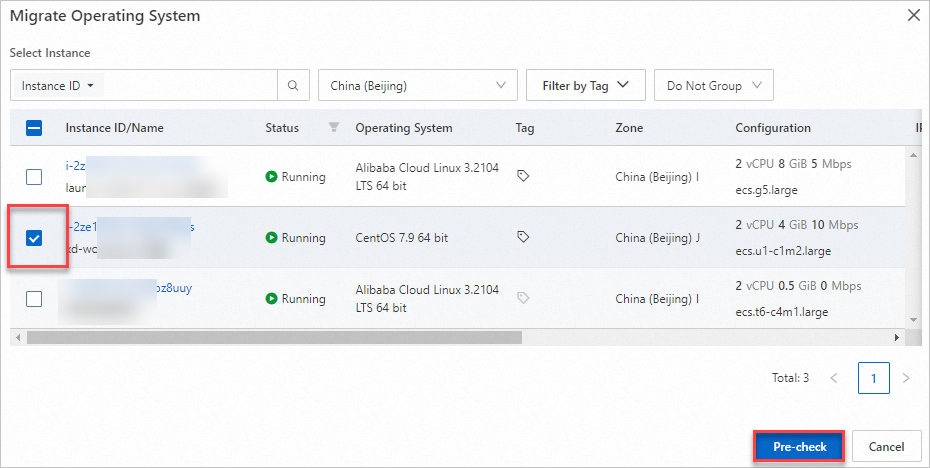
[オペレーティングシステムの移行] ダイアログボックスで、システムは自動的に移行前チェックを実行します。これには約 10 秒かかります。
事前チェックのステータスが
 から
から  に変わった場合、事前チェックは成功です。
事前チェックのステータスが
から  に変わった場合、事前チェックは失敗です。インターフェイスのプロンプトに従って問題を解決し、再度移行を試みてください。
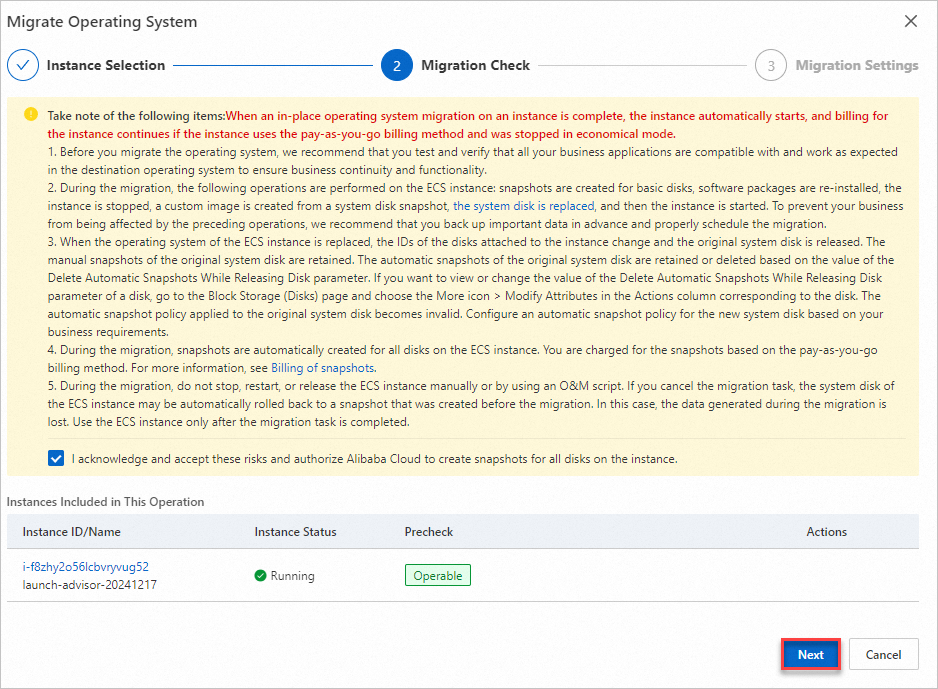
オペレーティングシステム移行の注意事項をよく読んだ後、[これらのリスクを認識し、同意し、Alibaba Cloud が ECS インスタンスのすべてのディスクのスナップショットを作成することを許可します] を選択し、[次へ] をクリックします。
[オペレーティングシステムの移行] ダイアログボックスで、移行先オペレーティングシステムを選択できます。
[同じ移行先オペレーティングシステムを選択]:バッチ移行を実行する場合、複数のインスタンスを同じオペレーティングシステムに移行できます。
[インスタンスごとに移行先オペレーティングシステムを選択]:バッチ移行を実行する場合、複数のインスタンスを異なるオペレーティングシステムに移行できます。
[移行可能性のチェック] をクリックして、移行チェックの結果を表示します。
チェックには約 30 秒かかります。
 :オペレーティングシステムは移行可能です。
 :移行はサポートされていません。インターフェイスのプロンプトで失敗の理由を確認できます。
[移行] をクリックします。
[オペレーティングシステムの移行] ページで、オペレーティングシステム移行の進捗状況を確認できます。
警告オペレーティングシステムの移行中は、手動で ECS インスタンスを停止、再起動、またはリリースしないでください。O&M スクリプトを使用してこれらの操作を実行しないでください。そうしないと、移行が失敗します。
段階的移行
ステップ 1:移行元のインポート
移行元とは、移行を計画しているオンプレミスサーバー、VM、または他のクラウドプラットフォーム上のサーバーのことです。
コマンドラインによる移行元のワンクリックインポート (推奨)
重要移行元サーバーはパブリックネットワークアクセスが必要です。移行元サーバーにファイアウォールの制限がある場合は、「SMC サービスのドメイン名は何ですか?」を参照して SMC のドメイン名とポートを取得し、ファイアウォールのホワイトリストに追加してください。
移行元サーバーがパブリックネットワークにアクセスできない場合、またはプライベートネットワーク転送を使用して移行効率を向上させたい場合は、「プライベートネットワーク移行」ソリューションをご参照ください。
SMC コンソール - OS 移行に移動します。
OS 移行ページで、[移行元のインポート] をクリックします。
ページのプロンプトに従ってパラメーターを設定し、アクティベーションコードコマンドをコピーします。次の表にパラメーターを説明します。
パラメーター
説明
移行元タイプ
[Alibaba Cloud ECS インスタンス] を選択します。
インポート方法
[コマンドラインインポート] を選択します。
[アクティベーションクォータ]
アクティベーションコードでアクティベートできる移行元の数。値の範囲は 1 から 1,000 です。デフォルトは 200 です。
[有効期間]
アクティベーションコードの有効期間。値の範囲は 1 から 90 日です。デフォルトは 90 日です。
アクティベーションコード
アクティベーションコードを生成した後、コマンドをコピーします。次の手順に従ってください:
アクティベーションコードの生成 をクリックします。
[Linux Shell] タブをクリックします。
[コピー] をクリックしてアクティベーションコードコマンドをコピーします。
移行元サーバーにログインし、コピーしたコマンドを管理者権限で貼り付けて実行し、移行元をインポートします。
Linux 移行元サーバーにログインします。
コピーしたコマンドを管理者権限で貼り付けて実行し、移行元をインポートします。

移行元サーバー [s-bp18x8751kgz2oyh****] のインポートに成功しました!のようなメッセージが表示されます。これは、移行元が正常にインポートされたことを示します。
SMC コンソールの [オペレーティングシステムの移行] ページで、[リアルタイム移行ステータス] 列の移行元のステータスを確認します。
ステータスが [ソースオンライン] の場合、インポートは成功です。
移行元が他の状態にある場合、インポートは失敗しています。以下の解決策に基づいて障害をトラブルシューティングし、再度移行元をインポートしてください:
コンソールのエラーメッセージまたは SMC クライアントのインストールディレクトリにあるログファイルに基づいて障害をトラブルシューティングします。デフォルトでは、SMC クライアントは /smc にインストールされます。
一般的な問題とその解決策については、「SMC よくある質問」および「エラーのトラブルシューティング」をご参照ください。
SMC クライアントを使用した移行元のインポート
SMC クライアントの詳細については、「SMC クライアント使用ガイド」をご参照ください。
SMC コンソール - OS 移行に移動します。
OS 移行ページで、[移行元のインポート] をクリックします。
[移行元のインポート] ページで、パラメーターを設定します。次の表にパラメーターを説明します。
パラメーター
説明
移行元のタイプ
Alibaba Cloud ECS インスタンス
インポート方法
[クライアントインポート] を選択します。
インポートの説明
[インポートの説明] の後、移行元サーバーのオペレーティングシステム (Linux または Windows) とビットバージョン (32 ビットまたは 64 ビット) に基づいて、対応する SMC クライアントをダウンロードします。
移行元をインポートします。
重要移行中は SMC クライアントを閉じないでください。閉じると、移行元が SMC コンソールとの接続を失い、移行が失敗します。
WinSCP などのファイル転送をサポートするリモート接続ツールを使用して、SMC クライアントを Linux 移行元サーバーにアップロードします。
Linux 移行元サーバーにリモート接続し、SMC クライアントパッケージを解凍します。
この例では、
Linux 64 ビット汎用版を使用します。異なるバージョンの SMC クライアントを使用する場合は、コマンドのパッケージ名を実際にダウンロードしたファイル名に置き換えてください。tar -zxvf go2aliyun_client.tar.gz説明Linux 64 ビット Arm 版は、g6r 汎用インスタンスファミリーと c6r コンピュート最適化インスタンスファミリーをサポートしています。インスタンスファミリーの詳細については、「Arm ベースのエンタープライズレベルのコンピューティングインスタンスファミリー」をご参照ください。
(オプション) 移行したくないファイルやディレクトリをフィルタリングして除外することができます。
重要移行にブロックレプリケーションを有効にしている場合、ファイルやディレクトリを移行から除外することはできません。
アクティベーションコードまたは AccessKey ペアを取得します。
(推奨) アクティベーションコードの取得:SMC コンソールの [インポート手順] セクションで、[アクティベーションコードの生成] をクリックし、アクティベーションコードをコピーします。
AccessKey ペアの取得:Alibaba Cloud アカウントの AccessKey ペアは、AccessKey ID と AccessKey Secret で構成されます。AccessKey ペアを作成していない場合は、作成してください。詳細については、「AccessKey ペアの作成」をご参照ください。
SMC クライアントフォルダで、次のコマンドを実行して SMC クライアントを実行します。
この例では `go2aliyun_client2.6.5_linux_x86_64` ディレクトリを使用します。ディレクトリ名はクライアントのバージョンによって変わります。ダウンロードして解凍したフォルダの名前に置き換えてください。
cd go2aliyun_client2.6.5_linux_x86_64
sudo chmod +x go2aliyun_client
sudo ./go2aliyun_client
プロンプトに従ってアクティベーションコードまたは AccessKey ペアを入力します。この例ではアクティベーションコードを使用します:

アクティベーションコードまたは AccessKey ペアを入力した後、以下のプロンプトが表示される場合があります:
移行元システムにスナップショットドライバーがインストールされていない場合、SMC クライアントがプロンプトを表示します。次の図に示すように、スナップショットドライバーをインストールするかどうかを選択できます。
移行タスクを作成する際にブロックレプリケーションを有効にする場合は、
yesと入力してスナップショットドライバーを自動的にインストールします。移行タスクを作成する際にブロックレプリケーションを有効にしない場合は、
noと入力します。
重要スナップショットドライバーのインストールに失敗した場合、移行タスクを作成する際にブロックレプリケーションを有効にしないでください。そうしないと、移行が失敗します。

ほとんどの主流の移行元システムには rsync がデフォルトでインストールされています。そうでない場合、SMC クライアントがプロンプトを表示します。次の図に示すように、
yesと入力して rsync を自動的にインストールします。
移行元システムで SELinux が有効になっている場合、SMC クライアントはそれを無効にするようにプロンプトを表示します。次の図に示すように、
yesと入力して SELinux を自動的に無効にします。
移行元サーバー [s-bp11npxndknsycqj****] のインポートに成功しました!のようなメッセージが表示され、移行元が正常にインポートされたことを示します。説明移行元のインポートに失敗した場合は、応答メッセージに基づいて問題をトラブルシューティングできます。その後、次のコマンドを順に実行してバックグラウンドプログラムを終了し、移行元を再インポートします。一般的な問題と解決策の詳細については、「SMC よくある質問」および「エラーのトラブルシューティング」をご参照ください。
sudo ./go2aliyun_client --abort
sudo ./go2aliyun_client
SMC コンソールの [オペレーティングシステムの移行] ページで、[リアルタイム移行ステータス] 列の移行元のステータスを確認します。
ステータスが [移行元オンライン] の場合、インポートは成功しています。
ステータスが他の値の場合、インポートは失敗しています。問題を解決するには、以下の解決策を参照し、再度インポートを試みてください。
コンソールのエラーメッセージまたは SMC クライアントのインストールディレクトリにあるログファイルに基づいて障害をトラブルシューティングします。デフォルトでは、SMC クライアントは /smc にインストールされます。
一般的な問題と解決策の詳細については、「SMC よくある質問」および「エラーのトラブルシューティング」をご参照ください。
ステップ 2:移行設定
対象の移行元の [操作] 列で、[移行の開始] をクリックします。
[移行設定] ダイアログボックスで、パラメーターを設定します。
次の表に、オペレーティングシステム移行のパラメーターを説明します:
[現在のオペレーティングシステム]:現在のオペレーティングシステムがデフォルトで表示され、変更できません。例:CentOS 7。
[移行先オペレーティングシステム]:ドロップダウンリストから、移行したいオペレーティングシステムを選択します。例:Alibaba Cloud Linux 3。
移行ドリル(任意):
[移行ドリル] を有効にするかどうかを決定します。この機能はデフォルトで有効になっており、Linux オペレーティングシステムの移行でのみサポートされています。詳細については、「移行ドリルの設定」をご参照ください。
説明移行ドリルは、実際の移行の前に移行ソリューションをシミュレートおよび検証します。これにより、移行ソリューションの実現可能性とリスクを理解し、実際の移行中の潜在的な問題やデータ損失を減らすことができます。
移行ドリルは、潜在的な問題を迅速に特定し、解決策を提供し、移行の成功率を向上させるのに役立ちます。
実行モード (条件付き):
[移行ドリル] が有効になっている場合、実行モード ドロップダウンリストから移行ドリルの実行方法を選択できます。デフォルトのオプションは [ドリルと移行] です。
2 つの方法の違いは次のとおりです:
[ドリルのみ]:移行ドリルタスクのみを作成します。移行ドリルが完了した後、オペレーティングシステムの移行が必要な場合は、手動で移行タスクを開始する必要があります。
[ドリルと移行]:移行ドリルが完了した後、ドリル項目が [クリティカル] 状態でない場合、システムは自動的にオペレーティングシステムの移行タスクを開始します。
[移行の開始] をクリックします。[オペレーティングシステムの移行を確認してください] ダイアログボックスで、注意事項をよく読み、[通知されたことを確認します] をクリックします。
[オペレーティングシステムの移行] ページで、リアルタイムの移行ステータスを確認します。
警告オペレーティングシステムの移行中は、手動で Linux インスタンスを停止、再起動、またはリリースしないでください。O&M スクリプトを使用してこれらの操作を実行しないでください。そうしないと、移行が失敗します。
移行結果の確認
 説明
説明移行タスクが完了すると、ECS インスタンスは自動的に再起動します。システム初期化フェーズでは、ソフトウェアパッケージの更新などの操作が実行されます。システムが正常に起動するまで、ECS インスタンスでいかなる操作も行わないでください。システム初期化フェーズには約 15〜30 分かかります。具体的な時間は、システムソフトウェアパッケージの数によって異なります。
移行先移行元の [操作] 列で、[移行先インスタンスの表示] をクリックします。次に、インスタンスの詳細ページで、オペレーティングシステムが移行先オペレーティングシステムに移行されているかどうかを確認します。
重要移行後、移行元インスタンスは新しいシステムカーネルとソフトウェアパッケージに移行されます。元のシステムディスクデータは変更されません。ただし、環境や依存関係の変更により、アプリケーションが期待どおりに実行されない場合があり、ビジネス障害を引き起こす可能性があります。徹底的なテストと検証を行う必要があります。
移行元システムディスクのデータをロールバックするには、自動的に作成されたバックアップスナップショットを使用してデータを復元できます。手順は次のとおりです:
ECS コンソール - スナップショットに移動します。
自動的に作成されたバックアップスナップショットの [操作] 列で、[ディスクのロールバック] をクリックします。
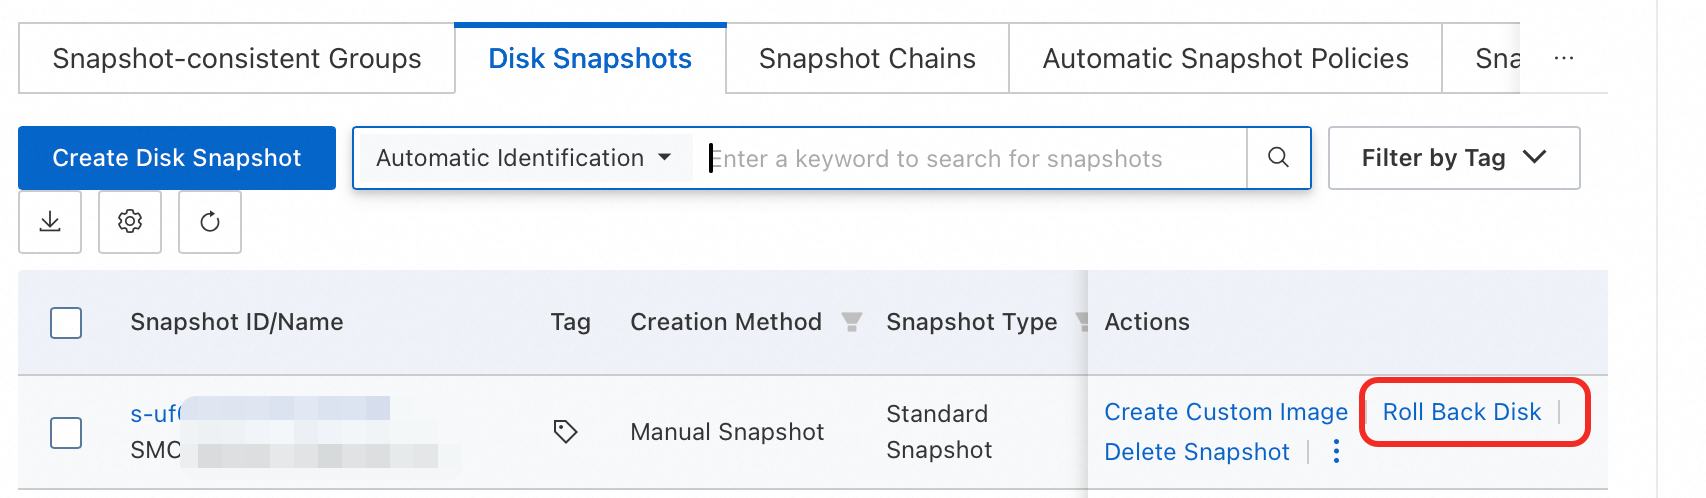
[ディスクのロールバック] ダイアログボックスで、[確認] をクリックします。
リソースのクリーンアップ
移行中、SMC は ECS インスタンスのクラウドディスク上のデータをバックアップするために、SMC_Backup_Snapshot_XXX という名前の従量課金スナップショットを作成します。これらのスナップショットが不要になった場合は、不要な料金を避けるために速やかに削除してください。詳細については、「スナップショットの削除」をご参照ください。