Kafkaは、高スループットと高スケーラビリティを備えた分散メッセージキューサービスです。 Kafkaは、ログ収集、データ集約、ストリーミング処理、オンラインおよびオフライン分析などのビッグデータ分析に広く使用されています。 ビッグデータエコシステムにとって重要です。 このトピックでは、data Transmission Service (DTS) を使用して、PolarDB for MySQLクラスターから自己管理型Kafkaクラスターにデータを同期する方法について説明します。 データ同期機能を使用すると、メッセージ処理機能を拡張できます。
前提条件
Kafkaクラスターが作成され、Kafkaのバージョンは0.10.1.0〜2.7.0です。
PolarDB for MySQLクラスターでバイナリログ機能が有効になっています。 詳細については、次をご参照ください: バイナリログの有効化
注意事項
ソースデータベースにはPRIMARY KEYまたはUNIQUE制約が必要で、すべてのフィールドが一意である必要があります。 そうでない場合、宛先データベースは重複するデータレコードを含み得る。
制限事項
同期するオブジェクトとしてテーブルのみを選択できます。
DTSは、名前に基づいてデータ同期タスクのオブジェクトを自動的に更新しません。
説明データ同期中にソーステーブルの名前が変更されたが、選択したオブジェクトに新しいテーブル名が含まれていない場合、DTSはテーブルのデータをターゲットKafkaクラスターに同期しません。 名前が変更されたテーブルのデータを同期するには、タスクの選択したオブジェクトにテーブルを追加する必要があります。 詳細については、「データ同期タスクへのオブジェクトの追加」をご参照ください。
手順
データ同期インスタンスを購入します。 詳細については、「DTSインスタンスの購入」をご参照ください。
説明購入ページで、ソースインスタンスをPolarDBに設定し、ターゲットインスタンスをKafkaに設定し、同期トポロジを片道同期に設定します。
DTSコンソールにログインします。
説明Data Management (DMS) コンソールにリダイレクトされている場合は、右下隅にある
 の
の アイコンをクリックして、以前のバージョンのDTSコンソールに移動します。
左側のナビゲーションウィンドウで、[データ同期] をクリックします。
[同期タスク] ページの上部で、ターゲットインスタンスが存在するリージョンを選択します。
データ同期インスタンスを見つけ、[操作] 列の [タスクの設定] をクリックします。
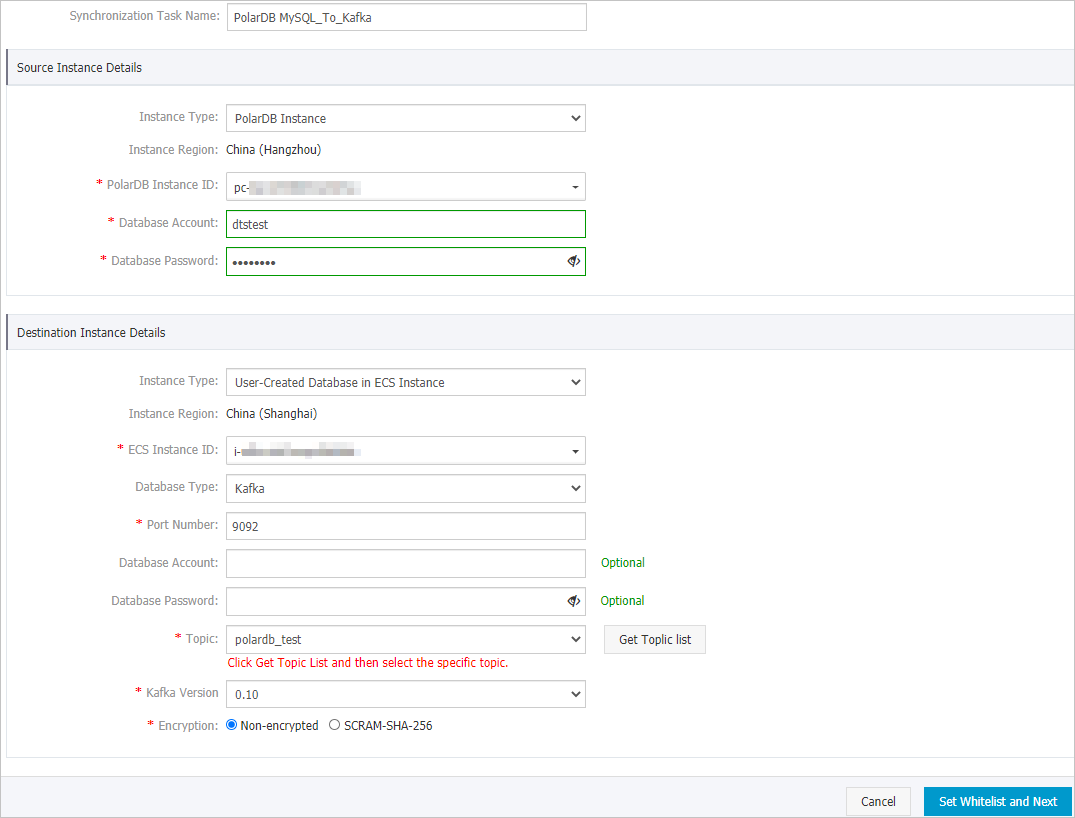
ソースインスタンスとターゲットインスタンスを設定します。

セクション
パラメーター
説明
N/A
同期タスク名
タスク名は自動生成されます。 簡単に識別できるように、有益な名前を指定することをお勧めします。 一意のタスク名を使用する必要はありません。
ソースインスタンスの詳細
インスタンスタイプ
このパラメーターはPolarDBインスタンスに設定されており、変更できません。
インスタンスリージョン
購入ページで選択したソースリージョン。 このパラメーターの値は変更できません。
PolarDBインスタンスID
PolarDB for MySQLクラスターのIDを選択します。
データベースアカウント
PolarDB for MySQLクラスターのデータベースアカウントを入力します。 アカウントには、同期するオブジェクトに対する読み取り権限が必要です。
データベースパスワード
データベースアカウントのパスワードを入力します。
ターゲットインスタンスの詳細
インスタンスタイプ
Kafkaクラスターのデプロイに基づいてインスタンスタイプを選択します。 この例では、[ECSインスタンスのユーザー作成データベース] を選択します。
説明他のインスタンスタイプを選択した場合、Kafkaクラスターのネットワーク環境をデプロイする必要があります。 詳細については、「準備の概要」をご参照ください。
インスタンスリージョン
購入ページで選択したターゲットリージョン。 このパラメーターの値は変更できません。
ECS インスタンス ID
KafkaクラスターがデプロイされているElastic Compute Service (ECS) インスタンスのIDを選択します。
データベースエンジン
Kafkaを選択します。
ポート番号
Kafkaクラスターのサービスポート番号を入力します。 デフォルトのポート番号は9092です。
データベースアカウント
Kafkaクラスターへのログインに使用するユーザー名を入力します。 Kafkaクラスターで認証が有効になっていない場合は、ユーザー名を入力する必要はありません。
データベースパスワード
ユーザー名に対応するパスワードを入力します。 Kafkaクラスターで認証が有効になっていない場合は、パスワードを入力する必要はありません。
トピック
[トピックリストの取得] をクリックし、ドロップダウンリストからトピック名を選択します。
Kafkaバージョン
移行先Kafkaクラスターのバージョンを選択します。
暗号化
ビジネスとセキュリティの要件に基づいて、[非暗号化] または [SCRAM-SHA 256] を選択します。
ページの右下隅にある [ホワイトリストと次への設定] をクリックします。
説明DTSは、DTSサーバーのCIDRブロックをソースPolarDBクラスターのホワイトリストとターゲットECSインスタンスのインバウンドルールに追加します。 これにより、DTSサーバーがソースクラスターとターゲットインスタンスに接続できるようになります。
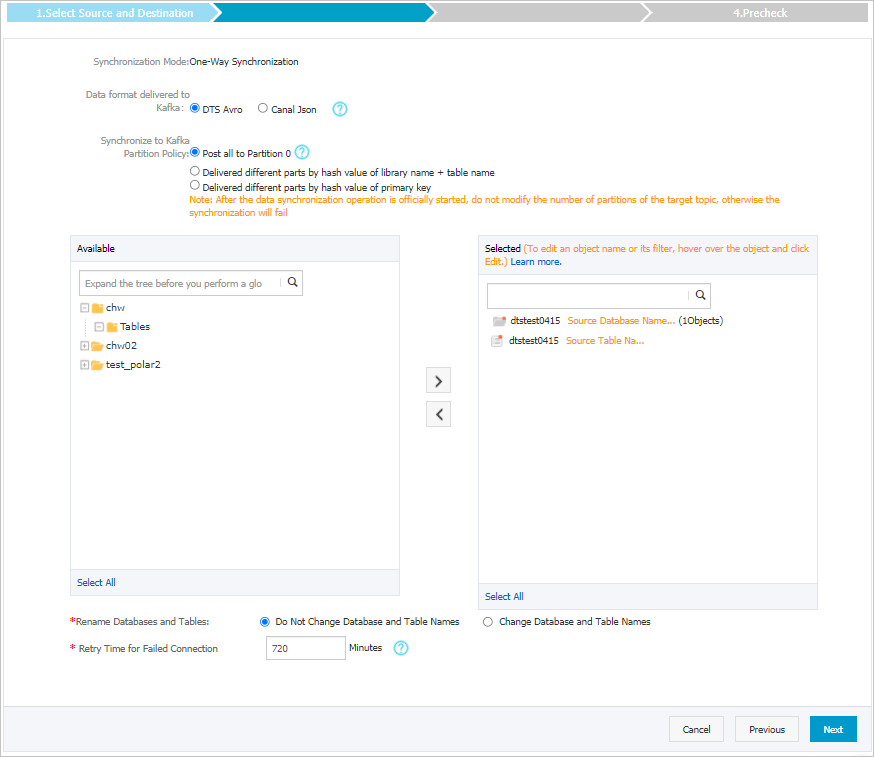
同期するオブジェクトを選択します。

パラメーター
説明
Kafkaのデータ形式
Kafkaクラスターに同期されるデータは、AvroまたはCanal JSON形式で保存されます。 詳細については、「Kafkaクラスターのデータ形式」をご参照ください。
Kafkaパーティションへの出荷データのポリシー
データをKafkaパーティションに同期するために使用されるポリシー。 ビジネス要件に基づいてポリシーを選択します。 詳細については、「Kafkaパーティションにデータを同期するためのポリシーの指定」をご参照ください。
同期するオブジェクト
[使用可能] セクションから1つ以上のテーブルを選択し、
 アイコンをクリックして、[選択済み] セクションにテーブルを追加します。 説明
DTSは、テーブル名をステップ6で選択したトピック名にマップします。 テーブル名マッピング機能を使用して、ターゲットクラスターに同期されるトピックを変更できます。 詳細については、「同期するオブジェクトの名前変更」をご参照ください。
データベースとテーブルの名前変更
オブジェクト名マッピング機能を使用して、ターゲットインスタンスに同期されるオブジェクトの名前を変更できます。 詳細は、オブジェクト名のマッピングをご参照ください。
失敗した接続の再試行時間
既定では、DTSがソースデータベースまたはターゲットデータベースへの接続に失敗した場合、DTSは次の720分 (12時間) 以内に再試行します。 必要に応じて再試行時間を指定できます。 DTSが指定された時間内にソースデータベースとターゲットデータベースに再接続すると、DTSはデータ同期タスクを再開します。 それ以外の場合、データ同期タスクは失敗します。
説明DTSが接続を再試行すると、DTSインスタンスに対して課金されます。 ビジネスニーズに基づいて再試行時間を指定することを推奨します。 ソースインスタンスとターゲットインスタンスがリリースされた後、できるだけ早くDTSインスタンスをリリースすることもできます。
ページの右下隅にある [次へ] をクリックします。
初期同期を設定します。

パラメーター
説明
初期同期
[初期スキーマ同期] と [初期フルデータ同期] の両方を選択します。 DTSは、必要なオブジェクトのスキーマと履歴データを同期し、増分データを同期します。
フィルターオプション
デフォルトでは、増分同期フェーズでDDLを無視が選択されています。 この場合、DTSは、増分データ同期中にソースデータベースで実行されるDDL操作を同期しません。
ページの右下隅にある事前チェックをクリックします。
説明データ同期タスクを開始する前に、DTSは事前チェックを実行します。 データ同期タスクは、タスクが事前チェックに合格した後にのみ開始できます。
タスクが事前チェックに合格しなかった場合は、失敗した各項目の横にある
 アイコンをクリックして詳細を表示できます。
 詳細に基づいて問題をトラブルシューティングした後、新しい事前チェックを開始します。
問題をトラブルシューティングする必要がない場合は、失敗した項目を無視して新しい事前チェックを開始してください。
次のメッセージが表示されたら、[事前チェック] ダイアログボックスを閉じます。[事前チェックの合格] その後、データ同期タスクが開始されます。
[データ同期] ページで、データ同期タスクのステータスを表示できます。
