This topic describes how to view information about software installed on office terminals, configure and view unauthorized software, and review employee applications to use unauthorized software.
Software statistics
The software statistics feature provides a comprehensive and intuitive overview of software installations across all office terminals in your company. You can click Terminal Name on the device list page to view information about installed software. For more information, see View the device list. You can also view information about installed software on the Software Statistics page.
Log on to the Secure Access Service Edge (SASE) console.
In the navigation pane on the left, choose .
On the Software Statistics tab, you can view information about the installed software.

Find the software and click the number in the Terminals Installed with Software column. In the Installed Terminal Details panel, you can view information about all terminals on which the software is installed.
In the Actions column, click Quick Import to add the software to the unauthorized software list.
Disabling software
You can configure unauthorized software for your company to prevent employees from using the software and improve office security. To configure unauthorized software, you must first configure a software type, create software of that type, and then configure a policy for the software.
Secure Access Service Edge (SASE) includes built-in applications, such as instant messaging, cloud storage, cloud notes, and P2P download tools. You can configure blacklist policies for these applications.
Add a software type
Log on to the Secure Access Service Edge (SASE) console.
In the navigation pane on the left, choose .
On the Software Blacklist tab, you can configure a software type.
In the Software Type section, click Add.
In the Add Software Type dialog box, enter a name for the custom software type and click OK.
The software type name can be 1 to 128 characters long and can contain Chinese characters, letters, digits, hyphens (-), underscores (_), and periods (.). The name must start with a Chinese character, letter, or digit.
For example, you can set the software type to Instant Messaging.
Create software to be disabled
Choose one of the following methods:
Software List for Synchronization
Click Create Software and select the Software List for Synchronization tab. You can enter a software name in the search box or select the software to synchronize from the list.
Click OK to complete the synchronization.
Custom Software
Click Create Software. On the Custom Software tab, configure the parameters and click OK.
Configuration Item | Description |
Software Name | The name of the software. The name can be 1 to 128 characters in length and can contain Chinese characters, letters, digits, hyphens (-), underscores (_), and periods (.). It must start with a Chinese character, letter, or digit. |
Software Type | From the drop-down list, select the software type. You can configure up to 10 software types for a single piece of unauthorized software. |
Terminal System | Configure the terminal system, process name, and installation directory for the software. The operating systems include Windows and macOS. Each process name is associated with one installation directory. You can add up to 20 entries. |
Configure software disabling policies
If employees need to use unauthorized software, they can submit an application to use unauthorized software.
Click Blacklist Policy Settings, and on the Blacklist Policy Settings page, click Create Policy. In the Create Policy panel, configure the parameters and click OK.
Parameter | Description |
Policy Name | The name of the policy. The name can be 1 to 128 characters in length and can contain Chinese characters, letters, digits, hyphens (-), underscores (_), and periods (.). It must start with a Chinese character, letter, or digit. |
Action | The action of the policy. Valid values:
|
Applicable User | The users to whom the policy applies.
|
Exception User | The users to whom the policy does not apply. Separate multiple users with commas (,). |
Blacklist Software | The software that you want to disable. You can specify the software by name or by type.
|
Policy Status | The status of the policy. |
Priority | The priority of the policy. The value can be from 0 to 99. A smaller value indicates a higher priority. |
Approval Process Configuration | Specify whether to allow employees to submit applications for approval to use unauthorized software. If you allow employees to submit applications for approval, you must select an approval process. For more information about how to create an approval process, see Configure an approval process. |
Prompt Display Configuration | Set the prompt message that is displayed when unauthorized software is blocked. You can set the prompt message in Chinese and English. |
View violation events
You can view the trend chart for Violation Events, the top five Unauthorized Software and their corresponding Violations, and the top five User in Violation and their corresponding Violations.
To view information about all unauthorized software and users in violation, click Details.
Other operations
View details of unauthorized software
On the Unauthorized Software page, find the software and click Details in the Actions column. In the Details panel, you can view detailed information about the unauthorized software.
Manage disabled software
On the Unauthorized Software page, find the software and click Edit in the Actions column to modify its information.
Delete unauthorized software
If a piece of software is no longer considered unauthorized, you can click Delete in the Actions column for that software. After the software is deleted, its use is no longer recorded as a violation event.
ImportantIf a software application is on the unauthorized list but is not blocked, check whether the Process Name is correct in the Details panel.
Before you delete a piece of unauthorized software, make sure that no policies apply to it. Otherwise, you cannot delete the software.
Software library
The software library is a centralized platform for managing software. You can upload installation packages for your company's software to the library and configure the software category, visibility, and installation check policy. Employees can then install the software from the library in the SASE client. Administrators can also use the Software Distribution feature to push software to all hosts with the SASE client for automatic installation.
Manage software
Go to the Software Library page to perform the following operations:
Add software
Click Add Software. In the Add Software panel, configure the parameters and click OK.
Parameter
Description
Software Name
Set a custom name for the software.
Software Description
Set a description for the software.
Software Category
Set the category for the software. You can select an existing category from the drop-down list or click Add Category to add a custom category.
Upload Logo
Upload an icon for the software. Supported file types: PNG, JPG, JPEG, and WEBP. The file size cannot exceed 20 MB.
Visibility Scope
Specific User Group: Visible only to users in the specified user groups.
Specific Device Tag: Visible only to devices with the specified tags.
Specific Device: Visible only to the specified devices.
All Users: Visible to all users.
All Devices: Displays all devices.
Not Configured: Not visible in the client.
Installation Check
During distribution, check whether the software is successfully installed on the terminal host. If you enable this feature, you must select at least one operating system.
Windows
Software Full Name: For more information about how to obtain this, see Obtain the full name of a Windows software.
English Name: For more information about how to obtain this, see Obtain the full English name of a Windows software.
Mac
Bundle ID: For more information about how to obtain this, see Obtain the Bundle ID of a macOS application.
Edit software
Find the target software and click View in the Actions column. In the panel that appears, click Edit at the top to modify the software information.
Delete software
Find the target software, click Delete in the Actions column, and follow the on-screen instructions to delete the software.
NoteIf a Software Distribution task for the software is Running, you cannot delete the software. To delete the software, you must first stop the software distribution task.
Manage software versions
Go to the Software Library page, find the target software, and click View in the Actions column. You can then perform the following operations:
Add a version
In the Version Information section of the Details panel, click Add Version.
In the Add Software Version dialog box, configure the parameters and click OK.
Parameter
Description
Operating System
Windows
macOS(Apple)
macOS(Intel)
Software Publisher
Local Upload: Click Upload Local File to upload a local installation package. Windows supports
.exeand.msiformats. macOS supports.dmgand.pkgformats.Third-party Links: Enter an external download link.
MD5
Enter the MD5 hash of the installation package to verify its integrity. When you upload a local file, the MD5 hash is automatically generated.
Software Version Number
Set the specific version number of the software.
Published Version
Find the target version and turn on the switch in the Status column to publish the version.
After the version is published, you can view and install it in the of the SASE client (version 5.0 or later) by choosing Settings > Tools.
Distribution Version
After you submit a software distribution task, the system automatically sends an installation command to SASE clients that are version 5.0 or later. The client then automatically performs the installation.
Find the target version record and click Deploy in the Actions column. In the panel that appears, enter the required information (see Create a software distribution task) and click OK to create the distribution task.
Go to the Software Distribution page to view the status and results of the software distribution. For more information, see View the status of a software distribution task. To stop the task, see Stop a software distribution task.
Edit a version
Find the target version and click Edit in the Actions column to modify the software version information.
Delete a version
Find the target version and click Delete in the Actions column to delete the software version.
NoteIf a Software Distribution task for the software is Running, you cannot delete the software. To delete the software, you must first stop the software distribution task.
Software Distribution
The Software Distribution feature lets you deploy installation packages from the software library to specified terminals that have SASE client version 5.0 or later installed. The packages are then automatically installed. You can configure the distribution time, scope, validity period, download speed limit, and retry policy to ensure a controlled distribution process. After a distribution task is complete, you can view its status and details.
Create a Software Distribution task
Go to the Software Distribution page and click Software Distribution.
In the Software Distribution dialog box, configure the parameters and click OK.
Parameter
Description
Task Name
Set a name for the distribution task.
Distribute Software
Select the software to be distributed from the software library.
Distribution Time
Deploy Now: The task is executed immediately after it is created.
Specify Time: You can specify multiple time periods to execute the distribution task. Once the task is completed, it will not be executed in subsequent time periods. The entire task is executed only once.
Installation Parameters
Set the installation parameters required for the software installation.
Effective Scope
The following six scope types are supported:
Specific User Group
Specific Device Tag
Specific Device
All Users
All Devices
Validity Period
Valid Days: Set the specific number of valid days (1 to 100).
Indefinite: The distribution task is permanently valid.
Rate Limit
Enable: Set the maximum download speed for the SASE client in KB/s.
Disable: Do not limit the download speed.
Distribution Retry Count
Set the number of automatic retries after a distribution failure (0 to 5).
Timeout
Set the timeout period for task execution in seconds. The value can be from 0 to 86400.
Stop a Software Distribution task
Go to the Software Distribution page, find the target distribution task, and stop the task using one of the following methods:
Method 1: In the Actions column, click Stop and follow the on-screen instructions.
Method 2: In the Actions column, click View. In the panel that appears, click Stop Distribution / Installation and follow the on-screen instructions.
After a task is stopped, it cannot be re-enabled. To distribute the software again, you must create a new distribution task.
View the status of a Software Distribution task
Go to the Software Distribution page, find the target distribution task, and perform the following operations to view its status and details:
View distribution status
View the Status column. The statuses include Pending, Running, and Stopped.
View execution result distribution
Hover over the cell in the Task Result column to view the number of tasks in each status: All, Pending, Running, Execution Successful, and Execution Failed.
View complete information
In the Actions column, click View. In the panel that appears, you can view the total number of target devices, the distribution of statuses, the distribution of software installation statuses, and the distribution and installation details.
View execution logs of a terminal device
In the Actions column, click View. In the panel that appears, find the distribution record for the target device and click View Logs in the Actions column.
Download detailed records of a distribution task
In the Actions column, click View. In the panel that appears, click Policy Export Tasks to download the detailed records of the distribution task.
Review employee applications
If an employee needs to use unauthorized software for a special reason, they can submit an application. After an application is submitted, you can review it on the User Application tab. If the application is approved, the employee can use the software for the specified period. For more information about how employees can submit an application to use unauthorized software, see Submit an application to use unauthorized software.
Log on to the Secure Access Service Edge (SASE) console.
In the navigation pane on the left, choose .
On the User Application tab, you can review the applications submitted by employees to use unauthorized software.
Allow: The employee can use the software for the specified period. The usage is not recorded as a violation.
Reject: The employee cannot use the software. If the employee uses the software, the action is recorded as a violation.
Appendix: Obtain unique software identifiers
Obtain the full name of a Windows software
The full name of a software program in Windows is a string that uniquely identifies an application. It is a basic property and is unique within the system. You can obtain it in one of the following ways:
From Software Management in the SASE console: Use this method if the software is already recorded in the SASE console.
From "Uninstall or change a program" in Windows: Use this method if the software is not displayed in the SASE console.
From Software Management in the SASE console (Recommended)
Go to the Software Statistics page, set Terminal Type to Windows, find the target software, and view its name in the Software Name column.
From "Uninstall or change a program" in Windows
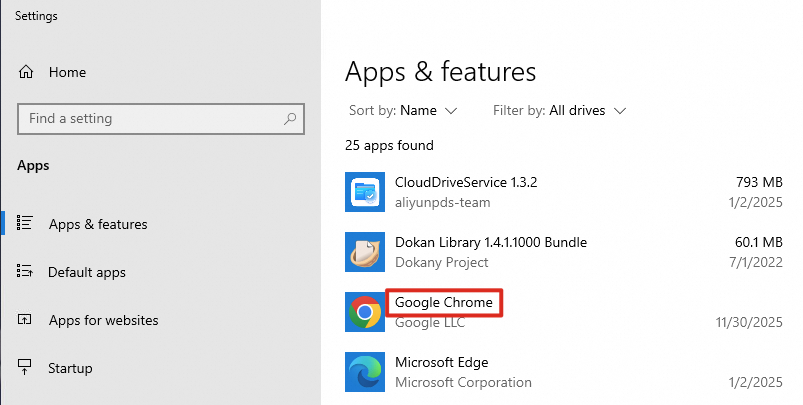
Open Uninstall or change a program in Windows.
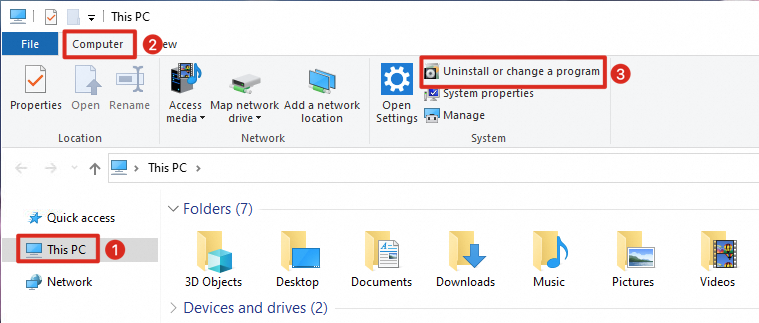
Find the corresponding software name in the Uninstall or change a program list.
Find the full English names of Windows software
If your Windows system language is English, use the full software name obtained in the Obtain the full name of a Windows software section as its English name. You do not need to perform the following steps.
The full English name of a software program in Windows is a string that uniquely identifies an application. It is a basic property and is unique within the system. You can obtain it as follows:
In Windows Settings, find Time & Language.
In the Preferred languages section, add English (United Kingdom).
Install the English (United Kingdom) language and select Set as my Windows display language.
Open Uninstall or change a program in Windows.
Find the corresponding software name in the Uninstall or change a program list.
Obtain the Bundle ID of a macOS application
The Bundle ID in macOS is a string that uniquely identifies an application. It is a basic property and is unique within the system. You can obtain it in one of the following ways:
From Software Management in the SASE console: Use this method if the software is already recorded in the SASE console.
From the terminal in macOS: Use this method if the software is not displayed in the SASE console.
From Software Management in the SASE console (Recommended)
Go to the Software Statistics page, set Terminal Type to macOS, and find the target software.
Click the number in the Terminals Installed with Software column. In the Installed Terminal Details panel, you can view the bundleId in the list.
NoteThe Bundle ID of an application may vary depending on the installation channel. You can query the corresponding Bundle ID based on the specific terminal and its user.
If you cannot determine the terminal or user, you can add multiple Bundle IDs when you configure a new channel.
From the terminal in macOS
Open the Terminal application in macOS.
Enter the
codesign -dvvvcommand, drag the application into the terminal, and run the command.Example:
codesign -dvvv /Applications/DingTalk.app.After the command runs, the value of the
Identifierfield in the output is the Bundle ID.