After ApsaraMQ for Kafka is integrated with Function Compute by using EventBridge, ApsaraMQ for Kafka triggers can be used to invoke functions to process messages published to ApsaraMQ for Kafka based on your business requirements. This topic describes how to create an ApsaraMQ for Kafka trigger, configure input parameters of a function, and write and test function code in the Function Compute console.
Overview
After you submit a request to create a trigger in the Function Compute console, Function Compute automatically creates event streams in EventBridge based on the configurations of the trigger.
After the trigger is created, you can view the information about the trigger in the Function Compute console. You can also view information about created resources in the EventBridge console. When a message is enqueued in ApsaraMQ for Kafka, the associated function in Function Compute is invoked. One or more message events are pushed to the function in batches for processing based on your batch configurations.
Usage notes
The ApsaraMQ for Kafka instance that serves as the trigger source must reside in the same region as the function to be invoked in Function Compute.
If the number of created event streams reaches the upper limit, no more ApsaraMQ for Kafka triggers can be created. For information about the upper limit of event streams, see Limits.
Before you start
EventBridge
Function Compute
ApsaraMQ for Kafka
Step 1: Create an ApsaraMQ for Kafka trigger
After you create an ApsaraMQ for Kafka instance, log on to the Function Compute console, click the desired function to go to the function details page, click the Configurations tab, and then click Create Trigger on the Triggers page. After you create the trigger, click OK. The following figure shows the details.
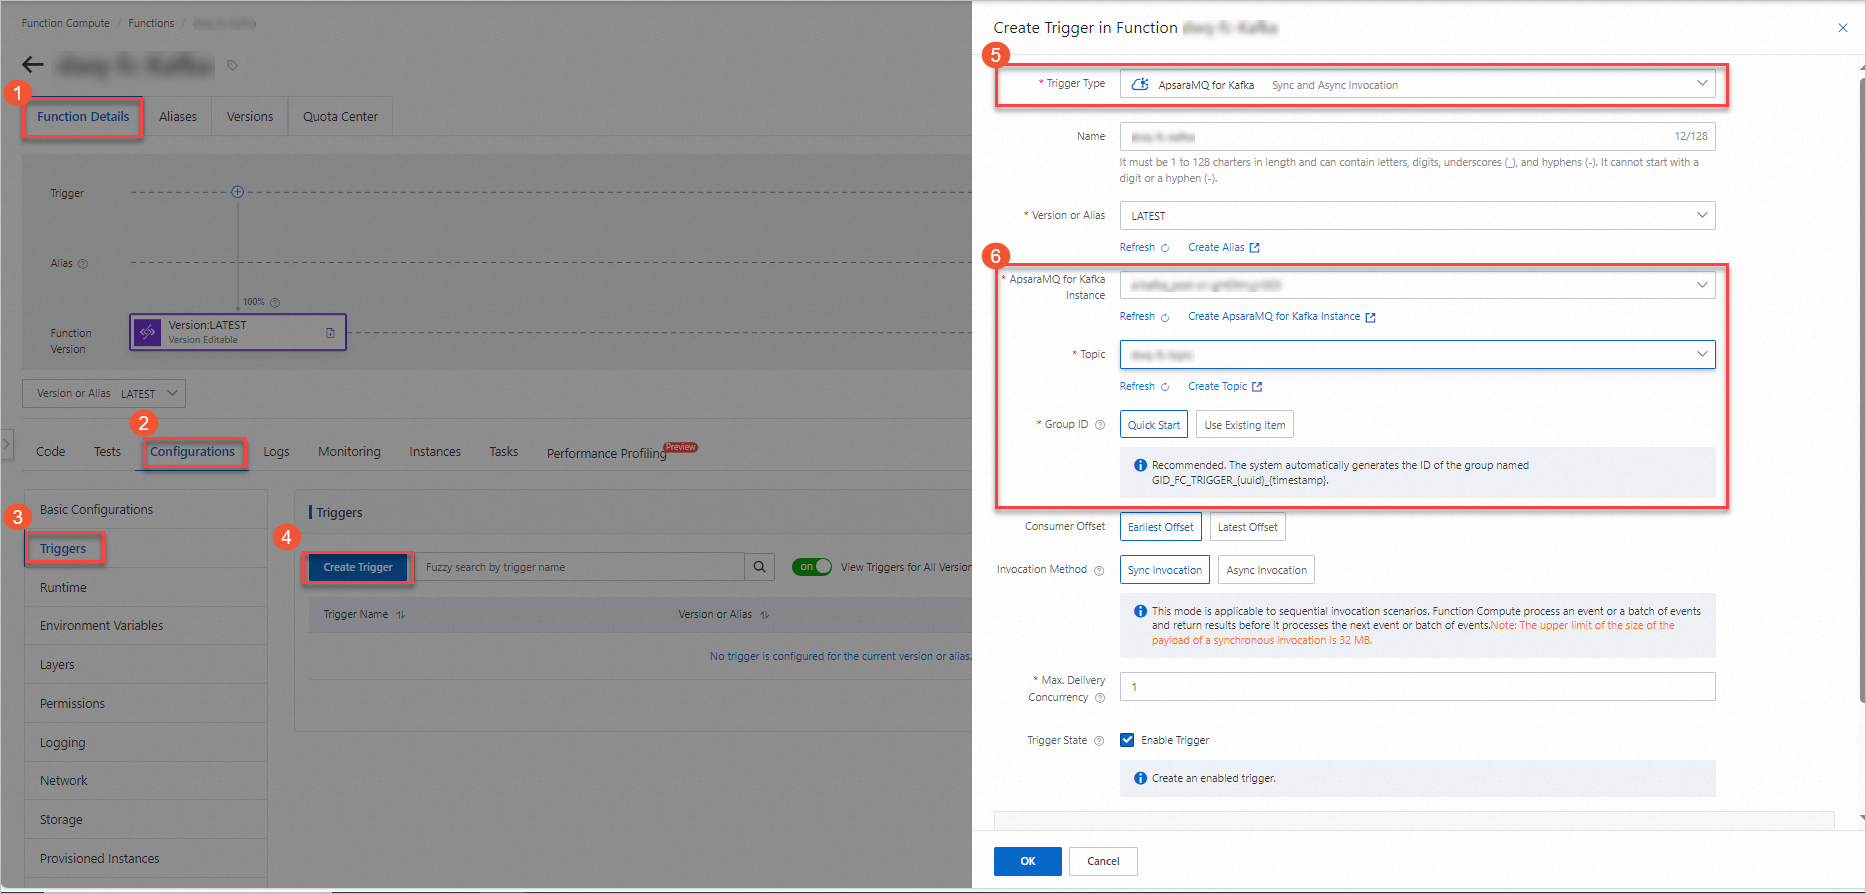
The following table describes the basic parameters.
Parameter | Description | Example |
Consumer Offset | Specify the consumer offset of messages. A consumer offset specifies the point from which ApsaraMQ for Kafka starts to pull messages from EventBridge. Options:
| Earliest Offset |
Invocation Method | Select a function invocation method. Options:
| Sync Invocation |
Max. Delivery Concurrency | Specify the maximum number of ApsaraMQ for Kafka messages that can be concurrently delivered to Function Compute. Valid values: 1 to 300. This parameter is available only if you set the Invocation Method parameter to Sync Invocation. If you need higher concurrency, go to Quota Center of EventBridge, find the quota whose name is EventStreaming FC Sink Maximum Concurrent Number of Synchronous Posting, and then click Apply in the Actions column to request a quota increase. | 1 |
For information about advanced configurations, such as push settings, retry policies, and dead-letter queues, see Advanced features of triggers.
Step 2: (Optional) Configure input parameters
The event sources of ApsaraMQ for Kafka are passed to the function in the form of event as input parameters. You can use code to parse and process event. You can manually pass event to the function to simulate a trigger event.
On the Code tab of the function details page, click the
 icon next Test Function and select Configure Test Parameters from the drop-down list.
 In the Configure Test Parameters panel, click the Create New Test Event or Modify Existing Test Event tab, enter the event name and event content, and then click OK.
The following sample code provides an example of
event:[ { "specversion":"1.0", "id":"8e215af8-ca18-4249-8645-f96c1026****", "source":"acs:alikafka", "type":"alikafka:Topic:Message", "subject":"acs:alikafka_pre-cn-i7m2t7t1****:topic:mytopic", "datacontenttype":"application/json; charset=utf-8", "time":"2022-06-23T02:49:51.589Z", "aliyunaccountid":"164901546557****", "data":{ "topic":"****", "partition":7, "offset":25, "timestamp":1655952591589, "headers":{ "headers":[ ], "isReadOnly":false }, "key":"keytest", "value":"hello kafka msg" } }, { "specversion":"1.0", "id":"8e215af8-ca18-4249-8645-f96c1026****", "source":"acs:alikafka", "type":"alikafka:Topic:Message", "subject":"acs:alikafka_pre-cn-i7m2t7t1****:topic:mytopic", "datacontenttype":"application/json; charset=utf-8", "time":"2022-06-23T02:49:51.589Z", "aliyunaccountid":"164901546557****", "data":{ "topic":"****", "partition":7, "offset":25, "timestamp":1655952591589, "headers":{ "headers":[ ], "isReadOnly":false }, "key":"keytest", "value":"hello kafka msg" } } ]For information about the parameters defined in the CloudEvents specification, see Overview.
The following table describes the parameters contained in data.
Parameter
Type
Example
Details
topic
String
TopicName
The topic name.
partition
Int
1
The information about partitions on the ApsaraMQ for Kafka instance.
offset
Int
0
The message offset of the ApsaraMQ for Kafka instance.
timestamp
String
1655952591589
The timestamp that indicates when message consumption started.
Step 3: Write and test function code
After your trigger is created, you can write function code and test the function to verify whether the code is correct. In actual usage scenarios, the trigger automatically invokes the function when corresponding ApsaraMQ for Kafka events occur.
On the Code tab of the function details page, write code in the code editor and click Deploy.
In this example, the function code is written in Node.js.
'use strict';
/*
To enable the initializer feature
please implement the initializer function as below:
exports.initializer = (context, callback) => {
  console.log('initializing');
  callback(null, '');
};
*/
exports.handler = (event, context, callback) => {
  console.log("event: %s", event);
  // Parse the event parameters and process the event.
  callback(null, 'return result');
}
Test the function.
Method 1: If you configure
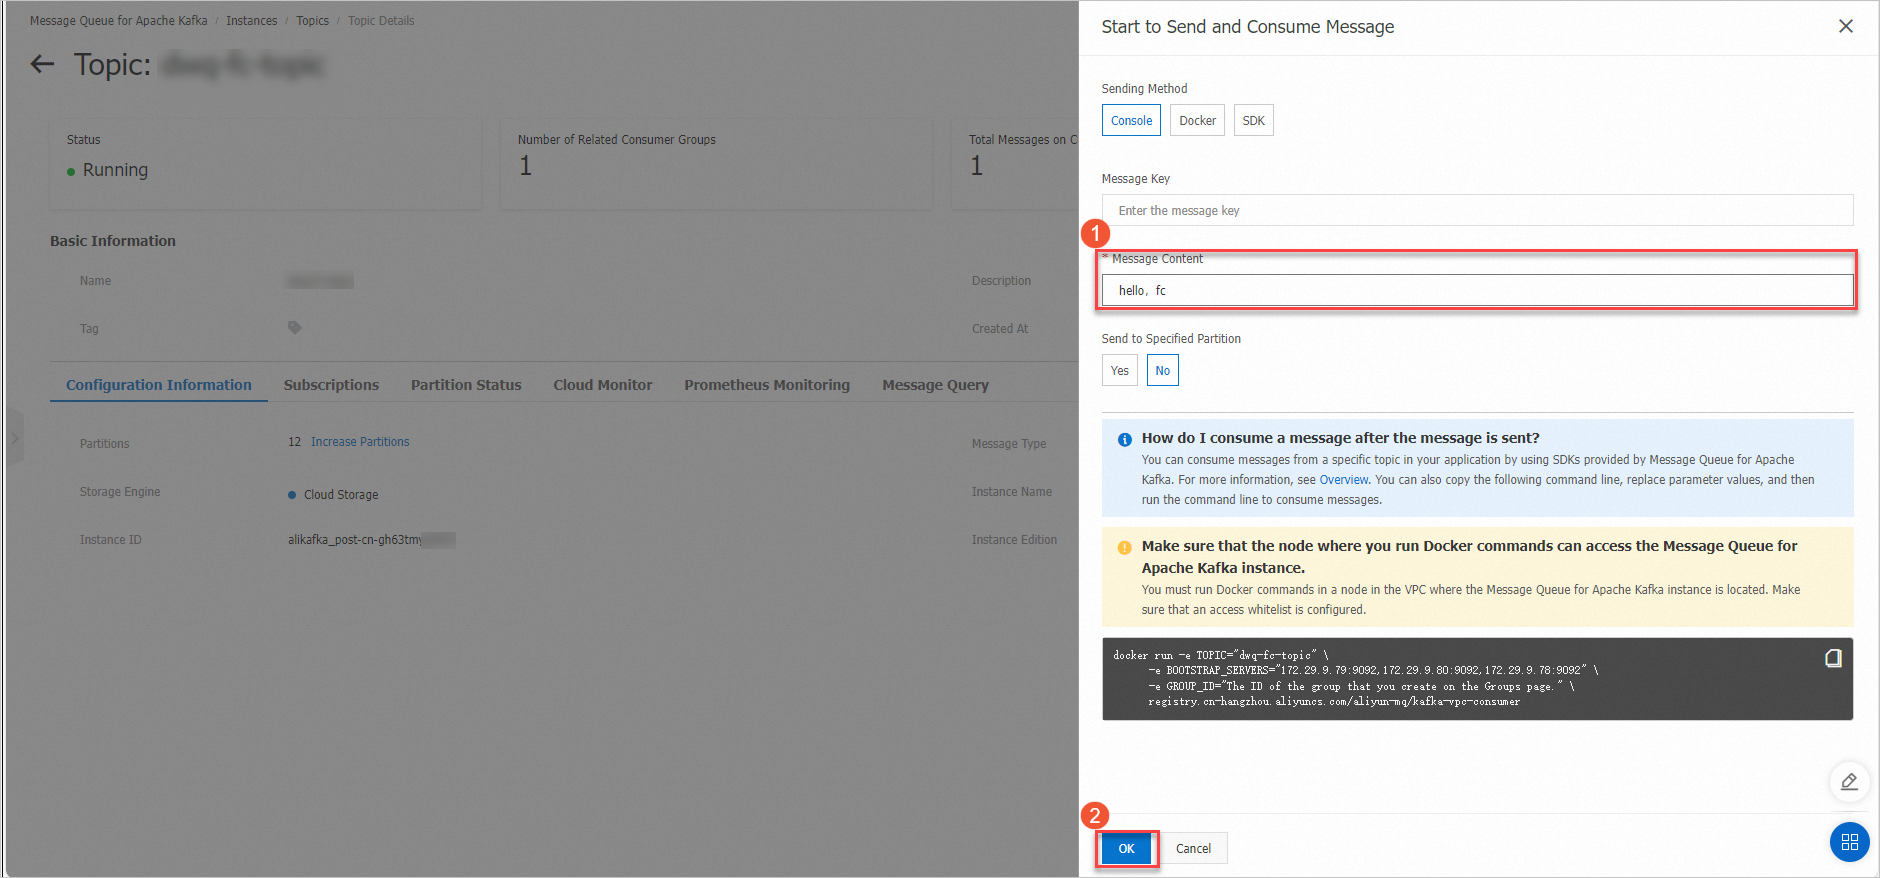
eventto simulate an event source, click Test Function.Method 2: Log on to the ApsaraMQ for Kafka console, select the topic that you created, and click Send Message. The following figure shows an example.
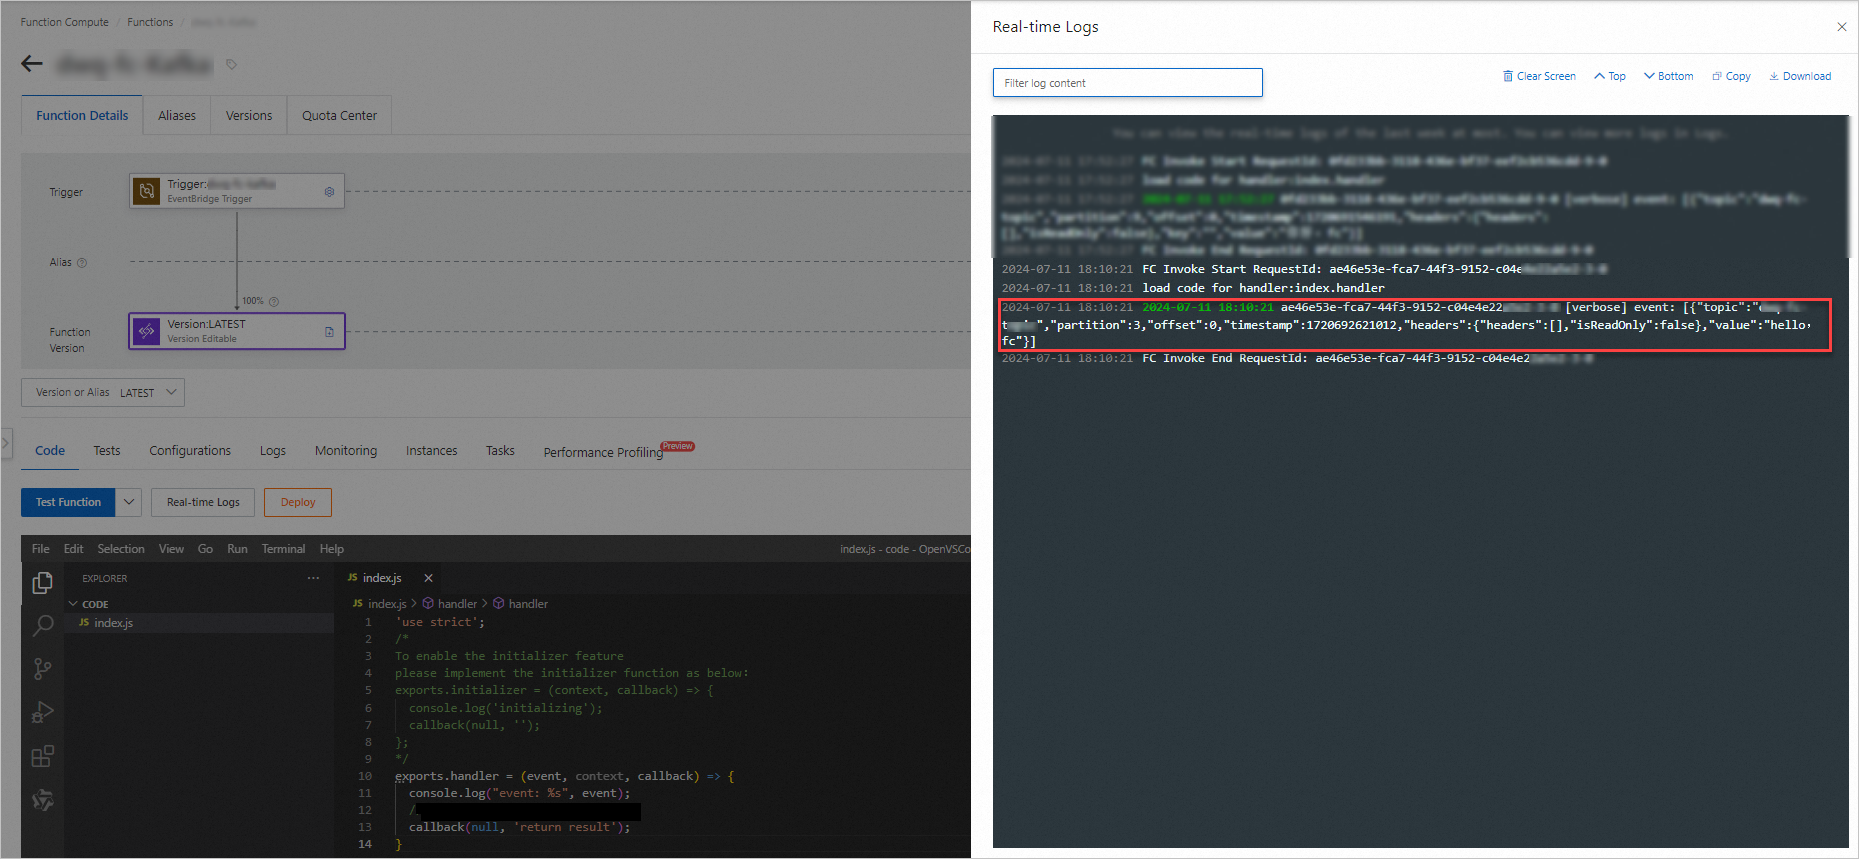
After the execution is complete, view the result in Real-time Logs.
References
To modify or delete an existing trigger, see Manage triggers.