You can use Alibaba Cloud Elasticsearch to perform full-text searches and semantic analysis on data in PolarDB-X, which is the upgraded version of Distributed Relational Database Service (DRDS). The Data Integration service of DataWorks lets you synchronize large amounts of data from PolarDB-X to Alibaba Cloud ES in minutes.
Background information
DataWorks is an end-to-end big data development and governance platform based on big data compute engines. DataWorks provides features such as data development, task scheduling, and data management. You can create synchronization tasks in DataWorks to rapidly synchronize data from various data sources to Alibaba Cloud Elasticsearch.
The following types of data sources are supported:
Alibaba Cloud databases: ApsaraDB RDS for MySQL, ApsaraDB RDS for PostgreSQL, ApsaraDB RDS for SQL Server, ApsaraDB for MongoDB, and ApsaraDB for HBase
Alibaba Cloud PolarDB for Xscale (PolarDB-X) (formerly DRDS)
Alibaba Cloud MaxCompute
Alibaba Cloud Object Storage Service (OSS)
Alibaba Cloud Tablestore
Self-managed databases: HDFS, Oracle, FTP, Db2, MySQL, PostgreSQL, SQL Server, MongoDB, and HBase
The following synchronization scenarios are supported:
Synchronize big data from a database or table to Alibaba Cloud Elasticsearch in offline mode. For more information, see Create a batch synchronization task to synchronize all data in a database to Elasticsearch.
Synchronize full and incremental big data to Alibaba Cloud Elasticsearch in real time. For more information, see Create a real-time synchronization task to synchronize data to Elasticsearch.
Prerequisites
You have created a PolarDB-X instance. For more information, see .
You have created an Alibaba Cloud Elasticsearch cluster and enabled the Auto Indexing feature for the cluster. For more information, see Create an Alibaba Cloud Elasticsearch cluster and Configure the YML file.
You have created a DataWorks workspace. For more information, see Create a workspace.
You can synchronize data only to Alibaba Cloud ES. Self-managed Elasticsearch clusters are not supported.
The PolarDB-X instance, ES instance, and DataWorks workspace must be in the same region.
The PolarDB-X instance, ES instance, and DataWorks workspace must be in the same time zone. Otherwise, a time zone difference may occur between the source and destination data after synchronization.
Billing
For information about the billing of Alibaba Cloud Elasticsearch clusters, see Elasticsearch billable items.
For information about the billing of exclusive resource groups for Data Integration, see Billing of exclusive resource groups for Data Integration (subscription).
Procedure
Step 1: Prepare source data
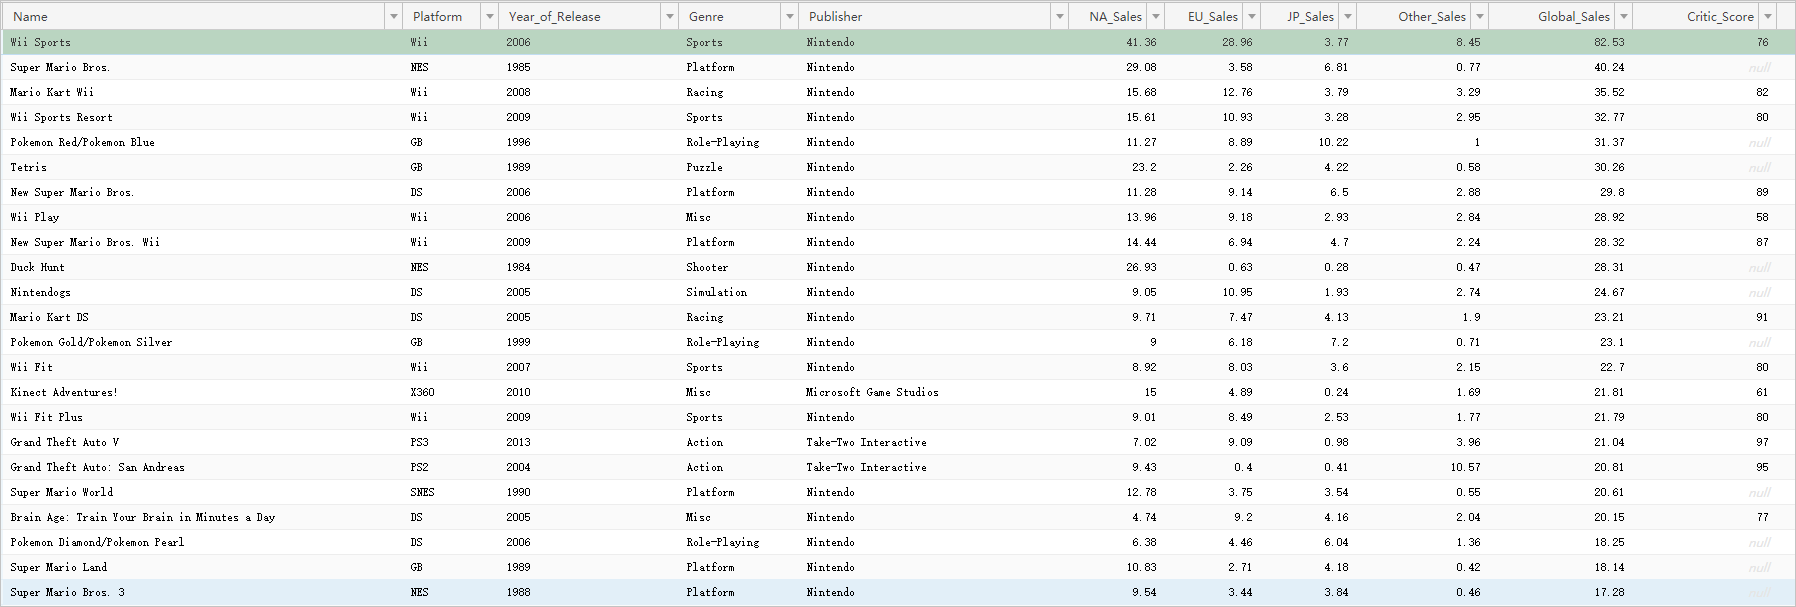
Insert data into the PolarDB-X 1.0 instance.
For more information, see and Basic SQL operations. The following figure shows the test data that is used in this topic.
Step 2: Purchase and create an exclusive resource group
Purchase an exclusive resource group for Data Integration and attach a VPC and a workspace to the resource group. Exclusive resource groups ensure fast and stable data transmission.
Log on to the DataWorks console.
In the top menu bar, select a region. In the navigation pane on the left, click Resource Group.
On the Resource Groups tab, click .
On the DataWorks Exclusive Resources (Subscription) page, set Resource Type to Exclusive Resource Group For Data Integration, enter a name for the resource group, and then click Buy Now to purchase the exclusive resource group.
For more information, see Step 1: Create an exclusive resource group for Data Integration.
In the Actions column of the exclusive resource group that you created, click Network Settings to attach a virtual private cloud (VPC). For more information, see Attach a VPC.
NoteIn this example, an exclusive resource group for Data Integration is used to synchronize data over a VPC. For more information about how to use an exclusive resource group for Data Integration to synchronize data over the Internet, see Configure an IP address whitelist.
To synchronize data, the exclusive resource group must be connected to the VPCs in which the PolarDB-X and Elasticsearch instances reside. Therefore, you must attach the exclusive resource group to the VPC, Zone, and VSwitch of the PolarDB-X instance and the Elasticsearch instance. To view the VPC information for an instance, see View the basic information of an Elasticsearch instance.
ImportantAfter you attach the VPC, you must add the CIDR block of the VSwitch to the private access whitelists of the PolarDB-X and Elasticsearch instances. For more information, see Configure a public or private access whitelist for an Elasticsearch instance.
In the upper-left corner of the page, click the back icon to return to the Resource Groups page.
Find the exclusive resource group that you created and click Attach Workspace in the Actions column to attach the target workspace to the resource group.
For more information, see Step 2: Associate the exclusive resource group for Data Integration with a workspace.
Step 3: Add data sources
Add the PolarDB-X and Elasticsearch data sources in the Data Integration service of DataWorks.
Go to the Data Integration page.
Log on to the DataWorks console.
In the left-side navigation pane, click Workspace.
Find the workspace and choose in the Actions column.
In the navigation pane on the left, click Data Source.
Add a PolarDB-X data source.
On the Data Source page, click Add Data Source.
On the Add Data Source page, search for and select DRDS.
On the Add DRDS Data Source page, configure the parameters for the data source and test the connectivity. After the connectivity test is successful, click Complete.
For more information, see Add a PolarDB-X data source.
Add an Elasticsearch data source in the same way. For more information, see Add an Elasticsearch data source.
Step 4: Configure and run a data synchronization task
A batch synchronization task runs on the exclusive resource group. The resource group retrieves data from the data source in Data Integration and writes the data to Elasticsearch.
You can use the codeless UI or the code editor to configure the batch synchronization task. This topic uses the codeless UI as an example. For more information about how to use the code editor to configure a batch synchronization task, see Configure a batch synchronization task using the code editor and Elasticsearch Writer.
This topic describes how to create an offline sync task in legacy Data Development (DataStudio).
Go to the Data Development page in DataWorks.
Log on to the DataWorks console.
In the navigation pane on the left, click Workspaces.
In the Actions column of the target workspace, choose .
Create a batch synchronization task.
In the navigation pane on the left, go to the Data Development tab. Click the
 icon and choose . Create a business flow as prompted.
Right-click the business flow that you created and choose .
In the Create Node dialog box, enter a name for the node and click Confirm.
Configure the network and resources.
In the Source section, set Source to DRDS and Data Source to the name of the data source from which you want to synchronize data.
In the Resource Group section, select the exclusive resource group.
In the Destination section, set Destination to Elasticsearch and Data Source to the name of the data source to which you want to synchronize data.
Click Next.
Configure the task.
In the Source section, select the table from which you want to synchronize data.
In the Destination section, configure the parameters for the destination.
In the Field Mapping section, configure the mappings between the Source Fields and Target Fields. For more information, see Configure an offline sync task in codeless UI.
In this example, the default Source Field is used and only the Destination Field is modified. To the right of Destination Field, click the
 icon. In the dialog box that appears, enter the field configuration.
{"name":"Name","type":"text"}
{"name":"Platform","type":"text"}
{"name":"Year_of_Release","type":"date"}
{"name":"Genre","type":"text"}
{"name":"Publisher","type":"text"}
{"name":"na_Sales","type":"float"}
{"name":"EU_Sales","type":"float"}
{"name":"JP_Sales","type":"float"}
{"name":"Other_Sales","type":"float"}
{"name":"Global_Sales","type":"float"}
{"name":"Critic_Score","type":"long"}
{"name":"Critic_Count","type":"long"}
{"name":"User_Score","type":"float"}
{"name":"User_Count","type":"long"}
{"name":"Developer","type":"text"}
{"name":"Rating","type":"text"}
In the Channel Control section, configure the channel parameters.
For more information, see Configure a batch synchronization task using the codeless UI.
Run the task.
(Optional) Configure scheduling properties for the task. On the right side of the page, click Scheduling Configuration and configure the scheduling parameters as needed. For more information, see Scheduling Configuration.
In the toolbar, click the Save icon to save the task.
In the toolbar, click the Submit icon to submit the task.
If you configure scheduling properties for the task, the task runs periodically. You can also click the Run icon in the toolbar to run the task immediately.
If the log contains the message
Shell run successfully!, the task is successful.
Step 5: View the data synchronization results
Log on to the Kibana console of the destination Alibaba Cloud ES instance.
For more information, see Log on to the Kibana console.
In the navigation pane on the left, click Dev Tools.
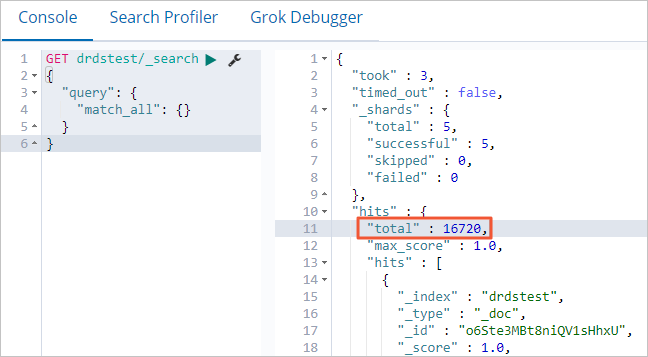
In the Console, run the following command to query the number of data entries in the destination.
NoteYou can compare the number of data entries in the destination with the number of data entries in the source to verify that all data is synchronized.
GET drdstest/_search
{
  "query": {
    "match_all": {}
  }
}
If the command is successful, the following result is returned.
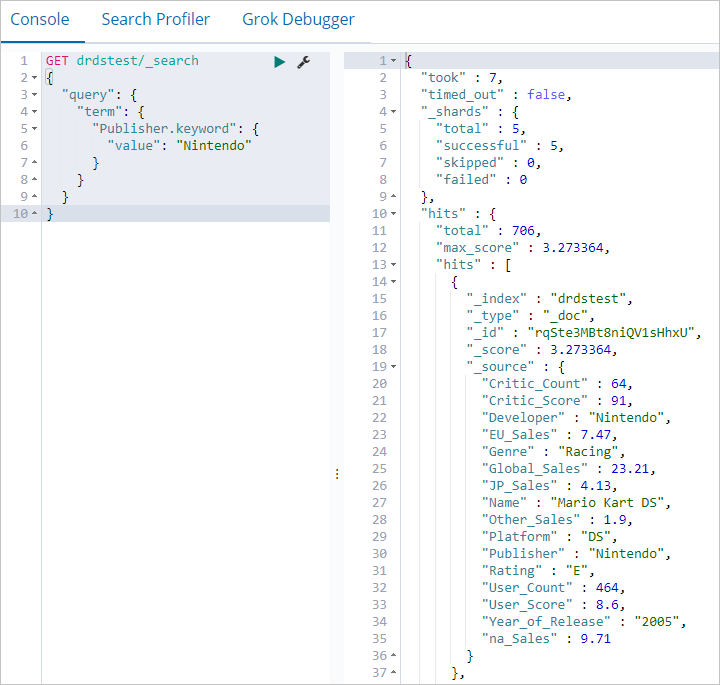
You can run the following command to retrieve data from a specific field.
GET drdstest/_search
{
  "query": {
    "term": {
      "Publisher.keyword": {
        "value": "Nintendo"
      }
    }
  }
}
If the command runs successfully, the following output is returned.