For workloads like deep learning, AI, or graphics acceleration in applications (such as OpenGL, Direct3D, and cloud gaming), GPUs provide high-performance computing and smooth graphics rendering only after a Tesla driver is installed. If you did not install a Tesla driver when creating your GPU-accelerated compute-optimized Linux instance, you must install it manually afterward. This document explains how to install the Tesla driver on such Linux instances.
Procedure
This procedure applies to all GPU-accelerated compute-optimized Linux instances. For more information, see GPU-accelerated compute-optimized instance families (gn, ebm, and scc series). You must install a Tesla driver compatible with the instance's operating system.
Step 1: Download the Tesla driver
Visit the NVIDIA driver download page.
NoteFor more information about how to install and configure an NVIDIA driver, see NVIDIA CUDA Installation Guide for Linux.
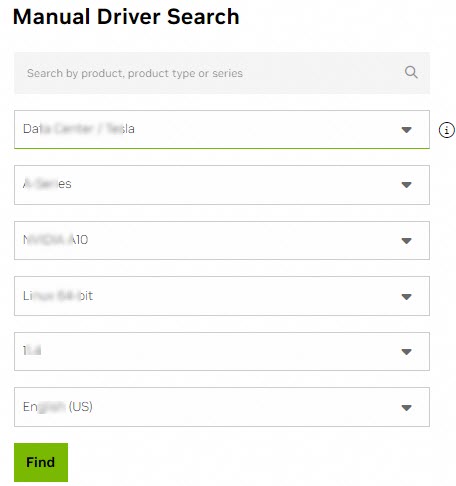
Configure search conditions and click Find to search for a driver that is suitable for your instance.

The following table describes the search conditions.
Condition
Description
Example
Product type
Product series
Product family
Select the product type, series, and family based on the GPU of the GPU-accelerated instance.
NoteTo view the details of a GPU-accelerated instance, such as its instance ID, instance type, and operating system, see View instance information.
Data Center / Tesla
A-Series
NVIDIA A10
Operating system
Select a Linux version based on the image of the instance.
Linux 64-bit
CUDA Toolkit version
Select a CUDA Toolkit version.
11.4
Language
Select a language for the driver.
Chinese (Simplified)
On the search result page, click View More Versions.
Find the driver version you want to download and click View next to the driver name.
For example, select Data Center Driver for Linux x64 with driver version 470.161.03 and CUDA Toolkit version 11.4.
On the driver details page, right-click Download and select Copy URL.

Connect to your Linux GPU instance.
For more information, see Connect to Linux.
Run the following command to download the driver installation package.
The driver download URL in the example command is the link you copied in Substep 5.
wget https://us.download.nvidia.com/tesla/470.161.03/NVIDIA-Linux-x86_64-470.161.03.run
Step 2: Install the Tesla driver
The installation method varies by different operating systems.
CentOS
Run the following command to check whether the kernel-devel and kernel-headers packages are installed on the GPU-accelerated instance:
sudo rpm -qa | grep $(uname -r)If the output is similar to the following, which includes the version information for the kernel-devel and kernel-headers packages, the packages are already installed.
kernel-3.10.0-1062.18.1.el7.x86_64
kernel-devel-3.10.0-1062.18.1.el7.x86_64
kernel-headers-3.10.0-1062.18.1.el7.x86_64
If you do not find
kernel-devel-*andkernel-headers-*in the output, you must download and install the corresponding versions of the kernel-devel and kernel-headers packages.ImportantA mismatch between the kernel and kernel-devel versions causes a driver compilation error during driver installation. Therefore, confirm the version number of
kernel-*in the command output before downloading the corresponding version of kernel-devel. In the example output, the kernel version is 3.10.0-1062.18.1.el7.x86_64.
Grant permissions and install the Tesla driver.
For a Linux 64-bit operating system, we recommend using the
.runformat of the Tesla driver, such as NVIDIA-Linux-x86_64-xxxx.run. Run the following commands to grant permissions and install the Tesla driver.NoteIf you are using other formats of the Tesla driver, such as
.debor.rpm, see the NVIDIA CUDA Installation Guide for Linux for the installation instructions.sudo chmod +x NVIDIA-Linux-x86_64-xxxx.runsudo sh NVIDIA-Linux-x86_64-xxxx.runRun the following command to verify the installation.
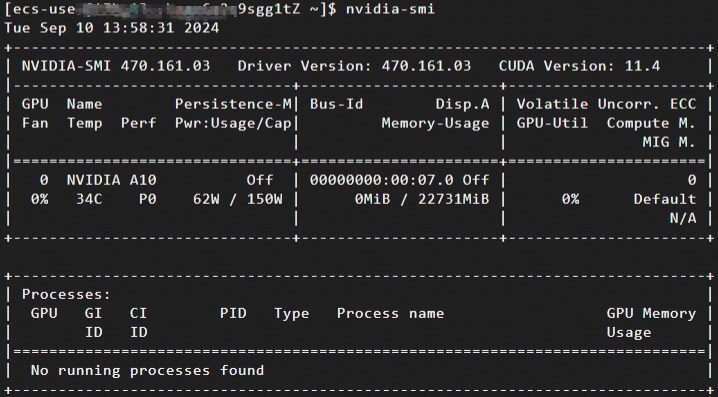
nvidia-smiOutput similar to the following indicates a successful installation.

(Optional) Enable Persistence Mode by using the NVIDIA Persistence Daemon.
After the Tesla driver is installed, Persistence Mode is
Offby default. The driver is more stable with Persistence Mode enabled. To ensure stable business operations, we recommend that you enable Persistence Mode by using the NVIDIA Persistence Daemon. For more information, see Persistence Daemon on the official NVIDIA website.NotePersistence Mode is a user-configurable driver property that keeps the target GPU initialized.
Enabling Persistence Mode with
nvidia-smi -pm 1can cause issues, such as the setting being disabled after the instance restarts. For more information, see What do I do if Persistence Mode that I enabled does not take effect and the ECC status or the MIG feature fails to be configured after a GPU-accelerated instance is restarted? We recommend enabling Persistence Mode by using the NVIDIA Persistence Daemon.
Run the following command to start the NVIDIA Persistence Daemon.
sudo nvidia-persistenced --user username
# Replace username with your username.
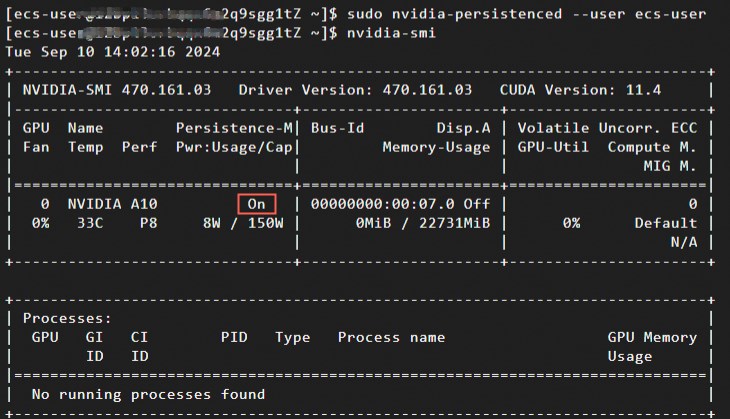
Run the following command to check the status of Persistence Mode.
nvidia-smiOutput similar to the following indicates Persistence Mode is
On.
(Optional) Configure Persistence Mode to enable on system reboot.
Persistence Mode is disabled after a system reboot. To automatically enable it on startup, follow these steps.
The Tesla driver installation package installs NVIDIA's scripts (such as example and installer scripts) to
/usr/share/doc/NVIDIA_GLX-1.0/samples/nvidia-persistenced-init.tar.bz2.Run the following commands to decompress and install the NVIDIA scripts.
cd  /usr/share/doc/NVIDIA_GLX-1.0/samples/
sudo tar xf nvidia-persistenced-init.tar.bz2
cd  nvidia-persistenced-init
sudo sh install.sh
Run the following command to check if the NVIDIA Persistence Daemon is running correctly.
sudo systemctl status nvidia-persistencedOutput similar to the following indicates the NVIDIA Persistence Daemon is running correctly.
 Note
NoteYou can adapt the NVIDIA Persistence Daemon installation script to your operating system to ensure it works properly.
Run the following command again to confirm that Persistence Mode is
On.nvidia-smi(Optional) Run the following commands to stop the NVIDIA Persistence Daemon.
You can disable the NVIDIA Persistence Daemon based on your business requirements.
sudo systemctl stop nvidia-persistenced
sudo systemctl disable nvidia-persistenced
(Conditionally required) If your GPU instance belongs to the ebmgn8v, ebmgn7, or ebmgn7e instance family, install the nvidia-fabricmanager service that matches your driver version.
ImportantFor ebmgn8v, ebmgn7, or ebmgn7e instance families, the GPU will not function without the matching nvidia-fabricmanager service.
If your instance does not belong to one of these families, skip this step.
Install the nvidia-fabricmanager service.
You can install the nvidia-fabricmanager service from a repository or a package file. The following examples are for CentOS 7.x and CentOS 8.x with a driver version of 460.91.03. Replace
driver_versionwith the version number of the driver you downloaded in Step 1: Download the Tesla driver.Source code
Installation package
Run the following commands to start nvidia-fabricmanager:
sudo systemctl enable nvidia-fabricmanager
sudo systemctl start nvidia-fabricmanager
Run the following command to check if the service was installed successfully.
systemctl status nvidia-fabricmanagerThe following output indicates a successful installation.

Ubuntu and other operating systems
Grant permissions and install the Tesla driver.
For a Linux 64-bit operating system, we recommend using the
.runformat of the Tesla driver, such as NVIDIA-Linux-x86_64-xxxx.run. Run the following commands to grant permissions and install the Tesla driver.NoteIf you are using other formats of the Tesla driver, such as
.debor.rpm, see the NVIDIA CUDA Installation Guide for Linux for the installation instructions.sudo chmod +x NVIDIA-Linux-x86_64-xxxx.runsudo sh NVIDIA-Linux-x86_64-xxxx.runRun the following command to verify the installation.
nvidia-smiOutput similar to the following indicates a successful installation.

(Optional) Enable Persistence Mode by using the NVIDIA Persistence Daemon.
After the Tesla driver is installed, Persistence Mode is
Offby default. The driver is more stable with Persistence Mode enabled. To ensure stable business operations, we recommend that you enable Persistence Mode by using the NVIDIA Persistence Daemon. For more information, see Persistence Daemon on the official NVIDIA website.NotePersistence Mode is a user-configurable driver property that keeps the target GPU initialized.
Enabling Persistence Mode with
nvidia-smi -pm 1can cause issues, such as the setting being disabled after the instance restarts. For more information, see What do I do if Persistence Mode that I enabled does not take effect and the ECC status or the MIG feature fails to be configured after a GPU-accelerated instance is restarted? We recommend enabling Persistence Mode by using the NVIDIA Persistence Daemon.
Run the following command to start the NVIDIA Persistence Daemon.
sudo nvidia-persistenced --user username
# Replace username with your username.
Run the following command to check the status of Persistence Mode.
nvidia-smiOutput similar to the following indicates Persistence Mode is
On.
(Optional) Configure Persistence Mode to enable on system reboot.
Persistence Mode is disabled after a system reboot. To automatically enable it on startup, follow these steps.
The Tesla driver installation package installs NVIDIA's scripts (such as example and installer scripts) to
/usr/share/doc/NVIDIA_GLX-1.0/samples/nvidia-persistenced-init.tar.bz2.Run the following commands to decompress and install the NVIDIA scripts.
cd  /usr/share/doc/NVIDIA_GLX-1.0/samples/
sudo tar xf nvidia-persistenced-init.tar.bz2
cd  nvidia-persistenced-init
sudo sh install.sh
Run the following command to check if the NVIDIA Persistence Daemon is running correctly.
sudo systemctl status nvidia-persistencedOutput similar to the following indicates the NVIDIA Persistence Daemon is running correctly.
 Note
NoteYou can adapt the NVIDIA Persistence Daemon installation script to your operating system to ensure it works properly.
Run the following command again to confirm that Persistence Mode is
On.nvidia-smi(Optional) Run the following commands to stop the NVIDIA Persistence Daemon.
You can disable the NVIDIA Persistence Daemon based on your business requirements.
sudo systemctl stop nvidia-persistenced
sudo systemctl disable nvidia-persistenced
(Conditionally required) If your GPU instance belongs to the ebmgn8v, ebmgn7, or ebmgn7e instance family, install the nvidia-fabricmanager service that matches your driver version.
ImportantFor ebmgn8v, ebmgn7, or ebmgn7e instance families, the GPU will not function without the matching nvidia-fabricmanager service.
If your instance does not belong to one of these families, skip this step.
Install nvidia-fabricmanager.
You can install nvidia-fabricmanager by using the source code or the installation package. The commands that are required to install nvidia-fabricmanager vary based on the OS. In the following examples, Ubuntu 16.04, Ubuntu 18.04, Ubuntu 20.04, Ubuntu 22.04, and Ubuntu24.04 are used. Replace
driver_versionwith the version of the driver that you downloaded in Step 1: Download the Tesla driver.ImportantOn Ubuntu 22.04, the nvidia-fabricmanager service requires a Tesla driver version later than 515.48.07. This example uses driver version 535.154.05.
On Ubuntu 24.04, the nvidia-fabricmanager service requires a Tesla driver version later than 550.90.07. This example uses driver version 570.133.20.
Source code
Installation package
Run the following commands to start nvidia-fabricmanager:
sudo systemctl enable nvidia-fabricmanager
sudo systemctl start nvidia-fabricmanager
Run the following command to check if the service was installed successfully.
systemctl status nvidia-fabricmanagerThe following output indicates a successful installation.
 Note
NoteThe nvidia-fabricmanager package version must match the Tesla driver version to ensure the GPU functions correctly. On Ubuntu systems, if you install the nvidia-fabricmanager service from an installation package, the
apt-dailyservice may automatically update the package. This can cause a version mismatch between the nvidia-fabricmanager package and the Tesla driver, which can cause the service to fail and make the GPU unusable. For more information about how to resolve this issue, see GPU unavailable due to a version mismatch between nvidia-fabricmanager and the Tesla driver .
References
GPU-accelerated compute-optimized instances that run Windows only support the installation of a Tesla driver for general-purpose computing workloads like deep learning and AI. For more information, see Manually install a Tesla driver on a GPU-accelerated compute-optimized instance (Windows).
To automatically install a Tesla driver during instance creation, see Automatically install or load a Tesla driver when you create a GPU-accelerated instance.
If you need to uninstall the current Tesla driver, see Uninstall Tesla drivers.
If the installed driver is unsuitable or incorrect, you can upgrade it. For instructions, see Upgrade the NVIDIA Tesla or GRID driver.