If the NVIDIA Tesla driver is not automatically installed on a GPU-accelerated compute-optimized Alibaba Cloud Linux 3 instance when the instance is created, you can manually install the driver. However, the operations are tedious, which involve downloading software packages, compiling and installing the driver, and configuring relevant components such as Compute Unified Device Architecture (CUDA). To quickly install the NVIDIA Tesla driver and the relevant components, such as CUDA, PyTorch, and TensorFlow, you can use the Yellowdog Updater Modified (YUM) method. This method helps better unleash the high-performance computing power of GPUs, improve efficiency, and provide smoother graphics display effects.
The OpenAnolis community provides AI-related components in Anolis operating systems. Alibaba Cloud Linux 3 is developed based on Anolis 8 and is compatible with Anolis 8. You can install Anolis 8 software packages, such as NVIDIA Tesla driver, CUDA, PyTorch, and TensorFlow packages, on Alibaba Cloud Linux 3. For more information, see OpenAnolis community. In this topic, the following versions are used: NVIDIA Tesla driver version 525.105.17, CUDA version 11.4, PyTorch version 1.10.1, and TensorFlow 2.5.0.
Preparations
This topic applies only to GPU-accelerated compute-optimized Alibaba Cloud Linux 3 instances on which the NVIDIA Tesla driver is not installed. For more information, see GPU-accelerated compute-optimized instance families.
Before you install the NVIDIA Tesla driver, create a GPU-accelerated compute-optimized instance. Then, configure the epao repository to obtain more software packages and install the kernel-devel package for the kernel of the current operating system. Perform the following steps:
Create a GPU-accelerated instance.
In this example, a GPU-accelerated compute-optimized instance of the gn6i instance family is used. The operating system of the instance is Alibaba Cloud Linux 3. The NVIDIA Tesla driver is not installed on the instance. For more information, see Create a GPU-accelerated instance.
Connect to the GPU-accelerated instance.
For more information, see Connect to a Linux instance by using a password or key.
Run the following command to configure the epao repository to obtain more software packages:
sudo yum install -y anolis-epao-releaseRun the following command to check whether the kernel-devel package of the current operating system kernel is installed:
sudo rpm -qa | grep kernel-develIf the command output shown in the following figure is returned, the kernel-devel package of the operating system kernel is installed.

If the preceding command output is not returned, install the kernel-devel package.
Procedure
In most cases, when you install the NVIDIA Tesla driver, the CUDA, PyTorch, and TensorFlow components are installed at the same time. The components are tools used to accelerate deep learning and machine learning tasks.
Run the following command to install the NVIDIA Tesla driver:
sudo yum install -y nvidia-driver nvidia-driver-cuda
Install the CUDA Toolkit.
Run the following command to install the CUDA Toolkit:
sudo yum install -y cudaRun the
ll /usr/localcommand to view the CUDA Toolkit version.
Run the following command to install PyTorch:
sudo yum install -y pytorch
Run the following command to install TensorFlow:
sudo yum install -y tensorflow
Verify the installation result
Check the version of the installed NVIDIA Tesla driver
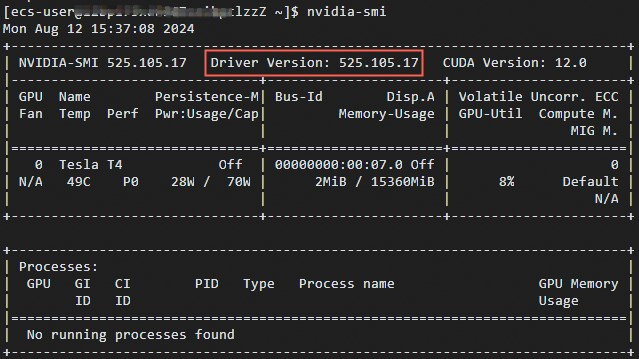
Run the
nvidia-smicommand. If the driver and components are installed, you can view the version of the installed NVIDIA Tesla driver.
Test CUDA
Run the
cdcommand to go to the directory in which test sample files are stored.The
/usr/local/cuda-11.4/extras/demo_suite/directory contains specific test sample programs, such as the CUDA sample program nameddeviceQuery.
Run the
sudo ./deviceQuerycommand to query CUDA information.For example, run the command to query information about texture memory, constant memory, and shared memory.

